
Related Manuals for Voxx HR7012S


Summary of Contents for Voxx HR7012S
- Page 1 HR7012 ReAR SeAt Video HeAdReSt SySteM HR7012S HR7012MA HR7012d vAilAble in six configurAtions owner’s Manual...
-
Page 3: Table Of Contents
GAme CONTROLLeR OPeRATION - OPTIONAL ����������������������������������������������������������������������������������������38 TROUBLeSHOOTING ������������������������������������������������������������������������������������������������������������������������������������������40 SPeCIfICATIONS ��������������������������������������������������������������������������������������������������������������������������������������������������42 COmPLIANCe INfORmATION �������������������������������������������������������������������������������������������������������������������������43 USeR NOTeS ����������������������������������������������������������������������������������������������������������������������������������������������������������44 © 2014 VOXX� electronics Corp� All rights reserved� This manual, or any portion thereof, may not be reproduced without the express written permission of VOXX electronics Corp�... -
Page 4: Congratulations
USB, m1 (m2), A/V-IN, AUX medIA, and GAme* Source)� The monitor has a built-in infrared audio transmitter channel� HR7012S: is a 7” LCd monitor (No dVd) that allows the user to select from several sources (m1 (m2), A/V-IN, AUX, and GAme* Source)� The monitor has a built-in infrared audio transmitter channel�... -
Page 5: Note: When The Monitors Are Set To The "A/V" In Source And "Auto On" Is Selected Both
2 Configuration 3: • Two 7” LCd monitors (m1/m2) (HR7012S) (screens only) connected to automotive head unit (radio) with built-in dVd player or external dVd, Blu-ray player or other A/V source� (Figure 3) NOTE: When the Monitors are set to the “A/V” IN source and “AUTO ON” is selected both monitors will turn ON automatically when a video signal is received from a external source. - Page 6 LCd monitor with a built in dVd player and AUX input (HR7012MA)� (Figure 5) HR7012d HR7012MA (M1) (M2) figure 5 Configuration 6: One 7” LCd monitor (m1) with a built-in dVd player and HdmI input (HR7012D) and One 7” LCd monitor (m2) (screen only) (HR7012S)� (Figure 6) HR7012S HR7012d (M2) (M1) figure 6...
-
Page 7: Configuration
24-26 for details) note: Whenever NeXT, VOLUme UP/dOWN� the FM transmitter is active, regular radio reception may be poor. Turn the • HR7012S: POWeR, SOURCe, PIX, LefT/ FM transmitter off to allow normal radio RIGHT, meNU/SeLeCT, VOLUme UP/ reception. -
Page 8: Cautions
HR7012 ReaR Seat Video HeadReSt SyStem owner’s manual CAUtionS Important Notice Safety Precaution An LCd Panel and/or Video monitor may be for safety reasons, when changing a video installed in a motor vehicle and visible to the disc it is recommended that the vehicle driver if the LCd Panel or Video monitor is not be in motion, and that you do not used for vehicle information, system control,... -
Page 9: Figure
HR7012 ReaR Seat Video HeadReSt SyStem owner’s manual GeneRAl oPeRAtinG inStRUCtionS for best disc operation , it is important that you read this section completely� dVd Region Coding • If disc is not clean, use a commercially available cleaning cloth to gently wipe The HR7012mA/HR7012d and the dVd are the disc from the center out�... -
Page 10: Figure
HR7012 ReaR Seat Video HeadReSt SyStem owner’s manual fRont PAnel ContRolS - HR7012MA HR7012MA AUDIO VIDEO AUDIO figure 8... -
Page 11: Figure
HR7012 ReaR Seat Video HeadReSt SyStem owner’s manual fRont PAnel ContRolS - HR7012MA (continued) DVD disc insertion slot. (figure 8) 11. 1/8”Wired Headset/earbud Output jack IR TRANSMITTeR and IR SeNSOR This jack is used to connect a IR Transmitter: is used to broadcast audio standard wired headphone/earbuds�... -
Page 12: Figure
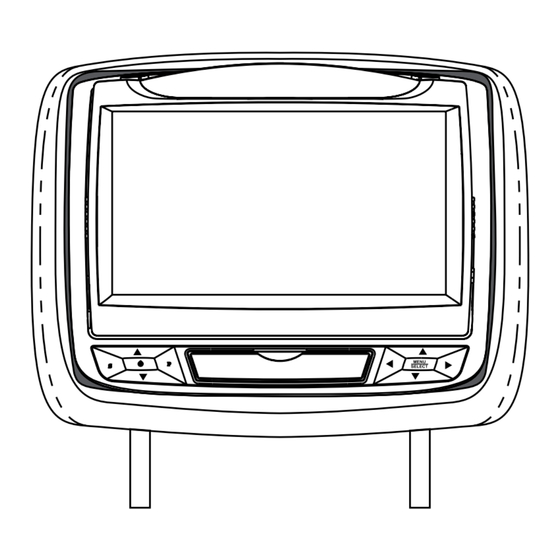
HR7012 ReaR Seat Video HeadReSt SyStem owner’s manual fRont PAnel ContRolS - HR7012S HR7012S AUDIO VIDEO AUDIO figure 9... -
Page 13: Figure
This button is used to select the A/V IN, AUX, m2 or GAme (optional)� (figure 9) POWeR ( ) Button This button is used to turn the HR7012S ON and Off (press and hold for 5 seconds to turn Off) (figures 9)� AUX jacks (RCA Type) -
Page 14: Front Panel Controls - Hr7012D
HR7012 ReaR Seat Video HeadReSt SyStem owner’s manual fRont PAnel ContRolS - HR7012d HR7012d HDMI/MHL figure 10... - Page 15 HR7012 ReaR Seat Video HeadReSt SyStem owner’s manual fRont PAnel ContRolS - HR7012d (continued) 1. DVD disc insertion slot. (Figure 10) 12. DOWN ( q ) Button This button is used to navigate selections 2. IR TRANSMITTeR and IR SeNSOR on the screen and can also be used to IR Transmitter: is used to broadcast audio navigate the dVd menu�...
-
Page 16: Remote Control Battery Installation
HR7012 ReaR Seat Video HeadReSt SyStem owner’s manual ReMote ContRol bAtteRy inStAllAtion installation of the Remote Control battery The remote control comes with a battery already installed with a Pull Tab to prevent battery discharge� Remove the Pull Tab before using the remote control for the first time� (figure 11) note: The remote control will only operate with the HR7012 rear seat video headrest system. -
Page 17: Headphone Battery Installation
HR7012 ReaR Seat Video HeadReSt SyStem owner’s manual HeAdPHone bAtteRy inStAllAtion installation of the Headphone batteries each wireless IR headphone requires two AAA batteries� 1� Locate the battery compartment cover on the left earphone� 2� While holding the left earphone in one hand, press down on the battery compartment cover and slide it UP and Off in the direction shown�... -
Page 18: Remote Control Operation
HR7012 ReaR Seat Video HeadReSt SyStem owner’s manual ReMote ContRol oPeRAtion figure 15... - Page 19 HR7012 ReaR Seat Video HeadReSt SyStem owner’s manual ReMote ContRol oPeRAtion (continued) 12. diSPlAy 1. PoWeR ( Press the TV button (4) and the Press this button to turn the system ON dISPLAy button show monitor and Off� (figure 15) status, modulator status, IR Transmitter 2.
- Page 20 HR7012 ReaR Seat Video HeadReSt SyStem owner’s manual ReMote ContRol oPeRAtion (continued) 19 20 figure 16...
- Page 21 25. VolUMe doWn ( - ) or UP ( + ) 17. SUb-t (dVd Mode only) Used to adjust the volume on wired If the dVd playing has different Headphones (HR7012mA and HR7012S subtitle options, press this button to only)� display and select the desired available subtitle language�...
-
Page 22: System Menu
System Menu changes are best made without a DVD inserted into the unit. This section describes how to adjust and set settings using the six setup screens (figure 17): 5� IRT ON/Off 1� VOLUme CONTROL (HR7012mA) and (HR7012S) 6� defAULT dVd ON/Off: (HR7012mA) and (HR7012d) 2� PICTURe CONTROL -or- 3�... -
Page 23: Using The System Menu
MENU/SELECT button� note: The System Menu and all Sub-Menus will automatic disappear from main screen OK button within 5 or 6 seconds if no selections have been made. HR7012MA/d HR7012S figure 19... -
Page 24: System Setup Sub-Menus
VolUMe ContRol (Wired Headphones only) (HR7012MA) (HR7012S) figure 20 VolUMe ContRol from the front Panel (M1 and M2) (HR7012MA and HR7012S only): (figure 20) 1� Press and hold the MENU/SELECT button on the front panel of the system (figure 19) for 3 to 5 seconds to show the System Menu�... -
Page 25: Picture Control
(HR7012MA) sources. After adjusting the DVD picture controls, the user can make separate settings for the other A/V sources. (HR7012S) (HR7012d) figure 22 PiCtURe ContRol from the front Panel (M1 and M2) (figure 22): 1� Press and hold the MENU/SELECT button on the front panel of the system (figure 19) for 3 to 5 seconds to show the System Menu�... - Page 26 HR7012 ReaR Seat Video HeadReSt SyStem owner’s manual SySteM SetUP SUb-MenUS (continued) fM ModUlAtoR (HR7012S) (HR7012MA) (HR7012d) figure 23 fM ModUlAtoR on/off from the front Panel (figure 23): Press and hold the MENU/SELECT button on the front panel of the system for 3 to 5 1�...
- Page 27 HR7012 ReaR Seat Video HeadReSt SyStem owner’s manual SySteM SetUP SUb-MenUS (continued) fM CHAnnel HR7012MA (M1 only) HR7012S (M1 only) HR7012d (M1 only) SYSTEM MENU SYSTEM MENU VOLUME CONTROL VOLUME CONTROL PICTURE CONTROL PICTURE CONTROL FM MODULATOR OSD LANGUAGE OSD LANGUAGE...
- Page 28 HR7012 ReaR Seat Video HeadReSt SyStem owner’s manual SySteM SetUP SUb-MenUS (continued) fM Channel from the Remote Control (figure 25): 1� Select “m1” on the Remote Control� 2� Press the System Menu button then use the UP/DOWN direction buttons to select FM Modulator and press the Enter button to enter the fm modulator sub-menu�...
-
Page 29: Osd Language
SySteM SetUP SUb-MenUS (continued) oSd lAnGUAGe HR7012MA (M1) HR7012S (M2) HR7012d (M2) figure 26 oSd lAnGUAGe from the front Panel (M1 and M2) (figure 26): Press and hold the MENU/SELECT button on the front panel of the system (figure 19) for 1�... - Page 30 HR7012 ReaR Seat Video HeadReSt SyStem owner’s manual SySteM SetUP SUb-MenUS (continued) iRt on/off HR7012MA (M1) HR7012S (M2) HR7012d (M2) figure 27 iRiRt on/off (M1 and M2) from the front Panel(figure 27): 1� Press and hold the MENU/SELECT button on the front panel (figure 19) of the system for 3 to 5 seconds to show the System Menu�...
- Page 31 HR7012 ReaR Seat Video HeadReSt SyStem owner’s manual SySteM SetUP SUb-MenUS (continued) defAUlt dVd on/off (not AVAilAble on HR7012S) HR7012MA(M1) HR7012MA(M2) or HR7012d (M2) figure 28 With the “Default DVD ON” feature selected, the unit will default to DVD Mode each time the system is turned ON�...
- Page 32 MENU/SELECT button to enter selection� note: • default Auto AV: HR7012S monitor(s) will automatically turn ON when a connected video source is detected and turned ON� note: This feature will only work if the system is installed with an external source connected to the A/V IN of the unit.
-
Page 33: Dvd Playback Settings And Adjustments
HR7012 ReaR Seat Video HeadReSt SyStem owner’s manual dVd PlAybACk SettinGS And AdJUStMentS The Setup menu contains features and options that lets you customize your dVd player� for example, you can set screen display or a language for the on-screen display or prevent dVd playback of certain dVd disc (for example PG-13 or R Rated) for children�... -
Page 34: Language Setup
HR7012 ReaR Seat Video HeadReSt SyStem owner’s manual dVd SettinGS And AdJUStMentS (continued) PASSWoRd note:The rating level can only be changed when the correct password is entered on the The default Password is 3308� This password password setting. is always accepted even after a new password has been entered�... - Page 35 HR7012 ReaR Seat Video HeadReSt SyStem owner’s manual dVd SettinGS And AdJUStMentS (continued) SUbtitle lAnGUAGe Playing USb Memory devices The SUBTITLe setup option page allows the 1� The system will detect the insertion user to select the language for the OSd� The of a USB device automatically if no user can either select eNGLISH, fReNCH, disc is loaded�...
- Page 36 HR7012 ReaR Seat Video HeadReSt SyStem owner’s manual dVd SettinGS And AdJUStMentS (continued) diSC bASiCS To get the optimum use out of the dVd player, make sure you read this section completely� types of discs your dVd Player will play • dVd* disc - dVd discs that contain video�...
-
Page 37: Dvd Region Codes
HR7012 ReaR Seat Video HeadReSt SyStem owner’s manual dVd ReGion CodeS The dVd player is preset to a region code at the factory depending on where the dVd player is sold� dVds from a different region cannot be played in this unit and the unit will display “WRONG REGION”�... -
Page 38: Av Inputs, Outputs, Hdmi/Mhl And Usb Port Information
HR7012 ReaR Seat Video HeadReSt SyStem owner’s manual AV inPUtS, oUtPUtS, HdMi/MHl and USb PoRt infoRMAtion AV inPUtS, AV oUtPUtS Samsung multimedia adapter: • http://www.samsung.com/us/mobile/ Audio/Video inputs cell-phones-accessories/multimedia- adapters * An external video source, video game system, or other audio/video devices can note: Some Samsung smartphones be connected to the AV input�... - Page 39 HR7012 ReaR Seat Video HeadReSt SyStem owner’s manual AV inPUtS, oUtPUtS, HdMi/MHl and USb PoRt infoRMAtion (continued) USB PORT INFORMATION USb Port The USB port provides two functions: 1� media port for USB thumb drives: • T he Media port allows for the playing of mP3 music files, jpeg files and some video file formats when the USB source is selected�...
-
Page 40: Game Controller Operation - Optional
HR7012 ReaR Seat Video HeadReSt SyStem owner’s manual GAMe ContRolleR oPeRAtion - oPtionAl battery installation functional description Back of the Game Controller Front of the Game Controller BACK BATTERY COVER TAB COVER SCREW DIRECTION BUTTONS SELECT START DOWN SELECT START LED-POWER CONTROLLER BATTERY COMPARTMENT... - Page 41 HR7012 ReaR Seat Video HeadReSt SyStem owner’s manual GAMe ContRolleR oPeRAtion - oPtionAl (continued) There are 54 single player games in the games list to choose from and six games are for two players� one-Player The games can be selected from either the m1 monitor or the m2 monitor�...
-
Page 42: Troubleshooting
HR7012 ReaR Seat Video HeadReSt SyStem owner’s manual tRoUbleSHootinG Symptom Remedy device does not power “ON” • Is the ignition turned “ON”? • Is the screen rotated to the operating position? • Are batteries installed in remote control? IR sensor inoperative • Verify that the batteries in the remote control are good�... - Page 43 HR7012 ReaR Seat Video HeadReSt SyStem owner’s manual tRoUbleSHootinG (continued) Symptom Remedy Picture is distorted� • Check the disc for fingerprints and clean with a soft cloth, wiping from center to edge� • The disc might be damaged, try another disc� • It is normal for some distortion to appear during forward or reverse scan�...
-
Page 44: Specifications
HR7012 ReaR Seat Video HeadReSt SyStem owner’s manual SPeCifiCAtionS monitor Specifications Type TfT Active matrix LCd Resolution 2400 (W) x 480 (H) Pixels 1,152,000 Back Light Power Source +12 VdC Power Consumption Operating Temperature 32°f ~ 125°f (0°C ~ +55°C) Storage Temperature -22°f ~ 150°f (-20°C ~ +70°C) Video display System... -
Page 45: Compliance Information
HR7012 ReaR Seat Video HeadReSt SyStem owner’s manual CoMPliAnCe infoRMAtion FCC Notice Notice This device has been tested and found to disposal of Old electrical & electronic comply with the limits for a Class B digital equipment (Applicable in the european device, pursuant to part 15 of the fCC Union and other european countries with Rules�... -
Page 46: User Notes
HR7012 ReaR Seat Video HeadReSt SyStem owner’s manual USeR noteS... - Page 47 If you have any questions regarding this product or require technical assistance, please call 1-800-225-6074 © 2014 VoXX eletronics Corp,150 Marcus blvd. Hauppauge, ny 11788 128-9273...
Need help?
Do you have a question about the HR7012S and is the answer not in the manual?
Questions and answers