
Subscribe to Our Youtube Channel
Related Manuals for Dinex Perfect Temp


Summary of Contents for Dinex Perfect Temp
- Page 1 Perfect•Temp Users Guide Revised July, 2007 WWW.DINEX.COM 800-523-9752 INTERNATIONAL, INC. 628-2 HEBRON AVE, GLASTONBURY, CT 06033...
- Page 2 Perfect•Temp User’s Guide Thank you for purchasing the Dinex Perfect•Temp System. For more than 35 years, Dinex has been the leader in contemporary, innovative products for healthcare foodservice. Today, Dinex is the industry standard for healthcare systems, equipment and tray-top products throughout the United States and Canada.
-
Page 3: Table Of Contents
Table of Contents Introduction Perfect•Temp System Overview ................3 Perfect•Temp Principles of Operation..............3 Advantages of Cook-Chill ..................4 Equipment Perfect•Temp Cart ....................6 Perfect•Temp Main Controller................10 Operation and Programming ……………………………………………………… 11 Perfect•Temp Trays and Dishware Overview......................24 Classic........................ 25 Classic II………………………………………………………………………….. -
Page 4: Introduction
Introduction Perfect•Temp System Overview The Perfect•Temp system consists of a walk-in or roll-in refrigerator, a Perfect•Temp rethermalization cart, an electronic controller, a set of serving trays with insulated covers, and an assortment of reusable and disposable dishware. The purpose of this system is to permit cold plating of patient meals in advance so as to achieve maximum productivity from the kitchen staff. -
Page 5: Advantages Of Cook-Chill
Advantages of Cook-Chill The Perfect•Temp meal delivery system is based upon cook-chill technology, which allows food to be prepared in advance of service, rapidly chilled, and held in chilled inventory (food bank). Patient meals are plated chilled and held under refrigeration. Just prior to service, foods to be served hot are rethermalized. -
Page 6: Equipment
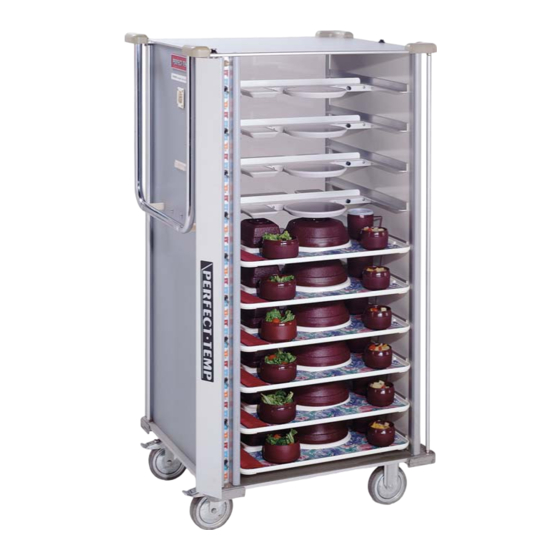
Equipment... - Page 7 Equipment The Perfect•Temp Cart The Perfect•Temp rethermalization cart is the culmination of many years of development and testing. Its design has addressed the deficiencies of similar rethermalization systems on the market and has produced a rethermalization cart that surpasses the competition in appearance, flexibility, durability—and most importantly, performance.
-
Page 8: Perfect•Temp Cart
The Perfect•Temp Cart Structure The Perfect•Temp cart has a solid aluminum base, 3/8” thick, which has been machined to accept the aluminum corner extrusions. The top of the cart is the mirror image of the bottom, which securely locks the vertical corner extrusions into place. The side panels of the cart incorporate a sandwich design consisting of an aluminum outer panel, a 3/8”... - Page 9 Classic II system permits the placing of salads, desserts, and so on, directly on the tray without cumbersome and unattractive plastic over-wraps. Patient perception is enhanced; convenience is improved for both patients and dietary staff; and clean-up is reduced. The ability to use disposable, reusable plastic, or china dishware interchangeably is helpful in fulfilling specific patient needs.
- Page 10 The design of the heater pad assembly offers the advantage of being field replaceable without affecting the adjoining heater pads. Separate pads also minimize heat conductivity to the Perfect•Temp cart body, reducing electrical loads and improving efficiency. Heater Pad Control (On-Off) Depending upon the cart model, each Perfect•Temp cart will have 16, 20 or 24 tray levels.
-
Page 11: Perfect•Temp Main Controller
Perfect•Temp Main Controller The primary purpose of the main controller is to deliver consistent, precisely controlled electrical voltage to the heater pads. The controller accepts 200 to 240 VAC input and delivers the necessary output voltage and current to the pads. The second function of the main controller is to time there rethermalization cycle. - Page 12 PERFECT-TEMP STATION COMMANDER CONTROLLER – MODEL PT-SC SERIES OPERATION INSTRUCTIONS Introduction The PT-SC controller (Station Commander) is configured into two independent modules, the Operator Module and the Power Module which are linked together by an interconnecting, low-voltage cable. The software, or programming information, is entered and stored in the operator module which may be wall mounted or installed in a roll-in refrigerator bezel.
- Page 13 No meals programmed for this cart. This cart is unplugged. No meals programmed for this cart. Cart is plugged in. Meals are programmed for this cart. This cart is unplugged. Meals are programmed for this cart. Cart is plugged in. Cart is rethermalizing meal.
- Page 14 Programming Number of Carts Displayed and Speaker Press the “PROGRAM” key Display will prompt: Select: Program Meal Times Configure Unit Use the “ “ keys to highlight “Configure Unit”. Press the “YES” key to select. Enter pass code “15037” on the keypad. Display will prompt: Select: System Setup...
- Page 15 Meal Parameters The Station Commander operator module has the capability of programming the carts under its control for different rethermalization cycle lengths for each meal. This means that the breakfast meal rethermalization cycle could be less than the dinner and lunch cycles, should this be desirable.
- Page 16 8) Press the “YES” key to select. 9) Display will prompt: Retherm Hold Maintain(on) Ready(off) Breakfast Lunch Dinner The retherm times depend on the type of dishes used. Fro example: HH Disposables average 37 minutes; HH Resuables average 38 minutes; china averages 40 minutes. 10) Use the “...
- Page 17 Use the “ “ keys to highlight “Configure Unit”. Press the “YES” key to select. Enter pass code “15037” on the keypad. Display will prompt: Select: System Setup Set Meal Parameters Set Pass codes Set Time of Day Reset Use the “ “...
- Page 18 Enter pass code “15037” on the keypad. Display will prompt: Select: System Setup Set Meal Parameters Set Pass codes Set Time of Day Reset Use the “ “ keys to highlight “Set Time of Day”. Press the “YES” key to select. Use the keypad to enter a new time.
- Page 19 Use the “ “ keys to highlight “Reset”. Press the “YES” key to select. Display will prompt: Resetting the unit will Destroy all programming information. Do you wish to continue? 10) Press the “YES” key to complete the resetting process. 11) Press the “CANCEL”...
- Page 20 15) Press the “CANCEL” key to exit programming or repeat steps 6-14 for the next cart. IMPORTANT: The Perfect Temp cart must be hooked up to the drop cord 15 minutes prior to the start of the cycle. Failure to do so may cause the Station Commander to not recognize...
- Page 21 Copy Meal Times The “Copy Meals” command can be very convenient if multiple carts have the same “Meal Times”. This command copies the meal times from one cart to another. Press the “PROGRAM” key Display will prompt: Select: Program Meal Times Configure Unit Use the “...
- Page 22 15) Display will prompt: Cart Copied. Press Yes to Continue. 16) Press the “YES” key to continue. 17) Repeat steps 9-16 to copy information to additional carts. 18) Press the “CANCEL” key to exit programming. Manual Starting of Carts Regardless of what has been programmed, any Perfect-Temp cart may be manually started to begin rethermalization at any time.
- Page 23 Stopping Meal Rethermalization Warning!! Meals should be stopped at the controller prior to disconnecting cart. Failure to do this will result in excess wear on cart plugs and receptacles. Use the “ “ keys to highlight the cart you would like to stop. Press the “CANCEL”...
- Page 24 Trays and Dishware...
-
Page 25: Perfect•Temp Trays And Dishware
Perfect•Temp Trays and Dishware The Perfect•Temp system uses two dish styles and two tray designs that will meet any requirement: The Classic is a traditional, open style tray using individual dome covers. The Classic II is compartmentalized and has a full, insulated cover. This is ideal for satellite operations where trays must be stacked. - Page 26 Classic Server Individual Dome Covers The Perfect•Temp Classic server is a round entrée, open style, non-obstructive food service tray specifically designed to hold individual soup and entrée domes. The server consists of three compartments. Two are elevated above the server bottom and are dedicated to soup and entrée dishes.
- Page 27 Soup Dome The Perfect•Temp Classic series round dish thermalization system features a one-piece, insulated, rectangular soup dome. Construction: • Polypropylene insulated dome molded with an exterior texture that matches Classic entrée dome, while interior surfaces are smooth • Recessed, injection molded knob hot platten bonded to the top of the soup dome Dimensions: Overall height: 2.0625”...
-
Page 28: Classic
Classic Server to Dishware Compatibility ________________________________________________________________________ Server Cavity Sales Code Description Qty/Case ________________________________________________________________________ Servers PTCLS3 Ivory Dome Covers – Entrée PTCLED10 Teal PTCLED12 Midnight Blue PTCLED17 Cranberry Dome Covers – Soup PTCLSD10 Teal PTCLSD12 Blue PT-CLSD-8 Mauve China Entrée Dishes HHC10 Ivory High Heat Disposable Dishware... -
Page 29: Classic Ii
Tray Mat D & E 5312X122733 Whispering Floral Classic 1000 D & E 5312Z122733 Whispering Floral Classic II 1000 Insulated Mugs/Lids 4Mxx Tradition Mug TT59 Tradition Mug Lid 2000 1197/xxHT Classic Mug 1194/8714 Classic Mug Lid 2000 4000/xxH Heritage Mug 4000/8714 Heritage mug Lid 2000... - Page 30 Classic II Server Server and Full Cover Server The Perfect•Temp Classic II server is a compartmented style, round entrée food service tray specifically designed for the Perfect•Temp rethermalization system. It incorporates individual soup, entrée and side dishware. The Classic II server consists of six compartments, two of which are cut through the server bottom and are dedicated to soup and entrée dishes.
- Page 31 Classic II Server to Dishware Compatibility ________________________________________________________________________ Server Cavity Sales Code Description Qty/Case ________________________________________________________________________ Servers PTCL2S3 Ivory Covers - Full PTCL2C8D Mauve Covers – Partial PTCL2PC8D Mauve China Entrée Dishes HHC10 Ivory High Heat Disposable Dishware HH20 Soup Bowl 1000 HH30 Soup Lid 1000...
-
Page 32: Menus And Plating Recommendations
Menus and Plating Recommendations... -
Page 33: Menus
Menus When planning a menu for use on a Perfect•Temp cart, remember these basic rules to obtain the best results: • Use “oven frying” instead of deep fat frying to eliminate the release of fats during rethermalization. If you must deep fry some foods, it is preferable to bread the product and avoid batter. -
Page 34: Garnishes And Sauces
Garnishes and Sauces Garnishes Nothing dresses up a meal more than an attractive garnish. Since the garnish is subject to rethermalization, it is preferable to use items which will not detract from the food by contributing foreign odor or by wilting due to exposure to heat. The garnish should be clean and edible, and it should enhance the food being served. - Page 35 Sauces Pineapple Pork Raisin and pineapple Pork Cheese Lamb, fish Dill Fish Tomato Fish, lamb Lemon Fish Sweet and sour Pork Mornay Eggs, fish Veloute Poultry Bechamel Chicken, beef Another suggestion is to dress up gravies with carrots, peppers, tomato pieces, mushrooms, celery and/or pimento to give them a colorful look instead of the flat look you get from most gravies.
-
Page 36: Plating Recommendations
Plating Recommendations Proper plating of foods will ensure that satisfactory temperatures will be reached during the heating cycle. Plating is really a matter of using these common sense guidelines: • The greater the area of food on the dish that comes in contact with the heater pad, the better the results. - Page 37 General Plating Guide and Procedures Use proper portion sizes to ensure that the food is heated to the proper temperature. Follow this guide to obtain the best results: Maximum Dish Food Weight Rectangular Bowl Cereals and Soup 6 oz. High Heat Side Dish Vegetables 4 oz.
-
Page 38: Production Specifics
Production Specifics Breakfast Foods Hot Cereals – Increase water for recipe by 15%. Hold 1/3 of water required for recipe until cooking is complete. Then add reserved water as ice or ice water. After rethermalization, cereal will be at the desired consistency, not overly thick. French Toast –... - Page 39 Vegetables General Instructions Vegetable preparation is determined by the desired softness or doneness. Since frozen vegetables are already blanched, they can be used in a thawed state for a crisp final texture. For more institutional users, the following is recommended: Cook from thawed state, Blanch from thawed state, then blast chill:...
- Page 40 Miscellaneous Nonstick Cooking Spray – Coating the entire plate is recommended for: • Unbreaded fish products • Vegetable lasagna without sauce • Stiff macaroni and cheese • Pancakes Variation on Mashed Potatoes – If mashed potatoes are to be used atop an entrée dish such as shepherds pie, brown the mashed potatoes in a 350°F.
- Page 41 Meatloaf, Macaroni & Cheese and Vegetables A. Meat Loaf (4 oz.) B. Macaroni & Cheese (up to 6 oz.) C. Vegetables (4 oz.) A. Place meat flat on dish, add gravy if desired. B. Spread macaroni and cheese on dish. C.
- Page 42 Beef Stew with Noodles Entrée Dish A. Beef Stew B. Noodles (6 oz.) (4 oz.) A. Portion stew on plate and spread. B. Spread noodles alongside stew and add gravy, if desired. Casserole and Vegetables A. Casserole (up to 8 oz.) B.
- Page 43 Sliced Meat with Gravy, Baked Potato and Vegetables B. Baked A. Sliced Meat Potato w/Gravy (4 oz.) (up to 6 oz. including gravy) C. Vegetables (4 oz.) A. Place meat directly on plate, add gravy. B. Cut potato in half and lay on plate, skin side up. C.
- Page 44 Fish Fillet, Potatoes Au Gratin and Vegetables (Butter/Lemon Sauce) B. Potatoes Au Gratin (up to 5 oz.) A. Fish Fillet (up to 5 oz.) C. Vegetables (4 oz.) A. Put 1 oz. butter/lemon sauce on dish. Lay uncooked, thawed fillet flat and top with 1 oz.
-
Page 45: Meal Assembly And Delivery
Meal Assembly and Delivery... -
Page 46: Tray Assembly
Meal Assembly and Delivery Tray Assembly A one-shift trayline operation offers two options: • Early starting, which will tray breakfast, lunch and dinner • Late starting, which will tray lunch, dinner and next day’s breakfast Personnel designated for tray assembly during the eight-hour shift should be responsible for setting up, operating, breaking down, pre-portioning soups, cereals and special items. - Page 47 Is cart transit time to units or chill food to lower prolonged and affecting starting temperature. temperatures? Consult Dinex. Are trays sitting on unit before service Correct service (during beverage prep and service or procedure, if held and served by nursing when possible.
- Page 48 Specific Tray Assembly Considerations for Classic II Full Cover Since the cover places a limitation on the maximum height of tray components, and the individual compartment heights vary, it is recommended that sample trays be prepared, and various possible configurations tried, prior to actual trayline assembly. This will save much time and frustration in handling tray covers that do not close properly.
-
Page 49: Rethermalization
Hot Beverages Hot beverages are added to trays at time of service. However, since they cannot be added directly to each individual tray prior to cover removal, a method for handling hot beverages at the unit level needs to be established. Again, the use of an extra, miscellaneous tray on each side of the cart is suggested. -
Page 50: Sanitation
If you need to remove only a few trays while keeping the rest of them in the hold cycle, do not push the stop button. Simply open the door, unplug the cart, remove the desired trays, replug the cart, and close the door. The hold cycle will continue until you push the stop button. - Page 51 Products such as Dip-It by Economics Laboratories, or Nuware by Dubois Chemicals are commercially available. Directions for proper formulization and use are provided by the manufacturer. Perfect•Temp Cart Sanitation and Cleaning The Perfect•Temp cart has been designed to withstand mild detergent cleaning and other non-steam-generating wash operations.
- Page 52 Perfect•Temp Roll-in Refrigerator Cleaning 1. Use proper detergent, i.e., a sanitizer or mild detergent (neutral or mildly alkaline) recommended for metal surfaces. Follow with a sanitizing rinse solution. Quats are usually the best sanitizing agents. Always follow label directions when using these products. CAUTION: Do not use abrasive cleaning solvents.
-
Page 53: Satelliting
Dinex has one tray style that can be used to satellite assembled trays to other facilities: the Classic II with Full cover. - Page 54 1. Trays assembled in the central facility are loaded onto stacking carts and placed under refrigeration until delivery. 2. Trays are secured on stacking carts with adjustable belts. 3. Stacking carts are then loaded onto a refrigerated truck for delivery. 4.
- Page 55 4. A system for handling diet changes and late trays at the satellite needs to be established. Suggestions: • Gather data on the number and types of trays required by meal. • If feasible, establish a late tray and diet change policy within the facility that delineates cut-off times for hot food and when diet changes will take effect.
-
Page 56: System Troubleshooting
System Troubleshooting ___________________________________________________________________________ Problem Probable Causes Suggested Remedies _________________________________________________________________________________ Foods did not Cart not plugged in ........Review procedures to start rethermalization rethermalize Cart switch not properly set ....Review switch setting procedure No power to cart........Check power source Refrigerator door open......Close refrigerator door Defective heater pad ........Change heater pad Controller improperly programmed ..........Correct controller programming... - Page 57 _________________________________________________________________________________________ Problem Probable Cause(s) Suggested Remedies __________________________________________________________________________________________ Perfect•Temp cart does Cart not connected properly.....Check that cart is properly connected not rethermalize at all Controller circuit breakers although controller tripped ..........Reset circuit breakers on back of controller appears to be Relays within controller functioning properly defective ..........Defective unit—return to factory Refrigerator door left open ....Close door...
-
Page 58: Product Warranties
Product Warranties and Service... - Page 59 DURATION Dinex provides a six (6) month warranty for all Warranted Products. The warranty period begins on the date the Warranted Products are shipped to Customer. The warranty period for any Warranted Product or part furnished to correct a warranty failure will be the unexpired term of the warranty applicable to the repaired or replaced Warranted Product.
- Page 60 Dinex or recommended in writing by Dinex; (v) the use of the Warranted Product in a manner or environment, or for any purpose, for which Dinex did not design or license it, or in violation of Dinex’s recommendations or instructions on use;...
- Page 61 DURATION Dinex provides a one (1) year warranty for the Warranted Products. The warranty period begins on the date the Warranted Products are shipped to Customer. The warranty period for any Warranted Product or part furnished to correct a warranty failure will be the unexpired term of the warranty applicable to the repaired or replaced Warranted Product.
- Page 62 Dinex or recommended in writing by Dinex; (v) the use of the Warranted Product in a manner or environment, or for any purpose, for which Dinex did not design or license it, or in violation of Dinex’s recommendations or instructions on use;...
- Page 63 Dinex after its good faith investigation. Dinex Software. In addition to the other warranties set forth herein, with respect to Dinex licensed software, Dinex warrants that it has the right to license or sublicense the software to Customer for the purposes and subject to the terms and conditions set forth in Dinex standard terms and conditions.
- Page 64 Dinex or recommended in writing by Dinex; (v) the use of the Warranted Product in a manner or environment, or for any purpose, for which Dinex did not design or license it, or inconsistent with Dinex’s recommendations or instructions on use including, but not limited to, power supply requirements identified in Product Specifications;...
- Page 65 any adjustment, such as alignment, calibration, or other normal preventative maintenance required of Customer; and (iv) expendable supply items.
- Page 66 24-hour-a-day, 7-day-a-week phone monitoring and provides instant response to all service calls from our customers. During normal business hours (8 a.m. to 5 p.m. Eastern Time), service calls to Dinex will be handled by Service Department staff. After hours on weekdays, and continuing through Saturday and Sunday, customer calls will be answered by the call center for Dinex Parts &...
Need help?
Do you have a question about the Perfect Temp and is the answer not in the manual?
Questions and answers