Table of Contents
Advertisement
Quick Links
Download this manual
See also:
Instruction Manual
Quick Start Guide
®
SmartStar
A Series Systems
(8600, 8602, 8603, and 8604)
iOptron Corp. | 6E Gill Street | Woburn, MA 01801 USA | (781) 569‐0200 | Toll Free (866) 399‐4587 | www.iOptron.com
Step 2. Attaching the Mount
1. Raise wedge plate on the tripod by turning two tilt
locks (12);
2. Attach mount to wedge plate using supplied azimuth
lock screw (10).
3. lower wedge plate to it's lowest position by turning the
upper tilt lock upward while lightly push the mount
down. Secure the mount by tightening the lower lock.
Installing Batteries
Step 3a.
Note: you may use 8 AA batteries (Step 3a and 3b) or the AC
adaptor (Step 5) to operate the mount.
Carefully remove the battery compartment cover (shown)
open. Gently pull the battery holder out of the
compartment
attached wires.
Step 3b.
Insert 8 AA batteries
diagram on the holder to orient the batteries properly. Replace
the holder back into the battery compartment and replace the
lid.
For reference: the battery pack fits in with wires on the bottom right
(See arrow in photo). Use only fresh batteries. Using/mixing old or low
batteries may cause error messages.
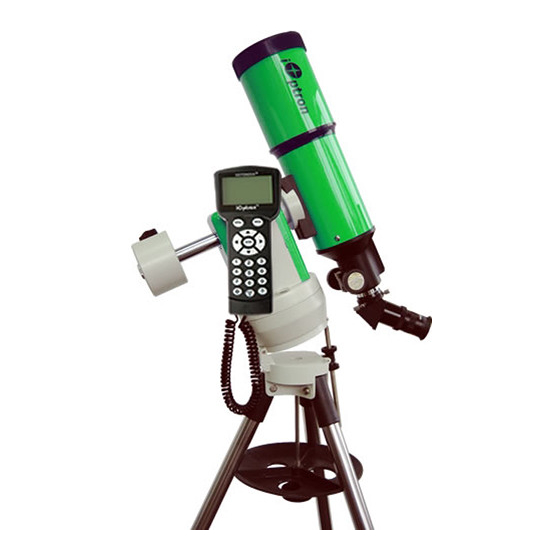
Attaching Telescope
Step 4.
#2 knob
Attach telescope to mount using dovetail lock knob (#2).
(Picture shows 80mm refractor. However all scopes will attach in
the same manner.)
Step 1. Preparing the Tripod
1. Extend tripod legs to full
extension.
2. Slide tray on bottom of shaft
(#7). Then screw on round
black knob (#9).
to avoid breaking the
(see photo in Step 3b)
in the holder. Refer to the
(not included)
Advertisement
Table of Contents

Subscribe to Our Youtube Channel
Related Manuals for iOptron SmartStar 8600


Summary of Contents for iOptron SmartStar 8600
- Page 1 (See arrow in photo). Use only fresh batteries. Using/mixing old or low batteries may cause error messages. Attaching Telescope Step 4. Attach telescope to mount using dovetail lock knob (#2). (Picture shows 80mm refractor. However all scopes will attach in the same manner.) ...
- Page 2 (1) Position the mount so that the “SOUTH” mark is facing south (A compass may be helpful). (2) The telescope tube should be pointed directly up at the zenith. If it is not perfectly straight then loosen the altitude lock #4 ...
- Page 3 Then select an object (ex. “Moon”) by scrolling with the arrow keys. Press ENTER. The telescope will automatically slew to the object and lock on. It will automatically begin to track once it locks on to the object. Step 14. Sync to Target (Use this to center and synchronize the object selected in Step 13).
- Page 4 Use the focus knob to bring objects into focus. You may need to turn the focus knob quite a few turns to focus your telescope for the first time. Always start observing using a low power eyepiece (such as a 25mm eyepiece) to get a nice wide field of view.
Need help?
Do you have a question about the SmartStar 8600 and is the answer not in the manual?
Questions and answers