Table of Contents
Advertisement
Available languages
Available languages
Quick Links
CD RECEIVER
RECEPTOR CON CD
RECEPTEUR CD
• This unit is equipped with the display demonstration. To cancel it, see page 8.
• Esta unidad está equipada con demostración en la pantalla. Para cancelarla, consulte la página 8.
• Cet appareil est équipé d'une fonction de démonstration des affichages. Pour l'annuler, référez-
vous à la page 8.
For installation and connections, refer to the separate manual.
Para la instalación y las conexiones, refiérase al manual separado.
Pour l'installation et les raccordements, se référer au manuel séparé.
S
S
INSTRUCTIONS
MANUAL DE INSTRUCCIONES
MANUEL D'INSTRUCTIONS
KD-AR400/KD-G400
KD-AR400/KD-G400
KD-AR400/KD-G400
KD-AR400
KD-G400
For customer Use:
Enter below the Model No. and
Serial No. which are located on
the top or bottom of the
cabinet. Retain this information
for future reference.
Model No.
Serial No.
GET0189-001A
[J]
Advertisement
Chapters
Table of Contents

Related Manuals for JVC KD-AR400


Summary of Contents for JVC KD-AR400
- Page 1 CD RECEIVER KD-AR400/KD-G400 RECEPTOR CON CD KD-AR400/KD-G400 RECEPTEUR CD KD-AR400/KD-G400 KD-AR400 KD-G400 • This unit is equipped with the display demonstration. To cancel it, see page 8. • Esta unidad está equipada con demostración en la pantalla. Para cancelarla, consulte la página 8.
-
Page 2: How To Reset Your Unit
INFORMATION (For U.S.A.) This equipment has been tested and found to comply with the limits for a Class B digital device, pursuant to Part 15 of the FCC Rules. These limits are designed to provide reasonable protection against harmful interference in a residential installation. This equipment generates, uses, and can radiate radio frequency energy and, if not installed and used in accordance with the instructions, may cause harmful interference to radio communications. -
Page 3: Table Of Contents
Thank you for purchasing a JVC product. Please read all instructions carefully before operation, to ensure your complete understanding and to obtain the best possible performance from the unit. CONTENTS MP3 OPERATIONS ......18 How to reset your unit ....... -
Page 4: Location Of The Buttons
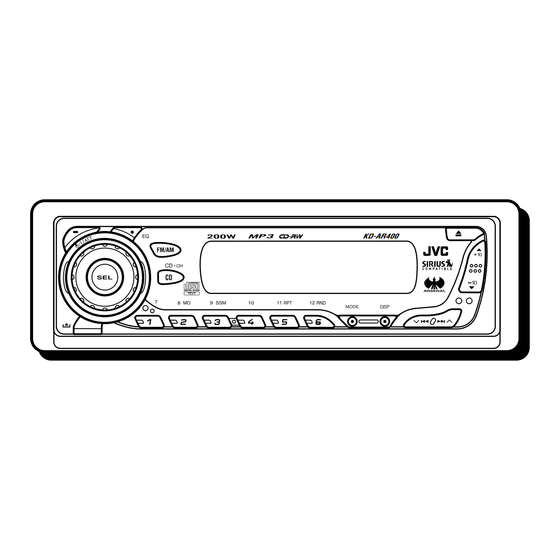
LOCATION OF THE BUTTONS Control panel Display window 1 Control dial Display window (standby/on/attenuator) button a Disc information indicators 3 SEL (select) button TAG (ID3 Tag), (folder), (track/file) 4 EQ (equalizer) button s Main display 5 FM/AM button d EQ (equalizer) indicator 6 CD CD-CH (CD changer) button f Sound mode (C-EQ: custom equalizer) 7 Display window... -
Page 5: Remote Controller
Remote controller 3 • Selects the preset stations while listening to the radio. Each time you press the button, the preset station number increases, and the selected station is tuned in. • Skips to the first file of the previous folder while listening to an MP3 disc. -
Page 6: Preparing The Remote Controller
Preparing the remote controller Return the battery holder. Insert again the battery holder by pushing it until you hear a clicking sound. Before using the remote controller: • Aim the remote controller directly at the remote sensor on the main unit. Make sure there is no (back side) obstacle in between. -
Page 7: Basic Operations
BASIC OPERATIONS Turning on the power Volume level appears. Turn on the power. Volume level indicator Note on One-Touch Operation: Adjust the sound as you want. (See When you select a source in step 2 below, the pages 22 and 23.) power automatically comes on. -
Page 8: Canceling The Display Demonstration
Canceling the display Select “DEMO OFF.” demonstration When shipped from the factory, display demonstration has been activated, and starts DEMO OFF DEMO ON automatically when no operations are done for about 20 seconds. • It is recommended to cancel the display demonstration before you use the unit for the first time. -
Page 9: Setting The Clock
Setting the clock To check the current clock time or change the display mode Press DISP (display) repeatedly. Press and hold SEL (select) for more Each time you press the button, than 2 seconds so that one of the the display changes as follows: PSM items appears on the display. -
Page 10: Radio Operations
RADIO OPERATIONS Listening to the radio To stop searching before a station is received, press the same button you have pressed for searching. You can use either automatic searching or manual searching to tune in to a particular station. Searching for a station manually: Manual search Searching for a station automatically: Auto search... -
Page 11: Storing Stations In Memory
Storing stations in memory Tune in to a station you want while “M” (manual) is still flashing. You can use one of the following two methods to To tune in to stations of store broadcasting stations in memory. higher frequencies •... -
Page 12: Tuning In To A Preset Station
Manual preset Repeat the above procedure to store other stations into other preset You can preset up to 6 stations in each band numbers. (FM1, FM2, FM3, and AM) manually. Ex.: Storing FM station of 92.5 MHz into the Notes: preset number 1 of the FM1 band. -
Page 13: Cd Operations
CD OPERATIONS Refer to “MP3 OPERATIONS” on pages 18 to 21 The display changes to show the following: for operating MP3 discs. Current source indication Playing a CD Open the control panel. CD indicator Total playing time Total track number of the inserted disc of the inserted disc Note on One-Touch Operation:... -
Page 14: Locating A Track Or A Particular Portion On A Cd
To stop play and eject the CD To go to a particular track directly Press 0. Press the number button corresponding to the CD play stops and the control panel flips down. track number to start its playback. The CD automatically ejects from the loading slot. -
Page 15: Selecting Cd Playback Modes
To play back tracks repeatedly How to use the +10 and –10 buttons (Track Repeat Play) • Ex. 1: To select track number 32 while You can play back the current track repeatedly. playing track number 6 Press MODE to enter the functions mode while playing a (Three times) (Twice) -
Page 16: Playing A Cd Text
Playing a CD Text Prohibiting disc ejection In a CD Text, some information about the disc (its You can prohibit disc ejection and can lock a disc disc title, performer, and track title) is recorded. in the loading slot. This CD Text information will be shown automatically when you play a CD Text. -
Page 17: Mp3 Introduction
MP3 INTRODUCTION What is MP3? How are MP3 files recorded and played back? MP3 is an abbreviation of Motion Picture Experts Group (or MPEG) Audio Layer 3. MP3 is simply a MP3 “files (tracks)” can be recorded in “folders” file format with a data compression ratio of 1:10 —in PC terminology. -
Page 18: Mp3 Operations
MP3 OPERATIONS Refer also to “CD OPERATIONS” on pages 13 to The display changes to show the following: Current source indication Playing an MP3 disc Open the control panel. CD indicator Note on One-Touch Operation: Total folder Total file When a disc is already in the loading slot, number number pressing CD CD-CH turns on the unit and starts... -
Page 19: Locating A File Or A Particular Portion On An Mp3 Disc
To stop play and eject the disc Notes: • The display shows up to 8 characters at a time and Press 0. scrolls if there are more than 8 characters. Playback stops and the control panel flips down. See also “To select the scroll mode—SCROLL” on The disc automatically ejects from the loading slot. - Page 20 To go to a particular file quickly within the To go to a particular folder directly current folder (+10 and –10 buttons) IMPORTANT: Press MODE to enter the functions mode To directly select the folders using the number while playing an MP3 disc. button(s), it is required that folders are assigned 2 digit numbers at the beginning of their folder names.
-
Page 21: Selecting Mp3 Playback Modes
To skip to the next or previous folder Active Mode Plays at random indicator Press 5 (up) while playing an MP3 FLDR RND RND and All files of the disc to skip to the next folder. indicators current folder, then Each time you press the button light up. -
Page 22: Sound Adjustments
SOUND ADJUSTMENTS Selecting preset sound modes Indication For: Preset values (C-EQ: custom equalizer) LOUD USER (Flat sound) You can select a preset sound mode (C-EQ: ROCK Rock or custom equalizer) suitable to the music genre. disco music CLASSIC Classical –02 music Select the sound mode you want. -
Page 23: Adjusting The Sound
Adjusting the sound Adjust the setting. You can adjust the sound characteristics to your To increase the level or preference. turn on the loudness Select the item you want to adjust. To decrease the level or Each time you press the turn off the loudness button, the adjustable items change as follows:... -
Page 24: Other Main Functions
OTHER MAIN FUNCTIONS Changing the general settings Adjust the PSM item selected. (PSM) You can change the items listed in the table on page 25 by using the PSM (Preferred Setting Mode) control. Basic Procedure Press and hold SEL (select) for more Repeat steps 2 and 3 to adjust the than 2 seconds so that one of the other PSM items if necessary. - Page 25 Preferred Setting Mode (PSM) items • For detailed operations of each PSM items, refer to the pages listed in the table. Factory-preset Indications Selectable values/items settings page DEMO Display demonstration DEMO OFF DEMO ON DEMO ON 1 – 12 1 (1:00) CLOCK H Hour adjustment CLOCK M...
- Page 26 30, the unit automatically changes the Connection Manual (separate volume). volume level to “VOL 30.” • For connecting the JVC SIRIUS Radio, refer to the SIRIUS Radio Setup Manual (separate volume). • HIGH PWR: You can adjust the volume level...
-
Page 27: Detaching The Control Panel
Attaching the control panel Detaching the control panel Insert the right side of the control You can detach the control panel when leaving panel into the groove on the panel the car. holder. When detaching or attaching the control panel, be careful not to damage the connectors on the back of the control panel and on the panel holder. -
Page 28: Cd Changer Operations
CD CHANGER OPERATIONS Playing discs We recommend that you use the JVC MP3- compatible CD changer with your unit. By using this CD changer, you can play back your Select the CD changer (CD-CH). original CD-Rs (Recordable) and CD-RWs (Rewritable) recorded either in audio CD format CD-CH* or in MP3 format. - Page 29 To go to a particular disc directly • When the current disc is a CD: Playback starts from the first track of the Press the number button corresponding to the current disc. disc number to start its playback (while the CD changer is playing).
- Page 30 * First time you press +10 or –10 button, the track/file skips to the nearest higher or lower This is possible only when connecting a JVC CD track/file with a track/file number of multiple changer equipped with CD Text and/or MP3 disc ten (ex.
-
Page 31: Selecting The Playback Modes
To play back tracks/files repeatedly Selecting the playback modes (Track Repeat/Folder Repeat/Disc Repeat Play) To play back tracks/files at random (Folder Random/Disc Random/Magazine Press MODE to enter the Random Play) functions mode during play. Press MODE to enter the functions mode during play. Press RPT (repeat), while “MODE”... -
Page 32: External Component Operations
22 and 23.) Select the external component (LINE IN). LINE IN* To use the JVC SIRIUS Radio, refer to the SIRIUS Radio Setup Manual (separate volume). • If “LINE IN”* does not appear on the display, see page 26 and select the external input (“LINE IN”). -
Page 33: Troubleshooting
TROUBLESHOOTING What appears to be trouble is not always serious. Check the following points before calling a service center. Symptoms Causes Remedies • Sound cannot be heard The volume level is set to the Adjust it to the optimum level. from the speakers. - Page 34 Symptoms Causes Remedies • Disc cannot be played No MP3 files are recorded on Change the disc. back. the disc. MP3 files do not have the Add the extension code extension code <.mp3> in their <.mp3> to their file names. file names.
- Page 35 Symptoms Causes Remedies • “NO DISC” appears on No disc is in the magazine. Insert discs into the magazine. the display. Discs are inserted upside down. Insert discs correctly. • “NO MAG” appears on No magazine is loaded in the Insert the magazine.
-
Page 36: Maintenance
MAINTENANCE Handling discs When playing a CD-R or CD-RW Before playing back CD-Rs or CD-RWs, read This unit has been designed to reproduce CDs, their instructions or cautions carefully. CD-Rs (Recordable), CD-RWs (Rewritable), and • Use only “finalized” CD-Rs or CD-RWs. CD Texts. -
Page 37: Specifications
SPECIFICATIONS AUDIO AMPLIFIER SECTION CD PLAYER SECTION Maximum Power Output: Type: Compact disc player Front: 50 W per channel Signal Detection System: Non-contact optical Rear: 50 W per channel pickup (semiconductor laser) Continuous Power Output (RMS): Number of channels: 2 channels (stereo) Front: 19 W per channel into 4 Ω, 40 Hz to Frequency Response: 5 Hz to 20 000 Hz 20 000 Hz at no more than 0.8%... - Page 38 IMPORTANTE (EE.UU.) Este equipo se ha sometido a todo tipo de pruebas y cumple con las normas establecidas para dispositivos de Clase B, de conformidad con la Parte 15 de las reglas de la FCC (Comisión Federal de Comunicaciones). Estas reglas están diseñadas para asegurar una protección razonable contra este tipo de interferencias en las instalaciones residenciales.
- Page 39 Muchas gracias por la compra de un producto JVC. Como primer paso, por favor lea detenidamente este manual para comprender a fondo todas las instrucciones y obtener un máximo disfrute de esta unidad. CONTENIDO Cómo reposicionar su unidad ....¿Qué es MP3? .......... 17 ¿Cómo se graban y reproducen los...
-
Page 40: Ubicación De Los Botones
UBICACIÓN DE LOS BOTONES Panel de control Ventanilla de visualización 1 Dial de control Ventanilla de visualización 2 Botón (en espera/encendido/ a Indicadores de información del disco atenuador) TAG (etiqueta ID3), (carpeta), 3 Botón SEL (selección) (pista/archivo) 4 Botón EQ (ecualizador) s Pantalla principal 5 Botón FM/AM d Indicador EQ (ecualizador) -
Page 41: Control Remoto
Control remoto 3 • Selecciona la emisora preajustada mientras está escuchando la radio. Cada vez que pulsa el botón, el número de la emisora preajustada aumenta, y se sintoniza la emisora seleccionada. • Salta al primer archivo de la carpeta anterior mientras está... -
Page 42: Preparación Del Control Remoto
Preparación del control Vuelva a colocar a la portapila. Inserte nuevamente a la portapila remoto empujándolo hasta escuchar un chasquido. Antes de emplear el control remoto: (lado posterior) • Apunte el control remoto directamente hacia el sensor remoto de la unidad principal. Asegúrese de que no haya obstáculos en el camino. -
Page 43: Operaciones Basicas
OPERACIONES BASICAS Conexión de la alimentación Aparece el nivel de volumen. Encienda la unidad. Indicador de nivel de volumen Nota sobre la operación con pulsación única: Ajuste el sonido según se desee. La unidad se enciende automáticamente cuando (Consulte las páginas 22 y 23). usted selecciona la fuente en el paso 2 de abajo. -
Page 44: Cancelación De La Demostración En Pantalla
Cancelación de la Seleccione “DEMO OFF”. demostración en pantalla La unidad se expide de fábrica con la demostración en pantalla activada para que se DEMO OFF DEMO ON inicie automáticamente tras un período de inactividad de 20 segundos. • Se recomienda cancelar la demostración en pantalla antes de utilizar la unidad por primera vez. -
Page 45: Ajuste Del Reloj
Ajuste del reloj Para verificar la hora actual en el reloj o cambiar el modo de pantalla Pulse DISP (pantalla) Pulse y mantenga pulsado SEL repetidamente. (selección) durante más de 2 Cada vez que pulsa el botón, la segundos para que aparezca uno de pantalla cambia de la manera los ítems de PSM en la pantalla. -
Page 46: Operaciones De La Radio
OPERACIONES DE LA RADIO Para escuchar la radio Para cancelar la búsqueda antes de recibir una emisora, pulse el mismo botón que el pulsado para la búsqueda. Podrá sintonizar una determinada emisora mediante búsqueda automática o búsqueda Para buscar una emisora manual. -
Page 47: Cómo Almacenar Emisoras En La Memoria
Cómo almacenar emisoras en Sintonice la emisora deseada mientras “M” (manual) está la memoria parpadeando. Las emisoras podrán almacenarse en la memoria Para sintonizar emisoras mediante uno de los dos métodos siguientes. de frecuencias más altas • Preajuste automático de emisoras FM: SSM (Memoria secuencia de las emisoras más fuertes) •... -
Page 48: Preajuste Manual
Preajuste manual Repita el procedimiento de arriba para almacenar otras emisoras en Podrá preajustar manualmente hasta 6 emisoras los otros números de preajuste. en cada banda (FM1, FM2, FM3 y AM). Ej.: Almacenamiento de una emisora FM de Notas: 92,5 MHz en el número de preajuste 1 de la •... -
Page 49: Operaciones Del Reproductor De Cd
OPERACIONES DEL REPRODUCTOR DE CD Para los detalles sobre la operación con discos La pantalla cambia para mostrar los siguientes: MP3, consulte “OPERACIONES DE MP3” en las Indicación de la fuente actual páginas 18 a 21. Reproducción de un CD Abra el panel de control. -
Page 50: Localizando Una Pista O Un Determinado Pasaje De Un Cd
Para parar la reproducción y expulsar el CD Para seleccionar directamente una determinada pista Pulse 0. La reproducción del CD se para y el panel de Pulse el botón de número correspondiente al control bascula hacia abajo. El CD será número de pista que desea reproducir. -
Page 51: Selección De Los Modos De Reproducción De Cd
Para reproducir las pistas repetidamente Cómo usar los botones +10 y –10 (Reproducción repetida de pistas) • Ej. 1: Para seleccionar la pista número 32 Podrá reproducir repetidamente la pista actual. mientras se está reproduciendo la Pulse MODE para entrar en pista número 6 modo de funciones mientras se está... -
Page 52: Reproducción Del Cd Text
Reproducción del CD Text Prohibición de la expulsión del disco En el CD Text, se ha grabado cierta información relacionada con el disco (el título del disco, su Es posible inhibir la expulsión del disco y ejecutante y título de pista). bloquearlo dentro de la ranura de carga. -
Page 53: Introducción De Mp3
INTRODUCCIÓN DE MP3 ¿Qué es MP3? ¿Cómo se graban y reproducen los archivos MP3? MP3 es abreviatura de Motion Picture Experts Group (o MPEG) Audio Layer 3. El MP3 es En terminología PC, “archivos (pistas)” MP3 se simplemente un formato de archivo con una relación pueden grabar en “carpetas”. -
Page 54: Operaciones De Mp3
OPERACIONES DE MP3 Refiérase también a “OPERACIONES DEL La pantalla cambia para mostrar los siguientes: REPRODUCTOR DE CD” en las páginas 13 a 16. Indicación de la fuente actual Reproducción de un disco MP3 Abra el panel de control. Indicador CD Nota sobre la operación con pulsación única: Número total Número total de... -
Page 55: Localizando Un Archivo O Un Determinado Pasaje Del Disco Mp3
Para parar la reproducción y expulsar el disco Notas: • En la pantalla se visualizan simultáneamente hasta Pulse 0. 8 caracteres, efectuándose el desplazamiento La reproducción del disco se para y el panel de secuencial si hay más de 8. control bascula hacia abajo. - Page 56 Para desplazarse rápidamente a un Para ir directamente a una carpeta determinado archivo dentro de la carpeta específica actual (botones +10 y –10) IMPORTANTE: Pulse MODE para entrar en modo de Para seleccionar directamente las carpetas funciones mientras se está reproduciendo un utilizando el(los) botón(es) numérico(s), será...
-
Page 57: Selección De Los Modos De Reproducción De Mp3
Para saltar a la carpeta siguiente o anterior Indicador Se reproducen de Modo activado forma aleatoria Pulse 5 (arriba) mientras se está FLDR RND Los Todos los archivos reproduciendo un disco MP3, para indicadores de la carpeta actual, saltar a la siguiente carpeta. RND y luego todos los Cada vez que pulsa el botón... -
Page 58: Ajustes Del Sonido
AJUSTES DEL SONIDO Selección de los modos de Indicación Para: Valores preajustados sonido preajustados (C-EQ: LOUD ecualizador personalizable) USER (Sonido plano) ROCK Rock o Puede seleccionar un modo de sonido música de preajustado (C-EQ: ecualizador personalizable) disco adecuado al género musical. CLASSIC Música –02 clásica... -
Page 59: Ajuste Del Sonido
Ajuste del sonido Al ajustar los graves, los agudos o la sonoridad, el ajuste realizado por usted quedará almacenado en el modo de sonido seleccionado (C-EQ), Usted puede ajustar las características de sonido incluyendo “USER”. a su preferencia. Si está usando un sistema de dos altavoces, ajuste el nivel del desvanecedor a “00”. -
Page 60: Otras Funciones Principales
OTRAS FUNCIONES PRINCIPALES Cambio de los ajustes Ajuste el ítem de PSM seleccionado. generales (PSM) Podrá cambiar las opciones listadas en la tabla de la página 25 utilizando el control PSM (Modo de ajustes preferidos). Procedimiento básico Pulse y mantenga pulsado Repita los pasos 2 a 3 para ajustar SEL (selección) durante más de los otros ítems PSM, si es... - Page 61 Los ítems de Modo de ajustes preferidos (PSM) • Para las operaciones detalladas de cada una de las opciones PSM, refiérase a las páginas indicadas en la tabla. Valores/ Ajustes de Consulte Indicaciones opciones seleccionables fabrica la página DEMO Demostración en pantalla DEMO OFF DEMO ON DEMO ON...
- Page 62 KS-U57 y el componente exterior, consulte el Manual de instalación/conexión (volumen • HIGH PWR: Puede ajustar el nivel de volumen separado). entre “VOL 00” y “VOL 50”. • Para conectar la Radio SIRIUS de JVC, consulte el Manual de configuración de la radio SIRIUS (volumen separado).
-
Page 63: Desmontaje Del Panel De Control
Cómo instalar el panel de control Desmontaje del panel de control Inserte el lado derecho del panel de control en la ranura del portapanel. Podrá desmontar el panel de control cuando salga de su automóvil. Al desmontar o instalar el panel de control, preste atención para no dañar los conectores provistos al dorso del panel de control y en el portapanel. -
Page 64: Operación Del Cambiador De Cd
OPERACIÓN DEL CAMBIADOR DE CD Reproducción de los discos Con esta unidad se recomienda utilizar el cambiador de CD de JVC compatible con MP3. Seleccione el cambiador de CD (CD-CH). Utilizando este cambiador de CD, podrá reproducir sus CD-Rs (grabables) y CD-RWs... - Page 65 Para seleccionar directamente un • Cuando el disco actual es un CD: La reproducción se inicia desde la primera determinado disco pista del disco actual. Pulse el botón del número correspondiente al número de disco deseado para iniciar su reproducción (mientras el cambiador de CD está reproduciendo el CD).
- Page 66 Esto es posible solamente cuando se conecta un Si el disco reproducido actualmente es un disco cambiador de CD JVC equipado con capacidad de MP3, se omiten archivos dentro de la misma lectura de información de CD Text y/o disco MP3.
-
Page 67: Selección De Los Modos De Reproducción
Para reproducir repetidamente las pistas/ Selección de los modos de los archivos (Reproducción repetida de reproducción pistas/de carpetas/de discos) Para reproducir las pistas/las archivos de Pulse MODE para entrar en forma aleatoria (Reproducción aleatoria modo de funciones durante la reproducción. de carpetas/de discos/de cargador) Pulse RPT (repetición), mientras Pulse MODE para entrar en... -
Page 68: Operaciones Del Componente Exterior
Consulte “Para seleccionar el componente exterior a utilizar—EXT IN” en la página 26. Seleccione el componente exterior Para utilizar la Radio SIRIUS de JVC, consulte (LINE IN). el Manual de configuración de la radio SIRIUS (volumen separado). -
Page 69: Localización De Averias
LOCALIZACIÓN DE AVERIAS Lo que aparenta ser una avería podría resolverse fácilmente. Verifique los siguientes puntos antes de acudir al centro de servicio. Síntomas Causas Remedios • El sonido no sale por los El nivel de volumen está Ajustarlo al nivel óptimo. altavoces. - Page 70 Síntomas Causas Remedios • No se puede reproducir El disco no contiene ningún Cambie el disco. el disco. archivo MP3. Los archivos MP3 no tienen Añada el código de extensión código de extensión <.mp3> en <.mp3> a los nombres de los nombres de archivos.
- Page 71 Síntomas Causas Remedios • “NO DISC” aparece en No hay disco en el magazin. Inserte los discos en el la pantalla. magazin. Los discos han sido insertados Inserte los discos boca abajo. correctamente. • “NO MAG” aparece en la No hay ningún magazin cargado Inserte el magazin.
-
Page 72: Mantenimiento
MANTENIMIENTO Manipulación de los discos Cuando se reproduce un CD-R o CD-RW Antes de reproducir los CD-Rs o CD-RWs, lea atentamente sus instrucciones o precauciones. Esta unidad ha sido diseñada para reproducir • Utilice únicamente CD-Rs o CD-RWs CDs, CD-Rs (Grabables), CD-RWs “finalizados”. -
Page 73: Especificaciones
ESPECIFICACIONES SECCION DEL AMPLIFICADOR DE SECCION DEL REPRODUCTOR DE CD AUDIO Tipo: Reproductor de discos compactos Sistema de detección de la señal: Captor óptico Máxima potencia de salida: sin contacto (láser de semiconductor) Delantera: 50 W por canal Número de canales: 2 canales (estéreo) Trasera: 50 W por canal... -
Page 74: Comment Réinitialiser Votre Appareil
IMPORTANT POUR PRODUITS LASER 1. PRODUIT LASER CLASSE 1 2. ATTENTION: N’ouvrez pas le couvercle supérieur. Il n’y a aucune pièce réparable par l’utilisateur à l’intérieur de l’appareil; confiez toute réparation à un personnel qualifié. 3. ATTENTION: Risque de radiations laser visible et invisible quand l’appareil est ouvert et que le système de verrouillage ne fonctionne pas ou a été... - Page 75 Merci pour avoir acheté un produit JVC. Veuillez lire attentivement toutes les instructions avant d’utiliser l’appareil afin de bien comprendre son fonctionnement et d’obtenir les meilleures performances possibles. TABLE DES MATIÈRES Comment réinitialiser votre appareil ..FONCTIONNEMENT DES MP3 .... 18 Comment utiliser la touche MODE ....
-
Page 76: Emplacement Des Touches
EMPLACEMENT DES TOUCHES Panneau de command Fenêtre d’affichage 1 Molette de commande Fenêtre d’affichage 2 Touche (attente/en service/ a Indicateurs d’information de disque sourdine) TAG (balise ID3), (dossier), (plage/ 3 Touche SEL (sélection) fichier) 4 Touche EQ (égaliseur) s Affichage principal 5 Touche FM/AM d Indicateur EQ (égaliseur) 6 Touche CD CD-CH (changeur de CD) -
Page 77: Télécommande
Télécommande 3 • Choisit les stations préréglées lors de l’écoute de la radio. Chaque fois que vous appuyez sur la touche, le numéro de station préréglée augmente et la station choisie est accordée. • Saute au premier fichier du dossier précédent pendant l’écoute d’un disque MP3. -
Page 78: Préparation De La Télécommande
Préparation de la Remettez le porte-pile en place. Insérez le porte-pile en le poussant jusqu’à ce télécommande que vous entendiez un déclic. Avant d’utiliser la télécommande: (face arrière) • Pointez la télécommande directement sur le capteur de télécommande de l’appareil principal. -
Page 79: Fonctionnement De Base
FONCTIONNEMENT DE BASE Mise sous tension Le niveau de volume apparaît. Mettez l’appareil sous tension. Indicateur du niveau de volume Ajustez le son comme vous le Remarque sur le fonctionnement monotouche: Quand vous choisissez la source à l’étape 2 ci- souhaitez. -
Page 80: Annulation De La Démonstration Des Affichages
Annulation de la Choisissez “DEMO OFF”. démonstration des affichages À l’expédition de l’usine, la démonstration est en service et celle-ci démarre automatiquement DEMO OFF DEMO ON quand aucune opération n’est effectuée pendant environ 20 secondes. • Il est recommandé d’annuler la démonstration des affichages avant d’utiliser l’appareil pour la première fois. -
Page 81: Réglage De L'horloge
Réglage de l’horloge Pour vérifier l’heure actuelle ou changer le mode d’affichage Appuyez répétitivement sur DISP Maintenez pressée SEL (sélection) (affichage). pendant plus de 2 secondes de Chaque fois que vous appuyez façon que l’un des éléments PSM sur la touche, l’affichage change apparaisse sur l’affichage. -
Page 82: Fonctionnement De La Radio
FONCTIONNEMENT DE LA RADIO Pour arrêter la recherche avant qu’une station Ecoute de la radio ne soit accordée, appuyez sur la même touche que vous avez utilisée pour la recherche. Vous pouvez utiliser la recherche automatique ou Recherche manuelle d’une station: l’accord manuel pour accorder une station particulière. -
Page 83: Mémorisation Des Stations
Mémorisation des stations Accordez une station souhaitée pendant que “M” (manuel) clignote. Vous pouvez utiliser l’une des deux méthodes suivantes pour mémoriser les stations reçues. Pour accorder des stations • Présélection automatique des stations FM: de fréquences supérieures SSM (Mémorisation automatique des meilleures stations) •... -
Page 84: Accord D'une Station Présélectionnée
Présélection manuelle Répétez la procédure ci-dessus pour mémoriser d’autres stations sur Vous pouvez présélectionner manuellement un d’autres numéros de présélection. maximum de 6 stations pour chaque bande (FM1, FM2, FM3 et AM). Remarques: Ex.: Mémorisation de la station FM située à •... -
Page 85: Fonctionnement Du Lecteur Cd
FONCTIONNEMENT DU LECTEUR CD Référez-vous à “FONCTIONNEMENT DES MP3” L’affichage change comme suit: aux pages 18 à 21 pour utiliser les disques MP3. Indication de la source actuelle Lecture d’un CD Ouvrez le panneau de commande. Indicateur CD Durée de lecture Nombre total de totale du disque plages du disque... -
Page 86: Localisation D'une Plage Ou D'un Passage Particulier Sur Un Cd
Pour arrêter la lecture et éjecter le CD Pour aller directement à une plage particulière Appuyez sur 0. La lecture de CD s’arrête et le panneau de Appuyez sur la touche numérique commande s’ouvre. Le CD est éjecté correspondante au numéro de plage souhaité automatiquement de la fente d’insertion. -
Page 87: Sélection Des Modes De Lecture De Cd
Pour reproduire les plages répétitivement Comment utiliser les touches +10 et –10 (Lecture répétée de plage) • Ex. 1: Pour choisir la plage numéro 32 Vous pouvez reproduire la plage actuelle pendant la lecture de la plage numéro 6 répétitivement. Appuyez sur MODE pour entrer en mode de fonction pendant la lecture d’un CD. -
Page 88: Lecture D'un Cd Text
Lecture d’un CD Text Interdiction de l’éjection du disque Dans un CD Text, certaines informations à propos du disque (le titre du disque, l’interprète Vous pouvez interdire l’éjection d’un disque et le et le titre de la plage) sont enregistrées. verrouiller dans la fente d’insertion. -
Page 89: Présentation Du Format Mp3
PRÉSENTATION DU FORMAT MP3 Qu’est-ce que le format MP3? Comment les fichiers MP3 sont-ils enregistrés et MP3 est l’abréviation de Motion Picture Experts reproduits? Group (ou MPEG) Audio Layer 3. MP3 est simplement un format de fichier avec un rapport de compression de données de 1:10 (128 Kbps*). -
Page 90: Fonctionnement Des Mp3
FONCTIONNEMENT DES MP3 Référez-vous aussi “FONCTIONNEMENT DU L’affichage change comme suit: LECTEUR CD” aux pages 13 à 16. Indication de la source actuelle Lecture d’un disque MP3 Ouvrez le panneau de commande. Indicateur CD Remarque sur le fonctionnement monotouche: Nombre total Nombre total Si un disque se trouve déjà... -
Page 91: Localisation D'un Fichier Ou D'un Passage Particulier Sur Un Mp3 Disque
Pour arrêter la lecture et éjecter le disque Remarques: • L’affichage montre 8 caractères en même temps et Appuyez sur 0. défile s’il y a plus de 8 caractères. La lecture s’arrête que le panneau de commande Référez-vous aussi à “Pour choisir le mode de s’ouvre. - Page 92 Pour aller rapidement à un fichier Pour aller directement à un dossier donné particulier dans le dossier actuel (touches +10 et –10) IMPORTANT: Pour choisir directement un dossier en Appuyez sur MODE pour entrer en mode de utilisant les touches numériques, il faut que le fonctions pendant la lecture d’un disque MP3.
-
Page 93: Sélection Des Modes De Lecture De Mp3
Pour sauter au dossier suivant ou précédent Indicateur Reproduit Mode allumé aléatoirement Appuyez sur 5 (haut) pendant la FLDR RND Les Tous les fichiers du lecture d’un disque MP3 pour sauter au dossier suivant. indicateurs dossier actuel, puis Chaque fois que vous appuyez RND et les fichiers du sur la touche consécutivement,... -
Page 94: Ajustement Du Son
AJUSTEMENT DU SON Sélection des modes sonores Indication Pour: Valeurs préréglées préréglés (C-EQ: égaliseur LOUD personnalisé) USER (Son plat) ROCK Musique rock ou disco Vous pouvez choisir un mode sonore préréglé (C-EQ: égaliseur personnalisé) convenant à votre CLASSIC Musique –02 genre de musique. -
Page 95: Ajustement Du Son
Ajustement du son Quand vous ajustez les graves, les aigus ou le loudness, l’ajustement réalisé est mémorisé pour le mode sonore actuellement choisi (C-EQ) y compris Vous pouvez ajuster les caractéristiques du son à “USER”. votre préférence. Si vous utilisez un système à deux enceintes, réglez le niveau de fader sur “00”. -
Page 96: Autres Fonctions Principales
AUTRES FONCTIONS PRINCIPALES Modification des réglages Ajustez l’élément PSM choisi. généraux (PSM) Vous pouvez changer les éléments qui apparaissent dans le tableau de la page 25 en utilisant le réglage PSM (mode des réglages préférés). Procédure de base Répétez, si nécessaire, les étapes 2 Maintenez pressée SEL (sélection) pendant plus de 2 secondes de et 3 pour ajuster les autres éléments... - Page 97 Les éléments Preferred Setting Mode—Mode de réglage préféré (PSM) • Pour des informations détaillées sur chaque réglage PSM, référez-vous aux pages données dans le tableau. Valeurs/réglages Réglages pré- Voir Indications sélectionnables réglés à l’usine Page DEMO Démonstration des DEMO OFF DEMO ON DEMO ON affichages...
- Page 98 Manuel d’installation/raccordement (volume écoute avec un niveau de volume séparé). supérieur à 30, l’appareil change le • Pour la connexion de la radio JVC SIRIUS, référez- niveau de volume automatiquement vous au Manuel d’installation de la radio SIRIUS sur “VOL 30”.
-
Page 99: Détachement Du Panneau De Commande
Comment attacher le panneau de Détachement du panneau de commande commande Insérez le côté droite du panneau de commande dans la rainure située du Vous pouvez détacher le panneau de commande côté droit du porte-panneau. quand vous quittez la voiture. Lors du détachement ou de la remise en place du panneau de commande, faites attention de ne pas endommager les connecteurs situés à... -
Page 100: Fonctionnement Du Changeur De Cd
FONCTIONNEMENT DU CHANGEUR DE CD Lecture des disques Nous vous recommandons d’utiliser le changeur de CD compatible MP3 JVC avec votre appareil. Choisissez le changeur de CD (CD-CH). En utilisant ce changeur de CD, vous pouvez reproduire vos CD-R (enregistrables) et CD-RW (réinscriptibles) originaux enregistrés au format... - Page 101 • Quand le disque actuel est un CD: Pour aller directement à un disque La lecture démarre à partir de la première particulier plage du disque actuel. Appuyez sur la touche numérique correspondante au numéro de disque souhaité pour commencer sa reproduction (alors que le changeur de CD est en lecture).
- Page 102 +10 ou –10, l’appareil saute à la C’est uniquement possible quand un changeur plage ou le fichier supérieur ou inférieur le de CD JVC possédant la capacité de lire les plus proche dont le numéro est un multiple informations des CD Text et/ou des disques MP3 de 10 (par ex.
-
Page 103: Sélection Des Modes De Lecture
Pour reproduire les plages/fichiers Sélection des modes de lecture répétitivement (Lecture répétée de plage/ dossier/disque) Pour reproduire les plages/fichiers dans un ordre aléatoire (Lecture aléatoire de Appuyez sur MODE pour entrer dossier/disque/magasin) en mode de fonctions pendant la lecture d’un disque. Appuyez sur MODE pour entrer en mode de fonctions pendant la lecture d’un disque. -
Page 104: Fonctionnement De L'appareil Exterieur
IN” à la page 26. souhaitez. (Voir les pages 22 et 23). Choisissez l’appareil extérieur (LINE IN). Pour utiliser la radio JVC SIRIUS, référez-vous LINE IN* au Manuel d’installation de la radio SIRIUS (volume séparé). • Si “LINE IN”* n’apparaît pas sur l’affichage, référez-vous à... -
Page 105: Dépannage
DÉPANNAGE Ce qui apparaît comme un problème n’est pas toujours très sérieux. Vérifier les points suivants avant d’appeler un centre de réparation. Symptômes Causes Remèdes • Le son ne peut pas être Le niveau de volume est réglé Ajustez-la sur le niveau entendu des enceintes. - Page 106 Symptômes Causes Remèdes • Le disque ne peut pas Aucun fichier MP3 n’est Changez le disque. être reproduit. enregistré sur le disque. Les fichiers MP3 ne possèdent Ajoutez le code d’extension pas le code d’extension <.mp3> <.mp3> aux noms de fichier. dans leur nom.
- Page 107 Symptômes Causes Remèdes • “NO DISC” apparaît sur Il n’y a pas de disque Insérez des disques dans le l’affichage. dans le magasin. magasin. Les disques sont insérés à Insérez les disques l’envers. correctement. • “NO MAG” apparaît sur Aucun magasin n’est en place Mettez un magasin en place.
-
Page 108: Entretien
ENTRETIEN Manipulation des disques Lors de la reproduction d’un CD-R ou CD-RW Avant de reproduire un CD-R ou CD-RW, lisez attentivement leurs instructions et précautions. Cet appareil est conçu pour reproduire les CD, • Utilisez uniquement des CD-R ou CD-RW CD-R (enregistrable), CD-RW (réinscriptible) et “finalisés”. -
Page 109: Spécifications
SPÉCIFICATIONS SECTION AMPLIFICATEUR AUDIO SECTION LECTEUR CD Puissance de sortie maximum: Type: Lecteur de disque compact Avant: 50 W par canal Système de détection de signal: Capteur sans Arrière: 50 W par canal contact optique (semiconducteur laser) Puissance de sortie en mode continu (RMS): Nombre de canaux: 2 Canaux (stéréo) Avant: 19 W par canal pour 4 Ω, 40 Hz à... - Page 110 US RESIDENTS ONLY Having TROUBLE with operation? Please reset your unit Refer to page of How to Reset Still having trouble?? USA ONLY Call 1-800-252-5722 http://www.jvc.com We can help you! EN, SP, FR 1003KKSMDTJEIN © 2003 VICTOR COMPANY OF JAPAN, LIMITED...
Need help?
Do you have a question about the KD-AR400 and is the answer not in the manual?
Questions and answers