Table of Contents
Advertisement
Owner's Operator and Maintenance Manual
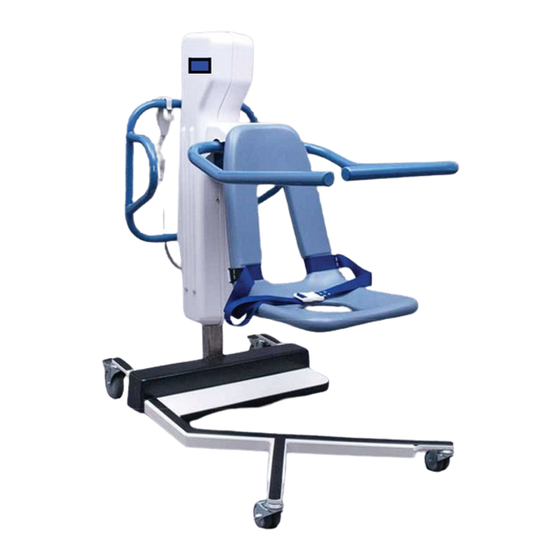
1900/1900S Bath Lift
DEALER: This manual MUST be given to
the user of the patient lift.
USER: BEFORE using this patient lift, read
this manual and save for future reference.
For more information regarding Invacare
products, parts, and services, please visit
www.invacare-ccg.com or call 800.668.2337
Advertisement
Table of Contents
Troubleshooting

Related Manuals for Invacare 1900


Summary of Contents for Invacare 1900
- Page 1 DEALER: This manual MUST be given to the user of the patient lift. USER: BEFORE using this patient lift, read this manual and save for future reference. For more information regarding Invacare products, parts, and services, please visit www.invacare-ccg.com or call 800.668.2337...
- Page 2 - otherwise, injury or damage may occur. ACCESSORIES WARNING Invacare products are specifically designed and manufactured for use in conjunction with Invacare accessories. Accessories designed by other manufacturers have not been tested by Invacare and are not recommended for use with Invacare products. For further information on this product, please call the following: Customer Service ‐ 1‐800‐668‐2337 Technical Support ‐ 1‐866‐616‐2631 NOTE: Updated versions of this manual are available on www.invacare‐ccg.com.
-
Page 3: Table Of Contents
Detecting Wear and Damage ...18 Cleaning the Lift...18 Maintenance Procedures...19 Adjusting Arm Angle and Tension ...19 Inspecting/Tightening the Seat ...20 Inspecting and Adjusting the Lift Column ...20 Calibrate the 1900 Scale ...22 Troubleshooting...23 LIMITED WARRANTY ... 24 Part No. 1148113 1900/1900S Bath Lift... -
Page 4: Special Notes
If RFI causes erratic behavior, PUSH the Red Power Switch OFF IMMEDIATELY. DO NOT turn the Power Switch ON while transmission is in progress. MAINTENANCE Maintenance MUST be performed ONLY by qualified personnel. 1900/1900S Bath Lift MEANING NOTICE Part No. 1148113... -
Page 5: Label Location
LABEL LOCATION LABEL LOCATION Serial number label is located here Pinch Point. 1079203 Part No. 1148113 1900/1900S Bath Lift... -
Page 6: Typical Product Parameters
AUDIO LOW BATTERY ALARM: MOTOR SAFETY DEVICES: APPROXIMATE LIFTS PER CHARGE: WARRANTY (ELECTRIC/ELECTRONICS): EMERGENCY STOP BUTTON: *NOTE: Varies depending upon load and stroke. 1900/1900S Bath Lift BATH LIFT 1900/1900S 41 inches (104 cm) 18 inches (45 cm) 16.5 inches (42 cm) 16 inches (40 cm) 21 inches (53 cm) -
Page 7: Section 1-General Guidelines
Operating the Lift Check all parts for shipping damage before using. In case of damage, DO NOT use the equipment. Contact the dealer or customer service for further instructions. DO NOT attempt any transfer without approval of the resident’s physician, nurse or medical assistant. Thoroughly read the instructions in this owner’s manual, observe a trained team of experts perform the lifting procedures and then perform the entire lift procedure several times with proper supervision and a capable individual acting as a resident. Use common sense in all lifts. Special care MUST be taken with people with disabilities who cannot fully cooperate while being transferred. Although Invacare recommends that two assistants be used for all lifting and transferring procedures, our equipment will permit proper operation by one assistant. The use of one assistant is based on the evaluation of the health care professional for each individual case. Make sure there is an audible click when mounting battery on the battery charger to confirm proper mounting. Otherwise, injury or damage may occur. DO NOT exceed maximum weight limitation of the lift. The weight limitation for the 1900 and 1900S bath lift is 350 lbs. ALWAYS keep hands and fingers clear of moving parts to avoid injury. Lifting/Transferring Invacare recommends the use of the safety strap and shoulder harness when using the bath lift. ALWAYS adjust the safety strap and shoulder harness for safety and comfort before transport. During transfer, raise the seat so the resident’s feet are suspended from the floor. DO NOT roll caster base over objects such as carpet, raised carpet bindings, door frames, or any uneven surfaces or obstacles that would create an imbalance of the lift and could cause the lift to tip over. Wheelchair wheel locks MUST be in a locked position before transferring the resident into the wheelchair for transport. Part No. 1148113 1900/1900S Bath Lift... -
Page 8: Performing Maintenance
WARNING TAGS on some equipment. DO NOT remove these tags. Carefully read battery/battery charger information prior to installing, servicing or operating your lift. Pinch Points WARNING Pinch points exist at base of lift. Be careful, injury could occur. Caster Lift Pinch Base Casters Points Caster FIGURE 1.1 Pinch Points 1900/1900S Bath Lift Part No. 1148113... -
Page 9: Section 2-Operating The Bath Lift
NOTE: For this procedure, refer to FIGURE 2.1 and FIGURE 2.2 on page 10. NOTE: To transfer out of the bathing unit, reverse this procedure. NOTE: In some cases, the resident may need to be weighed. Refer to Using the Scale (Model 1900S ONLY) on page 11. 1. Bring the lift into position with the resident. NOTE: The seat may be lowered to its lowest position for a wheelchair transfer, or to a convenient height for a bed to wheelchair transfer, etc. Use the transfer methods prescribed by your facility and the needs of the resident. 2. Lock the two rear locking casters on the lift by pressing down on the locking pedal with your foot. Refer to FIGURE 2.1. 3. Swing one or both armrests up and back. 4. Transfer the resident. 5. Slowly bring the arm rests down in front of the resident. Part No. 1148113 WARNING FIGURE 2.1 Transferring into/out of the Bathing Unit 1900/1900S Bath Lift... - Page 10 Follow the facilities procedure for each individual. Invacare recommends the use of the safety strap and shoulder harness when using the bath lift. ALWAYS adjust the safety strap and shoulder harness for safety and comfort before transferring the resident onto the chair.
-
Page 11: Raising/Lowering The Bath Lift
Part No. 1148113 FIGURE 2.3 Raising/Lowering the Bath Lift FIGURE 2.4 Using the Scale (Model 1900S ONLY) RED Emergency Stop Button Control Box Press to Stop Rotate CLOCKWISE to Lift Seat Disengage Emergency Stop FIGURE 2.5 Emergency Stop 1900/1900S Bath Lift... -
Page 12: Emergency Lowering
A. Mix concentrated disinfectant with water to a dilution ration of half‐an‐ounce of disinfectant per one gallon of water. B. Transfer the diluted disinfectant into a labeled spray bottle. 2. Position the bath lift into the tub. Refer to STEPS 13 to 16 in Transferring into/out of the Bathing Unit on page 9. 3. Spray both sides of the seat surface, the safety strap, the shoulder strap, and the arm rests of the lift. Refer to Detail “A” of FIGURE 2.7. 4. Gently wipe the push handles, scale, hand pendant, and any other surfaces that were handled during the transport and bathing of the resident with a wash cloth containing the diluted disinfectant. Refer to Detail “B” of FIGURE 2.7. 5. Let the disinfectant sit for ten minutes. 1900/1900S Bath Lift DETAIL “B” DETAIL “A” Pull Down Red Tag for Emergency Lowering Actuator Column WARNING Part No. 1148113... -
Page 13: Mounting The Battery Charger
2. With a pencil, mark the middle hole position. 3. Measure down 6½ inches from the pencil mark and drill one mounting hole. 4. Install the bottom mounting screw until there is an approximate 1/8‐inch gap between the screw head and the wall. 5. Install the battery charger with mounting bracket onto the bottom mounting screw. 6. Drill the remaining two mounting holes. 7. Install the two remaining mounting screws through the mounting bracket and into the wall. Tighten securely. 8. Plug the battery charger into the wall electrical outlet. NOTE: The On LED should illuminate. Part No. 1148113 CAUTION DETAIL “B” - ELECTRONIC SURFACES Hand Pendant Push Handles Safety Strap FIGURE 2.7 Disinfecting the Lift Scale 1900/1900S Bath Lift... -
Page 14: Charging The Battery
NOTE: A battery needing to be fully recharged will take approximately four hours. 4. Lift up on the handle on the back of the battery (Detail “A”). 5. Lift the battery up and out away from the battery charger. 6. Reinstall the battery onto the control box of the lift (Detail “B”). 7. Push the battery into the lift housing and rock slightly until it locks into place (Detail “C”). NOTE: There will be an audible click when the battery locks into place (Detail “D”). 1900/1900S Bath Lift Battery Charger with Mounting Bracket (STEP 5) BOTTOM Mounting Screw (STEP 4) Emergency Pull Pin NOTE: The battery is shown being removed from and installed into a control box. Removing and installing a battery ... -
Page 15: Removing/Installing The Safety Strap
FIGURE 2.11. NOTE: To remove the shoulder strap, reverse this procedure. 1. Insert the belt through the bracket at the top of the chair. 2. Loop the hook‐and‐loop strip through the bracket and secure the strap. Part No. 1148113 WARNING Chair Frame DETAIL “A” Safety Strap Shoulder Strap Chair FIGURE 2.11 Installing/Removing the Buckle DETAIL “B” Hook-and-Loop Strip Hook- and-Loop Strip Shoulder Strap 1900/1900S Bath Lift... -
Page 16: Using The Shoulder Strap
NOTE: For this procedure, refer to FIGURE 2.12 and FIGURE 2.13. 1. Do one of the following: • Pass the belt under the right arm pit, across the chest, under the left arm pit and back behind the head. Shoulder Strap FIGURE 2.12 Using the Shoulder Strap • Position the center of the belt at the middle of the back and bring the ends under the arms. Shoulder Strap FIGURE 2.13 Using the Shoulder Strap 2. Secure the strap with the buckle. 3. Adjust the strap for comfort and safety. 1900/1900S Bath Lift Shoulder Strap Shoulder Strap Buckle Part No. 1148113... -
Page 17: Section 3- Maintenance And Troubleshooting
❑ Inspect the casters and axle bolts for tightness. ❑ Inspect casters for smooth swivel and roll. ❑ Ensure that casters are free of debris. ❑ Ensure that the mast is securely assembled to the boom and it raises and lowers smoothly. ❑ Inspect the inner mast for bends or scraps. ❑ Inspect the arms, hardware and attachment points. ❑ Ensure the arms pivot up and down. ❑ Ensure the arms do not drop when released in an up position. ❑ Inspect the arms are level and/or even. ❑ Inspect the electric actuator assembly for wear or deterioration. ❑ Ensure that the electric actuator assembly operates smoothly and quietly. ❑ Clean the lift whenever necessary. Regular cleaning will reveal loose or worn parts, enhance smooth operation and extend the life expectancy of the lift. ❑ Inspect all safety strap attachments to ensure proper connection and occupant safety. ❑ Inspect the safety strap for signs of wear. Replace if worn or damaged. ❑ Check that all labels are present and legible. Replace if necessary. ❑ Inspect electrical components for signs of corrosion. Replace if corroded or damaged. Part No. 1148113 1900/1900S Bath Lift... -
Page 18: Care And Maintenance Of Bath Lift
The arms and seat of the lift MUST be cleaned and disinfected after each use with a bath. Refer to Disinfecting the Lift on page 12. 1. A soft cloth, dampened with water and a small amount of mild detergent, wipe down all parts of the lift that are submerged in water from the bath. NOTE: The lift can be cleaned with non‐abrasive cleaners or disinfectants. 2. Remove and wash the safety strap. Refer to Removing/Installing the Safety Strap on page 15. NOTE: Follow the instructions for washing the safety strap that are printed on the strap. 1900/1900S Bath Lift WARNING Part No. 1148113... -
Page 19: Maintenance Procedures
• To adjust the tension ‐ Depending on the tension, either tighten or loosen one of the four jam nuts controlling arm tension (Detail “B”). 3. Tighten the arm clamp. NOTE: Tighten the arm until it is secured and stable in a lifted position. 4. Install the lift shroud. DETAIL “A” - ADJUSTING ARM ANGLE Stopping Plates FIGURE 3.1 Adjusting Arm Angle and Tension Part No. 1148113 WARNING DETAIL “B” - ADJUSTING ARM TENSION Jam Nuts Jam Nut 1900/1900S Bath Lift... -
Page 20: Inspecting/Tightening The Seat
I N t oward t he c olumn b y p erforming t he f ollowing: A. Using a very large bladed screwdriver or a quarter held firmly with a pair of pliers, turn the bearing IN just an 1/8th of a turn (Detail “C”). B. Run the lift up and down again and see if the bearing is now contacting the inner column enough to make a track in the oil. If not repeat STEP “A”. NOTE: When both the left and right sides and the front and back sides of the inner column show a slight track in the oil film, your bearings are properly adjusted. NOTE: It is very important that you DO NOT run the bearings in so far as to make the lift bind going up and down. 7. Wipe the excess oil film and replace the shroud. 1900/1900S Bath Lift Locknuts Bracket Locknuts FIGURE 3.2 Inspecting/Tightening the Seat Part No. 1148113... - Page 21 FIGURE 3.3 Inspecting and Adjusting the Lift Column Changing the Scale Battery Lift (Model 1900S ONLY) Column NOTE: For this procedure, refer to Space FIGURE 3.4. 1. Pull the scale from the lift column. Battery 2. Slide open the battery door on the back Door of the scale. 3. Replace the battery. FIGURE 3.4 Changing the Scale Battery (Model 1900S ONLY) 4. Reverse STEPS 1 and 2. Part No. 1148113 1900/1900S Bath Lift...
-
Page 22: Calibrate The 1900 Scale
7. Press the ZERO key. The display reads LOAD. 8. Put 200 pounds of weight on the seat of the bath lift. 9. Press the ZERO key. The display reads DONE. 10. Remove the weight. Press the LOCK/UNLOCK key. NOTE: The scale is now in test mode. 11. Press the ZERO key. The display reads 0.00 lb. NOTE: The scale will now be in normal operation. BACK VIEW OF SCALE DISPLAY FRONT VIEW OF SCALE DISPLAY FIGURE 3.5 Calibrate the 1900 Scale 1900/1900S Bath Lift NOTE: Hook and loop material not shown. CAL Button Display Window Part No. 1148113... -
Page 23: Troubleshooting
Replace the battery pack. Refer to Charging the Battery on page 14. Contact your Dealer. Charge battery. Contact Invacare. Tighten the jam nuts. Refer to Adjusting Arm Angle and Tension on page 19. Check battery. Replace if necessary Contact Invacare. SOLUTION 1900/1900S Bath Lift... -
Page 24: Limited Warranty
If within such warranty period any such product shall be proven to be defective, such product shall be repaired or replaced, at Invacare’s option. This warranty does not include any labor or shipping charges incurred in replacement part installation or repair of any such product. Invacare’s sole obligation and your exclusive remedy under this warranty shall be limited to such repair and/or replacement.
Need help?
Do you have a question about the 1900 and is the answer not in the manual?
Questions and answers