Table of Contents
Advertisement
Fully Automatic Washing Machine
Thank you very much for purchasing Panasonic Washing Machine.
Before operating this washing machine, please read these instructions completely, paying
NA-F70T1P_EN.indd 1
NA-F70T1P_EN.indd 1
Operating Instructions
special attentions to Safety & General Precautions.
Model No.
W9901-7GC00
PHAT0808-0
Printed in Thailand
10/1/08 5:42:46 PM
10/1/08 5:42:46 PM
Advertisement
Table of Contents

Related Manuals for Panasonic NA-F70T1P


Summary of Contents for Panasonic NA-F70T1P
-
Page 1: Operating Instructions
Fully Automatic Washing Machine Operating Instructions Model No. Thank you very much for purchasing Panasonic Washing Machine. Before operating this washing machine, please read these instructions completely, paying special attentions to Safety & General Precautions. W9901-7GC00 PHAT0808-0 Printed in Thailand NA-F70T1P_EN.indd 1... -
Page 2: Table Of Contents
Contents ITEM PAGE Safety & General Precautions Name of parts Procedures before washing Determining load and detergent levels with the Quick Indication Laundry Detergent How to use liquid detergent How to use bleach How to use softener When putting the softener in or removal of the lint fi lter is diffi cult. How to use powdered synthetic detergents How to use powdered detergent “Economy’’... -
Page 3: Safety & General Precautions
Safety & General Precautions To prevent the risk of danger or material loss or damage to the user of others, make sure to follow the precautions described below. WARNING CAUTION May cause a serious injury or death. May cause physical injury or damage other items. WARNING Never disassemble, repair or remodel this When you are cleaning your washing... - Page 4 WARNING Do not damage the power cord and Remove any dust which may accumulate power plug. around the power cord. (Do not damage, modify, immoderately bend, When dust has accumulated on and around twist, pull, or bundle the power cord, do not the power plug, and the dust gets damp or put the power cord and power plug close to wet, the insulation plug become defective...
-
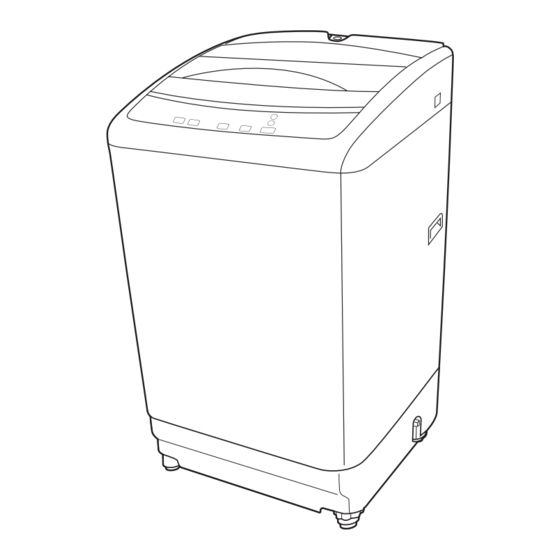
Page 5: Name Of Parts
Name of parts Leveller Feeding Valve Lint Filter A Lint Filter B Bleach / Liquid Detergent Inlet Pulsator Drain Hose Power Plug Power Cord Operation Panel Adjustable Leg Accessories Water Supply Hose (1) Water Tap Adaptor (1) Bottom Cover (1) Hose Hole Drain hose (1) Cover A (2) -
Page 6: Determining Load And Detergent Levels With The Quick Indication
Determining load and detergent levels with the Quick Indication Put the laundry into the Allow the machine to churn the Detergent volume indications. machine. laundry for 5 seconds. Press the [POWER ON] button The pulsator operates for about A lamp will light up indicating and then press the [START/ 5 seconds without any water in the appropriate water level and... -
Page 7: How To Use Liquid Detergent
How to use liquid detergent Put in the liquid detergent according to the [NOTE] water level into the bleach / liquid detergent • Liquid detergent, like powdered inlet. detergent is not easily dissolved and can leave scum along the Bleach / Liquid Detergent Inlet inside of the washing tub, so be sure to rinse thoroughly. -
Page 8: How To Use Powdered Synthetic Detergents
How to use powdered synthetic detergents POWDERED SYNTHETIC DETERGENT [CONCENTRATED TYPE] Color transfer and color fading will occur if the detergent directly in contact with the laundry (for a long time). Please use white handkerchief, etc. to wrap the detergent before put it into the tub. How to use powdered detergent How to dissolve 1. -
Page 9: Operations Panel
NA-F70T1P_EN.indd 9 NA-F70T1P_EN.indd 9 10/1/08 5:43:22 PM 10/1/08 5:43:22 PM... -
Page 10: Normal Course
NORMAL Course Suitable for normal washing of casual laundry. Press the [POWER ON] button and put in the laundry. Press the [START/HOLD] button. • The light will indicate “NORMAL’’ Course automatically. • The machine will measure the load size without water (laundry sensing). -
Page 11: Delicate Course
DELICATE Course Suitable for washing soft laundry. Remark: Amount of laundry that can be washed at one time : 3.0 kg Press the [POWER ON] button and put in the laundry. Press the [PROGRAM] button twice for • The light will indicate “DELICATE’’ Course automatically. -
Page 12: Reserve Program (9 Hours)
RESERVE Program (9 hours) The washing cycle will be fi nished approximately 9 hours from the current time (Sometimes the operation time may exceed the reserve time caused by the water feeding and draining condition). Programming timer [RESERVE] only can be used with [NORMAL] and [HYPER SPEEDY] course. Press the [POWER ON] button and put in the laundry. -
Page 13: Child Lock Program
CHILD LOCK program This is an emergency alarming mode with a continuous buzzer sounds when child open the lid during operation to prevent a child from drowning (condition where there is a water inside the tub) by falling into the tub which contains water. Close the lid to stop the buzzer. -
Page 14: Process Settings
Process settings You can select PROGRAM to wash your own laundry according to your preferences. (By pressing [PROCESS] button) WASH To reuse the wash water. • After washing, the wash water is left in the tub and the machine stop operation. SPIN To spin the separately washed laundry. -
Page 15: Maintenance: Tub Dry
Maintenance To prevent from fungus growth at the outer tub area. “TUB DRY” Remark: Please be informed do not put laundry inside the tub during this program. Press the [POWER ON] button. Press the [PROGRAM] button three times • The [TUB HYGIENE] light will be indicated. for [TUB HYGIENE] Course. -
Page 16: Please Observe The Following Instructions
Please observe the following Instructions If the spinner tub does not stop within Do not spray anything or pour water 15 seconds after you open the lid over the lid. during spinning, immediately stop • Do not put water, pesticides, using the machine, and contact your hair products, deodorants, or dealer for repair. -
Page 17: How To Install
How to install Placement • Do not install the washing machine in any extremely damp place such as a bathroom, or in a place exposed to the weather. There is a danger of electric shock, fi re, machine trouble and deformation of machine. -
Page 18: Connect The Water Supply Hose
Connect the water supply hose That the appliance is to be connected to the water faucet using new water tap adaptor and water supply hose and that old one should not be reused. 1. Loosen the 4 screws on the water tap adaptor just enough to slip the adaptor over the mouth of the faucet. 2. -
Page 19: To Connect Drain Hose
To connect Drain Hose 1. Connect the drain hose securely to the drain hose connection of the washing machine. And move the hose band next to the body. Drain Hose Connection Drain Hose Hose Band 2. Fasten the drain hose on the rear side of body as shown by the hose holder supplied with the washing machine. -
Page 20: Troubleshooting
Troubleshooting The following symptoms are not trouble. Symptoms Causes Machine begins fi lling water in the • When the laundry amount is large at the HIGH water level, the middle of the wash. machine sometimes fi lls automatically. When level goes down, the machine fi... -
Page 21: Error Indication
• Please refer to “[CHILD LOCK] program’’ on page 13. • The buzzer does not sound. • Unplug the power cord and request for service. Specifi cation Model NA-F70T1P 220 – 240 V~ Voltage 50 Hz Power consumption 410 W... - Page 22 NA-F70T1P_EN.indd 22 NA-F70T1P_EN.indd 22 10/1/08 5:44:11 PM 10/1/08 5:44:11 PM...
Need help?
Do you have a question about the NA-F70T1P and is the answer not in the manual?
Questions and answers