Sony DAV-DZ310 Operating Instructions Manual
Dvd home theatre system
Hide thumbs
Also See for DAV-DZ310:
- Operating instructions manual (168 pages) ,
- Installation manual (2 pages) ,
- Quick setup manual (2 pages)

Related Manuals for Sony DAV-DZ310


Summary of Contents for Sony DAV-DZ310
- Page 1 4-165-470-12(1) DVD Home Theatre System Operating Instructions DAV-DZ310/DZ610 ©2010 Sony Corporation...
-
Page 2: Precautions
To prevent injury, this apparatus protection technology must be “PLAYSTATION” is a must be securely attached to the authorized by Macrovision, trademark of Sony Computer floor/wall in accordance with the and is intended for home and Entertainment Inc. installation instructions. -
Page 3: About These Operating Instructions
® About These DivX is a registered trademark of DivX, Inc., and is Operating used under license. Instructions MPEG Layer-3 audio coding technology and patents • The instructions in these licensed from Fraunhofer IIS Operating Instructions and Thomson. describe the controls on the About MPEG-4 Visual remote. -
Page 4: Table Of Contents
Table of Contents Settings Precautions..........2 About These Operating Instructions ..3 Changing the Brightness of the Front Playable Discs/Files on a USB Panel Display........60 Device..........5 Setting the Demonstration Mode to On/ Package Contents ........10 Off ..........60 Index to Parts and Control .... -
Page 5: Playable Discs/Files On A Usb Device
Playable Discs/Files on a USB Device Type Disc logo Characteristics Icon DVD VIDEO • DVD VIDEO • DVD-R/DVD-RW in DVD VIDEO format or video mode • DVD+R/DVD+RW in DVD VIDEO format VR (Video • DVD-R/DVD-RW in VR (Video Recording) mode Recording) mode (except for DVD-R VIDEO CD •... - Page 6 Type Disc logo Characteristics Icon USB device – • USB device that contains the following kinds of files. 2)3) – MP3 files or WMA/AAC files – JPEG image files – DivX/MPEG4 video files A logical format of files and folders on CD-ROMs, defined by ISO (International Organization for Standardization).
- Page 7 Note that some playback functions may not work with some DVD+RWs/DVD+Rs, even if they have been correctly finalized. In this case, view the disc by normal playback. Also some DATA CDs/DATA DVDs created in Packet Write format cannot be played. Notes about Multi Session CD •...
- Page 8 The system will attempt to play any data with the extensions above, even if it is not in MP3/WMA/ AAC/JPEG/DivX/MPEG4 format. Playing this data may generate a loud noise which could damage your speaker system. • The following can increase the time it takes to start playback: –...
- Page 9 • The playback order for the system may differ from the playback order of the connected USB device. • Always turn off the system before removing the USB device. Removing the USB device while the system is on may corrupt the data on the USB device. •...
-
Page 10: Package Contents
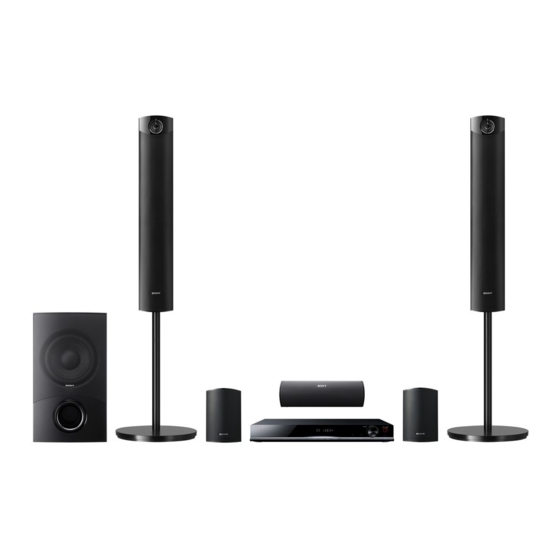
Package Contents Main unit Speaker packages • DAV-DZ310 • DAV-DZ610 • Speaker cords (1 set) (red/white/green/gray/blue) • Foot pads (1 set) • Speaker assembly parts For DAV-DZ310 • Speaker assembly parts for the tall speakers For DAV-DZ610 Accessories • Remote commander •... -
Page 11: Index To Parts And Control
Index to Parts and Control For more information, refer to the pages indicated in parentheses. Front panel A Disc tray J Play operation buttons B Front panel display (page 12) Z (open/close) Opens or closes the disc tray. (remote sensor) Receives the remote signal. -
Page 12: Front Panel Display
Front panel display A Karaoke indicator G HDMI indicator Lights up when a signal is established Lights up when the karaoke mode is on. between a TV and the unit via HDMI. B SLEEP indicator H NIGHT indicator Flashes when the sleep timer is set. Lights up when the night mode is on. -
Page 13: Rear Panel
Rear panel ANTENNA SPEAKERS SUR R SUR L COAXIAL 75 DIGITAL AUDIO IN VIDEO OPTICAL FRONT R FRONT L SUBWOOFER CENTER COMPONENT VIDEO OUT SPEAKERS A SPEAKERS jacks (page 24) E TV (AUDIO IN R/L) jacks (page 25) B HDMI OUT jack (page 25) F VIDEO OUT jack (page 25) C TV (DIGITAL IN OPTICAL) jack (DAV- G COMPONENT VIDEO OUT jacks... -
Page 14: Remote Control
DVD VIDEO. About the operation of the supplied remote ANGLE (page 37) You can operate this system and a Sony TV with Switches to other viewing angles when the supplied remote. multi-angles are recorded on a DVD VIDEO. - Page 15 D SOUND MODE (page 52) H DVD TOP MENU (page 38) Selects the sound mode. Opens or closes the DVD’s Top Menu. DYNAMIC BASS (page 52) DVD MENU (page 38) Reinforces bass frequencies. Opens or closes the DVD’s menu. NIGHT (page 52) C/X/x/c Activates the night mode function.
- Page 16 To insert the batteries Insert two R6 (size AA) batteries (supplied) by matching the 3 and # ends on the batteries to the markings inside the compartment. Note • Do not leave the remote in an extremely hot or humid place.
-
Page 17: Guide To The Control Menu
Guide to the Control Menu You can use the Control Menu to select a function and to view related information. DISPLAY Press DISPLAY while using the “DVD/CD” or “USB” function. Each time you press DISPLAY, the Control Menu changes: 1 t 2 t 3 t 1 t ... 1 Control Menu 1 2 Control Menu 2 (appears when available) 3 Control Menu off... -
Page 18: Control Menu
Control Menu Example: Control Menu 1 when playing a DVD VIDEO. Currently playing title number Currently playing chapter number Total number of titles Playback status Total number of chapters (N Playback, Control Menu items X Pause, x Stop, etc.) 9 8 ( 9 9 ) Type of source being 1 3 ( 9 9 ) DVD VIDEO... - Page 19 [PROGRAM] (page 39) You can select the track to play in the order you want. [SHUFFLE] (page 40) You can play the tracks/files in random order. [REPEAT] (page 41) You can play the entire disc/USB device (all titles/all tracks/all folders/all files) repeatedly or one title/chapter/track/folder/file repeatedly.
- Page 20 List of Control Menu Items for karaoke Item Item Name, Function, Relevant Source [KARAOKE MODE] (page 42) Set karaoke mode to on/off. [VOCAL SELECT] (page 44) Selects different kind of vocals recorded in the disc. • The Control Menu icon indicator lights up in yellow when you select any item except [OFF] ([PROGRAM], [SHUFFLE], [REPEAT], [A/V SYNC], [KARAOKE MODE], and [VOCAL SELECT] only).
-
Page 21: Getting Started
Getting Started Step 1: Installing the System How to position the system Install the system by referring to the illustration below. A Front speaker (L (left)) B Front speaker (R (right)) C Center speaker D Surround speaker (L (left)) E Surround speaker (R (right)) F Subwoofer G Unit To attach the foot pads to the subwoofer... - Page 22 Install the speakers on a vertical and flat wall where reinforcement is applied. • Sony is not responsible for accidents or damage caused by improper installation, insufficient wall strength or improper screw installation, natural calamity, etc.
- Page 23 Fasten the screws to the wall, then hang the speaker on the wall. Depth of fastened screw 8 to 10 mm inch) For the center speaker For the small speakers 145 mm inches) For the tall speakers (DAV-DZ610 only) 101.6 mm (4 inches)
-
Page 24: Step 2: Connecting The System
Step 2: Connecting the System Connecting the speakers Insert the connectors of the speaker cords to match the color of the SPEAKERS jacks of the unit until they click. Gray (Surround right speaker (R)) K E R S S P E A S U R S U R Blue... - Page 25 Connecting your TV/set-top box When connecting to a TV only When connecting to a TV and set-top box Video 2 Audio 1 Video 1 Video 2 Audio 1 Connecting the video to your TV Depending on the jacks on your TV, select one of the connection methods. x Method 1: Video cord (supplied) connection This is the basic connection.
- Page 26 2 Connecting the audio from your TV/set-top box To listen to TV or set-top box sound via the system, select one of the connection methods. x Method 1: Audio cord (not supplied) connection This is the basic connection and sends an analog audio signal. x Method 2: Digital optical cord (not supplied) connection (DAV-DZ610 only) Sound quality will be improved compared to Method 1.
-
Page 27: Connecting The Other Components
To change the color system (PAL or NTSC) (Asian, Australian, Middle Eastern, and South African models only) Depending on your TV, you may be required to select either PAL or NTSC for the color system. The initial setting for Australian, Middle Eastern, and South African models is PAL. The initial setting for Asian models is NTSC. -
Page 28: Connecting The Antenna (Aerial)
Connecting the antenna (aerial) N N A A N T E IA L 7 C O A X FM wire antenna (aerial) (supplied) Note • After connecting the FM wire antenna (aerial), extend and keep it as horizontal as possible. Connecting the AC power cord (mains lead) Connect the AC power cord (mains lead). -
Page 29: Step 3: Setting Up The System
this message still does not appear, recall the Step 3: Setting up the Quick Setup display (page 60). Press X/x to select a language, then System press LANGUAGE SETUP OSD: ENGLISH Performing the Quick Setup MENU: ENGLISH FRENCH AUDIO: SUBTITLE: SPANISH Displayed items vary depending on the area. - Page 30 Press C/c to select the speaker Connect the calibration mic (supplied) formation image as the speakers are to the A.CAL MIC jack on the front actually positioned, then press panel. Set up the calibration mic at ear level using a tripod, etc. (not supplied). SPEAKER FORMATION The front of each speaker should face the calibration mic, and there should be no...
- Page 31 Unplug the calibration mic, press C/c Press X/x to select [HDMI SETUP], then to select [YES], then press press To quit the Quick Setup HDMI SETUP Press DISPLAY in any Step. HDMI RESOLUTION: AUTO (1920x1080p) CONTROL FOR HDMI: VOLUME LIMIT: AUDIO RETURN CHANNEL: AUTO Setting the type of video...
- Page 32 To select the type of video signal Press X/x to select [PROGRESSIVE (COMPONENT OUT)], then press output from the COMPONENT VIDEO OUT jacks VIDEO SETUP When you connect the unit and your TV with a TV TYPE: 16:9 PROGRESSIVE component video cable, select the type of video (COMPONENT OUT) 4:3 OUTPUT: FULL...
-
Page 33: Playback
Press VOLUME +/– to adjust the volume. Playback Playing a Disc Playing Files on a Disc/ USB Device FUNCTION "/1 FUNCTION VOLUME +/– C/X/x/c, DVD MENU VOLUME +/– RETURN DISPLAY Press FUNCTION repeatedly to select “DVD/CD.” The selected item appears in the front panel display. - Page 34 To select the playback source of Load the source. the USB device x For a disc You can select the memory number for playback Place a disc on the tray by pressing Z to depending on the USB device. open/close the disc tray. Press MEMORY SELECT.
- Page 35 x For JPEG files When different file types are Press C/X/x/c to select an image on a disc/USB device You can select the file type that is played with priority when mixed media (audio files, JPEG image files, or video files) are on the disc/USB device.
-
Page 36: Other Playback Operations
Press Other Playback Play one frame at a X, then press STEP or time (Freeze STEP. Operations Frame) • STEP: go to the preceding frame. • STEP: go to the next frame. Playback operation buttons on Replay the previous during playback. the remote scene or briefly fast •... -
Page 37: Changing Angles
Press X/x to select the search method, Input the time code using the number then press buttons, then press • [TITLE/SCENE/TRACK] For example, to find a scene at 2 hours, 10 minutes, and 20 seconds after the • [CHAPTER/INDEX] beginning: press 2, 1, 0, 2, 0 ([2:10:20]). •... - Page 38 Example: Using the DVD’s menu Dolby Digital 5.1 channel LFE (Low Frequency Effect) Surround (L/R) When you play a DVD which contains several titles, you can select the title you want using 1: ENGLISH DOLBY DIGITAL 3 / 2 .1 DVD TOP MENU.
-
Page 39: Selecting The Playback Mode
• [CD]: You can play the CD layer. Selecting a playback area for a When the system is playing a CD layer, “CD” lights up in the front panel display. Super Audio CD Note • Super Audio CD audio signals are not output from the HDMI OUT jack. -
Page 40: Playing In Random Order
Press c. Follow Step 5 of “Playing in programmed order” for new The cursor moves to the track row [T] (in programming. this case, [01]). To cancel a program, select [--] under [T], then press PROGRAM 0: 00:00 ALL CLEAR To cancel all of the tracks in the –... -
Page 41: Playing Repeatedly
To return to normal playback To return to normal playback Press CLEAR, or select [OFF] in Step 3. Press CLEAR, or select [OFF] in Step 3. Note Note • You cannot use Shuffle Play with a VIDEO CD or • You cannot use Repeat Play with a VIDEO CD or Super VCD with PBC playback. -
Page 42: Enjoying Karaoke
• If you play a large MP3 file and JPEG image file at the same time, the sound may skip. Sony • [NORMAL]: You can set to the standard recommends that you set the MP3 bit rate to 128 kbps duration. -
Page 43: Key Control
Press X/x repeatedly to select Changing the key of a song [KARAOKE MODE], then press (Key Control) Press X/x to select [ON], then press To cancel karaoke mode Disconnect the microphone, or set [KARAOKE MODE] to [OFF]. You can change the key to suit your vocal range, except when the system is in stop mode. - Page 44 Selecting the vocals (Vocal About karaoke DVDs recorded Select) in Dolby Digital format When playing a karaoke DVD recorded in On karaoke DVDs recorded in Dolby Digital Dolby Digital format in karaoke mode, you can format, guide melody and guide vocal tracks are turn on or off the guide vocal recorded in the recorded in addition to the accompaniment.
-
Page 45: Displaying The Information Of A Disc/Usb Device
2.3. Displaying the ID3 ver 2.2/2.3 tag information display has priority when both ID3 ver 1.0/1.1 and ver Information of a Disc/ 2.2/2.3 tags are used for a single MP3 file. USB Device 5 Text information The DVD/Super Audio CD/CD text appears only when text is recorded on the disc. -
Page 46: Enjoying The Audio/Video Of The Connected Component
x DATA CD/DATA DVD/USB device (audio Enjoying the Audio/Video file) 1 Playing time and current track number of the Connected 2 Track (file) name* * If an MP3 file has an ID3 tag, the system will Component display a title name from the ID3 tag information. The system can support ID3 ver 1.0/1.1/2.2/2.3. - Page 47 Prepare the source. • “DVD/CD”: Insert the disc into the unit (page 33). • “TUNER FM”: Select the radio program (page 48). • “USB”: Connect the USB device directly (page 33). • “TV”: Select the channel on the TV or set- top box.
-
Page 48: Tuner
Press SYSTEM MENU. To change the preset number Tuner Select the desired preset number by pressing Presetting Radio PRESET +/– (page 48), then perform the procedure from Step 3. Stations You can preset 20 FM stations. Listening to the Radio Current station Current band and preset number Preset radio stations in the system’s memory... - Page 49 Press X/x to select “MONO.” • “STEREO”: Stereo reception. • “MONO”: Monaural reception. Press Press SYSTEM MENU.
-
Page 50: Sound Effect
Sound Effect Enjoying Surround Sound You can enjoy surround sound simply by selecting one of the system’s pre-programmed surround settings. Enjoying TV sound with the 5.1 channel surround sound effect Press SYSTEM MENU. Press X/x to select “SUR.SETTING,” then press or c. - Page 51 Sound from Surround setting Effect “PRO LOGIC” • 2 channel source: The system simulates surround sound from 2 channel sources and outputs sound from all the “PLII MOVIE” speakers. “PLII MUSIC” – “PRO LOGIC” performs Dolby Pro Logic decoding. – “PLII MOVIE” performs Dolby Pro Logic II movie mode decoding.
-
Page 52: Selecting The Sound Effect
Reinforcing bass frequencies Selecting the Sound Effect Press DYNAMIC BASS. “D. BASS ON” appears in the front panel display. Selecting the effect to suit the To turn off the sound effect source Press DYNAMIC BASS again. Press SOUND MODE repeatedly during Enjoying the sound at low playback until the desired mode appears in the front panel display. -
Page 53: Convenient Functions
This function is available on TVs with the your TV. “BRAVIA” Sync function. For details of the setting of your TV, refer By connecting Sony components that are to the operating instructions of your TV. compatible with the Control for HDMI function On the system, press FUNCTION with an HDMI cable, operation is simplified as repeatedly to select “DVD/CD.”... - Page 54 Watching a DVD by a single • You can also operate the System Audio Control button press function via the TV menu. • You can operate the volume and mute control of the system via the TV remote. (One-Touch Play) Press ONE-TOUCH PLAY Limiting the volume level of TV Your TV turns on, your TV’s function is set to...
-
Page 55: Transferring Songs Onto A Usb Device
• If you stop a transfer from an audio CD Changing the language for the halfway, the MP3 file that was being created is deleted. system’s on-screen display in • Transferring stops automatically if: sync with your TV – the USB device runs out of space during transfer. - Page 56 • When transferring multiple tracks on an audio Press X/x to select [TRACK] or [FOLDER], then press CD or multiple MP3 files on a DATA CD/ DATA DVD • [TRACK]: The folder list appears. Press X/x to select the desired folder, then press Source Folder name File name...
- Page 57 Press x to stop transferring. Transferring by single button To create a new MP3 file while press transferring You can transfer tracks/MP3 files simply onto a Press REC TO USB while transferring. USB device by using REC TO USB. “NEW TRACK” appears in the display and transferring continues in a new MP3 file right Load an audio CD/DATA CD/DATA after you press REC TO USB.
-
Page 58: Using The Sleep Timer
Using the sleep timer Adjusting the Delay Between the Picture and You can set the system to turn off at a preset time, so you can fall asleep listening to music. Sound Press SLEEP. [A/V SYNC] Each time you press SLEEP, the minutes display (the remaining time) changes by 10 minutes. -
Page 59: Changing The Input Level Of The Sound From Connected Components
• “MAIN”: Sound of the main language will be output. • “SUB”: Sound of the sub language will be output. • “MAIN+SUB”: Mixed sound of both the main and sub languages will be output. Changing the Input Level of the Sound from Connected Components The sound distortion of the connected component may be improved by reducing the... -
Page 60: Settings
Reperforming the Quick Settings Setup Changing the Brightness of the Front Panel Press FUNCTION repeatedly to select “DVD/CD.” Display The selected item appears in the front panel display. Press SYSTEM MENU. Press DISPLAY while the system is in stop mode. Press X/x to select “DIMMER,”... -
Page 61: Performing Further Settings
Press X/x to select an item, then press Performing Further The options for the selected item appear. Settings Example: [TV TYPE] VIDEO SETUP You can make various adjustments to items such TV TYPE: 16:9 as picture and sound. PROGRESSIVE 16:9 (COMPONENT OUT) 4:3 LETTER BOX 4:3 OUTPUT:... -
Page 62: Settings For The Display
[4:3 PAN SCAN]: Select this when you connect x [AUDIO] a 4:3 standard TV. The system automatically You can switch the language of the sound track. displays a wide picture on the entire screen and When you select [ORIGINAL], the language cuts off the portions that do not fit. -
Page 63: Settings For Hdmi
[OFF]: You can set the black level of the output signal to the standard level. [ON]: You can raise the standard black level. Use this when the picture becomes too black. 16:9 aspect ratio TV x [PAUSE MODE] Note (DVD VIDEO/DVD-R/DVD-RW only) •... -
Page 64: Settings For The Audio
[AUDIO (HDMI)] not be able to install some speakers. For better You can select the audio output status from the surround sound, Sony recommends that first you HDMI OUT jack. decide the position of the speakers. Press C/c to select a setting, then... - Page 65 • [NO SURROUND]: Select this when you install the center and front speakers only. • [FRONT ONLY]: Select this when you install the front speakers only. • [ALL FRONT]: Select this when you install all the speakers in front of the listening position.
-
Page 66: Other Settings
[JACKET PICTURE]: The jacket picture (still x [AUDIO DRC] picture) appears, but only when the jacket You can compress the dynamic range of the picture is already recorded on the disc (CD- sound track. [AUDIO DRC] is useful for EXTRA, etc.). If the disc does not contain a watching movies at low volume late at night. -
Page 67: Settings For The Speakers
enter a new 4-digit password, replace the disc in the [ON]: The system stores the resume points in unit and press N. When the display for entering your memory for up to 10 discs. password appears, enter your new password. [OFF]: The system does not store the resume points in memory. - Page 68 [SUBWOOFER] x [LEVEL (FRONT)] [YES] You can adjust the sound level of the front Note speakers, center speaker, and subwoofer. You • When you change the [CONNECTION] setting, the can set the parameters from –6.0 dB to 0 dB for [STANDARD] of [SPEAKER FORMATION] [L/R], and from –6.0 dB to +6.0 dB for setting remains the same, but the other settings of...
-
Page 69: Additional Information
If you have any questions or problems concerning your system, please consult your nearest Sony dealer. On placement On cleaning discs, disc/lens • Place the system in a location with adequate ventilation to prevent heat build-up in the system. -
Page 70: Notes About The Discs
Notes about the Discs On handling discs • To keep the disc clean, handle the disc by its edge. Do not touch the surface. • Do not stick paper or tape on the disc. • Do not expose the disc to direct sunlight or heat sources such as hot air ducts, or leave it in a car parked in direct sunlight as the temperature may rise considerably inside the... -
Page 71: Troubleshooting
If you experience any of the following difficulties while using the system, use this troubleshooting guide to help remedy the problem before requesting repairs. Should any problem persist, consult your nearest Sony dealer. Note that if service personnel changes some parts during repair, these parts may be retained. - Page 72 Symptom Problems and solutions Picture noise appears. • If the picture output from your system goes through your VCR to get to your TV, the copy-protection signal applied to some DVD programs could affect picture quality. Connect the unit directly to your TV. An image is not displayed on the •...
-
Page 73: Disc Playback
Symptom Problems and solutions There is no system sound from • Set [AUDIO (HDMI)] in [HDMI SETUP] to [ON] (page 64). your TV. • The HDMI OUT jack does not output Super Audio CD sound. • Perform the following procedure. 1 Turn the system off and on again. -
Page 74: Usb Playback
USB playback Symptom Problems and solutions A USB device does not start • While in stop mode, press x on the unit or the remote and then start playback playing from the beginning. (page 36). A USB device cannot be played. • USB devices formatted with file systems other than FAT12, FAT16, or FAT32 are unsupported.* * This system supports FAT12, FAT16, and FAT32, but some USB devices may not support all of these. -
Page 75: Control For Hdmi
USB device becomes complex. Follow the procedure in the operating instructions of the USB device to format the USB device. If the problem persists, contact your nearest Sony dealer. • The USB device is full. • The number of audio files and folders on the USB device has reached the upper limit. - Page 76 (USB) port. Make sure there is no problem with the USB device. If this display pattern persists, contact your nearest Sony dealer. “LOCKED” appears and a disc • Contact your Sony dealer or local authorized Sony service facility. cannot be ejected. “DATA ERROR” appears.
-
Page 77: Specifications
[VER.X.XX] (X is a number) may Input Stream: Dolby appear on the TV screen. Although this is not a Digital 5.1ch/DTS 5.1ch/ malfunction and for Sony service use only, Linear PCM 2ch normal system operation will not be possible. (Sampling Frequency: less... - Page 78 (w/h/d) incl. Speakers projecting parts Front Mass (approx.) 4.4 kg Supported file format DAV-DZ310 (SS-TS102) Speaker system Full range Bass reflex MP3 (MPEG 1 Audio Layer-3) Speaker unit 65 mm cone type File Extension: Rated impedance 3 ohms...
- Page 79 Frame rate: 30 fps Resolution: 720 × 576 Audio codec: AAC-LC (HE-AAC is not compatible.) DRM: Not compatible Design and specifications are subject to change without notice. • Standby power consumption 0.25 W. • Halogenated flame retardants are not used in the certain printed wiring boards.
-
Page 80: Playback Priority Of File Types
Playback Priority of File Types The table below describes the playback priority of file types under the [MEDIA] setting. File type on a disc or USB [MEDIA] setting device [VIDEO] [MUSIC/ [PHOTO] [MUSIC] PHOTO] Disc USB device Disc Disc/USB Disc/USB device device Video files only... -
Page 81: Language Code List
Language Code List The language spellings conform to the ISO 639: 1988 (E/F) standard. Code Language Code Language Code Language Code Language 1027 Afar 1183 Irish 1347 Maori 1507 Samoan 1028 Abkhazian 1186 Scots Gaelic 1349 Macedonian 1508 Shona 1032 Afrikaans 1194 Galician 1350 Malayalam 1509 Somali... -
Page 82: Index
Index Numerics 4:3 OUTPUT 62 INTERVAL 42 SCREEN SAVER 66 SETUP 61 Shuffle Play 40 SLEEP 58 A/V SYNC 58 JPEG RESOLUTION 64 SPEAKER FORMATION 64 ANGLE 37 SPEAKER SETUP 67 ATTENUATE 59 CONNECTION 67 AUDIO 62 Karaoke 42 DISTANCE 68 AUDIO (HDMI) 64 ECHO 43 LEVEL 68... - Page 87 61 LANGUAGE SETUP 62 OUTPUT 4:3 42 35 MEDIA 58 A/V SYNC 53 HDMI 61 MENU 37 ANGLE 29 Quick Setup 67 MULTI-DISC RESUME 59 ATTENUATE 62 AUDIO 64 AUDIO (HDMI) 52 NIGHT 66 AUDIO DRC 64 AUDIO RETURN CHANNEL 64 AUDIO SETUP 61 OSD 65 AUTO CALIBRATION...
- Page 88 Samoan 1507 Maori 1347 Irish 1183 Afar 1027 Shona 1508 Macedonian 1349 Scots Gaelic 1186 Abkhazian 1028 Somali 1509 Malayalam 1350 Galician 1194 Afrikaans 1032 Albanian 1511 Mongolian 1352 Guarani 1196 Amharic 1039 Serbian 1512 Moldavian 1353 Gujarati 1203 Arabic 1044 Siswati 1513 Marathi 1356 Hausa 1209...
- Page 89 [MEDIA] [MEDIA] [MUSIC] [PHOTO] [PHOTO/MUSIC] [VIDEO] JPEG JPEG JPEG JPEG JPEG JPEG JPEG JPEG JPEG JPEG JPEG JPEG JPEG JPEG JPEG JPEG...
- Page 90 MPEG4 m4v/mp4 MPEG4 Simple Profile 576 × 720 AAC-LC HE-AAC :DRM • 0.25 • S-Master...
- Page 91 75 Vp-p 1 :Y 75 Vp-p 0.7 :P ،P 0.25 19 A :HDMI OUT ."OFF" "DEMO" – [CONTROL FOR HDMI] – [OFF] (SS-TS102) DAV-DZ310 385 × 66 × 100 × 194 × 164 × 103 : MPEG 1 85 × (SS-TS103) DAV-DZ610 48/44.1/32 940 / 970 / 1,000 ×...
- Page 92 DAV-DZ310 POWER OUTPUT 108 + POWER OUTPUT C:13:50 142 : DAV-DZ610 POWER OUTPUT < 108 + < POWER OUTPUT 167 : 250/450 (AUDIO IN) TV 125/250 AUDIO IN 1 mV :DAV-DZ310 (Audio Return Channel) TV Dolby Digital VER.X.XX /5.1 DTS/5.1...
- Page 93 • • • "PUSH POWER" "PROTECTOR" " • "STANDBY" – – – Sony • (USB) "OVERLOAD," "REMOVE USB," (USB) "PUSH POWER" Sony • "LOCKED" Sony Sony • DATA ERROR • • JPEG • READING – – – –...
- Page 94 • • • Sony • • • Sony • • • • (coaxial) HDMI • HDMI [ON] [HDMI SETUP] [CONTROL FOR HDMI] • [CONTROL FOR HDMI] • HDMI • HDMI [ON] [OFF] [HDMI SETUP] [CONTROL FOR HDMI] • ""BRAVIA" HDMI "...
- Page 95 • • FAT32 FAT16 FAT12 FAT32 FAT16 FAT12 • • • [MEDIA] • • • JPEG • • JPEG 2,000,000 × 2,048 × 3,072 JPEG JPEG • 576 × • WMA PRO WMA Lossless WMA DRM • AAC Lossless AAC DRM •...
- Page 96 • [ON] [HDMI SETUP] [AUDIO (HDMI)] • Super Audio CD HDMI OUT • HDMI • USB/DATA DVD/DATA CD DATA CD/DATA DVD/USB • FAT32 FAT16 FAT12 • • • • • Joliet ISO 9660 2 DATA CD DATA CD/DATA DVD • (Universal Disk Format) UDF DATA DVD •...
- Page 97 • • [VIDEO SETUP] [TV TYPE] • • • • • • [RGB] /RGB (HDMI)] • • • – "TV" AUDIO OUT PlayStation 3 – HDMI • DIGITAL IN DAV-DZ610) OPTICAL • HDMI [AUTO] [HDMI SETUP] [AUDIO RETURN CHANNEL] • [ON] [HDMI SETUP] [CONTROL FOR HDMI]...
- Page 98 Sony • • • • • " " "COLD RESET" FUNCTION • [AUTO CALIBRATION] Measurement] [NONE] • [Complete. • • • High-bandwidth Digital Content) HDCP HDMI "HDMI" (Protection • HDMI OUT HDMI OUT HDMI OUT HDMI HDMI OUT • 62 31 •...
- Page 99 • • • • • •...
- Page 100 • • • Sony • • • • • • • • • • •...
- Page 101 [SUBWOOFER] [LEVEL (FRONT)] [YES] • [CONNECTION] dB +6.0 to dB- 6.0 [L/R] dB 0 to dB- 6.0 [STANDARD] TEST] .[SUBWOOFER] [CENTER] [SPEAKER FORMATION] [ON] [TONE [SPEAKER FORMATION] [STANDARD] 0.0 dB [L/R] 0.0 dB [CENTER] [DISTANCE (FRONT)] +2.0 dB [SUBWOOFER] [LEVEL (SURROUND)] [TEST TONE] +6.0 –6.0...
- Page 102 [ON] [OFF] • CHANGE] [PASSWORD [RESET] [SETUP] [PARENTAL CONTROL] [YES] [NO] [DivX (R) VOD] • [EFFECT] [INTERVAL] [MEDIA] [MULTI/2CH] [Registration Code [SPEAKER SETUP] [NO] [YES] Quick Setup [YES] • [NO] • [TEST TONE] [Deactivation Code [CONNECTION] [FRONT] [YES] http://www.divx.com [CENTER] [YES] [MULTI-DISC RESUME] [NONE]...
- Page 103 [JACKET PICTURE] [AUDIO DRC] AUDIO] CD-EXTRA [DRC [GRAPHICS] [BLUE] [OFF] [BLACK] [STANDARD] PARENTAL CONTROL [MAX] [PARENTAL CONTROL] • Dolby Digital [AUDIO DRC] [TRACK SELECTION] [STANDARD] MPEG Dolby Digital [OFF] [AUTO] [OTHERS • [AUTO] [TRACK SELECTION] LANGUAGE] [AUDIO] [LEVEL] [SETUP [SYSTEM SETUP] [PARENTAL CONTROL] [OFF] [LEVEL]...
- Page 104 • [NO SURROUND] • [FRONT ONLY] • [ALL FRONT] • [ALL FRONT - NO CENTER] [NO] [YES] • AUTO] [YES] AUTO] [CALIBRATION [CALIBRATION • SPEAKER] [NO] [FORMATION [AUTO CALIBRATION] Digital Cinema Auto) D. C. A. C. (Calibration A.CAL MIC [YES] [AUTO CALIBRATION] •...
- Page 105 – DATA DVD DATA CD • [CONTROL FOR HDMI] – [ON] /RGB (HDMI)] .HDMI OUT HDMI [AUDIO SETUP] [RGB] [SPEAKER FORMATION] Sony [AUDIO (HDMI)] HDMI • [STANDARD] HDMI OUT [OFF] [ON] • [NO CENTER] 96 PCM Dolby Digital 48 PCM •...
- Page 106 [OFF] [ON] 16:9 [PAUSE MODE] • [4:3 OUTPUT] DVD-RW/DVD-R/DVD VIDEO) [16:9] [VIDEO SETUP] [TV TYPE] [(COLOR SYSTEM (VIDEO CD] [AUTO] [FRAME] VIDEO CD [AUTO] NTSC HDMI [AUTO] DUAL [PAL] [HDMI SETUP] NTSC [NTSC] [HDMI RESOLUTION] NTSC HDMI OUT • • [AUTO (1920 ×...
- Page 107 [4:3 PAN SCAN] [AUDIO] [ORIGINAL] [SUBTITLE] VIDEO [AUDIO FOLLOW] [PROGRESSIVE (COMPONENT OUT)] COMPONENT VIDEO OUT • DVD VIDEO COMPONENT VIDEO OUT [SUBTITLE] [AUDIO] [MENU] [OFF] [ON] • [AUDIO] [MENU] [OTHERS [ON] [SUBTITLE] [ON] [START] [VIDEO SETUP] [YES] [NO] [TV TYPE] •...
- Page 108 [TV TYPE] VIDEO SETUP TV TYPE: 16:9 PROGRESSIVE 16:9 (COMPONENT OUT) 4:3 OUTPUT: 4:3 LETTER BOX FULL AUTO COLOR SYSTEM 4:3 PAN SCAN (VIDEO CD) PAUSE MODE: AUTO "DVD/CD" FUNCTION DISPLAY [SETUP] [4:3 LETTER BOX] [CUSTOM] VIDEO SETUP TV TYPE: 4:3 LETTER BOX PROGRESSIVE (COMPONENT OUT)
-
Page 109: Quick Setup
Quick Setup "DVD/CD" FUNCTION DISPLAY SYSTEM MENU [SETUP] "DIMMER" [QUICK] Quick Setup • "DIMMER OFF" • "DIMMER ON" SYSTEM MENU "AUTO STBY" SYSTEM MENU SYSTEM MENU "AUTO STBY" "DEMO" "ON" • "DEMO OFF" "OFF" • "DEMO ON" SYSTEM MENU SYSTEM MENU... - Page 110 • :"MAIN" • :"SUB" • :"MAIN+SUB" "TV" FUNCTION "AUDIO IN" SYSTEM MENU "ATTENUATE" • :"ATT ON" • :"ATT OFF" SYSTEM MENU...
- Page 111 [A/V SYNC] SLEEP "SLEEP" DISPLAY [A/V SYNC] SLEEP :[OFF] • SLEEP :[ON] • "SLEEP OFF" SLEEP • [A/V SYNC] SYSTEM MENU "SLEEP" (DUAL MONO) SYSTEM MENU Dolby Digital • Dolby Digital Dolby HDMI Digital DAV-DZ610 * AUDIO...
- Page 112 REC TO USB REC TO USB DATA DVD/DATA CD/CD "NEW TRACK" REC TO USB REC TO USB • REC TO USB "READING" REC TO USB • "PUSH PLAY" "COMPLETE" ".wma" ." ﺃﻭmp3") (".m4a" "USB" FUNCTION "TUNER FM" FUNCTION CLEAR –/+ PRESET –/+ TUNING CLEAR REC TO USB...
- Page 113 • [FOLDER] [TRACK] DATA CD/DATA DVD • :[TRACK] • :[FOLDER] DATA DVD/DATA CD "TRACK001" "FLDR001" Audio CD • ALL ] DATA CD/DATA DVD DATA DVD/DATA CD ALL ] ALL] "REC1-MP3" [START] "TRACK001" "REC1-CD" Audio CD "TRACK001" "FM001" "REC1-CD" "REC1-MP3" USB TRANSFER TRACK START TRACK...
- Page 114 • • – – • • • • MEMORY SELECT DATA CD/DATA DVD USB Memory 2 selected. Home Theatre System • • [Operation not possible.] • • • • • • DATA CD/DATA "MUSIC" "ROOT" "MUSIC" • •...
- Page 115 • • ONE-TOUCH PLAY HDMI [VOLUME LIMIT] [VOLUME LIMIT] THEATRE HDMI AUDIO] HDMI [RETURN CHANNEL HDMI • •...
- Page 116 HDMI "BRAVIA" Sync HDMI HDMI HDMI "BRAVIA" Sync Sony HDMI HDMI FUNCTION – "DVD/CD" – – DISPLAY – [SETUP] – – [CUSTOM] – – [HDMI SETUP] HDMI [CONTROL FOR HDMI] (High-Definition Multimedia Interface) HDMI [ON] • HDMI HDMI HDMI HDMI...
- Page 117 DYNAMIC BASS "D. BASS ON" SOUND MODE DYNAMIC BASS • "MUSIC" "MOVIE" :"AUTO" "AUTO" • "MOVIE" :"MOVIE" • :"MUSIC" "MUSIC" NIGHT "NIGHT" • Super Audio CD • Super Audio CD Super Audio CD NIGHT "USB" "AUDIO IN" – A.F.D." "A.F.D. STD" "SUR.SETTING"...
- Page 118 • "PRO LOGIC" "PLII MOVIE" "PLII MUSIC" Dolby Pro Logic "PRO LOGIC" – Dolby Pro Logic II "PLII MOVIE" – Dolby Pro Logic II "PLII MUSIC" – • "2CH STEREO" "A.F.D. STD" AUTO FORMAT) (DIRECT STANDARD • •...
- Page 119 SYSTEM MENU "SUR.SETTING" "PRO LOGIC" SYSTEM MENU • SYSTEM MENU "SUR.SETTING" SYSTEM MENU [STANDARD] [SPEAKER FORMATION] • "A.F.D. MULTI" AUTO FORMAT) (DIRECT MULTI •...
- Page 120 "MONO" • "STEREO" • "MONO" SYSTEM MENU...
- Page 121 SYSTEM MENU –/+ PRESET "TUNER FM" FUNCTION FM 10 : 88.00 MHz –/+ PRESET –/+ VOLUME "TUNER FM" FUNCTION D.TUNING –/+ TUNING "TUNED" –/+ TUNING SYSTEM MENU –/+ TUNING "MEMORY" –/+ TUNING SYSTEM MENU "FM MODE" COMPLETE...
- Page 122 :"DVD/CD" • :"TUNER FM" • :"USB" • :"TV" • :"AUDIO IN" •...
- Page 123 /DATA DVD/DATA CD 2.3/2.2 2.3/2.2/1.1/1.0 2.3/2.2 1.1/1.0 FUNCTION DATA DVD/ DATA CD • DVD/CD • • FUNCTION JPEG "DVD/CD" JPEG *Exif "TUNER FM" DISPLAY [DATE] "USB" "TV" 10( 15) DATA CD 18/9/2002 "AUDIO IN" AUDIO IN "Exchangeable Image File Format" * Japan Electronics and Information Technology Industries .(JEITA) Association...
- Page 124 2.3/2.2 2.3/2.2 1.1/1.0 CD/Super Audio CD/DVD "NO TEXT" DISPLAY • DISPLAY 0: 13 192k MP3 DVD-VR/DVD VIDEO 4, 5 Dvorak/Tchaikovsky/NedPho/Kreizberg Adagio - Allegro molto [T **:**:**/C **:**:**/D **:**:**] VIDEO CD Super VCD [T-**:**:**/C-**:**:**/D-**:**:**] [**:**:**] VIDEO CD /Super Audio CD PBC VIDEO CD/Super Audio CD JPEG Super VCD...
-
Page 125: Dolby Digital
karaoke DVD Dolby Digital Dolby Digital Dolby Digital VIDEO CD/CD DISPLAY [VOCAL SELECT] DVD VIDEO • [OFF] • [2+1] • • CD/VIDEO CD AUDIO • [OFF] • [L+R] • [STEREO] Super VCD • [OFF] • [1:L+R] 1: ENGLISH DOLBY DIGITAL 3 / 2 •... - Page 126 [KARAOKE MODE] [ON] [KARAOKE MODE] [OFF] KEYCON 6 – • MIC VOL – • • Super Audio Super Audio CD • [KARAOKE MODE] Super Audio CD [OFF] • (Karaoke Pon) – – – • VIDEO [1/L] /CD/CD KARAOKE PON • AUDIO Karaoke Pon KARAOKE PON...
- Page 127 [INTERVAL] • JPEG • [NORMAL] Sony • [FAST] [NORMAL] JPEG • [SLOW 1] [NORMAL] • [SLOW 2] [SLOW 1] • JPEG JPEG 3,000,000 JPEG • [INTERVAL] JPEG JPEG [MEDIA] JPEG JPEG DISPLAY [MEDIA] [MUSIC/PHOTO] [MUSIC/PHOTO] [MUSIC/PHOTO] DVD MENU MIC VOL –/+...
- Page 128 [OFF] CLEAR [OFF] CLEAR • • Super VCD VIDEO CD Super VCD VIDEO CD DISPLAY [EFFECT] [EFFECT] DISPLAY [REPEAT] • JPEG [MODE 1] • JPEG [MODE 2] DVD-VR/DVD VIDEO • JPEG [MODE 3] • [OFF] • [DISC] • JPEG [MODE 4] •...
- Page 129 [--] [01] PROGRAM 0: 00:00 ALL CLEAR – – – – 1. TRACK – – 2. TRACK – – 3. TRACK – – [ALL CLEAR] 4. TRACK – – 5. TRACK – – 6. TRACK – – 7. TRACK [02] •...
- Page 130 • [CD] Super Audio CD "CD" • HDMI Super Audio CD Super Audio CD DISPLAY [MULTI/2CH] • [MULTI] • [2CH] Super Audio CD DISPLAY [PROGRAM] Super Super Audio CD Audio CD [SET DISPLAY SUPER AUDIO CD] PROGRAM 0: 00:00 [CD LAYER/ ALL CLEAR –...
- Page 131 Dolby Digital (L/R) DVD TOP MENU 1: ENGLISH DOLBY DIGITAL 3 / 2 .1 (L/R) DVD MENU DVD MENU DVD TOP MENU DVD-VR DISPLAY / MP3 DATA CD/CD/ VIDEO CD [DISC MENU] / MP3 DVD DATA • [STEREO] [TOP MENU] [MENU] •...
- Page 132 [TITLE/SCENE/TRACK] • ([2:10:20]) 0 2 0 1 2 [CHAPTER/INDEX] • [TRACK] • [INDEX] • • DVD+RW [FOLDER] • [FILE] • [CHAPTER] [** (**)] ANGLE 98( 99) 13( 99) DVD VIDEO 0: 03: 17 SUBTITLE • DivX ".divx" ".avi" • [MUSIC/PHOTO] [MEDIA] DISPLAY [FILE]...
- Page 133 STEP STEP • STEP • STEP • • JPEG JPEG CLEAR • c > JPEG > . . • JPEG • • JPEG] JPEG [HDMI SETUP] [RESOLUTION > • [(1920×1080i) HD] [(1920×1080i) HD JPEG C • c • /m • •...
- Page 134 JPEG JPEG DISPLAY ٬[MEDIA] • DATA DVD/DATA CD) [MUSIC/PHOTO] JPEG JPEG • [MUSIC] • [VIDEO] • JPEG [PHOTO] JPEG JPEG PICTURE NAVI [MEDIA] DVD MENU DISPLAY [BROWSING] • [FOLDER LIST] • JPEG [PICTURE LIST] JPEG...
- Page 135 MEMORY SELECT (USB) USB Memory 2 selected. Home Theatre System • [Operation not possible.] • • "READING" [FOLDER LIST] [FOLDER LIST] MENU FOLDER LIST 01 Let's Talk About Love (1985) 02 1st Album (1986) 03 In the Middle of Nowhere (1986) 04 Ready for Romance (1986) 05 In the Garden of Venus (1987) 06 Romantic Warriors (1987)
- Page 136 +/– VOLUME FUNCTION "/1 FUNCTION VOLUME +/ _ C X x c DVD MENU VOLUME +/ _ RETURN DISPLAY DVD/" FUNCTION "CD FUNCTION • "DVD/CD" • "USB"...
- Page 137 PROGRESSIVE] COMPONENT VIDEO OUT [(COMPONENT OUT) VIDEO SETUP TV TYPE: 16:9 COMPONENT VIDEO OUT PROGRESSIVE (COMPONENT OUT) 4:3 OUTPUT: FULL "DVD/CD" FUNCTION COLOR SYSTEM AUTO (VIDEO CD) PAUSE MODE: AUTO DISPLAY [SETUP] VIDEO SETUP CUSTOM TV TYPE: 16:9 PROGRESSIVE (COMPONENT OUT) 4:3 OUTPUT: FULL COLOR SYSTEM...
- Page 138 [HDMI SETUP] [YES] Quick Setup HDMI SETUP DISPLAY HDMI RESOLUTION: AUTO (1920x1080p) CONTROL FOR HDMI: VOLUME LIMIT: AUDIO RETURN CHANNEL: AUTO /RGB(HDMI): AUDIO(HDMI): JPEG RESOLUTION: HDMI OUT [HDMI RESOLUTION] HDMI HDMI OUT "DVD/CD" FUNCTION HDMI SETUP HDMI RESOLUTION: AUTO (1920x1080p) CONTROL FOR HDMI: VOLUME LIMIT: AUDIO RETURN CHANNEL:...
- Page 139 A.CAL MIC [STANDARD] • [NO CENTER] • [NO SURROUND] • [FRONT ONLY] • [ALL FRONT] • [ALL FRONT - NO CENTER] • [YES] AUTO] • [CALIBRATION •...
-
Page 140: Quick Setup
LANGUAGE SETUP OSD: ENGLISH Quick Setup MENU: ENGLISH AUDIO: FRENCH SPANISH SUBTITLE: PORTUGUESE "1 VIDEO SETUP TV TYPE: 16:9 16:9 PROGRESSIVE (COMPONENT OUT) 4:3 OUTPUT: 4:3 LETTER BOX COLOR SYSTEM 4:3 PAN SCAN (VIDEO CD) AUTO PAUSE MODE: [16:9] • C X x c DISPLAY [4:3 PAN SCAN]... - Page 141 N N A A N T E IA L 7 C O A X "/1 "/1 "1...
- Page 142 NTSC NTSC NTSC "/1 "/1 FUNCTION NTSC PAL NTSC "NTSC"...
- Page 143 DAV-DZ610) O U T A U D IO A L O U D IG IT O P T IC IN L A U D IO D IG IT O P T IC • PlayStation •...
- Page 144 *HDMI V ID E O E O IN T V ID O N E N C O M P H D M I V ID E O U T E O O N T V ID P O N E C O M A R C O U T...
- Page 145 SPEAKERS K E R S S P E A S U R S U R C E N T O O F E S U B W F R O N K E R S S P E A F R O N •...
- Page 146 DAV-DZ610...
- Page 147 • • Sony •...
- Page 148 •...
- Page 149 ) [KARAOKE MODE] ) [VOCAL SELECT] [OFF] • [A/V SYNC] [REPEAT] [SHUFFLE] [PROGRAM] [ORIGINAL/PLAY LIST] [VOCAL SELECT] [KARAOKE MODE] [MULTI/2CH] [PLAY LIST] Super Audio CD...
- Page 150 ) [PROGRAM] ) [SHUFFLE] ) [REPEAT] ) [A/V SYNC] ) [DISC MENU] ) [BROWSING] JPEG ) [SETUP] [CUSTOM] Quick Setup ) [QUICK] Quick Setup ) [FOLDER] ) [FILE] JPEG ) [DATE] ) [INTERVAL] ) [EFFECT] ) [MEDIA] JPEG WMA/ AAC/ MP3) DATA CD/DATA DVD/USB JPEG MP3...
-
Page 151: Dvd+Rw
DVD VIDEO 98( 99) 13( 99) DVD VIDEO 0 : 0 4 : 1 7 DISC TITLE CHAPTER REPEAT Quit: ENTER DISPLAY ) [TRACK]/(36 ) [SCENE]/(36 ) [TITLE] ) [INDEX]/(36 ) [CHAPTER] ) [INDEX] ) [TRACK] ) [ORIGINAL/PLAY LIST] [ORIGINAL] DVD-RW/DVD-R) [PLAY LIST] ) [TIME]... - Page 152 DISPLAY "USB" "DVD/CD" DISPLAY DISPLAY 1 t 2 t 3 t 1 t...
- Page 153 • • • •...
- Page 154 ) SOUND MODE ) DVD TOP MENU ) DYNAMIC BASS ) DVD MENU ) NIGHT C X x c ) PICTURE NAVI (ENTER) JPEG (60 58 50 48 ) SYSTEM MENU ) RETURN O ENTER 53 42 39 36 33 29 17 ) DISPLAY (61 55 MUTING...
-
Page 155: Angle
TUNING TUNING SLOW SLOW Karaoke Pon ) AUDIO + VOLUME 5 ) SUBTITLE DVD VIDEO ) ANGLE Sony DVD VIDEO ) DISPLAY INPUT Sony TV 7 ) D.TUNING TV "/1 1 THEATRE 1 TV 7 (55 33 ) MEMORY SELECT... - Page 156 ANTENNA SPEAKERS SUR R SUR L COAXIAL 75 DIGITAL AUDIO IN VIDEO FRONT R FRONT L SUBWOOFER CENTER OPTICAL COMPONENT VIDEO OUT SPEAKERS ) (AUDIO IN R/L) TV ) SPEAKERS VIDEO OUT ) HDMI OUT COMPONENT VIDEO OUT DAV-DZ610) (DIGITAL IN OPTICAL) TV ) (COAXIAL 75 FM) ANTENNA...
- Page 157 Karaoke HDMI HDMI SLEEP NIGHT NTSC TUNED NTSC SA-CD Super Audio CD/CD...
- Page 158 MASTER VOLUME "/1 K REC TO USB 33 27 (USB) AUDIO IN 42 29 MIC/A.CAL MIC FUNCTION...
- Page 159 • DAV-DZ610 • DAV-DZ310 • • • DAV-DZ310 • DAV-DZ610 • (2) AA • • • (1) FM • Quick Setup...
- Page 160 • • •...
- Page 161 MP3/WMA/AAC/JPEG/DivX/MPEG4 • DATA CD/DATA DVD/USB – JPEG – DATA CD/DATA DVD/USB • • JPEG • • JPEG • MP3/WMA/AAC • MPEG4 • JPEG • DivX DivX, Inc. DivX • ® DivX Certified ® DivX USB/DATA DVD/DATA CD • ® DivX DivX •...
- Page 162 DVD+RW/DVD+R DATA CD/DATA DVD (Packet Write) • JPEG • JPEG JPEG • [Playback prohibited by area limitations.] • DATA CD/DATA DVD/USB JPEG • ".mp3" ".wma" *WMA ".m4a" *AAC ".jpeg" ".jpg" JPEG ".divx" ".avi" DivX ".m4v" ".mp4" MPEG4...
- Page 163 • (3(2 WMA/AAC – JPEG – DivX/MPEG4 – (International Organization for Standardization) ISO CD-ROM ISO/MPEG MPEG1) MP3 MPEG1 (Digital Rights Management) "Design rule for Camera File system" DCF JPEG Japan Electronics and Information ( (JEITA) Technology Industries Association (CD) (CD) CD-ROM/CD-R/CD-RW •...
-
Page 164: Dvd Video
DVD VIDEO DVD VIDEO • DVD-R/DVD-RW • VIDEO DVD+R/DVD+RW • VIDEO DVD-R/DVD-RW • DVD-R DL 2.0 1.1 VIDEO CD • VIDEO CD Super VCD • CD-R/CD-RW/CD-ROM • Super VCD Super Audio CD Super Audio CD • • CD-R/CD-RW • – DATA CD CD-R/CD-RW/CD-ROM •... - Page 165 Quick Setup HDMI "BRAVIA" Sync...
- Page 166 MPEG Thomson Fraunhofer IIS MPEG-4 • MPEG-4 VISUAL PATENT PORTFOLIO MPEG-4") ("VIDEO • MPEG LA "DVD" • MPEG-4 VIDEO DVD VIDEO DVD+RW/DVD+R DVD-RW/DVD-R • • MPEG LA, LLC HTTP://WWW.MPEGLA.COM...
- Page 167 Definition Multimedia Interface (HDMI HDMI HDMI High-Definition Multimedia Interface HDMI Licensing LLC "DVD-R" "DVD-RW" "DVD "DVD+R" "DVD+RW" "CD" VIDEO" "BRAVIA" Sony Corporation "PLAYSTATION" Sony Computer Macrovision Entertainment Inc. DIVX VIDEO ® DivX Macrovision DivX, Inc. DivX Certified www. DivX divx.com...
- Page 168 4-165-470-12(1) Sony Corporation...
Need help?
Do you have a question about the DAV-DZ310 and is the answer not in the manual?
Questions and answers