
Subscribe to Our Youtube Channel
Related Manuals for SCIFIT RST7000


Summary of Contents for SCIFIT RST7000
- Page 1 Users’ Operations Manual RST7000 Recumbent Stepper Before using this product, read this manual and follow all safety rules and operating instructions.
- Page 2 This page left blank purposely...
-
Page 3: Table Of Contents
WARRANTY CARD ..........34 SCIFIT... -
Page 4: Safety Information
SAFETY I NFORMATI ON T he purpose of safety symbols is to attract your attention to possible dangers . T he safety symbols , and their explanations , deserve your careful attention and understanding .T he safety warnings do not , by themselves , eliminate any danger . -
Page 5: Introduction
AHA is: Do moderately intense cardio 30 minutes a day, five The SCIFIT R S T 7 0 0 0 R e c u m b e n t S t e p p e r is days a week. -
Page 6: Specifications
SPECIFICATIONS Weight ..324 lbs. (147 Kg) ax User Weight . . 500 lbs. (227 kg.)- Fixed Seat 450 lbs. (204 Kg.) - Swivel Seat 00 lbs. (272 Kg.)- Bariatric Seat Power ..Self generating w/auto recharge battery back-up. Low Voltage AC adapter standard Resistance System . -
Page 7: Setup & Installation
SETUP & INSTALLATION Placement of Cardio Machine To aid in the placement of equipment, two wheels 40” / 1 Meter are located on the front of the unit. Movement of Safety Space machine should be done with two people. Carefully lift the rear of the unit until the wheels are engaged n the oor and position the unit in a desired location. -
Page 8: Assembly
ASSEMBLY SWIVEL SEAT ASSEMBLY Step 1: Pull upward the yellow T-handle of the seat adjustment lever, then lift and slide the seat post onto the frame track making sure the roller guide rail is between the top and bottom wheels of the base. Roller guide Step 2: Attach the handlebar plate to the seat post with (Qty. - Page 9 Front holes for bucket seat Tools R equired: 1/2” Wrench or socket Item #1 (x 4) 5/16-18 x 1.25 Serrated Screw Rear holes for bucket seat CI FI T SCIFIT • Scientific Solutions for Fitness • SCIFIT • Scientific Solutions for Fitness •...
- Page 10 Tools R equired: 1/2” Wrench or socket Front Item #1 (x 4) 5/16-18 x 1.25 Serrated Screw Rear SCIFIT • Scientific Solutions for Fitness • SCIFIT • Scientific Solutions for Fitness • SCI FI T...
- Page 11 5/16 Flat Washer Align bottom seat pad holes with these four hole locations Attach the handlebar to these holes from under the base plate SCIFIT • Scientific Solutions for Fitness • SCIFIT • Scientific Solutions for Fitness • SCI FI T...
-
Page 12: Product Overview
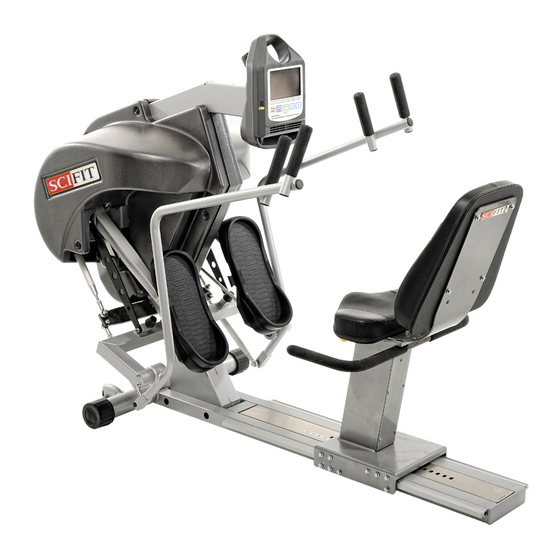
PRODUCT OVERVIEW Water bottle holder Intelli-Fit LCD control Dual position handles to console body muscle groups. Transport wheels Available seats: Adjustable bucket (shown) Fixed 2-piece high back Fixed bariatric Oversized foot pads Solutions for Fi Solutions for Fi SCI FI T... -
Page 13: Keypad Functions
KEYPAD FUNCTIONS Work Level Status LCD Screen: The Work Level Status L C D Screen gives a progressive real-time indication of the current work level of any and all programs. Select Workout or Insert Fitkey Manual Hills Random Heart Rate Profile Selection Area Allows the user to oose from 4 different... -
Page 14: Biomechanical Postioning
A lways follow medical professionals guidelines to reduce the risk of personal injury . F ailure to follow their directions may result in injury to yourself . SCIFIT • Scientific Solutions for Fitness • SCIFIT • Scientific Solutions for Fitness • SCI FI T... -
Page 15: Adjustments
ADJUSTMENTS Fixed Seat Horizontal Adjustment The seat should be positioned so the legs have a slight Fig. B bend at full extension.To adjust the seat, lift upward on the yellow knob located in the front of the seat assembly and move the seat forward or back as desired. The seat Pull upward on will adjust in 1”... - Page 16 Remove - Pull knob up and push seat backwards off the track. Replace - Pull knob up and push seat forward onto track. Fixed SCIFIT • Scientific Solutions for Fitness • SCIFIT • Scientific Solutions for Fitness • SCI FI T...
-
Page 17: Accessories
ACCESSORIES (Std) AC Adapter: P4861 Domestic/P3733 Int’l (Optional) Limit Range Kit: A3106 Provides continous power to the console when the Helps adjust the pedal range to adapt to the physical functional range of the user. machine is not in use. Plugs into the power entry connector located in the lower front of the machine (Optional) Heart Rate Belt: 65190 (Optional) Wheel Chair Platforms: 1181... -
Page 18: Heart Rate Transmitter Strap
H eart R ate monitoring systems may be inaccurate . I f you feel faint , stop exercising immediately . O ver exercising may result in serious injury or death . SCIFIT • Scientific Solutions for Fitness • SCIFIT • Scientific Solutions for Fitness • SCI FI T... -
Page 19: Program Instructions
The screen will remain illuminated at the most minimal levels of movement. SCIFIT products have a battery back up which will Time (mm:ss) 15:00 keep the screen illuminated for a short period after a completed workout or in the pause mode. - Page 20 The following profiles are available for selection MULTI-PEAKS COURSE Time (mm:ss) 15:00 Level Weight (lbs) RAMP SPRINT Enter user weight with the keys, TWIN PEAKS then press and begin exercise PEAK PROGRESSIVE Solutions for Fi Solutions for Fi SCIFIT...
-
Page 21: Heart Rate Program
Time (mm:ss) 15:00 Target Heart Rate Time (mm:ss) 15:00 Level Weight (lbs) Adjust the Target Heart Rate with the Select a random profile with the keys, then press keys, then press Solutions for Fi Solutions for Fi SCIFIT... - Page 22 Adjust the level intensity (range 1 - 20) with the keys, then press Time (mm:ss) 15:00 Level Weight (lbs) Enter user weight with the keys, then press and begin exercise SCIFIT • Scientific Solutions for Fitness • SCIFIT • Scientific Solutions for Fitness • SCIFIT...
-
Page 23: Program Instructions
PROGRAM INSTRUCTIONS Additional Key Features SCIFIT also includes extra user friendly key features that may be used during the workout. Fig. 1 Fig. 1 The console contains two 3-speed cooling fans (Low, Medium, High) that can be activated by the user at anytime during the workout (Fig. 1). -
Page 24: Set-Up Mode Instructions
The following are brief descriptions for each category that are currently in the Set-Up mode Note: Not all categories will pertain to the workout programs currently installed in your RST7000 Use the [UP] or [DOWN] arrows to make adjustments. After making adjustments the user may press [Quick Start] to save and exit the Set-Up mode at anytime. - Page 25 “WATT SCALAR” is greater than 1 and it will be harder to operate if it is less than 1. Press [ENTER] to advance SCIFIT Scientific Solutions For Fitness SCIFIT Scientific Solutions For Fitness...
- Page 26 The amount of time the screen will stay on after the [PAUSE] key is pressed, the users stops pedaling and the brake stops rotating. This time may be adjusted here. Note: Paused Timeout range is 0 - 180 seconds Press [ENTER] to advance SCIFIT Scientific Solutions For Fitness SCIFIT Scientific Solutions For Fitness...
- Page 27 When the Fit-Quik program is set for “Hills” you may adjust to preselect 1 of 7 workout contours: Course, Sprint, Twin Peaks, Peak, Progressive, Multi-peaks and Ramp. Press [ENTER] to advance SCIFIT Scientific Solutions For Fitness SCIFIT Scientific Solutions For Fitness...
- Page 28 FIT-QUIK RECOVERY (mm:ss): (For 2nd stage) Default: 0:35 Allows the option to increase or decrease the time length of the reverse portion of the 2nd stage. Press [ENTER] to advance SCIFIT Scientific Solutions For Fitness SCIFIT Scientific Solutions For Fitness SCIFIT...
- Page 29 Allows option to enable or disable the banners “Fast Forward”, “Slow” and “Reverse Fast” to be shown at the top of the screen during a ISO-Strength workout. Press [Enter] to advance SCIFIT Scientific Solutions For Fitness SCIFIT Scientific Solutions For Fitness...
-
Page 30: Set-Up Mode Instructions
When the ISO banner is enabled it allows the option to set a length of time to show “Slow” at the top of the screen. Example: Time set for 15 seconds Slow - displayed 15 seconds Press [Enter] to advance SCIFIT Scientific Solutions For Fitness SCIFIT Scientific Solutions For Fitness SCIFIT... -
Page 31: Maintenance & Service
MAINTENANCE & SERVICE Maintenance UNITED STATES CUSTOMER SERVICE For assistance in the service of SCIFIT products; The RST7000 is virtually maintenance phone : +1-800-745-1373 free. After training always wipe down your fax : +1-918-359-2045 SCIFIT exercise product. Perspiration that e-mail: service@scifit.com... -
Page 32: Warranty
WARRANTY It is very important that your SCIFIT machine is registered. This can be done http://www.SCIFIT.com/warrantyregistration.shtml online at or fill out and mail the registration form at the back of this manual. SCIFIT Statement of Warranty SCIFIT warranties new products against defective workmanship and/or materials under normal and proper use subject to the following limitations: (a) SCIFIT’s obligation to the original purchaser shall apply to:... - Page 33 WARRANTY SCIFIT STATEMENT OF WARRANTY (e) The below listed items have the following warranty coverage unless determined to be defective. These items include, but are not limited to: Treadmills – AC5000 models Warranty Period only Treadmill belts 12 months Treadmill belts decks 12 months Treadmill structure &...
- Page 34 INSPECT MERCHANDISE THOROUGHLY NOTING ANY DAMAGE ON RECEIVING PAPERWORK PRIOR TO SIGNING”. SCIFIT is not responsible for the repair or replacement of any unit or part damaged during transit or installation. The customer is responsible for inspection of each unit and part for shipping damage at time of delivery or installation, and prior to signing receiving paperwork.
- Page 35 Detailed description of symptoms encountered Installation SCIFIT is not responsible for the repair or replacement of any unit or part damaged during installation. The customer is responsible for inspection of each unit and part for damage at the time of installation. The customer is responsible for pursuing all damage claims with the installer.
- Page 36 Thank you in advance for your assistance! When requested by SCIFIT, defective parts must be returned to the SCIFIT factory within 20 days of receipt of replacement part. Otherwise SCIFIT will expect payment on the parts invoice net 30 days.
-
Page 37: Warranty Card
SCIFIT SCIFIT SCIFIT SCIFIT... - Page 39 Important: Please keep this page for your records Model Number:_________________________________ Serial Number:_________________________________ Date of Purchase:_________________________________ Manufactured By: SCIFIT Systems Inc. User Manual; #P4803A (8/1/2011)
- Page 40 5151 South 110th East Avenue Tulsa, Oklahoma 74146 Sales: 800.278.3933 or 918.359.2000 Customer Service: 800.745.1373 Order online 24/ 7 at www.SCIFIT. com...
Need help?
Do you have a question about the RST7000 and is the answer not in the manual?
Questions and answers
how to remove handle bar on scifit rst 7000