Table of Contents
Advertisement
Advertisement
Table of Contents

Summary of Contents for TechnoTrend TT-micro TC821 HDTV
- Page 1 Digital DVB-C/T2 Receiver ® TT-micro TC821 HDTV Instruction manual...
-
Page 2: Ing.-Anton-Kathrein-Straße
TechnoTrend Görler GmbH Ing.-Anton-Kathrein-Straße 2 D-83101 Rohrdorf-Thansau, Germany www.ttgoerler.com Right for technical specification change re- served. Date: 03/2012... -
Page 3: Table Of Contents
® TT-micro TC821 HDTV Operating and function elements ............5 Front side ..................5 Rear side ..................6 Remote control................7 Your appliance in brief ..............11 Summary of properties ............11 What does HDTV stand for? ............. 11 ... - Page 4 CONTENTS Information banner ..............33 Teletext ..................34 Channel list ................34 Favourites ................. 35 Channel scan ................39 EPG ................... 40 Timer ..................42 Recording function (PVR) ............47 Timeshift feature ..............52 ...
-
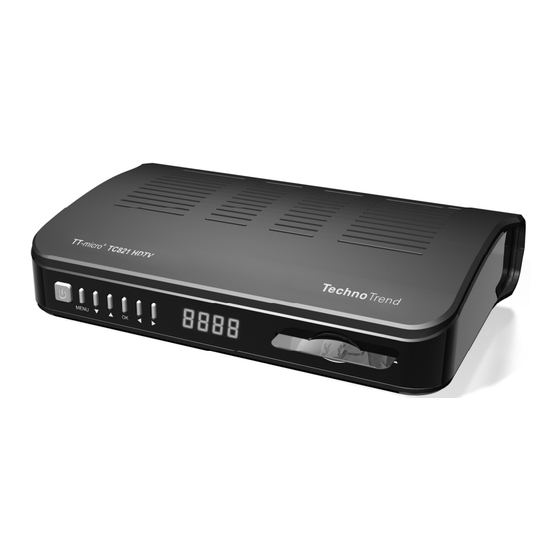
Page 5: Operating And Function Elements
® TT-micro TC821 HDTV 1. Operating and function elements Front side Standby button Keys to change channels, adjust the volume and con- trol the menu Four-digit LED display IR receiver Smart card reading device... -
Page 6: Rear Side
OPERATING AND FUNCTI OPERATING AND FUNCTION ELEMENTS Rear side Coaxial input for antenna connection RF IN RF IN Coaxial output RF OUT for "looping through" of the for "looping through" of the analogue signal to the TV set or a different device ifferent device („loop-through function”) Analogue audio left LEFT... -
Page 7: Remote Control
® TT-micro TC821 HDTV Remote control... - Page 8 OPERATING AND FUNCTION ELEMENTS Mute Switches sound to mute Numerical keys Directly selects the channel via the single buttons EPG button Opens EPG (EPG = Electronic Program Guide) Exit button - Cancels a process - Quits the menu Arrow buttons - for menu navigation ZAP Button - Toggles between the current and last channel...
- Page 9 ® TT-micro TC821 HDTV 10 Buttons for recording and replay Directly records running programme Rewind recording Bring up recording archive Starts and stops replay Restarts interrupted playback Changes to normal replay speed Fast forward recording Pause recording Starts Timeshift Quits replay or recording...
- Page 10 OPERATING AND FUNCTION ELEMENTS 17 VOL+ / VOL- buttons Turns up or down the volume Enter text Following on-screen instructions to input text with the re- mote control's keys 0 to 9.
-
Page 11: Your Appliance In Brief
® TT-micro TC821 HDTV 2. Your appliance in brief This new digital DVB-C/T2 receiver will open a whole new world of television for you - in top quality! This manual will help you make optimal use of the many func- tions and possibilities of your new digital receiver. - Page 12 YOUR APPLIANCE IN BRIEF Europe - HDTV is able to transfer the four-fold to five-fold of picture and sound information per channel. For comparison: NTSC (USA) 850 x 480 visible dots 1024 x 576 visible dots HDTV (up to) 1920 X 1080 visible dots This results in pictures that are displayed with sharp outlines, deep colours and extensive depth of sharpness, creating the impression of live witnessing.
-
Page 13: Contents Of Package
® TT-micro TC821 HDTV Contents of package When you open the package check that it contains all the items below and that nothing is damaged. The package con- tains: 1 receiver 1 operating instruction in English, Finnish and Swedish 1 quick start guide in English, Finnish and Swedish 1 remote control unit 2 batteries for the remote control unit, type LR03 / 1.5 V... -
Page 14: Safety And Environmental Protection
SAFETY AND ENVIRONMENTAL PROTECTION 3. Safety and environmental protection Read the following points prior to connecting and operating your receiver: The device is designed for domestic use. Only the functions described in this instruction manual may be carried out with this device. Keep the instruction manual ready at hand near the appli- ance. -
Page 15: Danger Caused By Electricity
TT-micro® T821 HDTV Danger caused by electricity There are dangerous voltages inside the appliance. Never open the housing or insert objects through the ventilation openings. Do not expose the appliance to dripping or spray water. Prevent liquid from getting into the appliance. Immediately pull the plug if need be. - Page 16 SAFETY AND ENVIRONMENTAL PROTECTION maximum admissible power consumption when purchasing leads or outlets. Unplug the power supply from its wall outlet to completely disconnect the unit from the mains. Always have qualified experts do receiver repairs or change receiver settings. The manufacturer accepts no liability for accidents of the user if the device is opened.
-
Page 17: Danger Of Injuries By Other Causes
TT-micro® T821 HDTV Danger of injuries by other causes Ensure that leads cannot be tripped over. Do not disassemble, short-circuit or throw batteries into the fire. Do not let liquid leaking from the battery come into contact with the skin, eyes or mucous membranes. If battery acid contacts your skin, immediately wash with lots of water and consult a doctor. -
Page 18: Notes On Handling Batteries
SAFETY AND ENVIRONMENTAL PROTECTION Notes on handling batteries If the battery is not used for a longer period, it should be removed from the remote control unit. Replace the batter- ies at least once a year to prevent it from leaking. Do not expose the batteries to extreme conditions, for in- stance by storing them on a radiator or excessive heat such as sunshine, fire or the like. -
Page 19: Disposing Of Batteries And The Appliance
TT-micro® T821 HDTV ingredients soften or otherwise damage the feet. Place a non-slip mat under the feet, as appropriate. Disposing of batteries and the appliance Sort packaging by type before disposal. Do not throw the appliance into your household waste. When you find that the appliance is of no practical use any longer, contact your local disposal authority or company about proper ways of disposal. -
Page 20: Getting Started
GETTING STARTED 4. Getting started Insert batteries into remote control unit The battery compartment is situated at the rear of the re- mote control unit. 1. Open the battery compartment by pushing the covering bracket a bit down and lifting the battery compartment lid. 2. - Page 21 ® TT-micro TC821 HDTV Antenna port Connect the antenna cable of your house or room antenna with the receiver's antenna input socket RF IN. Connecting a TV set The receiver can be connected to the TV set in several ways whereby the possibilities are also dependent on the TV set.
- Page 22 GETTING STARTED Connecting an audio system You can opt between two different kinds of connection for connecting your stereo or surround decoder to your receiver. Connect the devices by means of a Cinch cable (sockets LEFT and RIGHT), or Connect the devices using an optical cable (socket SPDIF). Note: With this type of connection the sound reproduction for the TV should be switched to mute.
-
Page 23: Inserting The Smart Card
® TT-micro TC821 HDTV Connection diagram Attention! Note the connection information, see page 20. HDTV picture quality only via HDMI interface. Insert pluggable power supply only at the end. Inserting the smart card Operating the appliance without a smart card means that you can only receive non-encrypted channels. - Page 24 GETTING STARTED These are obtainable in trade shops and sometimes even di- rectly from the channel provider. Completely insert the smart card into the card reader with the chip to the bottom. Note: An own smart card menu item is available in the main menu, see page 71.
-
Page 25: First Steps (Installation)
® TT-micro TC821 HDTV 5. First steps (installation) Switching on the receiver As soon as you have inserted the pluggable power supply of the receiver in a power outlet, the receiver switches on and the display on the housing front shows boot. -
Page 26: First Time Installation
FIRST STEPS (INSTALLATION) In order to confirm a selection, press the OK button. The selected menu item is now run or executed. In order to delete the OSD or to leave a called up program press the Exit button. The red, the green, the yellow and the blue coloured but- tons on the remote control have different functions which depend on the menu currently on the screen. - Page 27 ® TT-micro TC821 HDTV buttons. 2. Set the default Menu Language by using the button. Select the next menu item by pressing the 3. Set the default Audio Language by using the buttons. Select the next menu item by pressing the button.
- Page 28 FIRST STEPS (INSTALLATION) 5. In the Preferences Menu, you can change the HDMI resolu- tion (Auto, 1080i, 720p or original) by using the but- tons. Select the next menu item by pressing the button. 6. You can change the Aspect ratio (16:9 or 4:3) by using the buttons.
- Page 29 ® TT-micro TC821 HDTV Note: If you have a wide screen TV, select 16:9. If you have a tradi- tional TV (which is not widescreen), select 4:3. 7. Change the Aspect conversion by using the or buttons. Select the next menu item by pressing the button.
- Page 30 FIRST STEPS (INSTALLATION) 9. If you connect the STB to terrestrial signal, you can choose to turn on or turn off aerial power to the antenna (use the buttons). Press the OK button to save and continue to the next screen. Press Exit to exit this menu without saving. 10.
- Page 31 ® TT-micro TC821 HDTV 12. Now the tuner is looking for the channels (if you select Auto). It may take some time to find all the channels in your net- work. After it is finished it will start playing the first channel.
-
Page 32: Operation
OPERATION 6. Operation Change of channel There are various ways of changing channels: By pressing CH+ or CH-. By pressing the ZAP button it is possible to change back- wards and forwards between the two last selected chan- nels. By directly picking the channel from the channel list. Volume In addition to controlling the volume of your TV set, your ste- reo or your surround decoder, you can also specify the gen-... -
Page 33: Information Banner
® TT-micro TC821 HDTV Information banner The info banner is automatically displayed every time you change channels. Press the Info key to call up the information banner with- out changing the channel. The info banner displays the selected channel number and the station. -
Page 34: Teletext
OPERATION Please note: You are displayed information on the next channel when pressing the arrow key . By pressing the arrow key return to the information on the current channel. Pressing Exit or the Info key hides the information banner. Teletext 1. -
Page 35: Favourites
® TT-micro TC821 HDTV 2. Use TV / Radio button to scroll through TV / radio / all channels. 3. Use the arrow keys / / / to select the desired channel from the list. Pressing the arrow keys selects the next or previous channel on the list. - Page 36 OPERATION 2. Press the arrow keys to pick the menu item Pref- erences. Press OK. 3. Press the arrow keys to pick the menu item Fa- vourites. Press OK. 4. Select the channel you want to include in a favourite channel list by pressing arrow keys...
- Page 37 ® TT-micro TC821 HDTV 5. Press the colour keys Red, Green, Yellow or Blue to include the channel in favourites list 1, 2, 3 or 4. 6. Press the colour keys Red, Green, Yellow or Blue again to exclude the channel in favourites list 1, 2, 3 or 4.
- Page 38 OPERATION 1. Press the Info button. 2. Select the Group you want to rename by pressing arrow keys 3. Select the Name be pressing the arrow keys 4. Finally press the OK button to close the screen and save the name.
-
Page 39: Channel Scan
® TT-micro TC821 HDTV 2. Select the list you want by pressing FAV button. 3. Press the arrow keys to pick a channel and then press OK to accept. Channel scan Following first-time installation, it may be necessary to scan afresh, e.g. -
Page 40: Epg
OPERATION Update Channels – updates the channel order list which is altered at times by the operator. Retune – re-scans all channels. Note: This will erase all channels, favourites and pa- rental control settings. When the scan is com- plete you will be told whether and how many channels were found. - Page 41 ® TT-micro TC821 HDTV Many stations give a forecast of the day but do not offer detailed descriptions. There are also TV stations that do not broadcast any EPG information. 1. Select a channel as appropriate. 2. Press the EPG key to call up the electronic programme guide.
-
Page 42: Timer
OPERATION Note: Detailed information on the "Timer” subject can be found in the next paragraph By pressing the REC button the selected programme is re- corded. For further information on the PVR function, see page Re- cording function (PVR). 3. Press Exit or EPG to quit the EPG. Timer Setting a timer allows you to switch your receiver on or off at a specified time to record a programme, act as alarm or sleep... - Page 43 ® TT-micro TC821 HDTV 4. A timer list menu is displayed Adding a PVR record event to the timer list Enter to the timer list. Press the yellow colour button Press the ZAP button until PVR record timers screen is...
- Page 44 OPERATION With the arrow key select frequency of this event. Options are once, weekly and daily. Select the next menu item by pressing the arrow button. With the arrow key select start date of this event. Select the next menu item by pressing the arrow but- ton.
- Page 45 ® TT-micro TC821 HDTV Adding an alarm timer event to the timer list Enter to the timer list. Press the yellow colour button Press the ZAP button until Alarm timers screen is dis- played. With the arrow key select frequency of this event.
- Page 46 OPERATION 11. If you want to change the message displayed, you can se- lect Message with the arrow key , then press ar- row key . A new screen is displayed for you to rename the message. Follow the on screen instructions to rename the message.
-
Page 47: Recording Function (Pvr)
® TT-micro TC821 HDTV Editing a timer event Enter to the timer list. With the arrow key select the timer event you want to edit and press green button to enter the edit timer screen list. Edit the timer in the same way to add the timer event. - Page 48 OPERATION The medium should provide a minimum of 16 GB (recom- mended 32 GB) of free memory to record. If you only use the Timeshift function, see page 52, the medium should have at least 8 GB of free memory space. This is sufficient for one hour of HDTV recording The recommended speed of the USB medium is 10 MB/sec.
- Page 49 ® TT-micro TC821 HDTV ferent channel on different transponder while recording. Ob- serve the screen display. Selecting programme for programmed recording If there is a programmed recording, the receiver switches on at a certain time and records the programme previously se- lected.
- Page 50 OPERATION 2. Select the arrow keys to select the desired pro- gramme. 3. Press the OK or button to start replay of the recorded pro- gramme. Note: While replay is running, the respective functions are available to you via the following buttons, For replay: recording is running backwards faster.
- Page 51 ® TT-micro TC821 HDTV Pause replay For replay: recording runs forward faster. Op- tions are 2, 4, 8, 16 and 32. Quits replay or recording Remove the data carrier Note: Do not remove the medium by simply pulling the USB mem- ory stick or USB plug.
-
Page 52: Timeshift Feature
OPERATION Formatting medium 1. Press the Menu button to open the main menu. 2. Use the arrow buttons to highlight the Advanced Features item and press the OK button. 3. Select the item PVR disk manager and press the OK button. 4. - Page 53 ® TT-micro TC821 HDTV Apparently, the replay is stopped, while in fact it is recorded in the background. 2. Press PLAY to commence playback at the stopped position. 3. Press INFO button to show the time of programme recorded. 4. You can start the actions as following while recording with...
-
Page 54: Radio Mode
OPERATION Radio mode Also digital radio programmes that are transmitted via DVB-T and DVB-C can be received with the receiver. Please note: Pressing TV/Radio button will scroll through TV, radio and all programmes. Some radio stations provide an EPG. The Timer function can be used via EPG, too. -
Page 55: System Information
® TT-micro TC821 HDTV Note. All previous channel, recording and parental guidance setting will be reset. 4. Press the OK button. The appliance will reset. It switches off and shortly after that on again. 5. Do an initial installation, see page 26. - Page 56 OPERATION Updating the software Every time you turn on the receiver it checks for and auto- matically installs new software updates. If it finds any, a mes- sage to that effect will be displayed on the TV screen. Or you can force software updates.
- Page 57 ® TT-micro TC821 HDTV 4. Follow instructions on screen and given in the software release.
-
Page 58: Preferences
PREFERENCES 7. Preferences Volume Preferences 1. Press the Menu button, then select Preferences and press the OK button. 2. Pressing the arrow buttons to select the Volume item and press the OK button. -
Page 59: Parental
® TT-micro TC821 HDTV 3. By pressing the arrow buttons you can adjust the Audio Descriptor (AD) volume. 4. Use the arrow buttons to select the wakeup Volume item. Then adjust the standard volume when the STB is started up by using the arrow buttons Parental 1. - Page 60 PREFERENCES 3. Select the channel you want to lock or unlock by pressing arrow keys 4. Press the Yellow button to lock or unlock the selected channel. 5. Press the Blue button to enter PIN. 6. Press the Red button to enable or disable parental lock. Note: If you enable parental lock, then whenever you change to locked channels or press MENU button, a pop- up menu will ask for PIN.
-
Page 61: Audio Preferences
® TT-micro TC821 HDTV Audio Preferences 1. Press the Menu button, then select Preferences and press the OK button. 2. Pressing the arrow buttons select the Audio Preferences and press the OK button. - Page 62 PREFERENCES 3. Use the arrow buttons to select the right menu option. Audio Type Choose from the following options: a. Normal – Without audio description Audio – With audio description for hearing impaired users Visual – With audio description for visually impaired users Digital output Choose from the following options: PCM (standard)
- Page 63 ® TT-micro TC821 HDTV e. Danish Secondary Audio Language Choose from the following options: a. English b. Finnish c. Swedish d. Norwegian e. Danish Primary Subtitle Language Choose from the following options: a. English b. Finnish c. Swedish d. Norwegian e.
-
Page 64: Video Preferences
PREFERENCES Subtitle Type Choose from the following options: a. Normal b. Hard of Hearing After you made the changes – select the OK button to save and exit the menu. Press the Exit button to exit without saving and press the ZAP button to reset the menu to its default setting. Video Preferences 1. - Page 65 ® TT-micro TC821 HDTV 4. Change the aspect conversion by using the buttons. button. Select the next menu item by pressing the...
- Page 66 PREFERENCES Note: Use ZOOM to fill the screen with a full image at all times or use Letterbox to show the original picture format. 5. If you connect the STB through a SCART connection, you can send the video image RGB format (best picture) or Composite format (standard image) (use the buttons).
- Page 67 ® TT-micro TC821 HDTV Picture scaling The setting possibilities for Aspect conversion depend on the selected picture format. Letterbox Picture format 16:9 Zoom Letterbox Picture format Zoom...
-
Page 68: Technical Preferences
PREFERENCES Technical Preferences 1. Press the Menu button. Use the arrow buttons to high- light the Preferences item and press the OK button. Then select the Technical Preferences item by using the arrow buttons . Then press the OK button. - Page 69 ® TT-micro TC821 HDTV 2. Use the arrow buttons to select the right menu option. Menu Language Select the desired language for the OSD (On Screen Display). Standby Power Saving Select On or Off to select standby power options. On will give you minimum power consumption during standby but there is no clock display and loop through is off.
- Page 70 PREFERENCES Active Aerial Power Choose from the following options: On: Turn on power to antenna if your antenna does not provide its own mains supply Off: Turn off power to antenna...
-
Page 71: Conax Menu
® TT-micro TC821 HDTV 8. Conax Menu This menu is only of relevance if you use a Conax smart card for receiving encrypted channels. Press the Menu button to open the main menu. Use the arrow keys to highlight the Conax Menu item and press the OK button. -
Page 72: Diagnostics
DIAGNOSTICS 9. Diagnostics Attention! Do your best to avoid unnecessary risks. Never attempt to repair defects or perceived defects on the device by yourself. You may encounter problems in every electronic appliance. However, these problems need not be caused by a defect. Often the cause is poor connections or errors in connecting. - Page 73 ® TT-micro TC821 HDTV Connection lost Check connection Previously received Channel out of service None channel not available DECT telephone interfer- Increase distance be- ence tween TV set and tele- phone No or poor or SCART- or HDMI plug not...
- Page 74 DIAGNOSTICS Batteries used up Exchange old batteries of the remote control for new ones Certain channels These channels have no 24 hr service and are some- sometimes not times not available. This is not a fault. available...
-
Page 75: Technical Data
® TT-micro TC821 HDTV 10. Technical data Characteristics DVB T2 receiver in accordance with EN 302 755 DVB T receiver in accordance with EN 300 744 DVB C receiver in accordance with EN 300 429 V1.2.1 (ITU-T J.83 Annex A) MPEG-2 and MPEG-4 AVC/H.264 video coding... -
Page 76: Power Supply
TECHNICAL DATA Input/output specifications Input connection: IEC 60169-2 female (75 Ω Loop-through connector: IEC 60169-2 male (75 Ω Digital HDMI video out SCART output (TV) in accordance with EN 50049-1: - TV SCART output: CVBS, Y/C, RGB, Audio - Switch signal: at PIN8 0/6/12 V; at PIN16 0/1-3 V Analogous audio output (left/right) using RCA (Cinch) Digital audio out (PCM stereo, AC3) via optical S/PDIF USB 2.0 connection... - Page 77 ® TT-micro TC821 HDTV Operation power consumption less 20 W Deep stand-by power consumption less 0.5 W Admissible temperature range Temperature +5 °C…+40 °C Standards + regulations DVB standards EN 302 755 / EN 300 744 / EN 300 429 V1.2.1 (ITU-T J.83 Annex A)
Need help?
Do you have a question about the TT-micro TC821 HDTV and is the answer not in the manual?
Questions and answers