Table of Contents
Advertisement
Quick Links
Advertisement
Table of Contents

Related Manuals for Teac P-55KIT


Summary of Contents for Teac P-55KIT
- Page 1 P-55KIT/P-55 DISC LABEL PRINTER INSTRUCTION MANUAL REV:C...
-
Page 2: Important Safety Instructions
IMPORTANT SAFETY INSTRUCTIONS 1) Read these instructions. when moving the cart/apparatus combination to 2) Keep these instructions. avoid injury from tip-over. 3) Heed all warnings. 4) Follow all instructions. 5) Do not use this apparatus near water. 6) Clean only with dry cloth. 7) Do not block any ventilation openings. - Page 3 IMPORTANT SAFETY INSTRUCTIONS...
-
Page 4: Table Of Contents
Table of Contents IMPORTANT SAFETY INSTRUCTIONS ................2 Section 1: Introduction......................5 Section 2: Unpacking and Inspection ..................7 Section 3: Identifying the Parts....................8 Section 4: Choosing an Adequate Location................11 Section 5: Removing Shipping Materials................13 Section 6: Setting the Parallel Interface Mode on the PC ............ 14 Section 7: Installing the Label Editor .................. -
Page 5: Section 1: Introduction
Section 1 : Introduction Thank you for purchasing the TEAC P-55. The P-55 is a label printer suited to printing a high quality of label on a moderate amount of CD or DVD. This manual provides information on installing the P-55, connecting it to your PC, loading ribbons, etc. - Page 6 Comparative Table of Photo and Color Ribbons Understanding the characteristics of both types of ribbon will be helpful in determining which is best suited to your print work. Photo Ribbon Color Ribbon Type (wound on white shaft) (wound on black shaft) Economical than photo Price Higher than color ribbon...
-
Page 7: Section 2: Unpacking And Inspection
The packing-case contains the following items, as well as the P-55 itself. Please make certain that all the items are present. If anything is missing or damaged, contact your dealer. Accessories for P-55 and P-55KIT Accessories for P-55KIT ONLY Utility Software CD-ROM... -
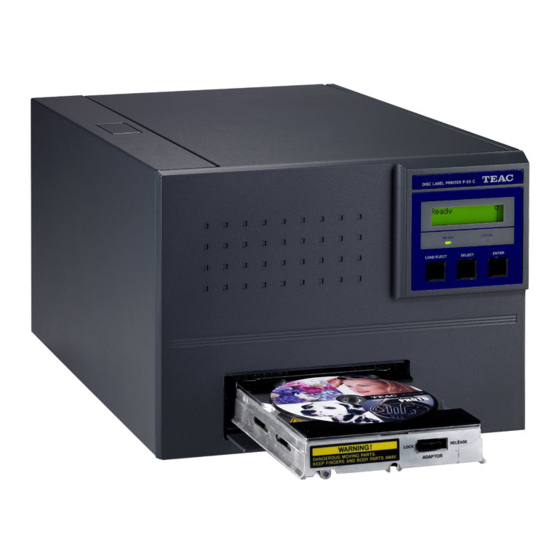
Page 8: Section 3: Identifying The Parts
Section 3 : Identifying the Parts Exhaust Fan (on the right side) This is an air outlet for dropping the temperature inside the unit. Do not let foreign objects get in through this opening, or the results may be damage to the unit and could hazardous to the operator. - Page 9 Re-transfer Ribbon Cartridge This is a cartridge for re-transfer ribbon. (As shipped from the factory, the cartridge does not contain re-transfer ribbon.) Lock Lever This is for locking the ribbon cartridge in place. Tray Door The tray slides out. Do not place any objects in front of this door. Tray Tray Adapter Lock Switch Tray Adapter...
- Page 10 STATUS AUX Connector (optional) This connector is not used when using the P-55 alone. Parallel Port Multi-connector This provides a parallel interface between your PC's printer port and the P-55 over the supplied printer cable. Intake Fan (with filter) This opening is for dropping the temperature inside the unit. Obstructing this opening may result in failures.
-
Page 11: Section 4: Choosing An Adequate Location
Section 4 : Choosing an Adequate Location The P-55 has been shipped with some internal parts fixed in place with special materials to prevent the unit from being damaged during transportation. Be sure to remove all shipping materials before use by referring to Section 5, Removing Shipping Materials. Avoid placing objects in front of the disc tray, or they might cause damage to the tray driving mechanism. - Page 12 WARNING Areas indicated by the hazardous heat warning label are very hot while the power is turned on or just after turning off the power. WARNING Do not put your fingers or sleeves close to the tray sliding in or out. They can be got in, possibly causing injuries.
-
Page 13: Section 5: Removing Shipping Materials
Section 5 : Removing Shipping Materials The P-55 has been shipped with some internal parts fixed in place with special materials to prevent the unit from being damaged during transportation. Be sure to remove all shipping materials before use. NOTE The P-55 is a precision machine. -
Page 14: Section 6: Setting The Parallel Interface Mode On The Pc
Section 6 : Setting the Parallel Interface Mode on the PC To use the P-55, you need to set your PC's parallel port to ECP mode. This setting is made in the BIOS setup. For how to do this, refer to your PC's manual. -
Page 15: Section 7: Installing The Label Editor
Section 7: Installing the Label Editor Insert the supplied Utility Software CD-ROM into your PC's DVD/CD-ROM drive and an installation wizard will automatically start. If the installation wizard does not start automatically, click Start Menu My Computer CD-ROM SETUP. "Choose Setup Language" window comes up. Select ENGLISH and click OK. - Page 16 "Choose Destination Location" window comes up. Click Next. "Start Copying Files" window comes up. Click Next. "InstallShield Wizard Complete" window comes Click Finish. "Disc Label Editor Setup Complete" comes up. Place a check beside "Yes, I want to restart my computer now"...
-
Page 17: Section 8: Connections
Section 8 : Connections Printer Cable CAUTION For U.S.A. and Canada The P-55 does not come standard with a power cable. Use a UL or CSA approved cable, type SJT or SVT, No.18AmG. For cable connector, use one rated at more than 7A and 125V. For Europe The P-55 does not come standard with a mains plug/connector and mains cable. - Page 18 Press the power switch on the rear panel of the P-55 to turn it on. The LCD display on the front control panel will change as follows: I n i t i a l R A M T E A C P - 5 5 R e v X X .
-
Page 19: Section 9: Installing The Printer Driver
"Install software automatically (Recommended)" and click Next. "Please select the best match for (...)" window comes Choose "TEAC P-55 Disc Label Printer" and click Next. "Hardware Installation" window comes up. Click "Continue Anyway" "Completing the Add Printer Driver Wizard" window comes up. -
Page 20: Section 10: Control Panel Features
Section 10 : Control Panel Features LCD display: reports status information, etc. READY lamp: lights up to show that the printer is ready and can start printing. A circle (o) is displayed in the upper right corner of the LCD to indicate that the disc tray holds a print medium. - Page 21 5 Test Print: runs the printer in test print mode. When "Test Print" is selected and you press the ENTER button, the display reads "Set Up Disc" and the tray slides out. Then you can put one of the supplied blank disc (CD-R) on the tray and press the ENTER button again.
- Page 22 Status indications in the process of printing Busy: indicates that the printer is doing a print job. The LCD shows the following when dyes are being transferred from the ink ribbon to the re-transfer ribbon. (The following is in the case of photo ink. In the case of color ink, the sequence changes to Black Cyan Magenta...
-
Page 23: Section 11: Error Messages Explained
Section 11 : Error Messages Explained When an error develops, the ERROR lamp on the control panel lights up and the LCD shows an error message. Error Message Description Corrective Action ERROR The side door is open. Shut the side door. Door Open ERROR No ink ribbon cartridge is... - Page 24 NOTE 1 When "No INK Ribbon" or "No TFR Ribbon" is displayed and you find the corresponding ribbon is fully consumed, be sure to change it. (Attention: Do not close the side door without changing a fully consumed ribbon, or a tape that holds the ribbon shaft and the ribbon itself in place would be peeled off and thus the ribbon might get stuck in the mechanism, likely causing the printer to go out of order.) NOTE 2...
- Page 25 NOTE 3 "ERROR No TFR Ribbon" is also displayed when you load an ink ribbon in the re-transfer ribbon cartridge. Load a re-transfer ribbon by referring to Section 12. NOTE 4 How to mount the disc adapter Set the slide switch on the front of the tray drawer to the RELEASE position. Snap the protrusion of the adapter into the cut-out in the tray, as shown below.
-
Page 26: Section 12: Loading Ribbons
Section 12 : Loading Ribbons NOTES - Use genuine TEAC ribbons. - Carefully handle the ribbons to prevent them from being scratched or broken. - Be sure to take out the ribbon cartridge from the P-55 itself when replacing the ribbon. -
Page 27: Loading Ink Ribbon
Press the button on the top left of the unit and slowly open the hinged door down. 2. Loading Ink Ribbon Flip up the lock lever that holds the ink ribbon cartridge in place. Take out the ink ribbon cartridge by pulling it toward you. - Page 28 6) Take out an ink ribbon from its package and remove three pads. Place the ink ribbon with the take-up shaft on the left and the supply shaft on the right, and their protrusions facing you and their openings facing away from you. Insert the open end of the take-up shaft into the hole provided in the cartridge (for ease of work, we recommend holding the shaft by...
- Page 29 Mount the ink ribbon cartridge in the P-55 itself. When mounting the ribbon cartridge, push it directly and slowly. If you try to force it in slantwise, there is a chance that the ribbon might be broken. If the ribbon clogs somewhere, take out the cartridge, take up ribbon slack again, and slowly re-insert the cartridge.
- Page 30 Take out a re-transfer ribbon from its package and remove three pads. Place the re-transfer ribbon with the supply shaft on the left and the take-up shaft on the right, and their protrusions facing you and their openings facing away from you. Insert the open end of the take-up shaft into the hole provided in the cartridge (for ease of work, we recommend holding the shaft by...
- Page 31 Mount the re-transfer ribbon cartridge in the P-55 itself. When mounting the ribbon cartridge, push it directly and slowly. If you try to force it in slantwise, there is a chance that the ribbon might broken. ribbon clogs somewhere, take out the cartridge, take up ribbon slack again, and slowly re-insert the cartridge.
- Page 32 4. Checking the Remaining Ribbon Amount When the P-55 is Ready as the LCD indicates, I n k R e m a i n press the SELECT button as many times as necessary for "Ink Remain" to appear on the LCD, and then press the ENTER button.
-
Page 33: Section 13: Loading Print Media
- The P-55 supports a standard medium (12-cm diameter) only. Mini media (8-cm diameter) and odd-shaped media are not supported. - With the P-55 you need to use the TEAC-specified media exclusively. Use of commercially available media for inkjet printers might inevitably result in poor quality output. -
Page 34: Section 14: Getting Label Print Job Started
Click "Open" in the File menu of the Label Editor and select and load an image into the P-55. Click File Print. Get "TEAC P-55 Disc Label Printer" shown in the label editor NAME box and click Properties. Perform the following for the best possible output quality: 4)-1 In the Color field select a Method suited to the image you use. - Page 35 Click OK. Enter the necessary "Number of copies". Enter the "Outside" and "Inside diameter" to define the print area. (The outside diameter defaults to 120mm and the inside diameter to 21mm.) Click OK and the printing process starts. As the printing process proceeds the LCD display reads "Processing data"...
- Page 36 Select "TEAC P-55 Disc Label Printer" and click "Set printer properties". Click "Printing Preferences...". Click the Maintenance tab.
- Page 37 Load a print medium and click "Print" next to "Positioning pattern" on the Maintenance dialog. The first test pattern print process will start. When the first test pattern has been printed, take out the medium from the disc tray, and rotate the medium by 180 degrees and place it on the tray so that the arrow marked length is horizontal.
- Page 38 When the second pattern has been printed, take out the medium. NOTES - The upper and lower test patterns relative to the center hole are the same, and ditto for the left and right test patterns. - The upper and lower scales relate to vertical adjustment and the left and right scales relate to horizontal adjustment.
- Page 39 2) Correcting for hue shift between colors Place a new medium on the tray and click Print next to "CMYK pattern". 2) When the test pattern has been printed, take out the medium from the tray, and determine which pair of black and colored lines are Cyan Yellow aligned (or which pair of lines have the...
- Page 40 3) Correcting for aspect ratio Place a medium on the tray and click Print next to "Aspect ratio" on the Maintenance dialog. The first test pattern is printed. 3) Take out the medium, rotate it by 90 degrees and place the medium again on the tray so that the arrow marked length is horizontal, as shown.
- Page 41 When the second test pattern has been printed, take out the medium from the disc tray. Find out the longest line that is aligned with, or is least displaced with respect to, a scale mark. (You can use either the upper and lower scales or the left and right scales.) In the above example, you can get a value of +2 on the upper scale and a value of -3 on...
- Page 42 3. Beware When you successively print on multiple media an image in which linear elements are dominant and they run horizontally relative to the direction in which the disc tray slides out (see Figure 1), there are occasions where the print head retains these linear image elements after completing the print session and, when you start the next print session using an another image, this residual image also is output.
-
Page 43: Section 15: Maintenance
Section 15 : Maintenance It is important for you to clean the following parts in order to maintain print quality: (1) Platen roller (at ink ribbon replacement time) (2) Cooling Fan Filter (every half year) 1. Cleaning the platen roller (when replacing the ink ribbon, perform the following with the power on) 1) Press the SELECT button on the control panel as many times as necessary for... - Page 44 2. Cleaning the cooling fan filter (every half year) Remove a large screw that holds the grid in place, remove the grid, take out the filter from the grid, wash the filer with water, let it fully dry, and then replace the grid and filter. Cleaning the tray Use an appropriate brush or toothbrush to sweep the tray clean.
-
Page 45: Section 16: Packing
Section 16 : Packing When you need to ship the P-55, first replace the shipping materials in reverse order of removal by referring to Section 5, Removing Shipping Materials. Thereafter, pack the printer by referring to the illustration below. NOTE Shipping the P-55 without shipping materials replaced in place might result in damage to internal parts. -
Page 46: Section 17: Specifications
Color ink ribbon (CMY): 500 discs/ribbon Single color (black) ink ribbon: 1000 discs/ribbon (Re-transfer color ribbon: 500 discs/ribbon) Compatible Media: TEAC-specified thermal printable discs Printable Image Size: 12-cm CD (2048 pixels by 2048 pixels) Image Loading Capacity: One (1) image... - Page 47 3) External Dimensions...
-
Page 48: Section 18: Options
Section 18 : Options ■ Ink Ribbon Photo Ribbon Set Part No.: 19610050-10 (including ink ribbon and re-transfer ribbon, one each) Color Ribbon Set Part No.: 19610050-00 (including ink ribbon and re-transfer ribbon, one each) Single Color (Black) Ribbon (1 pc.) Part No.: 19610010-20 * Purpose-designed cartridge additionally required Color Re-transfer Ribbon Set... -
Page 49: Section 19: Contact Information
Section 19 : Contact Information ■ Product Information TEAC America, Inc. 7733 Telegraph Rd. Montebello, CA. 90640.USA URL: http://www.teac.com/DSPD/ e-mail: webmaster@teac.com TEAC Europe GmbH ICPD Department Bahnstrasse 12, D-65205 Wiesbaden-Erbenheim, Germany Phone: +49 (611) 7158 675 Fax: +49 (611) 7158 666 e-mail: info@teac-roboflex.de...
Need help?
Do you have a question about the P-55KIT and is the answer not in the manual?
Questions and answers