Table of Contents
Advertisement
Safari Tandem
TWO SEAT SWIVEL WHEEL LIFESTYLE STROLLER
11-AR224
OWNER'S MANUAL
This manual contains safety, assembly, use and maintenance
instructions. Read these instructions carefully before use and
keep them for future reference. Your child's safety may be
affected if you do not follow these instructions. The InStep®
lifestyle stroller must be assembled by an adult who has read
and understands the instructions in this manual.
Keep the packaging away from children and dispose all
packaging before use. Do not return to store. Call toll free
1-800-242-6110 for assistance and replacement parts.
Keep instructions for future reference.
Advertisement
Table of Contents

Related Manuals for InStep Safari Tandem 11-AR224


Summary of Contents for InStep Safari Tandem 11-AR224
- Page 1 Read these instructions carefully before use and keep them for future reference. Your child’s safety may be affected if you do not follow these instructions. The InStep® lifestyle stroller must be assembled by an adult who has read and understands the instructions in this manual.
- Page 2 Thank You For purchasing the InStep® lifestyle stroller. You will be sure to enjoy hours of pleasurable exercise and family time. If you have any questions or comments our customer service hours are: 8:00 AM - 5:00 PM Monday through Friday CST.
-
Page 3: Table Of Contents
Contents 1 SAFETY ..........1 5 USING THE LIFESTYLE STROLLER . -
Page 4: Safety
Safety WARNING! • Check the assembly (i.e.: fasteners, wheels) before using the product. • FAILURE TO FOLLOW THE SAFETY INSTRUCTIONS • Never allow children to assemble, fold, or disassemble the LISTED BELOW MAY RESULT IN SERIOUS INJURY OR lifestyle stroller. DEATH. -
Page 5: Use
WARNING! During use be sure to: • Take proper steps (clothing, ventilation, hydration) to protect • Any load attached to the handle affects the stability of the child from exposure hazards such as wind chill and heat the stroller. Unstable hazardous conditions may exist if exhaustion. -
Page 6: Storage
ADDITIONAL WARNINGS FOR CUSTOMERS • Do not use the lifestyle stroller in hazardous weather or at night. IN THE EUROPEAN UNION • Accessories not approved by the manufacturer shall not WARNING! be used. • Use the harness as soon as your child can sit unaided. STORAGE •... -
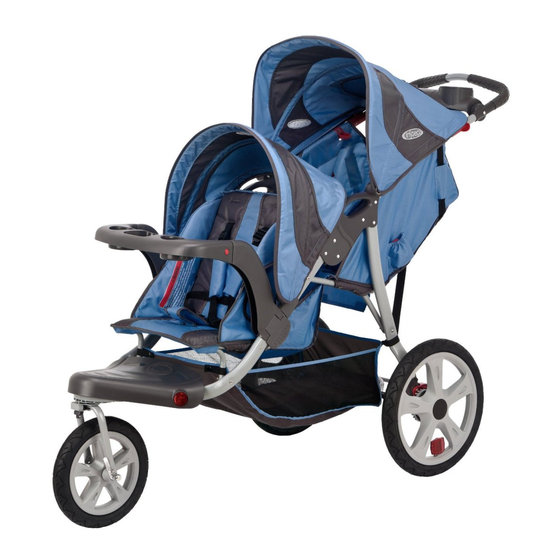
Page 7: Parts And Features
Parts and Features Car seat adapter Rear canopy Viewing window with sunshade (shade rolls up into elastic) Handle Car seat Parent tray with safety two drink holders strap and storage Car seat compartment strap holder Shoulder strap height adjustment Child tray Lift handle anchors Front seat with... -
Page 8: Assembly
Assembly UNFOLD THE LIFESTYLE STROLLER WARNING! • There are pinch points between the sidewalls and the frame of the lifestyle stroller that may cause injury. Fold or unfold the lifestyle stroller slowly using caution. Keep children clear when folding and unfolding the stroller. -
Page 9: Attach The Front Fork
ATTACH THE FRONT FORK It’s easiest to attach the fork, footrest and wheels by working from the underside of the stroller. Carefully turn the stroller over before proceeding to the next steps. ❶ Insert the fork into the two fork tubes located at the front of the stroller. -
Page 10: Attach The Footrest
ATTACH THE FOOTREST ❶ Place the footrest with the post holes facing up under the ❸ Insert the short screws through the frame and fork holes fork. Figure 3.4 into the footrest post holes. Completely tighten the screws. Tip! It may be easier to tighten the screws by rotating the ❷... -
Page 11: Attach The Front Wheel
ATTACH THE FRONT WHEEL WARNING! ❹ Close the quick release lever to the fully closed locked position. When closing the lever it should leave an imprint If the front wheel is not securely locked in place it may on your hand. The lever should have firm but not fall off the lifestyle stroller and cause serious injury or excessive pressure. -
Page 12: Attach The Rear Wheels
ATTACH THE REAR WHEELS WARNING! Rear wheels that are not securely locked in place may fall off the lifestyle stroller and cause serious injury or death. Always check the wheels are securely locked in Wheel bracket place before use. Locking tab Wheel axle ❶... -
Page 13: Attach The Child Tray Arms
ATTACH THE CHILD TRAY ARMS Important! The arms have been designed to come off the frame easily in the event too much weight is applied. To prevent Tray arm with breaking the tray arms during assembly do not apply weight to tray rest the child tray arms while tray is disengaged. -
Page 14: Attach The Child's Tray
ATTACH THE CHILD'S TRAY ❶ Align the pin on the child tray tube with the hole in the tray arm. The pin should fit into the inset of the hole. Figure 3.10 ❷ Press the child tray in until it snaps into place. ❸... -
Page 15: Attach The Front Canopy
ATTACH THE FRONT CANOPY ATTACH THE PARENT TRAY WARNING! ❶ Stretch the front canopy across the front of the stroller, positioning it just above the tray arm. Figure 3.11 Unstable items (such as: hot fluids, tall bottles, metal ❷ Align the pin inside the canopy bracket with hole in the containers) placed in the parent tray may tip over and stroller frame. -
Page 16: Safety Features
Safety Features USING THE 5-POINT SAFETY HARNESS WARNING! • Avoid serious injury from falling or sliding out. Always properly secure the passenger with the 5-point safety harness. • It may be dangerous to leave your child unattended. Never leave your child unattended in or near the lifestyle stroller. -
Page 17: Adjusting The Shoulder Strap Height
ADJUSTING THE SHOULDER STRAP HEIGHT Use these seat height slots to ❺ Make sure the strap is properly adjust the height of properly anchored on the the shoulder straps to your seat back. Repeat these child’s height. To adjust the steps for the opposite shoulder strap height: strap. -
Page 18: Using The Lifestyle Stroller
Using the Lifestyle Stroller USING THE MANUAL FRONT WHEEL USING THE PARKING BRAKE SWIVEL LOCK Important! The stroller must be completely stopped before Important! The front wheel must be locked in the fixed position engaging the rear brake. to use the stroller while jogging. ❶... -
Page 19: Reclining The Seat
RECLINING THE SEAT WARNING! Improper adjustment of the 5-point safety harness when the seat is in the reclined position may result in the child slipping into the leg openings and strangulation. Always re-adjust the 5-point safety harness to the new position. ❶... -
Page 20: Using The Child Tray
USING THE CHILD TRAY WARNING! ❷ Rotate the tray up and away from the tray arm. Figure 5.6 Unstable items (i.e.: Hot fluids, tall bottles, metal ❸ To close the tray, rotate the tray down onto the tray arm containers) placed in the child trays may tip over and until is clicks into place. -
Page 21: Inserting A Car Seat
INSERTING A CAR SEAT WARNING! • Incorrectly placing and securing the car seat may result in the seat, and child, being thrown from the stroller and cause serious injury or death. Ensure the car seat is placed correctly and secure before placing a child in it and during use. - Page 22 Attach the Car Seat Adapter Important! The car seat adapter bar must be removed when not ❷ Pull the knob on the right side of the car seat adapter out being used to support a car seat or when a child is seated in the and place the bracket on to the right lift handle.
- Page 23 Attach the Car Seat Straps Install the Car Seat ❶ Wrap the end of the safety strap with the metal ring around ❺ With the car seat facing towards the rear seat of the stroller, the lower frame support, with the ring on the inside. Place place the notch on the bottom of the car seat over the car the strap through the metal ring.
- Page 24 ❻ Fold the car seat handle down (if applicable). ❼ Remove the safety straps from the storage pockets located on each side of the stroller. Figure 5.12 ❽ Route each end of the safety strap up the side of the stroller, between the frame and canopy and towards the top of the car seat.
-
Page 25: Disassembling And Storing The Lifestyle Stroller
Disassembling and Storing the Lifestyle Stroller WARNING! ❹ Rotate the locking lever onto the locking pin on the side of the stroller frame. Figure 6.2 • There are pinch points between the sidewalls and the frame of the lifestyle stroller that may cause injury. Always fold or unfold the lifestyle stroller slowly and with caution. - Page 26 For compact storage remove the wheels: To remove the front wheel: To remove the rear wheels: ❶ Move the quick release lever into the open position. ❹ Pull up on the locking tab. Figure 6.3 ❺ Remove the wheel from the wheel bracket. Figure 6.4 ❷...
-
Page 27: Maintenance
Maintenance Warranty Always check the following before and during use: Pacific Cycle warrants this product to be free of defective materials and workmanship for 1 year from the date of original • Ensure there is no damage, missing parts and that all parts are purchase. - Page 28 Manufactured for Pacific Cycle, Inc (A Division of Dorel Industries) Pacific Cycle, Inc. 4902 Hammersley Road Madison, WI 53711 ©2013 Pacific Cycle, Inc. InStep® is a registered trademark of Pacific Cycle, Inc. www.instep.net Made in China · Printed 2013...
Need help?
Do you have a question about the Safari Tandem 11-AR224 and is the answer not in the manual?
Questions and answers