Table of Contents
Advertisement
Advertisement
Table of Contents

Related Manuals for Indesit FDE20


Summary of Contents for Indesit FDE20
- Page 1 Electric built in Double Oven Instructions for installation and use FDE20...
-
Page 3: Table Of Contents
Operation when using Top Oven for Grilling Conventional Grilling Using the Top Oven as a Convection Oven Operation when using the Top Oven as a Convection Oven Using the Main Oven for Fan Cooking Using the Main Oven for Other Functions... -
Page 4: Introduction
It is suggested that any pets be removed from the room until the smell has ceased. This odour is due to temporary finish on oven liners and elements and also any moisture absorbed by the insulation. -
Page 5: Safety Information
Always make sure all controls are turned off when you have finished cooking and when not in use. Always stand back when opening an oven door to allow any build up of steam or heat to disperse. Always use dry, good quality oven gloves when removing items from the oven/grill. - Page 6 Never allow anyone to sit or stand on any part of the appliance. Never store items above the appliance that children may attempt to reach. Never remove the oven shelves whilst the oven is hot. Never heat up unopened food containers as pressure can build up causing the container to burst.
-
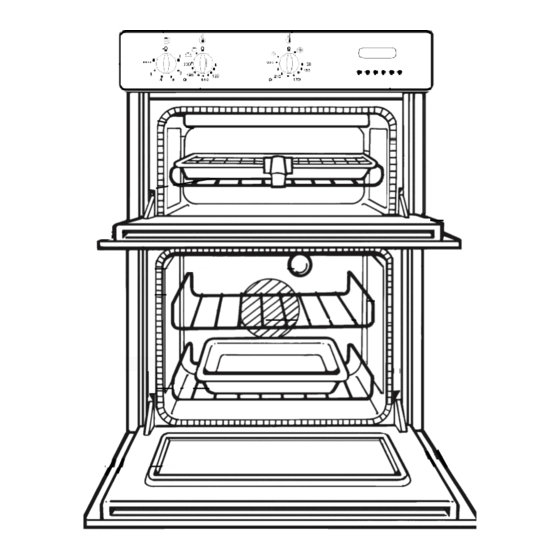
Page 7: Features
CATALYTIC SIDE LINERS MEAT PAN INNER DOOR GLASS MAIN OVEN TOP OVEN TEMPERATURE & FUNCTION CONTROL CONTROL MAIN OVEN PILOT LIGHT RATING PLATE CLOCK & OVEN TIMER CATALYTIC SIDE LINERS INNER DOOR GLASS OVEN SHELF OVEN FAN MAIN OVEN DOOR... -
Page 8: Controls
The main oven has a “Slow Cook Setting” , 90˚C, this can be used for slow cooking, keeping food warm and warming plates for a short period. Note: It is advisable to check that all oven controls have been switched off when you have MAIN OVEN TEMPERATURE AND FUNCTION CONTROL... -
Page 9: Oven Timer Operation
Automatic Cooking The Main Oven (only) can be controlled by the automatic timer. Never operate the grill or top oven when the main oven is set to cook automatically because the oven cavity can become warm and this may cause bacterial growth in food. -
Page 10: Know Your Timer
For Example: If you set a “Cook Period” for 2 hours, and “End Time” of 11:00. The timer will switch the oven(s) on at 9:00 and turn the oven(s) off at 11:00. You will hear a audible tone at 11:00, to indicate that the Auto Cooking Programme has finished. -
Page 11: Setting The Minute Minder
Electronic Clock and Automatic Oven Timer Operation SETTING THE TIME OF DAY Step 1 Make sure all oven controls are turned Off. Step 2 Check the electricity supply to the cooker is turned on. Step 3 When switched on the display will show 0.00 and the Auto symbol, Step 4 Press &... -
Page 12: Auto Cooking Programmes
(b) To set timer to switch on immediately and OFF automatically after a set cook period. a) TO SET THE TIMER TO SWITCH THE OVEN(S) ON AND OFF AUTOMATICALLY This allows you to cook at a specified time for a chosen period before the oven switches off Automatically. - Page 13 Check that the correct time of day is set, if not follow instructions for setting the time of day. Step 2 Place food onto the correct shelf position in the oven and close the oven door(s). Step 3 Turn the oven control(s) to the required temperature, and if necessary select the appropriate oven function.
- Page 14 5. If at any time the display shows three flashing zero’s 0.00 and ‘Auto’ , it is likely that the electricity supply to the oven has been interrupted. Reset the timer to the correct time of day. Food in the oven may, therefore, not have been cooked, before serving check food is thoroughly heated and completely cooked.
-
Page 15: Grill Pan And Handle
If a detachable handle is required, do not replace the screw and washers. Note: If a fixed handle is required, the grill pan cannot be kept in the main oven with the door closed but may be stored in the top oven with the door closed, when the top oven is not in use.. -
Page 16: Operation When Using The Top Oven For Grilling
Step 3 Turn knob (B) clockwise to select grill function setting: Set to: NOTE: As you turn past the end of the oven temperature scale you will feel resistance on the knob – continue turning clockwise until the grill setting position is selected. -
Page 17: Conventional Grilling
Please note that if a fixed handle is required, the grill pan cannot be kept in the Fan Oven with the door closed but may be stored in the Top Oven. -
Page 18: Using The Top Oven As A Convection Oven
WARNING: Items stored in the top oven will get hot when the main oven is in use. DO NOT allow young children near to the appliance when the top oven is in use as the C. It may also be necessary to increase... -
Page 19: Operation When Using The Top Oven As A Convection Oven
Do Not use: Meat Pans and Baking Trays larger than – 225mm x 300mm (9”x12”) DO NOT use the main oven meat pan as a meat pan in the top oven, as the air MAIN OVEN TEMPERATURE AND FUNCTION CONTROL circulation will be seriously restricted. -
Page 20: Using The Main Oven For Fan Cooking
At the end of the cooking period there may be a momentary puff of steam when the door is opened. This will disperse in a few seconds and is a perfectly normal characteristic of an oven with a good door seal. -
Page 21: Using The Main Oven For Other Functions
It is very important to strictly adhere to the basic principles of food handling and hygiene to prevent the possibility of bacterial growth. LIGHT ONLY SETTING When the Main Oven Temperature & Function Control (C) is turned clockwise to the setting, the main oven light only will illuminate. -
Page 22: Operation
Extra care should be taken when warming bone china, as it may be damaged in a hot oven. DO NOT place food or plates directly on the oven floor as this could damage both the oven lining and the plates which are being warmed. -
Page 23: Temperature Conversion Chart
Temperature Conversion Chart ˚F Mark Main Conventional Convection Oven – – Main Oven Oven –... -
Page 26: Oven Temperature Charts
Remember to reduce cooking temperatures by 10°C from standard recipes when using the top oven. Ensure that the cooking utensil used in the top oven is not larger than 300mm x 225mm (12"x 9"), e.g. Do Not use the main oven meat pan. -
Page 27: Care And Cleaning
TOP OVEN SIDE LINERS MAIN OVEN SIDE LINERS AND REAR PANEL The surfaces of the oven liners are treated with a special vitreous enamel which absorbs cooking soils. At temperatures of 220°C (425°F) or above, the special surface enables these soils to be slowly destroyed. - Page 28 MAIN OVEN BASE (a) Base & Rear of Top Oven and Base of Main Oven. Wipe out the oven with a damp soapy cloth. For more stubborn stains on the base of the oven use a well soaped fine steel wool soap pad.
- Page 29 Open the oven door and remove the oven shelves. Using a thick cloth, grip the lamp lens, unscrew anti- clockwise and remove the lens.
-
Page 30: Cleaning The Doors
Refit the door inner glass as follows. NOTE: The inner door glass has a special reflective coating on one side. Replace the door inner glass so that the statement: “IMPORTANT THIS FACE TOWARDS THE OVEN” can be read from the inner side of the door. -
Page 31: Installation
Installation Electrical Requirements For your own safety, we recommend that your cooker is installed by a competent person such as one who is registered with NICEIC (National Inspection Council for Electrical Installation Contracting). The cooker should be installed in accordance with the latest edition of the IEE Regulations. -
Page 32: Final Installation
Before the oven is fitted, the cabinet must be firmly secured to the backing wall for stability. d. The oven unit should now be lifted (this is a two person lift) into the cabinet and pushed fully home. e. Finally, the oven is secured to the cabinet by means of the four Pozi Wash Head screws - two through each side trim. -
Page 33: Tall Cabinet Ventilation
Tall Cabinet Ventilation Fig. 1 Ventilation Slot required here if cabinet does not fit to ceiling -51mm x 457mm min. area Ventilation Slot required here if the cabinet does fit to the ceiling - 51mm x 457mm min. 50mm area Air Gap 50mm Air Gap... - Page 34 Fig. 4 * excluding pipe work and other projections 560mm Viewed down through cabinet No. 6 x 15mm screw (4 supplied) Fig. 3 Oven Door Connector Cable if hob fitted Cable to Hob if fitted Cable To Oven...
-
Page 35: Something Wrong
Grilling guide. Switch off appliance and allow to cool for approx 30 mins. Switch the cooker back on and check that the Grill / Top oven is now operating. Check that you have selected:- “Grill” function on the “Top Oven / Grill Select”... - Page 36 Steam is a by - product of cooking any food with a high water contact. To help minimise always: a) Try to avoid leaving food in the oven to cool after being cooked. b) Use a covered container, wherever possible.
- Page 37 Notes...
- Page 38 Notes...
-
Page 39: If It Still Won't Work
If It Still Won’t Work... Contact the Service Office (0870 6070805) If something is still wrong with your appliance after you have been through the ‘Something Wrong’ list: Switch off and unplug the appliance from the mains. Call your nearest Service Office or local importer. When you contact us we will want to know the following: 1. -
Page 40: Key Contacts
Key Contacts Repair Service and Information Desk UK: 0870 6070805 ( Open 8am to 5.30pm Mon - Fri 9am to 5pm Sat and 10am to 4pm Sun Closed Bank Holidays) Note: Our operators will require the following information:- Model Number: Serial Number: Extended Warranty To join: UK 0870 442 7661...
Need help?
Do you have a question about the FDE20 and is the answer not in the manual?
Questions and answers