Subaru 2004 Legacy Service Manual
Engine section 1
Hide thumbs
Also See for 2004 Legacy:
- Service manual (4537 pages) ,
- Owner's manual (525 pages) ,
- General service manual (144 pages)
Table of Contents
Advertisement
2004 LEGACY SERVICE MANUAL
ENGINE SECTION 1
This service manual has been prepared
to provide SUBARU service personnel
with the necessary information and data
for the correct maintenance and repair
of SUBARU vehicles.
This manual includes the procedures
for maintenance, disassembling, reas-
sembling, inspection and adjustment of
components and diagnostics for guid-
ance of experienced mechanics.
Please peruse and utilize this manual
fully to ensure complete repair work for
satisfying our customers by keeping
their vehicle in optimum condition.
When replacement of parts during
repair work is needed, be sure to use
SUBARU genuine parts.
All information, illustration and specifi-
cations contained in this manual are
based on the latest product information
available at the time of publication
approval.
FUJI HEAVY INDUSTRIES LTD.
QUICK REFERENCE INDEX
FUEL INJECTION (FUEL SYSTEMS)
EMISSION CONTROL
(AUX. EMISSION CONTROL DEVICES)
INTAKE (INDUCTION)
MECHANICAL
EXHAUST
COOLING
LUBRICATION
SPEED CONTROL SYSTEMS
IGNITION
STARTING/CHARGING SYSTEMS
ENGINE (DIAGNOSTICS)
FUEL INJECTION (FUEL SYSTEMS)
EMISSION CONTROL
(AUX. EMISSION CONTROL DEVICES)
INTAKE (INDUCTION)
MECHANICAL
EXHAUST
COOLING
FU(H4SO 2.0)
EC(H4SO 2.0)
IN(H4SO 2.0)
ME(H4SO 2.0)
EX(H4SO 2.0)
CO(H4SO 2.0)
LU(H4SO 2.0)
SP(H4SO 2.0)
IG(H4SO 2.0)
SC(H4SO 2.0)
EN(H4SO 2.0)
(diag)
FU(H4SO 2.5)
EC(H4SO 2.5)
IN(H4SO 2.5)
ME(H4SO 2.5)
EX(H4SO 2.5)
CO(H4SO 2.5)
G2320GE2
Advertisement
Table of Contents

Related Manuals for Subaru 2004 Legacy


Summary of Contents for Subaru 2004 Legacy
-
Page 1: Crank Pulley
2004 LEGACY SERVICE MANUAL QUICK REFERENCE INDEX ENGINE SECTION 1 FUEL INJECTION (FUEL SYSTEMS) FU(H4SO 2.0) EMISSION CONTROL EC(H4SO 2.0) (AUX. EMISSION CONTROL DEVICES) INTAKE (INDUCTION) IN(H4SO 2.0) MECHANICAL ME(H4SO 2.0) This service manual has been prepared to provide SUBARU service personnel EXHAUST EX(H4SO 2.0) - Page 2 2003 LEGACY SERVICE MANUAL QUICK REFERENCE INDEX ENGINE SECTION 1 LUBRICATION LU(H4SO 2.5) SPEED CONTROL SYSTEMS SP(H4SO 2.5) IGNITION IG(H4SO 2.5) STARTING/CHARGING SYSTEMS SC(H4SO 2.5) EN(H4SO 2.5) ENGINE (DIAGNOSTICS) (diag) G2320GE2...
-
Page 3: Table Of Contents
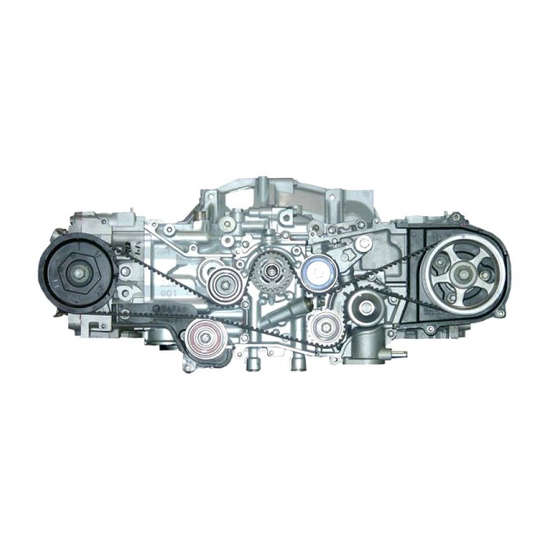
MECHANICAL ME(H4SO 2.0) Page General Description ..................2 Compression .....................22 Idle Speed ....................23 Ignition Timing...................24 Intake Manifold Vacuum................25 Engine Oil Pressure ..................26 Fuel Pressure....................27 Valve Clearance..................28 Engine Assembly ..................30 Engine Mounting ..................36 Preparation for Overhaul................37 V-belt......................38 Crank Pulley....................40 Timing Belt Cover..................42 Timing Belt ....................43 Cam Sprocket ...................48 Crank Sprocket ..................50... -
Page 4: Timing Belt
Timing Belt MECHANICAL 15.Timing Belt A: REMOVAL 1. TIMING BELT 1) Remove the V-belts. <Ref. to ME(H4SO 2.0)-38, REMOVAL, V-belt.> 2) Remove the crank pulley. <Ref. to ME(H4SO 2.0)-40, REMOVAL, Crank Pulley.> 3) Remove the timing belt cover. <Ref. to ME(H4SO 2.0)-42, REMOVAL, Timing Belt Cov- er.>... - Page 5 Timing Belt MECHANICAL 7) Remove the belt idler No. 2. B: INSTALLATION 1. AUTOMATIC BELT TENSION ADJUST- ER ASSEMBLY AND BELT IDLER 1) Preparation for installation of automatic belt ten- sion adjuster assembly. CAUTION: • Always use a vertical type pressing tool to move the adjuster rod down.
- Page 6 Timing Belt MECHANICAL 2) Install the automatic belt tension adjuster as- 499207400 CAM SPROCKET WRENCH sembly. Tightening torque: ⋅ 39 N m (4.0 kgf-m, 28.9 ft-lb) ME-00243 (2) While aligning the alignment mark (B) on timing belt with the mark (A) on sprockets, posi- tion the timing belt properly.
- Page 7 Timing Belt MECHANICAL 5) After ensuring the marks on timing belt and cam Tightening torque: ⋅ sprockets are aligned, remove the stopper pin from 10 N m (1.0 kgf-m, 7.2 ft-lb) belt tension adjuster. ME-00247 ME-00245 7) Install the timing belt cover. 6) Install the timing belt guide.
- Page 8 Timing Belt MECHANICAL 2. AUTOMATIC BELT TENSION ADJUST- 3. BELT TENSION PULLEY 1) Check the mating surfaces of timing belt and contact point of adjuster rod for abnormal wear or 1) Visually check the oil seals for leaks, and rod scratches.
-
Page 9: Cam Sprocket
Cam Sprocket MECHANICAL 16.Cam Sprocket NOTE: Do not confuse left and right side cam sprockets A: REMOVAL during installation. Cam sprocket No. 2 is identified 1) Remove the V-belts. <Ref. to ME(H4SO 2.0)-38, by a protrusion used to monitor the camshaft posi- REMOVAL, V-belt.>... - Page 10 Cam Sprocket MECHANICAL 3) Check the cam sprocket protrusion used for sen- sor for damage and contamination of foreign mat- ter. ME(H4SO 2.0)-49...
-
Page 11: Crank Sprocket
Crank Sprocket MECHANICAL 17.Crank Sprocket 3) Check the crank sprocket protrusion used for sensor for damage and contamination of foreign A: REMOVAL matter. 1) Remove the V-belts. <Ref. to ME(H4SO 2.0)-38, REMOVAL, V-belt.> 2) Remove the crank pulley. <Ref. to ME(H4SO 2.0)-40, REMOVAL, Crank Pulley.>... -
Page 12: Valve Rocker Assembly
Valve Rocker Assembly MECHANICAL 18.Valve Rocker Assembly (3) Tighten the bolts (a) through (d) to specified torque. A: REMOVAL Tightening torque: 1) Remove the V-belts. <Ref. to ME(H4SO 2.0)-38, ⋅ 25 N m (2.5 kgf-m, 18.1 ft-lb) REMOVAL, V-belt.> 2) Remove the crank pulley. <Ref. to ME(H4SO ( g ) ( c ) ( e ) - Page 13 Valve Rocker Assembly MECHANICAL E: INSPECTION 1. VALVE ROCKER ARM AND ROCKER SHAFT 1) Measure the inner diameter of valve rocker arm and outer diameter of valve rocker shaft, and deter- mine the difference (oil clearance) between the two values. Clearance between arm and shaft: Standard: 0.020 —...
-
Page 14: Camshaft
Camshaft MECHANICAL 19.Camshaft (1) Remove the bolts (a) and (b) in alphabetical sequence. A: REMOVAL 1) Remove the V-belts. <Ref. to ME(H4SO 2.0)-38, REMOVAL, V-belt.> 2) Remove the crank pulley. <Ref. to ME(H4SO ( a ) 2.0)-40, REMOVAL, Crank Pulley.> 3) Remove the timing belt cover. - Page 15 Camshaft MECHANICAL (3) Install the valve rocker assembly. CAUTION: • Do not remove the oil seal unless necessary. • Do not scratch the journal surface when re- moving the oil seal. B: INSTALLATION 1) Apply a coat of engine oil to camshaft journals and install the camshaft.
- Page 16 Camshaft MECHANICAL Tightening torque: 9) Install the tensioner bracket. ⋅ 10 N m (1.0 kgf-m, 7.2 ft-lb) Tightening torque: ⋅ 25 N m (2.5 kgf-m, 18.1 ft-lb) ( q ) ( o ) ( u ) ( s ) ( t ) ( v ) ( p ) ( r )
- Page 17 Camshaft MECHANICAL C: INSPECTION Cam base circle diameter A: Intake: 34.00 mm (1.3386 in) 1. CAMSHAFT Exhaust: 34.00 mm (1.3386 in) 1) Measure the bend, and repair or replace if nec- essary. Service limit: 0.020 mm (0.00079 in) ME-00276 2. CAMSHAFT SUPPORT Measure the side clearance of camshaft with set- ting the dial gauge at end of camshaft.
-
Page 18: Cylinder Head
Cylinder Head MECHANICAL 20.Cylinder Head CAUTION: Be careful not to scratch the mating surface of A: REMOVAL cylinder head and cylinder block. 1) Remove the V-belts. <Ref. to ME(H4SO 2.0)-38, 14) Similarly, remove the right side cylinder head. REMOVAL, V-belt.> B: INSTALLATION 2) Remove the crank pulley. - Page 19 Cylinder Head MECHANICAL 7) Install the cam sprocket. <Ref. to ME(H4SO NOTE: 2.0)-48, INSTALLATION, Cam Sprocket.> Keep all the removed parts in order for re-installing 8) Install the timing belt. <Ref. to ME(H4SO 2.0)- in their original positions. 44, INSTALLATION, Timing Belt.> CAUTION: 9) Install the timing belt cover.
- Page 20 Cylinder Head MECHANICAL 1) Installation of valve spring and valve: E: INSPECTION (1) Place the cylinder head on the ST. 1. VALVE SPRING ST 498267800 CYLINDER HEAD TABLE (2) Coat the stem of each valve with engine oil 1) Check the valve springs for damage, free length, and insert the valve into valve guide.
- Page 21 Cylinder Head MECHANICAL Color of spring part: 2. VALVE SEAT Intake [Silver] Inspect the intake and exhaust valve seats, and Exhaust [Silver] correct the contact surfaces with a valve seat cutter if they are defective or when valve guides are re- placed.
- Page 22 Cylinder Head MECHANICAL Clearance between the valve guide and valve 498267800 CYLINDER HEAD TABLE stem: 499767200 VALVE GUIDE REMOVER Standard Intake 0.035 — 0.062 mm (0.0014 — 0.0024 in) Exhaust 0.040 — 0.067 mm (0.0016 — 0.0026 in) ME-00290 (3) Turn the cylinder head upside down and place the ST as shown in the figure.
- Page 23 Cylinder Head MECHANICAL (6) Check the valve guide protrusion. 4. INTAKE AND EXHAUST VALVE Valve guide protrusion L: 1) Inspect the flange and stem of valve, and re- place if damaged, worn or deformed, or if “H” ex- Intake ceed the standard value. 20.0 —...
-
Page 24: Cylinder Block
Cylinder Block MECHANICAL 21.Cylinder Block 12) Remove the bolts (a) and (c) to remove the cyl- inder head. A: REMOVAL NOTE: Before conducting this procedure, drain the engine oil completely. 1) Remove the intake manifold. <Ref. to FU(H4SO 2.0)-11, REMOVAL, Intake Manifold.> 2) Remove the V-belts. - Page 25 Cylinder Block MECHANICAL 19) Remove the water pump after loosening the 25) Remove the oil filter. bolts in alphabetical sequence as shown in the fig- ure. ME-00299 26) Remove the water pipe. ME-00847 20) Remove the oil pump from cylinder block. Use a flat tip screwdriver as shown in the figure when removing the oil pump.
- Page 26 Cylinder Block MECHANICAL ME-00139 Service hole plug Snap ring Service hole cover Gasket Piston pin O-ring 27) Remove the service hole cover and service 28) Rotate the crankshaft to bring #1 and #2 pis- hole plugs using a hexagon wrench (14 mm). tons to bottom dead center position, then remove the piston snap ring through service hole of #1 and #2 cylinders.
- Page 27 Cylinder Block MECHANICAL 30) Similarly remove the piston pins from #3 and #4 NOTE: pistons. Be careful not to confuse the original combination 31) Remove the bolts which connect cylinder block of piston, piston pin and cylinder. on the side of #2 and #4 cylinders. 32) Back off the bolts which connect cylinder block on the side of #1 and #3 cylinders two or three turns.
- Page 28 Cylinder Block MECHANICAL B: INSTALLATION ME-00144 Crankshaft bearing Cylinder block Rear oil seal Crankshaft NOTE: NOTE: Remove oil on the mating surface of bearing and Do not allow liquid gasket to flow into O-ring cylinder block before installation. Apply a coat of grooves, oil passages, bearing grooves, etc.
- Page 29 Cylinder Block MECHANICAL Tightening torque: Tightening torque: ⋅ ⋅ 10 N m (1.0 kgf-m, 7.4 ft-lb) (E), (F), (G), (I): 20 N m (2.0 kgf-m, 14.8 ft-lb) ⋅ (H), (J): 18 N m (1.8 kgf-m, 13.3 ft-lb) ME-00398 ME-00399 4) Tighten the 10 mm cylinder block connecting bolts on RH side (E —...
- Page 30 Cylinder Block MECHANICAL Tightening torque: 13) Position the upper rail gap at (C) in the figure. ⋅ (A) — (G): 25 N m (2.5 kgf-m, 18.1 ft-lb) ⋅ (H): 6.4 N m (0.65 kgf-m, 4.7 ft-lb) ME-02087 14) Align the upper rail spin stopper (E) to the side hole (D) on the piston.
- Page 31 Cylinder Block MECHANICAL 17) Install the snap ring. CAUTION: Install snap rings in the piston holes located oppo- Piston front mark faces towards the front of en- site to the service holes in cylinder block, when po- gine. sitioning all pistons in the corresponding cylinders. NOTE: Use new snap rings.
- Page 32 Cylinder Block MECHANICAL 19) Install the piston pin. (6) Install the service hole plug and gasket. (1) Apply a coat of engine oil to ST3. NOTE: (2) Insert ST3 into the service hole to align pis- Use a new gasket. ton pin hole with connecting rod small end.
- Page 33 Cylinder Block MECHANICAL ME-00161 ⋅ Piston Service hole plug Tightening torque: N m (kgf-m, ft-lb) Piston pin Service hole cover T1: 6.4 (0.65, 4.7) Snap ring O-ring T2: 70 (7.1, 50.6) Gasket (7) Place the cylinder block to face the #3 and 24) Apply liquid gasket to mating surfaces and in- #4 cylinder side upward.
- Page 34 Cylinder Block MECHANICAL 25) Apply liquid gasket to mating surfaces and in- ST 499587100 OIL SEAL INSTALLER stall the oil separator cover. Liquid gasket: THREE BOND 1207C (Part No. 004403012) or equivalent ME-00164 (2) Apply liquid gasket to the matching surface of oil pump.
- Page 35 Cylinder Block MECHANICAL Tightening torque: CAUTION: ⋅ First: 12 N m (1.2 kgf-m, 8.7 ft-lb) Ensure the total “re-tightening angle” of the ⋅ Second: 12 N m (1.2 kgf-m, 8.7 ft-lb) step (6) and (7) does not exceed 180°. CAUTION: •...
- Page 36 Cylinder Block MECHANICAL C: DISASSEMBLY ME-00168 Connecting rod cap Top ring Oil ring Connecting rod bearing Second ring Snap ring 1) Remove the connecting rod cap. 2) Remove the connecting rod bearing. NOTE: Arrange the removed connecting rod, connecting rod cap and bearing in order, to prevent confusion. 3) Remove the piston rings using the piston ring ex- pander.
- Page 37 Cylinder Block MECHANICAL D: ASSEMBLY ME-00392 ⋅ Connecting rod bearing Second ring Tightening torque: N m (kgf-m, ft-lb) Connecting rod Top ring T: 45 (4.6, 33.3) Connecting rod cap Snap ring Oil ring Side mark 1) Apply oil to the surfaces of the connecting rod E: INSPECTION bearings.
- Page 38 Cylinder Block MECHANICAL Standard diameter: Out-of-roundness: 2.0 L model Standard A: 92.005 — 92.015 mm (3.6222 — 3.6226 0.010 mm (0.0004 in) B: 91.995 — 92.005 mm (3.6218 — 3.6222 2.5 L model A: 99.505 — 99.515 mm (3.9175 — 3.9179 B: 99.495 —...
- Page 39 Cylinder Block MECHANICAL Standard (2) If the cylinder inner diameter exceeds limit* after boring and honing, replace the cylinder 2.0 L model block. A: 92.005 — 92.015 mm (3.6222 — 3.6226 *: 2.0 L model B: 91.995 — 92.005 mm (3.6219 — 3.6222 92.515 mm (3.6423 in) 2.5 L model 2.5 L model...
- Page 40 Cylinder Block MECHANICAL 4) Check the snap ring installation groove (A) on 2) Clean the piston ring groove and piston ring. the piston for burr. If necessary, remove burr from 3) Squarely place the piston ring and oil ring in cyl- the groove so that the piston pin can lightly move.
- Page 41 Cylinder Block MECHANICAL Limit of bend or twist per 100 mm (3.94 in) in Connecting rod oil clearance: length: Standard 0.10 mm (0.0039 in) 0.016 — 0.044 mm (0.00063 — 0.0017 in) Unit: mm (in) Bearing size ( A ) Outer diameter of Bearings (Thickness at cen-...
- Page 42 Cylinder Block MECHANICAL ST 499037100 CONNECTING ROD BUSH- Crank pin: ING REMOVER AND IN- 2.0 L model STALLER Out-of-roundness 0.005 mm (0.0002 in) Cylindricality 0.006 mm (0.0002 in) Grinding limit To 51.750 mm (2.0374 in) dia. 2.5 L model Out-of-roundness 0.003 mm (0.0001 in) Cylindricality 0.004 mm (0.0002 in)
- Page 43 Cylinder Block MECHANICAL Unit: mm (in) Crank journal outer diameter Crank pin outer diameter #1, #3 #2, #4, #5 59.992 — 60.008 59.992 — 60.008 51.984 — 52.000 Journal O.D. (2.3619 — 2.3625) (2.3619 — 2.3625) (2.0466 — 2.0472) Standard Bearing size 1.998 —...
-
Page 44: Engine Trouble In General
Engine Trouble in General MECHANICAL 22.Engine Trouble in General A: INSPECTION NOTE: “RANK” shown in the chart refers to the possibility of reason for the trouble in order (“Very often” to “Rarely”) A — Very often B — Sometimes C — Rarely Symptom Problem parts, etc. - Page 45 Engine Trouble in General MECHANICAL Symptom Problem parts, etc. Possible cause RANK 4) Engine stalls after initial Engine control system <Ref. to EN(H4SO 2.0)(diag)-2, Basic Diagnostic Procedure.> combustion. Intake system Loosened or cracked intake duct Loosened or cracked PCV hose Loosened or cracked vacuum hose Defective intake manifold gasket Defective throttle body gasket...
- Page 46 Engine Trouble in General MECHANICAL Symptom Problem parts, etc. Possible cause RANK 3. Low output, hesitation and Engine control system <Ref. to EN(H4SO 2.0)(diag)-2, Basic Diagnostic Procedure.> poor acceleration Intake system Loosened or cracked intake duct Loosened or cracked PCV hose Loosened or cracked vacuum hose Defective intake manifold gasket Defective throttle body gasket...
- Page 47 Engine Trouble in General MECHANICAL Symptom Problem parts, etc. Possible cause RANK 5. Engine does not return to Engine control system <Ref. to EN(H4SO 2.0)(diag)-2, Basic Diagnostic Procedure.> idle. Intake system Loosened or cracked vacuum hose Other Stuck or damaged throttle valve 6.
- Page 48 Engine Trouble in General MECHANICAL Symptom Problem parts, etc. Possible cause RANK 10. Excessive fuel consump- Engine control system <Ref. to EN(H4SO 2.0)(diag)-2, Basic Diagnostic Procedure.> tion Intake system Dirty air cleaner element Belt Defective timing Compression Incorrect valve clearance Loosened spark plug or defective gasket Loosened cylinder head bolt or defective gasket Improper valve sealing...
-
Page 49: Engine Noise
Engine Noise MECHANICAL 23.Engine Noise A: INSPECTION Type of sound Condition Possible cause • Valve mechanism is defective. • Incorrect valve clearance Sound increases as engine Regular clicking sound • Worn valve rocker speed increases. • Worn camshaft • Broken valve spring •...
Need help?
Do you have a question about the 2004 Legacy and is the answer not in the manual?
Questions and answers