
Subscribe to Our Youtube Channel
Related Manuals for Baby Jogger POD


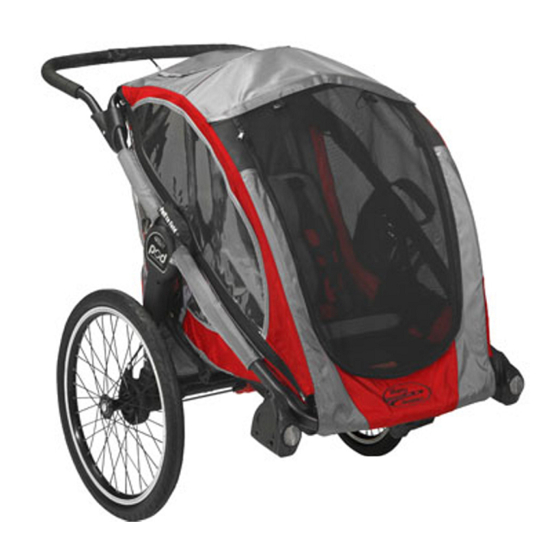
Summary of Contents for Baby Jogger POD
- Page 1 Assembly InstructIons Read these instructions carefully before use and keep them for future reference. Your child’s safety may be affected if you do not follow these instructions. www.babyjogger.com...
- Page 2 • Do not use with children who exceed the weight limitations. • Do not use cleaning solvents; clean only with mild soap and water. • Do not use the POD on stairs. Resulting damage to the POD will not be covered under warranty.
- Page 3 Frame Click Handlebar Attachment Bracket Remove chassis from box and set Insert handlebar into handlebar attachment brackets until both sides click into place. wheels aside. To unfold the chassis: Lift handle up and away from the lower frame until it clicks into place. Safety Strap Location Turn chassis upright and attach red safety strap to snap located...
- Page 4 POD seating compartment. Locate the white support rod Insert support rod into black canopy brackets located at the top center of the POD on each side of the frame. seating compartment.
- Page 5 rear Wheels & Parking brake Release Button Wheel Mount To install rear wheels: Insert wheel axle into wheel To remove rear wheels: Press the wheel release mount on chassis frame until it clicks into place. button while sliding the wheel away from the wheel mount.
-
Page 6: Safety Harness
saFety harness attaChment & COnFiguratiOn For use with a single passenger: Buckle shoulder straps of harness yoke into center two buckles on back of seat. Warning: When used with Place child in center seating Buckle center waist belt. only one child, the position. - Page 7 For use with two passengers: Buckle shoulder straps of harness yoke into two right buckles on back of seat. Repeat steps 2 and 3 to secure second child into safety harness on the left side of the seat. Place child in right seating Buckle the waist belt.
- Page 8 saFety harness saFety harness aDjustment to adjust shoulder harness length: to adjust crotch strap: Thread webbing strap through Rethread webbing strap Thread webbing strap through plastic guide on upper buckle through front of harness plastic guide on lower buckle to lengthen or shorten. yoke to hold in place.
- Page 9 to adjust shoulder harness height: Pull mesh seat back down to Unclip harness yoke from Slide the buckle down expose upper harness buckles. seat back. to desired height. Thread harness yoke through Fasten harness buckle to seat lower opening on mesh seat back. back and repeat on other side.
-
Page 10: Adjustable Handlebar
PoD has two height adjustments. to adjust the height of the handlebar: Highest Position Handlebar Attachment Bracket Lowest Position Press buttons on each side of the handlebar attachment brackets while pulling the handle tubing out. -
Page 11: Handbrake
• The POD Chassis is equipped with a hand Squeeze the hand brake to give you better brake for use with the Jogging Kit and control over your stroller while jogging or Stroller Kit. running or while strolling on uneven terrain. - Page 12 Completely unzip Roll bug canopy up Secure bug canopy in place by using bug canopy. to the top of the POD. the provided loops and barrels. to fold PoD: Safety Strap Unsnap red safety strap. Stand in front of chassis.
- Page 13 • Store your POD in a dry, well ventilated area. To avoid mildew, make sure fabric is dry before storing. Sunshine can fade fabric and dry out tires, so storing your POD indoors will prolong its good looks.
- Page 14 The POD offers three different conversion kits for Stroller, Jogger, or Trailer mode (sold separately) allowing you to choose how you want to use your POD. All conversion kits are easy to install with no tools necessary so you are free to change your activity on the go.
- Page 15 Warranty: Baby Jogger warrants that the frame is free of manufacturer defects for 5 years from date of purchase. Manufacturer’s defects include but are not limited to the breaking of welds and frame tube damage. Textile or soft side materials and all other components shall be warranted for one year from the date of purchase (except for tubes and tires).
- Page 16 We wish you many happy journeys with your new POD! your POD is a great product, and we are proud to manufacture it. if you have any questions or comments, please give us a call at: 1.800.241.1848 Baby Jogger is a Division of Dynamic Brands 8575 Magellan Parkway, Suite 1000 •...
Need help?
Do you have a question about the POD and is the answer not in the manual?
Questions and answers