Table of Contents
Advertisement
Advertisement
Table of Contents

Subscribe to Our Youtube Channel
Related Manuals for IKEA DATID OV8


Summary of Contents for IKEA DATID OV8
- Page 1 DÅTID...
- Page 3 ENGLISH DEUTSCH FRANÇAIS ITALIANO...
-
Page 4: Table Of Contents
Installation Daily use Electrical connection Cooking tables Environmental concerns Cleaning and maintenance IKEA GUARANTEE Safety Information Your safety and that of others are very The power cable must be long enough important for connecting the appliance, once This manual and the appliance itself provide... - Page 5 ENGLISH During and after use, do not touch the Scrapping of household appliances heating elements or interior surfaces This appliance is manufactured with of the appliance - risk of burns. Do not recyclable or reusable materials. allow the appliance to come into contact Dispose of it in accordance with local with cloths or other flammable materials waste disposal regulations.
-
Page 6: Product Description
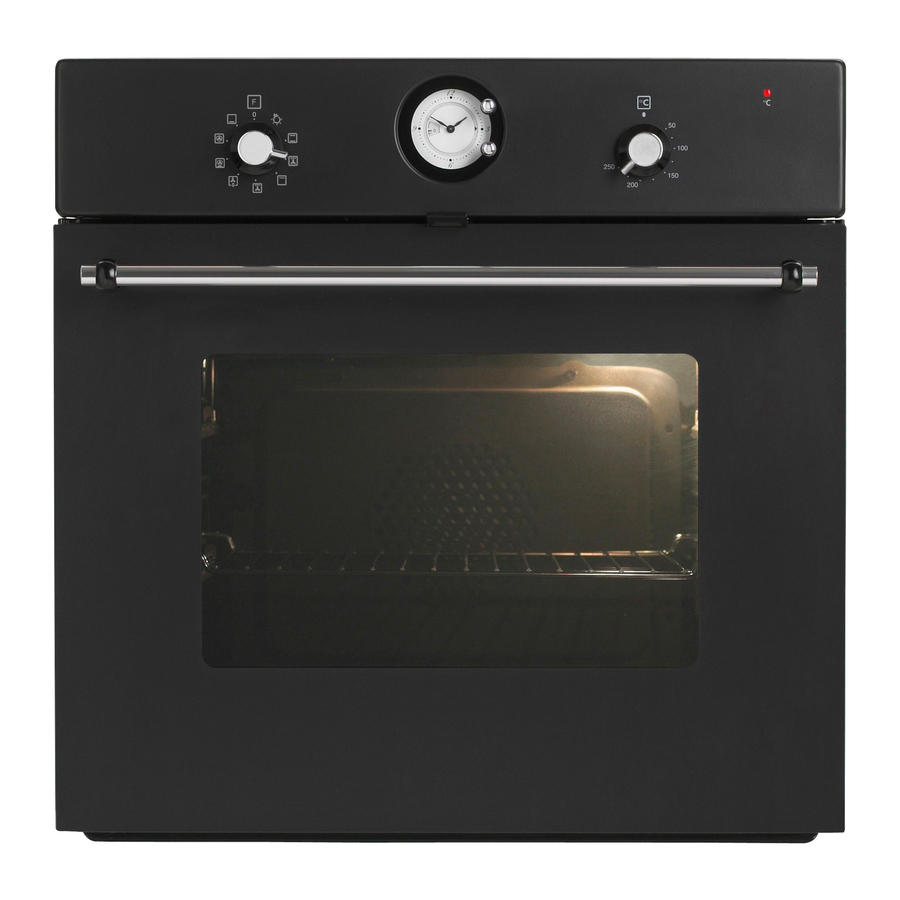
ENGLISH Product description Control panel Circular heating element Cooling fan (not visible) Top heating element Bottom heating element (not visible) Grill element (can be lowered) Oven cool door Rear oven lamp Accessories Baking tray Wire Shelf Drip tray Catalytic panels... -
Page 7: Control Panel
ENGLISH Control panel Function selector knob Thermostat knob Analog clock Thermostat indicator light (red) Daily use Analog clock The analog clock allows: Viewing the time of the day. To adjust the time of the day press button (B) and turn it anti-clockwise to set the time. Programming the cooking start time. -
Page 8: Switching On The Oven
ENGLISH Switching on the oven Turn the selector knob to the required symbol. Manual cooking Turn the thermostat knob clockwise to Turn the button (B) anti-clockwise the required temperature. (without pressing), until the symbol is At the end of the set cooking time an displayed in the window acoustic signal will sound and the oven Press the button (A) and turn it anti-... - Page 9 ENGLISH Oven Functions table Function Description of function OVEN OFF LAMP To switch on the oven light. TOP AND To cook meat, fish and poultry in the oven. BOTTOM Preheat the oven to the required cooking temperature and place HEATING the food inside as soon as the red thermostat light turns off.
-
Page 10: Cooking Tables
ENGLISH Cooking tables Recipe Function Preheating Level (from the Temperature Cooking time bottom) (°C) (min) MEAT Lamb, Kid, Mutton 90-100 100-1 10 100-1 10 Veal, Beef, Pork 90-100 90-1 10 90-1 10 Chicken, Rabbit, 70-80 Duck 70-80 70-80 Turkey 160-180 (3-5 kg) 170-180 170-180... - Page 11 ENGLISH Recipe Function Preheating Level (from the Temperature Cooking time bottom) (°C) (min) VEGETABLES Peppers, 50-60 tomatoes, roast 50-60 potatoes 50-60 SWEETS, PASTRIES, ETC Raising cakes 40-50 40-50 40-50 Filled pies 60-90 (with cheese) 60-90 60-90 Tarts 40-50 40-50 40-50 Apple strudel, 50-60 crèpes...
- Page 12 ENGLISH Recipe Function Preheating Level (from the Temperature Cooking time bottom) (°C) (min) Lasagna, potatoes 40-50 au gratin, cannelloni, pasta 40-50 timbales 40-50 Bread 30-40 30-40 30-40 Pizza 15-20 20-30 20-30 Vol-au-vents 20-30 30-40 30-40 Soufflés 40-50 50-60 50-60...
- Page 13 ENGLISH Cooking table for grill function Recipe Function Preheating Level (from the Temperature Cooking time bottom) (°C) (min) Toast 200-225 10-15 Sirloin steak 200-225 30-40 Cutlets 200-225 30-40 Sausages 200-225 30-40 Pork chops 200-225 30-40 Fish (cutlets) 200-225 30-40 Chicken legs 200-225 40-50 Kebabs...
-
Page 14: Cleaning And Maintenance
ENGLISH Cleaning and maintenance CLEANING Accessories • Soak the accessories in water with WARNING! washing up detergent immediately after Never use steam cleaning equipment. use, handling them with oven gloves if Only clean the oven when it is cool to still hot. - Page 15 ENGLISH • The appliance could be equipped with 2 Close the door as far as it will go (A), lift pyrolysis functions: it up (B) and turn it (C) until it is released • Energy-saving cycle (PYRO EXPRESS/ (D) (Fig. 2, 3, 4). ECO): which consumes approximately 25% less energy than the standard cycle.
-
Page 16: Important
Reconnect the oven to the power supply. NOTE: Only use 25-40W/230V type E-14, T300°C incandescent lamps. Fig. 6 Lamps are available from IKEA After Sales To reposition the heating element, lift Service. it up, pulling it slightly towards you, IMPORTANT: using halogen lamps, do... -
Page 17: What To Do If
“What to do if...” table. If any repairs are required, please contact Switch the appliance off and back on IKEA After Sales Service (to guarantee that again it to see if the fault persists. original spare parts will be used and repairs If after the above checks the fault still occurs, carried out correctly). -
Page 18: Technical Data
ENGLISH Technical data Dimensions Width Height Depth Usable volumes l Area of largest baking sheet (net surface) cm 1200 Bottom heating element W 1 150 Full oven (Top + Bottom) W 2550 Grill W 1400 Turbo grill W 1425 Fan cooking W 2025 Bottom heating element + fan W 3150... -
Page 19: Installation
ENGLISH Installation During use After unpacking the oven, make sure that it has not been damaged during transport Do not place heavy objects on the door and that the oven door closes properly. In as they could damage it. the event of problems, contact the dealer or Do not cling to the door or hang your nearest After-sales Service. - Page 20 ENGLISH Door safety device To open the door with the door safety device see Fig 1. Fig. 1 The door safety device can be removed by following the sequence of images (see Fig. 2). Fig. 2...
-
Page 21: Electrical Connection
1,5 mm ) must be carried out by a qualified the mains voltage. The rating plate is on electrician. Contact IKEA After Sales Service. the front edge of the oven (visible when the door is open). Environmental concerns... -
Page 22: Ikea Guarantee
Replaced service contractual partner or where non- parts become the property of IKEA.. original parts have been used. What will IKEA do to correct the problem? • Repairs caused by installation which is IKEA appointed service provider will examine faulty or not according to specification. - Page 23 • ask for clarifications on installation of the another address, IKEA is not liable for IKEA appliance in the dedicated IKEA any damage that may occur during kitchen furniture;...
- Page 24 © Inter IKEA Systems B.V. 2010 18535 AA-486217-1...
Need help?
Do you have a question about the DATID OV8 and is the answer not in the manual?
Questions and answers
Как почистить стекла дверцы с внутренней стороны ?
The context does not provide specific instructions for cleaning between the double glass of the IKEA DATID OV8 oven door. Therefore, it is not possible to determine how to clean the inner glass based on the given information.
This answer is automatically generated
Какие размеры противня?
The area of the largest baking sheet (net surface) is 1200 cm².
This answer is automatically generated
The oven will not turn on unless you set a timer, how do you turn this off?
To turn off the timer function on the IKEA DATID OV8 oven, turn button (B) anti-clockwise (without pressing) until the symbol is displayed in the window. This excludes the acoustic signal and deactivates the timer.
This answer is automatically generated
The oven is having a loud ticking sound like a clock all the time. No timer is in use.