Advertisement
Quick Links
Advertisement

Related Manuals for Fisher-Price V6889


Summary of Contents for Fisher-Price V6889
- Page 1 V6889 IMPORTANT! KEEP INSTRUCTIONS FOR FUTURE REFERENCE. www.fi sher-price.com.au...
- Page 2 IMPORTANT! DANGER To prevent electric shock, do not immerse in water; wipe clean with damp cloth. WARNING To prevent strangulation with power cord, never place transmitter within reach of child. CAUTION This product cannot replace responsible adult supervision.
- Page 3 An AC adaptor/charger is not a toy. • Disconnect the AC adaptor/charger from the receiver before cleaning. • Fisher-Price ® does not recommend the use of two monitors in one house. • Always remember that you are using public airwaves when using your monitor. Conversations, even from rooms near your transmitter, may broadcast to other nursery monitors, radios, cordless telephones or scanners outside your home.
- Page 4 AUSTRALIA: Mattel Australia Pty. Ltd., 658 Church Street, Locked Bag #870, Richmond, Victoria 3121 Australia. Consumer Advisory Service 1300 135 312. NEW ZEALAND: 16-18 William Pickering Drive, Albany 1331, Auckland. Fisher Price, Inc., a subsidiary of Mattel, Inc., East Aurora, NY 14052 U.S.A. ©2010 Mattel, Inc.
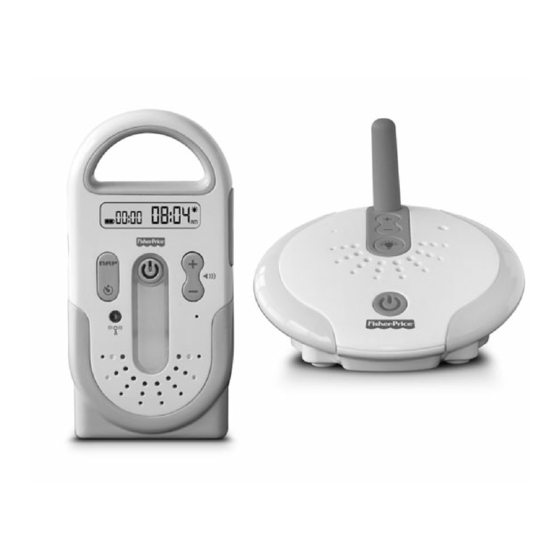
- Page 5 Features Back View Transmitter Back View Receiver...
- Page 6 Features Nightlight Button – press to turn on a soft glow. Nightlights Power Button and L.E.D. Microphone Nightlight Timer Switch - Turn on for 30 minutes of light. Volume Buttons - press to turn speaker volume up or down. Speaker Power Button and L.E.D.
- Page 7 Charging the Battery (Inside the Receiver) IMPORTANT! Fully charge the receiver (with battery pack inside) for fi ve hours before fi rst-time use. • Use only the included AC adaptor/charger! Do not use any other adaptor/charger. • Fit the AC adaptor/charger pin into the DC input jack on the receiver. •...
-
Page 8: Battery Safety Information
Battery Safety Information In exceptional circumstances, batteries may leak fl uids that can cause a chemical burn injury or ruin your product. To avoid battery leakage: • If replacing the battery pack, insert it as indicated inside the battery compartment. •... -
Page 9: Battery Removal
Battery Removal • To remove the battery pack, loosen both screws in the battery compartment door. Remove the door. • Pull the battery wire connector from the socket in the receiver. Contact Consumer Relations to purchase a battery pack. - Page 10 Testing Sound Reception Test transmitter and receiver reception each time you change location of use. Power Button and L.E.D. Power Button and L.E.D. • Place the transmitter in the room where you intend to use it. • Unwrap and fully extend the power cord for best transmission. Plug the power cord into a standard wall outlet.
- Page 11 Testing Sound Reception Power Button and L.E.D. Range Indicator Sound Lights • Place a receiver in the room where you intend to use it. • Press the power button to turn the power ON. Wait a few seconds to see if you have a good signal. If the range indicator light blinks along with beeping, you are out of range.
-
Page 12: Setup And Use
Setup and Use Night Light Battery Indicator Nap Timer Clock Clock Set • Turn receiver power ON. • Press and hold the bottom of the nap timer/clock button to choose 12-hour or 24-hour clock format. Press the top of the nap timer/clock button to make a choice. •... - Page 13 Setup and Use Nightlight Button Power Button Nightlight Nightlight and L.E.D. Timer Switch Timer Switch • Place the transmitter in the same room with child. Point the microphone towards the crib or play area. • Unwrap and fully extend the power cord for best transmission. Plug the power cord into a standard wall outlet.
- Page 14 Setup and Use Volume Buttons Range Indicator Sound Lights • Place a receiver where you can see and hear it. • To use AC power, unwrap and fully extend the AC adaptor/charger cord for best reception. Insert the AC adaptor/charger pin into the DC input jack on the receiver and plug into a standard wall outlet. •...
-
Page 15: Problems And Solutions
Make sure receiver power is ON. Release, press and hold the talk button and talk again. Hint: If, after checking all of these solutions, you believe that your transmitter power cord or AC adaptor/charger are ® damaged, please contact Fisher-Price... - Page 16 Care • Excess dirt in the transmitter microphone will hamper transmission of sound. Clean the outer surface of the transmitter and the receiver with a cloth lightly dampened with a mild cleaning solution. • Never immerse the transmitter, receiver or AC adaptor/charger. •...
Need help?
Do you have a question about the V6889 and is the answer not in the manual?
Questions and answers