Table of Contents
Advertisement
Quick Links
WPG-370
Wireless Presentation Gateway
User Guide
IMPORTANT: Please read this User Guide to obtain important information on installing
and using your product in a safe manner, as well as registering your product for future
service. Warranty information contained in this User Guide will describe your limited
coverage from ViewSonic Corporation, which is also found on our web site at http://
www.viewsonic.com in English, or in specific languages using the Regional selection
box in the upper right corner of our website. "Antes de operar su equipo lea cu
idadosamente las instrucciones en este manual"
Model No. VS15180
Advertisement
Table of Contents

Related Manuals for ViewSonic WPG-370


Summary of Contents for ViewSonic WPG-370
-
Page 1: User Guide
Warranty information contained in this User Guide will describe your limited coverage from ViewSonic Corporation, which is also found on our web site at http:// www.viewsonic.com in English, or in specific languages using the Regional selection box in the upper right corner of our website. -
Page 2: Compliance Information
Compliance Information Please read before proceeding • Use only the batteries and power adapter provided by the manufacturer. The use of unauthorized accessories may void your warranty. • Do not store your device in temperatures higher than 50°C (122°F). • The operating temperature for this device is from 0°C (32°F) to 35°C (95°F). FCC Notice The following statement applies to all products that have received FCC approval. - Page 3 CE Conformity for European Countries The device complies with the EMC Directive 2004/108/EC and Low Voltage Directive 2006/95/EC, R&TTE Directive 1999/5/EC. Following information is only for EU-member states: The mark shown to the right is in compliance with the Waste Electrical and Electronic Equipment Directive 2002/96/EC (WEEE).
- Page 4 Declaration of RoHS2 Compliance This product has been designed and manufactured in compliance with Directive 2011/65/EU of the European Parliament and the Council on restriction of the use of certain hazardous substances in electrical and electronic equipment (RoHS2 Directive) and is deemed to comply with the maximum concentration values issued by the European Technical Adaptation Committee (TAC) as shown below: Proposed Maximum...
-
Page 5: Copyright Information
Purchase Date: Product disposal at end of product life ViewSonic respects the environment and is committed to working and living green. Thank you for being part of Smarter, Greener Computing. Please visit ViewSonic website to learn more. USA & Canada: http://www.viewsonic.com/company/green/recycle-program/ Europe: http://www.viewsoniceurope.com/uk/support/recycling-information/... -
Page 6: Table Of Contents
3-3 Connect to WPG by wireless network ..................28 3-4 Using application software ......................29 Chapter 4: Using WPG‐370 on Intel WiDi Mode .................. 3 4 4-1 Switch WPG-370 to Intel WiDi Mode ..................34 4-2 Connect to WPG-370 by Intel WiDi .................... 34 Chapter 5: Using WPG‐370 on Media Streaming Mode ................ 3 8 ... -
Page 7: Chapter 1: Product Introduction
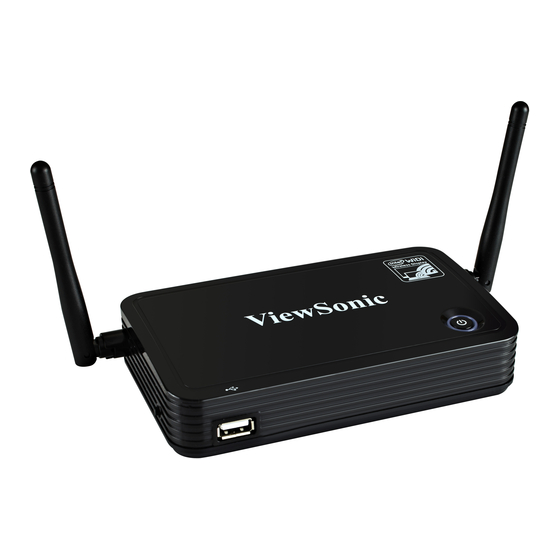
Chapter 1: Product Introduction Congratulations on your purchase of ViewSonic Wireless Presentation Gateway WPG‐370. This section introduces you to the WPG‐370 (referred to as the WPG in this user guide). 1‐1 Package Contents (1) WPG‐370 (2) AC adapter with UK/EU/US plug (3) CD‐ROM (4) Quick Installation Guide 1‐2 Hardware Recommendation WPG‐370 supports real time presentation, Intel Wireless Display® & Multimedia Media streaming play back functions. (1) Presentation Mode (HDMI/VGA) WPG‐370 is designed to able to stream video/music/photo contents from PC (Windows 7 /Window 8 only) to your TV through this device. PC or Notebook CPU: Core 2 Duo 2.0GHz or better Memory: 2.0 GB or better Network: 802.11g/n Wi‐Fi and/or 100/1000 Mbps Ethernet Software: WPG‐370 Utility. (Windows & MAC) ... -
Page 8: Intel Widi Mode (Hdmi)
(2) Intel WiDi Mode (HDMI) Users must have Intel WiDi® compatible platforms to support Intel Wireless Display. The requirement of Intel WiDi® compatible platforms is as below. System Requirement Component •2nd generation Intel® Core™ i3/i5/i7 Mobile Processor •3rd Generation Intel® Core™ i3/i5/i7 Mobile and Desktop Processor Processor Go Intel web site to check in detail: http://www.intel.com/support/wireless/wtech/iwd/sb/CS‐031059.htm •Intel® HD Graphics 4000 •Intel® HD Graphics 3000 (mobile) Graphics •Intel® HD Graphics 2500 •Intel® HD Graphics 2000 (mobile) •Intel® Centrino® Wireless‐N 1000, 1030, 2200, or 2230 •Intel® Centrino® Wireless‐N 2200 for Desktop •Intel® Centrino® Advanced‐N 6200, 6205, 6230, or 6235 •Intel® Centrino® Advanced‐N 6205 for Desktop Wireless •Intel® Centrino® Wireless‐N + WiMAX 6150 •Intel® Centrino® Advanced‐N + WiMAX 6250 •Intel® Centrino® Ultimate‐N 6300 Intel® My WiFi Technology (Intel® MWT) and Intel® Wireless Display must be Software pre‐installed and enabled. ... -
Page 9: Media Streaming Mode (Hdmi/Vga)
(3) Media Streaming Mode (HDMI/VGA) WPG‐370 is designed to able to stream video/music/photo contents from PC (Windows 7 based), smart phone, and Tablet‐PC to your TV through this device. PC or Notebook CPU: Core 2 Duo 2.0GHz or better Memory: 1.0 GB or better Network: 802.11g/n Wi‐Fi and/or 100/1000 Mbps Ethernet Smart phone CPU: 800 MHz or better Memory: 256 MB or better Network: 802.11g/n Wi‐Fi or better Tablet‐PC CPU: 600 MHz or better Memory: 256 MB or better Network: 802.11g/n Wi‐Fi or better Recommend software Android OS: AirFun or iMediaShare iOS: iMediashare ... -
Page 10: Highlights
1‐3 Highlights Thanks again for choosing the product. This product allows multiple users to connect to the same projector by wired or wireless network and avoiding the hassle of using VGA or HDMI cable. Features 802.11 a/b/g/n Wireless compatibility 802.11n 2.4GHz &... -
Page 11: Remote Controller
1‐4 Remote Controller No. Button description 1 Power on & off 2 Show standby screen (not available on this model) 3 Change mode (cycling Presentation, media streaming and WiDi) 4 Go to Previous Page ( not available on this model) 5 Go to next Page( not available on this model) 6 Return to top layer of OSD or Exit menu or stop play Music/ video 7 Show OSD Menu 8 Selection confirm 9 Move the cursor up 10 Move the cursor down ... - Page 12 11 Move the cursor right 12 Move the cursor left 13 Play or Pause Music or video 14 Previous key 15 Next Key 16 Fast backward key 17 Fast Forward key 18 Mute on/off 19 Increase Volume 20 Decrease Volume Notes: 1) Remote controller effective distance is 7 meters. This distance will be shortened in some environments, or when the battery is low. 2) If there’s strong light source near WPG and / or remote controller, remote controller may not be able to function properly. ...
-
Page 13: Hardware Setup/Installation
1‐5 Hardware Setup/Installation (1) Connect your device Note: HDMI and VGA can’t be connected at the same time. Note: USB port is for Firmware upgrade only in Intel® WiDi mode. (2) Connect power and push power button to turn on WPG‐370. After few seconds, when you see the below screen: the device is assigned an IP address, the system is in Presentation mode and ready to do PC mirror from your PC/Mac. Please connect to WPG370 via Wi‐Fi. ... - Page 14 (3) You can switch between Presentation mode, Intel WiDi® Adapter mode and Media Streaming mode by pushing the "Mode" button on remote or side of box.
-
Page 15: Chapter 2: Wpg-370 Administration Setting
Chapter 2: WPG‐370 administration setting. 2‐1 Using application software No Name Function Description 1 Menu Access menu list. 2 Play Start / pause presentation. When pausing a progressing presentation, the displaying image will freeze; press play button again to resume 3 Minimize Minimizes Application Software window 4 Close Closes Application Software window 5 Stop Stop a progressing presentation ... -
Page 16: Menu List
2‐2 Menu List Besides the buttons, you can also click ‘Menu’ button to access menu list. Item Description Information Check the information of connected WPG. Projection Control Controls the projection: Play: Start presentation. Pause: Pauses presentation. Stop: Stop presentation. Output Resolution: Changes display resolution and you can check Web Configuration menu Use the web browser to connect to the IP address of WPG (Wireless / Wired IP address). WPG’s IP address can be found at the lower‐left corner of Instruction page Exit Close menu list ... -
Page 17: Connect To Web Configuration Menu
2‐3 Connect to Web Configuration Menu Please key IP address and suffix(/remote/admin.html) in browser, Ex:, 192.168.59.254/remote/admin.html. Default pass word is “admin”. Item Description Application download Download application from Internet Mode switch Switch between Presentation, Intel WiDi®, and Media streaming mode ... -
Page 18: Status & Info
2‐4 Status & Info Displays system information, like system software version and IP address. Many useful information can be obtained here when you need help about system configuration and firmware upgrade. ... -
Page 19: Network Setting
2‐5 Network Setting Displays and configures the network settings. ... - Page 20 Item Description Obtain an IP address WPG will obtain an IP address from DHCP server automatically. Automatically Use the following IP Set WPG IP address manually. Fill the fields below to setup IP Address address. DNS Server Please input the IP address of the DNS (Domain Name Service) server. Click ‘Apply’ button to save the settings. NOTE: When the configuration settings are changed, you must restart the network connection. You can restart the network connection by clicking “Restart” on the web configuration menu.
-
Page 21: Wireless Settings
2‐6 Wireless Settings Configures wireless network settings. (1)‘Basic’ Settings Displays and configures the wireless settings. Item Description Wireless Function Select ‘Enable’ to enable wireless network function; ‘Disable’ to disable it. Mode Select wireless mode. Only AP (Access Point) mode is supported. Device Name (SSID) Input the Device Name of presentation gateway here. Default is ‘WPG‐370”. Channel Number Show the wireless channel number: 1 to 13. (1 to 11 in certain version of product) Click ‘Apply’ button to save the settings. NOTE: When the configuration settings are changed, you must restart the network connection. You can restart the network connection by clicking “Restart” on the main menu. - Page 22 (2) “Security” Setting Encryption: Disabled Disables wireless encryption. Encryption: WPA +WPA2 Enable WPA + WPA2 encryption. Wireless clients must support WPA encryption and know the encryption passphrase you set here. NOTE: When the configuration settings are changed, you must restart the network connection. You can restart the network connection by clicking “Restart” on the main menu. ...
- Page 23 (3) Band Setting Item Description Band Select the wireless band. Available options are: 2.4GHz (B+G+N) ‐ 802.11b, 802.11g, and 802.11n clients. 5GHz (B+G+N) ‐ 802.11b, 802.11g, and 802.11n clients. ...
-
Page 24: Virtual Ap Bridge Setting
2‐7 Virtual AP Bridge Setting Item Description Virtual AP only Ad‐hoc mode Bridge to Wireless Connect to Internet via Wireless AP router Bridge to Ethernet Connect to Internet via Wired AP router Bridge to Ethernet/ Wired Connection Step1: Connect LAN to the AP router Step2: Change Virtual AP Bridge to “Bridge to Ethernet” and click “Apply”. Then you can bridge WPG370 to Internet. Note: WPG 370 must connect to AP router and can’t connect to WAN directly. ... - Page 25 Bridge to Wireless/ Wireless connection Step1: Change Virtual AP Bridge to “Bridge to Wireless” and click Apply. Step2: Click Wireless connection button. Then there will show the Wireless AP list on the screen. Please choose the AP you want to connect. ...
-
Page 26: Projection Setting
2‐8 Projection Setting Displays and configures the projection setting. Item Description Instruction Page Language Selection Select the displaying language. HDMI Output Resolution Select HDMI output resolution for projection. VGA Output Resolution Select VGA output resolution for projection. NOTE: When the configuration settings are changed, you must restart the network connection. You can restart the network connection by clicking “Restart” on the main menu. ... -
Page 27: Password Setting
2‐9 Password Setting Displays and configures the password setting. Item Description Current Password Input current password here. Default pass word is “admin”. New Password / Confirmed Password New Password: Enter new password. Confirmed Password: Confirmed the new entered password. Click ‘Apply’ button to save the settings. NOTE: When the configuration settings are changed, you must restart the network connection. You can restart the network connection by clicking “Restart” on the main menu. ... -
Page 28: Restart
2‐10 Restart Restart WPG when the device is not working properly or to apply changes made on web configuration menu. Click ‘OK’ to restart the WPG, or click ‘Cancel’ to abort. ... -
Page 29: Firmware Upgrade
2‐11 Firmware Upgrade Select ‘Auto’, WPG will download and upgrade latest firmware automatically once WPG connects to Internet. If "Auto" upgrade fail, suggest using Manual Firmware upgrade, update process as following: 1. Download the firmware by pressing "Manual" button. 2. Rename file name to "install.img" if file name is difference. 3. Copy "install.img" to the root directory of a USB flash. 4. Press & hold the mode selection key and power on the device till show "Waiting for USB upgrade". 5. Please plug the USB flash into the USB connector. Firmware will be upgraded automatically. 6. After upgrading, the system will reboot automatically. Please power off/power on the device after reboot. Note: It’s recommended to use wired Ethernet connection to perform firmware upgrade. Before you can update FW on the internet, you must connect to Internet. If you have a AP router that connect to internet, you can follow the setting below to bridge WPG370 to the AP router and then connect to internet. For more information, please refer to 2.7 AP Bridge setting. ... -
Page 30: Logout
2‐12 Logout If you wish to logout from web configuration menu, click ‘Logout’. ... -
Page 31: Chapter 3: Using Wpg-370 On Presentation Mode
Chapter 3: Using WPG‐370 on Presentation Mode 3‐1 Switch WPG‐370 to Presentation Mode Push mode selection button on the WPG‐370 till you see the screen below, the box is ready for Presentation Mode connection. ... -
Page 32: Check The Ip Address Of Wpg
3‐2 Check the IP address of WPG When WPG is powered on, check the connected display, you can find the IP address and login code Instruction Page: You can connect to WPG by the IP address of the connection type you’re using (wired /wireless). ... -
Page 33: Connect To Wpg By Wireless Network
3‐3 Connect to WPG by wireless network Use your computer’s Wireless Network Connection window to access an available wireless network. Select the device from the list. Click Connect. The default device name is WPG‐370. Note: If using a wireless client other than Windows, the screen above may look differently. For more details, see your PC user guide. ... -
Page 34: Using Application Software
3‐4 Using application software You can install WPG370 application in the CD ROM or download the application from setup page of WPG‐370, detail see item 2‐1. . (1) Install application in CD‐ROM ... - Page 35 ...
- Page 36 ...
- Page 37 (2) Download application from Internet. Please follow instructions to download and install WPG‐370 application software according to your system: Please key IP address and suffix(/remote/admin.html) in browser, Ex:, 192.168.59.254/remote/admin.htm WPG’s IP address is shown at the Instruction page. Click ‘Windows x32’ or ”Windows x64” or ‘ MAC’ button to download application software. A window is prompted, to execute, please check “run”, or “save” to save application software for future usage. During the MAC application software installation, you will also be asked to install “soundflower” program to make your MAC PC to output audio correctly, please install it before going to next step. If you see this message (or anything similar from your antivirus program) when running WPG, please click ‘Unblock’ to allow WPG client software to access network, or WPG client program will not be able to work properly. ...
- Page 38 WPG will auto detect ‘Server IP’ please input login code as shown on instruction page. If login code is correct, application software will appear. ...
-
Page 39: Chapter 4: Using Wpg-370 On Intel Widi Mode
Chapter 4: Using WPG‐370 on Intel WiDi Mode 4‐1 Switch WPG‐370 to Intel WiDi Mode Push mode selection button on the WPG‐370 till you see the screen below, the box is ready for Intel Wireless Display connection. 4‐2 Connect to WPG‐370 by Intel WiDi For Intel WiDi platform device Please follow the next steps to do Intel WiDi connection ... - Page 40 1. Double click the Intel WiDi icon from your PC desktop. Click “Scan” for available adapters” and then connect to the adapter with same ID on the screen. ...
- Page 41 2. For the first connection, users need to type the password show on the projector or TV screen. ...
- Page 42 3. After the connection successful, PC screen will be projected to the screen of TV or projector. ...
-
Page 43: Chapter 5: Using Wpg-370 On Media Streaming Mode
Chapter 5: Using WPG‐370 on Media Streaming Mode 5‐1 Switch WPG‐370 to Media Streaming Mode Push mode selection button on the WPG‐370 till you see the screen below, the box is ready for Media Streaming Mode connection. In Media Streaming mode, you can streaming photo/music/video from your PC, Smartphone or tablet. Or play video/Music/photo form USB Please follow the instruction to do media streaming. Connect to WPG‐370 in Wi‐Fi AP list. ... - Page 44 Play media by WiFi streaming, we recommend software/AP as following : For more information Please check user manual of each software. Android: iMediaShare, Airfun iOS: iMediaShare, Wi‐Fi Media Play media by USB Plug in USB drive in to WPG‐370 Use remote or virtual remote to control. (key in IP address with suffix “/remote”) EX: 192.168.59.254/remote, will show below You can play Video, Photo or music that you select. ...
-
Page 45: Appendix A: Support Resolution
Appendix A: Support resolution Interface Output resolution 800x600@60Hz、1024x768@60Hz、1280x800@60Hz、1280x1024@60Hz、 VGA 1366x768@60Hz HDMI NTSC,PAL,480p,576p,720p50Hz,720p60Hz,1080i50Hz,1080i60hz,1080p50Hz,1080p60Hz Appendex B: WPG‐370 Support Media Format Video Format Format File extension AVI avi MPEG‐1 mpg, mpeg MPEG‐2 mpg, mpeg MPEG‐TS m2t, tts MPEG‐4 mp4, mp4v, mpeg4, m4v 3GP 3gp, 3gpp 3GP2 3g2, 3gpp2 MOV mov WMV wmv DVR‐MS dvr, dvr‐ms Audio Format Format File extension MP3 mp3 LPCM ... -
Page 46: Photo Format
Photo Format Format File extension GIF gif JPG jpg, jpeg BMP bmp PNG png ... -
Page 47: Customer Support
Contact your reseller service@ap.viewsonic.com T (Toll-Free)= 1-800-688-6688 United States www.viewsonic.com T (Toll)= 1-424-233-2530 service.us@viewsonic.com F= 1-909-468-3757 Limited Warranty Please go to the Customer Support table in this guide for the ViewSonic website in your region to get warranty information.
Need help?
Do you have a question about the WPG-370 and is the answer not in the manual?
Questions and answers