Table of Contents
Advertisement
Quick Links
INS10134 - 9/12
Installation Guide
Please Contact Moen First
For Installation Help, Missing or
Guía de Instalación
Replacement Parts
(USA)
Guide d'installation
1-800-BUY-MOEN (1-800-289-6636)
Mon - Fri 8:00 AM to 8:00 PM, Eastern
Sat. 9:00 AM to 5:30 PM Eastern
WWW.MOEN.COM
(Canada)
1-800-465-6130
Mon - Fri 7:30 AM to 8:00 PM, Eastern
WWW.MOEN.CA
Por favor, contacte primero con Moen
Para la ayuda de Instalación, los
Desaparecidos o las Piezas de Recambio
01-800-718-4345
Lunes a viernes de 8:00 a 20:00 hs.
(Costa Este)
Sáb. 8:00 a 18:30 hs. (Costa Este)
WWW.MOEN.MX
Veuillez d'abord contacter Moen
en cas de problèmes avec l'installation, ou pour
obtenir toute pièce manquante ou de rechange
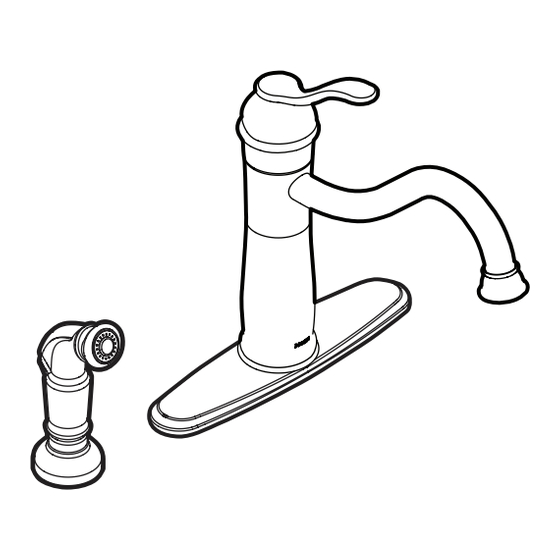
ONE-HANDLE KITCHEN FAUCET
1-800-465-6130
Du lundi au vendredi :
de 7 h 30 à 20 h, HE
WWW.MOEN.CA
MEZCLADORA MONOMANDO
PARA COCINA
ROBINET DE CUISINE À
UNE POIGNÉE
Advertisement
Table of Contents

Related Manuals for Moen ONE-HANDLE KITCHEN FAUCET


Summary of Contents for Moen ONE-HANDLE KITCHEN FAUCET
- Page 1 WWW.MOEN.COM (Canada) 1-800-465-6130 Mon - Fri 7:30 AM to 8:00 PM, Eastern WWW.MOEN.CA Por favor, contacte primero con Moen Para la ayuda de Instalación, los Desaparecidos o las Piezas de Recambio 01-800-718-4345 Lunes a viernes de 8:00 a 20:00 hs.
-
Page 2: Parts List
L. Deck Plate Gasket HERRAMIENTAS ÚTILES E. Mounting Nut M. Faucet Body Gasket Para que el cambio de la llave sea fácil y seguro, Moen le F. Spout Base N. Product Identification recomienda usar estas útiles herramientas. G. Deck Plate Label H. - Page 3 INS10134 - 9/12 Option/Option/Opción Place faucet body gasket (M) onto faucet body (B). Install faucet For 3 Hole Applications: Insert deck plate gasket (L) onto deck body (B) into spout base (F). plate (G) and place on mounting surface. Coloque el empaque del cuerpo de la mezcladora (M) sobre el Para aplicaciones de 3 agujeros: Inserte el empaque de la placa cuerpo de la mezcladora.
- Page 4 Partial screw install El tornillo parcial instala Installation partielle de la vis Thread mounting nut within ½" of sink base. Rosque la tuerca de montaje dentro del ½" de la base del fregadero. Visser l'écrou de montage à 1/2 po de la base de l'évier. Install mounting screws (K) into mounting nut (J).
- Page 5 INS1970 - 12/11 INS10134 - 9/12 Option/Option/Opción For Deck Thickness less than 1-1/4" Para el grueso de la cubierta menos que 1-1/4" Pour l'épaisseur de plate-forme moins que 1-1/4" For Deck Thickness less than 1-1/4" For Deck Thickness more than 1-1/4" Para el grueso de la cubierta menos que 1-1/4"...
- Page 6 Insert side spray hose (A) into hose guide (C) until side spray Remove and discard the protective cap from the side spray hose assembly is seated in the hose guide. (A). Insert the side spray hose (A) into the outlet hose of the faucet. After the fitting has been inserted as far as possible, push the white Inserte la manguera del rociador lateral (A) en la guía de la manguera clip until a “click”...
- Page 7 INS1970 - 12/11 INS10134 - 9/12 Cold Frio Froid Attach product identi cation label here. Sujete la etiqueta de la identi cación de producto aquí. Attachez l'étiquette d'identi cation de produit ici. Caliente Chaud To flush debris from the plumbing system: Remove aerator (H) by Turn on hot and cold water stop valves.
- Page 8 Some states, provinces and nations do not allow the exclusion or limitation of incidental or consequential damages, so the above limitations or exclusions may not apply to you. This warranty gives you specific legal rights and you may also have other rights which vary from state to state, province to province, nation to nation. Moen will advise you of the procedure to follow in mak- ing warranty claims.
Need help?
Do you have a question about the ONE-HANDLE KITCHEN FAUCET and is the answer not in the manual?
Questions and answers