Table of Contents
Advertisement
Quick Links
OPERATOR'S MANUAL
QUATTRO
™
4 Burner LP Gas Grill
SGP4330/SGP4330SB
fOR OUTDOOR USE
ONLy
LP GAS cyLiNDER
SOLD SEPARATELy
DANGER:
You WILL be KILLED or SERIOUSLY HURT if you do not follow the instructions
in this operator's manual.
NOTE TO iNSTALLER/ASSEMBLER: Give this Operator's Manual to the consumer so the consumer may retain it for
future reference.
SAVE THIS MANUAL FOR FUTURE REFERENCE
Visit the STOK website at: www.stokgrills.com
™
Advertisement
Table of Contents

Related Manuals for STOK QUATTRO SGP4330


Summary of Contents for STOK QUATTRO SGP4330
- Page 1 OUTDOOR USE ONLy LP GAS cyLiNDER SOLD SEPARATELy Visit the STOK website at: www.stokgrills.com DANGER: You WILL be KILLED or SERIOUSLY HURT if you do not follow the instructions in this operator’s manual. NOTE TO iNSTALLER/ASSEMBLER: Give this Operator’s Manual to the consumer so the consumer may retain it for future reference.
-
Page 2: Table Of Contents
Read the Assembly, produit de STOK, Operation, and Maintenance instructions s’il vous plaît la visite: http://register.STOK.com thoroughly before use, assembly, or servic- ing of this product. Para registrar su producto de STOK, por favor visita: http://register.STOK.com... -
Page 3: General Safety Rules
GENERAL SAFETY RULES The grill shall not be used under overhead combustible WARNiNG: construction. Keep area around this appliance free of combustible Read and understand all instructions. Failure to fol- materials, gasoline, and all other flammable vapors and low all instructions listed below, may result in electric liquids. -
Page 4: Specific Safety Rules
GENERAL SAFETY RULES If a leak is detected at any time, get away from the LP LP gas cylinders must be stored outdoors out of gas cylinder and call the fire department. reach of children and must not be stored in a building, garage, or any other closed in area. -
Page 5: Symbols
SYMBOLS The following signal words and meanings are intended to explain the levels of risk associated with this product. SyMBOL SiGNAL MEANiNG Indicates an imminently hazardous situation, which, if not avoided, will result DANGER: in death or serious injury. Indicates a potentially hazardous situation, which, if not avoided, could result WARNiNG: in death or serious injury. -
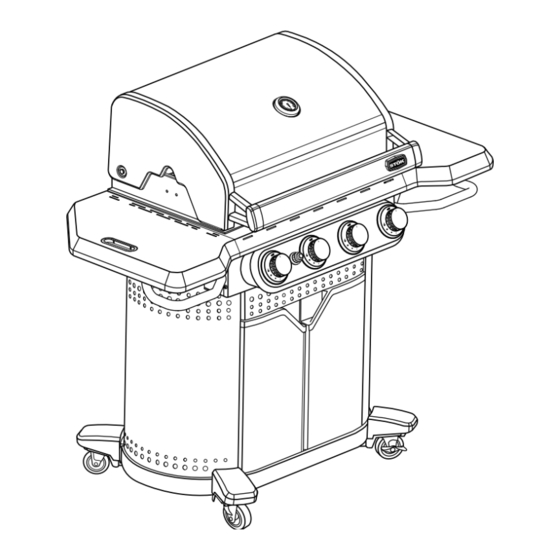
Page 6: Features
FEATURES PRODUcT SPEcificATiONS Total grill surface ..........600 sq. in. BTU rating ............... 48,000 Grilling surface height ..........34.5 in. Primary grilling surface ..450 sq. in. (25.75 in. x 17.5 in.) Fuel source ........Propane (not included) Warming rack ......150 sq. in. (24.5 in. x 6 in.) Natural gas convertible .......... -
Page 7: Tools Needed
FEATURES KNOW yOUR GRiLL PiZZA STONE - Make brick oven quality pizza using the grill and the porous ceramic pizza stone. The pizza stone See Figure 2. absorbs heat to promote even cooking. The stone will The safe use of this grill requires an understanding of the discolor with use but will not affect performance. -
Page 8: Loose Parts
LOOSE PARTS Fig. 4 Description Qty. Description Qty. A - Side shelf (left) ............1 R - Caster assembly (left side of base) ......2 B - Grill assembly ............1 S - Bottom panel ............1 C - Grate ............... 2 T - Rear panel ............... -
Page 9: Assembly
ASSEMBLY UNPAcKiNG STEP 1: iNSTALLiNG THE cASTER ASSEMBLy See Figure 5. This product requires assembly. The right side of the base has a circular cut-out where the Carefully lift grill from the carton and place it on a level LP gas tank will be placed. - Page 10 ASSEMBLY right side bolt panel (ee) front panel left side panel rear panel brace bolt (ee) Fig. 7 STEP 4: ATTAcHiNG iNSERT STORAGE TO BASE slot See Figure 8. Place the insert storage inside the cabinet on the left side.
- Page 11 ASSEMBLY STEP 5: MOUNTiNG THE GRiLL ASSEMBLy STEP 6: iNSTALLiNG HEAT TENTS TO THE cABiNET See Figure 10. See Figure 9. Heat tents work to evenly distribute heat inside the grill. Do not grill without the heat tents installed. NOTE: This step requires two people to lift and correctly position the grill assembly on the cabinet.
- Page 12 ASSEMBLY STEP 7: iNSTALLiNG GRATES AND GRATE iNSERTS grate See Figures 11 - 12. inserts Fully raise the hood. Carefully lay grates inside the grill assembly. Set a round grate insert in the hole of each of the grates.
- Page 13 ASSEMBLY STEP 9: iNSTALLiNG SiDE SHELVES STEP 8: iNSTALLiNG THE WARMiNG RAcK See Figure 14. See Figure 13. Remove the bottom screw from the spacers on each Fully raise the hood. side of the firebox. Lay the warming rack in the grooves on each side of ...
- Page 14 ASSEMBLY STEP 10: iNSTALLiNG THE GRiLL DOORS See Figure 15. Holding the grill door (left) securely, slide the pin in the bottom of the door into the hole in the base of the cabinet. Align the hole in the top of the door with the hole (left side) in the front panel.
-
Page 15: Lp Gas Cylinder
ASSEMBLY STEP 14: cONNEcTiNG REGULATOR TO THE STEP 13: iNSTALLiNG BATTERy iN iGNiTOR LP GAS cyLiNDER See Figure 18. See Figures 19 - 22. Turn the ignitor cap counterclockwise and lift cap from the control panel. Open cabinet doors. ... - Page 16 ASSEMBLY Remove cap from LP gas cylinder. regulator cylinder Hold the regulator firmly and insert nipple into the gas valve cylinder valve. NOTE: Nipple must be centered in the cylinder valve. Holding coupling nut and regulator as shown, turn coupling nut clockwise and tighten by hand taking care not to crossthread the connection.
- Page 17 ASSEMBLY Using a clean paint brush and a 50/50 mixture of mild DANGER: soap and water, brush soapy solution over all the con- nections and fittings on the grill. DO NOT smoke or use an open flame during leak test. ...
-
Page 18: Operation
OPERATION cOOKiNG/GRiLLiNG TiPS WARNiNG: The best oils to use when grilling meats are high- temperature oils (i.e., peanut, canola, safflower, and Do not allow familiarity with grill to make you care- cottonseed oils). less. Remember that a careless fraction of a second ... - Page 19 OPERATION electric cAUTiON: ignitor If ignition does NOT occur within 5 seconds, turn the control knob OFF and wait 5 minutes. Repeat lighting procedures. If burner does NOT ignite with the cylinder valve open, gas will continue to flow of the burner and could accidently ignite and result in serious personal injury.
- Page 20 OPERATION RESETiNG THE GAS REGULATOR SAfETy To ignite burners using match lighting: Open the hood. DEVicE Turn all control knobs on the control panel off. Since 1995, all regulators include a safety feature that restricts gas flow in the event of a gas leak. If you turn on ...
- Page 21 OPERATION To use the grate to grill meat: WARNiNG: Turn on the grill and close the hood. Preheat the grill for 10 - 15 minutes. Only place the pizza stone in cold grill. Placing the Open the hood and place the meat on clean grates and pizza stone in a hot grill can result in possible serious close the hood.
-
Page 22: Maintenance
MAINTENANCE Remove hitch pin securing the burner(s) to the bottom WARNiNG: of the grill. When servicing, use only identical replacement parts. Use of any other parts may create a hazard or cause hitch product damage. GENERAL MAiNTENANcE Do not mistake brown and black build up of grease and smoke for paint. - Page 23 MAINTENANCE gas valve orifice burner electrode Fig. 30 clean burner tubes using one of the following three ways: 1. Bend a stiff wire into a small hook. Run the hook through each burner tube several times. 2. Use a narrow bottle brush with flexible hand and run through burner tubes several times.
-
Page 24: Hose Check
MAINTENANCE HOSE cHEcK STORiNG THE GRiLL See Figure 33. Close cylinder valve completely. Inspect all hoses before each use. Replace any damaged hoses before using the Turn all control knobs on the control panel off. grill. Close cylinder valve completely. NOTE: Only use parts recommended by the manufacturer. -
Page 25: Troubleshooting
TROUBLESHOOTING PROBLEM cAUSE SOLUTiON Smell of gas Gas cylinder valve open. Turn off cylinder valve immediately and tighten connections. Turn off cylinder valve immediately and check Hose, regulator, or valve leaking. for damaged hose, regulator, or valve. Per- form leak test, see “Testing Valves, Hose, and Regulator for Leaks”... -
Page 26: Warranty
wARRANTY K™ Gas Grill limited WARRANTy Ō Thank you for purchasing a STŌK™ brand grill. Below is our limited gas grill product warranty. Before submitting a war- ranty claim, we suggest you read the Operator’s Manual that came with your grill. You may discover an easy and simple solution to your problem. If you cannot find the manual, a replacement can be obtained by calling the number below, or by downloading one from our web site at the address below. - Page 27 NOTES...
Need help?
Do you have a question about the QUATTRO SGP4330 and is the answer not in the manual?
Questions and answers