Omron Intelli-Sense HEM-780 Instruction Manual
Automatic blood pressure monitor with comfit cuff
Hide thumbs
Also See for Intelli-Sense HEM-780:
- Instruction manual (104 pages) ,
- Manual de instrucciones (52 pages) ,
- Instruction manual (13 pages)

Subscribe to Our Youtube Channel
Related Manuals for Omron Intelli-Sense HEM-780


Summary of Contents for Omron Intelli-Sense HEM-780
- Page 1 INSTRUCTION MANUAL Automatic Blood Pressure Monitor ™ with ComFit Cuff HEM-780 Model...
-
Page 2: Table Of Contents
CONTENTS Before Using the Monitor Introduction ......... .3 Important Safety Notes . -
Page 3: Introduction
INTRODUCTION Thank you for purchasing the Omron HEM-780 IntelliSense ® Automatic Blood Pressure Monitor with the ComFit ™ Cuff. Fill in for future reference. DATE PURCHASED: __________________ SERIAL NUMBER: ____________________ Staple your purchase receipt here Your new digital blood pressure monitor uses the oscillometric method of blood pressure measurement. -
Page 4: Important Safety Notes
Do not use a cellular phone near the unit. It may result in operational failure. Do not plug or unplug the adapter power cord with wet hands. Changes or modifications not approved by Omron Healthcare will void the user warranty. Do not disassemble or attempt to repair the unit or components. -
Page 5: Before Taking A Measurement
BEFORE TAKING A MEASUREMENT To ensure a reliable reading follow these recommendations: 1. Avoid eating, smoking, and exercising for 30 minutes before taking a measurement. Rest for at least 15 minutes before taking the measurement. 2. Stress raises blood pressure. Avoid taking measurements during stressful times. -
Page 6: Know Your Unit
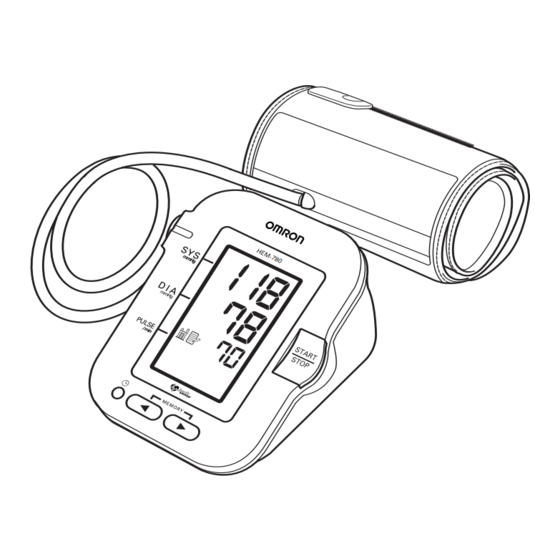
KNOW YOUR UNIT Main Unit: Display Battery Compartment Start/Stop Button Memory Buttons Air Jack Date/Time Setting Button AC Adapter Jack Components: Air Tube Grip Air Plug (Connects to Air Jack) Storage Case Arm Cuff AC Adapter... -
Page 7: Unit Display
UNIT DISPLAY Systolic Blood Pressure Diastolic Blood Pressure Heartbeat Symbol Memory Symbol Average Value Symbol Pulse Display Deflation Symbol Movement Error Symbol Date/Time Display Irregular Heartbeat Symbol Battery Low Symbol IRREGULAR HEARTBEAT SYMBOL IRREGULAR HEARTBEAT SYMBOL When the monitor detects an irregular rhythm two or more times during the measurement, the Irregular Heartbeat Symbol ( will appear on the display with the measurement values. -
Page 8: Battery Installation
BATTERY INSTALLATION 1. Press the M indicator on the battery cover and slide the cover off in the direction of the arrow. 2. Install 4 “AA” size batteries so the + (positive) and - (negative) polarities match the polarities of the battery compartment as indicated. -
Page 9: Using The Ac Adapter
USING THE AC ADAPTER Use only the authorized Omron AC Adapter, Model Number HEM-ADPT1, with this monitor. Use of any other adapter may cause damage to the monitor and will void the user warranty. To connect the AC Adapter x Insert the AC Adapter Plug into the AC Adapter Jack on the back side of the monitor as illustrated. -
Page 10: Setting The Date And Time
SETTING THE DATE AND TIME The Blood Pressure Monitor automatically stores up to 90 measurement values with the date and time. The monitor also calculates an average reading based on the last three measurement values. Set the monitor to the current date and time before taking a measurement for the first time. - Page 11 SETTING THE DATE AND TIME 3. SETTING THE MONTH Press the MEMORY up button to advance by increments of one month. Press the Date/Time Setting button to set the current month. The day flashes on the display. 4. SETTING THE DAY Press the MEMORY up button to advance by increments of one day.
- Page 12 SETTING THE DATE AND TIME 6. SETTING THE MINUTE Press the MEMORY up button to advance by increments of one minute. Press the Date/Time Setting button to set the current minute. The year flashes on the display. 7. Press the START/STOP button to turn the display off.
-
Page 13: Applying The Arm Cuff
APPLYING THE ARM CUFF 1. Make sure the air plug is securely inserted in the main unit. 2. Remove tight-fitting clothing from your upper arm. 3. Sit in a chair with your feet flat on the floor. Place your arm on a table so the cuff is level with your heart. - Page 14 APPLYING THE ARM CUFF 4. Hold the grip on the cuff securely Grip with your hand. Closure Strip 5. Turn the palm of your hand upward. 6. Apply the cuff to your left upper arm so the blue strip is on the inside of your arm and aligned with your middle finger.
- Page 15 APPLYING THE ARM CUFF 7. Wrap the cuff firmly in place around your arm using the closure strip. APPLYING THE CUFF ON THE RIGHT ARM When taking a measurement using the right arm use this instruction for Step 6. Apply the cuff to your right upper arm so the grip is centered on the inside of your inner arm.
-
Page 16: Taking A Measurement
TAKING A MEASUREMENT The monitor automatically determines your ideal inflation level. In rare circumstances when a higher inflation may be necessary, the monitor automatically re-inflates the cuff up to 30 mmHg higher than the initial inflation and restarts the measurement. 1. - Page 17 TAKING A MEASUREMENT You3blood pressure and pulse rate are dis- 3. When the measurement is complete, the arm played. cuff completely deflates. Your blood pressure and pulse rate are displayed. 4. Press the START/STOP button to turn the monitor off. NOTE: The monitor will automatically turn off after five minutes.
-
Page 18: Using The Memory Function
USING THE MEMORY FUNCTION Every time you complete a measurement the monitor stores the blood pressure and pulse rate in the memory. The Blood Pressure Monitor automatically stores up to 90 measurement values. When 90 sets of measurement values are stored in the memory, the oldest record is deleted to save the most recent measurement values. - Page 19 USING THE MEMORY FUNCTION TO DISPLAY THE MEASUREMENT VALUES The date and time is alternately displayed with the measurement values. 1. Press the MEMORY down button to display the most recent measurement values on the screen. MEMORY up button to display the oldest Press the measurement values.
-
Page 20: Care And Maintenance
CARE AND MAINTENANCE To keep your digital blood pressure monitor in the best condition and protect the unit from damage follow the directions listed below: Keep the monitor in the storage case when not in use. Make sure the AC Adapter is placed under the main unit so that is does not damage the display. -
Page 21: Error Indicators
ERROR INDICATORS SYMBOL CAUSE CORRECTION Remove the arm cuff. Refer to Monitor did not detect “Applying the arm cuff” on page pulse rate 13. Wait 2-3 minutes. Take another measurement. Remove the arm cuff. Cuff under-inflated Read, “Taking a Measurement” on page 16. Wait 2-3 minutes. -
Page 22: Troubleshooting Tips
TROUBLESHOOTING TIPS PROBLEM CAUSES AND SOLUTIONS No power. Replace worn batteries. No display appears on the unit. Check the battery installation for proper placement of the battery polarities. Blood pressure varies constantly. Many factors including stress, time of day, how you wrap the cuff, may Measurement values appear affect your blood pressure. -
Page 23: Quick Reference Guide
QUICK REFERENCE GUIDE To ensure a reliable reading, avoid eating, smoking, and exercising for 30 minutes before taking a measurement. You should try to measure your blood pressure at the same time each day. Avoid taking measurements during stressful times. 1. - Page 24 QUICK REFERENCE GUIDE 5. Press the START/STOP button. Display symbols appear. The cuff starts to inflate automatically. Remain still and do not talk during ® the measurement. NOTE: To stop the inflation or measurement, push the START/STOP button. The monitor will stop inflating, start deflating, and will turn off.
-
Page 25: Fcc Statement
FCC STATEMENT Note: POTENTIAL FOR RADIO/TELEVISION INTERFERENCE (for U.S.A. only) This product has been tested and found to comply with the limits for a Class B digital device, pursuant to part 15 of the FCC rules. These limits are designed to provide reasonable protection against harmful interference in a residential installation. -
Page 26: Warranty Information
OMRON SHALL NOT BE LIABLE FOR LOSS OF USE OR ANY OTHER INCIDENTAL, CONSEQUENTIAL OR INDIRECT COSTS, EXPENSES OR DAMAGES. Some states do not allow the exclusion or limitation of incidental or consequential damages, so the above exclusions may not apply to you. -
Page 27: Specifications
SPECIFICATIONS Model: HEM-780 Display: LCD Digital Display Measurement Range: Pressure: 0 to 299 mmHg, Pulse: 40-180/min. Accuracy/Calibration: Pressure: ±3mmHg or 2% of reading Pulse: ±5% of reading Inflation: Automatic by electric pump Deflation: Automatic pressure release valve Rapid Air Release:... - Page 28 Manufactured for: OMRON HEALTHCARE, INC. 1200 Lakeside Drive Bannockburn, Illinois 60015 www.omronhealthcare.com Made in China Copyright © 2005 Omron Healthcare, Inc. 780N2INST Rev...
- Page 29 MANUAL DE INSTRUCCIONES MONITOR AUTOMÁTICO DE LA PRESIÓN ™ ARTERIAL CON BRAZALETE COMFIT HEM-780 Modelo...
- Page 30 ÍNDICE Antes de usar el monitor Introducción .........E3 Notas de seguridad importantes .
-
Page 31: Introducción
• Adaptador de CA • 4 pilas “AA” • Estuche de almacenamiento • Manual de instrucciones impreso en inglés y español El monitor de la presión arterial de inflado automático HEM-780 IntelliSense ® está diseñado para uso domiciliario. GUARDE ESTAS INSTRUCCIONES... -
Page 32: Notas De Seguridad Importantes
No enchufe ni desenchufe el cable de alimentación eléctrica con las manos húmedas. Cambios o modificaciones no aprobados por Omron Healthcare anularán la garantía del usuario. No desarme ni intente reparar la unidad ni sus componentes. -
Page 33: Antes De Medir La Presión Arterial
ANTES DE MEDIR LA PRESIÓN ARTERIAL Para asegurar una lectura confiable, siga estas recomendaciones: 1. Evite comer, fumar y hacer ejercicios los 30 minutos anteriores a la medición. Descanse por lo menos 15 minutos antes de la medición. 2. El estrés aumenta la presión arterial. Evite realizar mediciones durante momentos de estrés. -
Page 34: Conozca Su Unidad
CONOZCA SU UNIDAD Unidad principal: Pantalla Compartimiento de las pilas Botón START/STOP (inicio/paro) Botones de memoria Conector de aire Botón de ajuste de fecha/hora Conector del adap- tador de CA Componentes: Tubo de aire Sujetador Enchufe de aire (se conecta al conector de aire) Estuche de almacenamiento Brazalete... -
Page 35: Pantalla De La Unidad
PANTALLA DE LA UNIDAD Presión arterial sistólica Presión arterial distólica Símbolo de latidos del corazón Símbolo de la memoria Símbolo de valor promedio Indicador del pulso Símbolo de desinflado Símbolo del error del movimiento Indicador de fecha/hora Símbolo de pilas bajas Símbolo de latidos irregulares del corazón SÍMBOLO DE LATIDOS IRREGULARES DEL CORAZÓN... -
Page 36: Instalación De Las Pilas
INSTALACIÓN DE LAS PILAS 1. Presione el indicador M situado en la tapa de las pilas y deslice la tapa en dirección de la flecha para extraerla. 2. Coloque 4 pilas “AA” de modo que las polaridades + (positiva) y - (negativa) coincidan con las polaridades indicadas en el compartimiento de las pilas. -
Page 37: Uso Del Adaptador De Ca
USO DEL ADAPTADOR DE CA Use sólo el adaptador de CA Omron autorizado, número de modelo HEM-ADPT1, con este monitor. El uso de cualquier otro adaptador puede causar daño al monitor y anulará la garantía del usuario. Para conectar el adaptador de CA x Inserte el enchufe del adaptador de CA en el conector del adaptador de CA situado en la parte trasera del monitor, tal como se ilustra. -
Page 38: Ajuste De La Fecha Y La Hora
AJUSTE DE LA FECHA Y LA HORA El monitor de la presión arterial automáticamente almacena hasta 90 valores de medición con la fecha y hora. El monitor también calcula una lectura promedio basada en los últimos tres valores de medición. Ajuste el monitor con la fecha y hora actual antes de realizar la primera medición. - Page 39 AJUSTE DE LA FECHA Y LA HORA 3. AJUSTE DEL MES Presione el botón de memoria progresivo para avanzar en incrementos de un mes. Presione el botón de Ajuste de fecha/hora para fijar el mes actual. El día parpadea en la pantalla. 4.
- Page 40 AJUSTE DE LA FECHA Y LA HORA 6. AJUSTE DE LOS MINUTOS Presione el botón de memoria progresivo para avanzar en incrementos de un minuto. Presione el botón de Ajuste de fecha/hora para fijar los minutos. El año parpadea en la pantalla. 7.
-
Page 41: Colocación Del Brazalete
COLOCACIÓN DEL BRAZALETE 1. Asegúrese de que el enchufe de aire esté insertado firmemente en la unidad principal. 2. Quítese la ropa apretada de la parte superior del brazo. 3. Siéntese en una silla con los pies en el suelo. Coloque su brazo sobre una mesa de manera que el brazalete quede a nivel de su corazón. - Page 42 COLOCACIÓN DEL BRAZALETE 4. Agarre el sujetador del brazalete Sujetador firmemente con su mano. Tira de cierre 5. Voltee la palma de su mano hacia arriba. 6. Coloque el brazalete en la parte superior de su brazo izquierdo, de manera que la franja azul esté hacia el interior de su brazo y alineada con su dedo medio.
- Page 43 COLOCACIÓN DEL BRAZALETE 7. Envuelva firmemente el brazalete alrededor de su brazo usando la tira de cierre . COLOCACIÓN DEL BRAZALETE EN EL BRAZO DERECHO Cuando realice una medición usando el brazo derecho, emplee esta instrucción del Paso 6. Coloque el brazalete en la parte superior de su brazo derecho de forma que el sujetador quede centrado en el lado interior de su brazo.
-
Page 44: Cómo Realizar Una Medición
CÓMO REALIZAR UNA MEDICIÓN El monitor determina automáticamente el nivel de inflado ideal. En raras circunstancias, cuando puede ser necesario un mayor nivel de inflado, el monitor automáticamente vuelve a inflar el brazalete a un valor 30 mmHg más alto que el nivel de inflado inicial y reinicia la medición. 1. - Page 45 CÓMO REALIZAR UNA MEDICIÓN • Press and holdthe memory down button to 3. Cuando termina la medición, el brazalete increase You3blood pressure and pulse rate are del brazo se desinfla completamente. displayed. Aparece en la pantalla su presión arterial y frecuencia de pulsos. 4.
-
Page 46: Uso De La Función De Memoria
USO DE LA FUNCIÓN DE MEMORIA Cada vez que usted realiza una medición, el monitor almacena los valores de presión arterial y frecuencia de pulsos en la memoria. El monitor de presión arterial automáticamente almacena hasta 90 valores de medición. Cuando se han almacenado 90 conjuntos de valores de medición en la memoria, el registro más antiguo se elimina para guardar el registro más reciente. - Page 47 USO DE LA FUNCIÓN DE MEMORIA PARA MOSTRAR LOS VALORES DE MEDICIÓN La fecha y hora se muestran alternativamente con los valores de medición. 1. Presione el botón de memoria hacia abajo para mostrar en la pantalla los valores de medición más recientes. de memoria hacia arriba para mostrar los Presione el botón valores de medición más antiguos.
-
Page 48: Cuidado Y Mantenimiento
CUIDADO Y MANTENIMIENTO Para conservar su monitor digital de presión arterial en perfecto estado y proteger la unidad contra daño, siga las instrucciones siguientes: Guarde el monitor en su estuche de almacenamiento cuando no lo use. Asegúrese de que el adaptador de CA esté colocado debajo de la unidad principal para no dañar la pantalla. -
Page 49: Indicadores De Error
INDICADORES DE ERROR SÍMBOLO CAUSA CORRECCIÓN Quítese el brazalete. Consulte la El monitor no sección “Colocación del detectó la frecuencia brazalete” en la página 13. de pulsos Espere 2 a 3 minutos. Realice otra medición. Brazalete inflado Quítese el brazalete. insuficientemente Lea la sección “Cómo realizar una medición”... -
Page 50: Sugerencias Para La Resolución De Problemas
SUGERENCIAS PARA LA RESOLUCIÓN DE PROBLEMAS PROBLEMA CAUSAS Y SOLUCIONES No hay alimentación. Reemplace las pilas. No aparece ninguna pantalla Verifique la instalación de las pilas en la unidad. para asegurar la correcta ubicación de las polaridades de las pilas. La presión arterial varía constante- mente. -
Page 51: Guía De Referencia Rápida
GUÍA DE REFERENCIA RÁPIDA Para asegurar una lectura confiable, evite comer, fumar y hacer ejercicios los 30 minutos anteriores a la medición. Debe tratar de medir la presión arterial a la misma hora cada día. Evite realizar mediciones durante momentos de estrés. 1. - Page 52 GUÍA DE REFERENCIA RÁPIDA 5. Presione el botón START/STOP (inicio/paro). Aparecen símbolos indicadores. El brazalete comienza a inflarse automáticamente. Permanezca quieto y no hable durante la ® medición. NOTA: Para detener el inflado o la medición, presione el botón START/STOP. El monitor detendrá...
-
Page 53: Declaración De La Fcc
DECLARACIÓN DE LA FCC NOTA: POSIBILIDAD DE INTERFERENCIA EN RADIO / TELEVISIÓN (para los EE.UU. únicamente) Las pruebas a las que se sometió este producto comprobaron que cumple con las limitaciones establecidas para dispositivos digitales Clase B, de conformidad con la sección 15 de las Normas de la FCC. El propósito de estas limitaciones es brindar protección razonable contra interferencias perjudiciales en el hogar. -
Page 54: Información Sobre La Garantía
única responsabilidad y su único recurso bajo las garantías mencionadas. Para obtener la garantía de servicio de cliente de Omron Healthcare llame al 1-800-634-4350 para la dirección de la localización de centro de reparación y de los gastos de vuelta del envío. La información para el servicio de la garantía está... -
Page 55: Especificaciones
ESPECIFICACIONES Modelo HEM-780 Pantalla: Pantalla LCD digital Espectro de medición: Presión 0 a 299 mmHg, Pulso: 40-180/min. Precisión/calibrado: Presión: ±3 mmHg o 2% de la medición Pulso: ±5% de la medición Inflado: Automático mediante bomba eléctrica Desinflado: Válvula de liberación automática de presión Liberación rápida de aire:... - Page 56 Fabricado para: OMRON HEALTHCARE, INC. 1200 Lakeside Drive Bannockburn, Illinois 60015 www.omronhealthcare.com Hecho en China Copyright © 2005 Omron Healthcare, Inc. 780N2INST Rev...
Need help?
Do you have a question about the Intelli-Sense HEM-780 and is the answer not in the manual?
Questions and answers