Omron HEM-711AC Instruction Manual
Hide thumbs
Also See for HEM-711AC:
- Instruction manual (56 pages) ,
- Getting started manual (1 page) ,
- Instruction manual (38 pages)

Related Manuals for Omron HEM-711AC


Summary of Contents for Omron HEM-711AC
- Page 1 Guide d’utilisation Tensiomètre automatique avec Intellisense HEM-711ACCAN MODÈLE...
-
Page 2: Table Of Contents
TABLE DES MATIÈRES Introduction ....................4 Notes sur la s curit ................... 5 Description de l appareil ................6 Guide de r f rence ..................7 Installation/remplacement des piles ............8 Installation du brassard ................. 9, 10 Prise de la tension art rielle ............... 11, 12 Fonction de m moire ................ -
Page 3: Introduction
INTRODUCTION Merci d avoir achet le tensiom tre automatique avec IntelliSense HEM-711AC d Omron. Bien que votre tension art rielle change au cours de la journ e, vous n avez aucun ajustement effectuer. Le tensiom tre s ajuste aux fluctuations de votre tat. Le tensiom tre IntelliSense dot d une technologie logique floue qui d tecte vos tensions systolique et diastolique, et personnalise le gonflement de chaque mesure. - Page 4 TITLE NOTES SUR LA SÉCURITÉ ¥ Les indicateurs d avertissement et les exemples d ic nes sont pr sent s pour vous aider utiliser le produit correctement et de fa on s curitaire, et pour pr venir le risque de dommages qui pourraient tre caus s, vous ou quelqu un d autre. ¥...
-
Page 5: Description De L Appareil
DESCRIPTION DE L’APPAREIL Coeur-symbole Affichage de la tension art rielle systolique Touche MISE EN MARCHE/ARR T Touche START Touche de rappel de la m moire Prise d air Affichage de la tension art rielle diastolique/du pouls Connecteur (se branche la brise d air) Brassard Tube d air Indicateur vert... -
Page 6: Guide De R F Rence
GUIDE DE RÉFÉRENCE vitez de boire, de fumer et de faire de l exercice au moins 30 minutes avant de prendre une mesure. 2. Enlevez les v tements ajust s de la partie sup rieure de votre bras. 3. Assoyez-vous sur une chaise, les pieds plat sur le sol, et placez votre bras sur une table de fa on que le brassard soit la m me hauteur que votre coeur. -
Page 7: Installation/Remplacement Des Piles
INSTALLATION/ REMPLACEMENT DES PILES Poussez le couvercle des piles dans la direction de la fl che. 2. Installez ou remplacez 4 piles ˙ AA ¨ en pla ant les polarit s (+/-) dans les directions indiqu es dans le bo tier des piles. 3. -
Page 8: Installation Du Brassard
INSTALLATION DU BRASSARD 1. Si le brassard est correctement assembl , le c t crochets du tissu se trouve l ext rieur du revers du brassard, et l anneau en m tal en forme de D ne touche pas votre peau. 2. - Page 9 INSTALLATION DU BRASSARD Tirez sur l extr mit du brassard pour que les bords sup rieur et inf rieur s ajustent de fa on gale autour de votre bras. 6. Lorsque le brassard est correctement install , rabattez FERMEMENT le c t boucles sur le c t crochets du tissu.
-
Page 10: Prise De La Tension Art Rielle
PRISE DE LA TENSION ARTÉRIELLE 1. Appuyez sur la touche ON/OFF a) Tous les symboles de l cran s affichent durant environ une seconde. b) Lorsque le tensiom tre est pr t prendre la mesure, le coeur-symbole appara t l cran Initial LCD Test 2. - Page 11 PRISE DE LA TENSION ARTÉRIELLE Directives pour conditions spéciales: ¥ S il est reconnu que votre tension systolique est de plus de 220 mmHg, appuyez sur la touche START et maintenez-la jusqu ce que le tensiom tre gonfle le brassard 30 40 mmHg de plus que votre tension systolique pr sum e.
-
Page 12: Fonction De M Moire
FONCTION DE MÉMOIRE Ce tensiom tre est dot d une m moire capable d enregistrer quatorze mesures. Chaque fois qu une mesure est compl t e, le tensiom tre met automatiquement en m moire la tension art rielle et le pouls. ¥... -
Page 13: Adaptateur Courant Alternatif
ADAPTATEUR COURANT ALTERNATIF Pour viter des dommages potentiels au tensiom tre, utilisez seulement l adaptateur courant alternatif (mod le HEM-ADPT1). Pour brancher l adaptateur courant alternatif 1. Ins rez le connecteur de l adaptateur courant alternatif dans la prise sur le c t du tensiom tre. 2. - Page 14 Si vous ne pouvez obtenir une bonne mesure apr s avoir appliqu les solutions plus haut d crites, COMMUNIQUEZ SANS FRAIS AVEC LE SERVICE 1-800-634-4350, et indiquez À LA CLIENTÈLE D’OMRON AU au repr sentant que vous avez un mod le HEM-711AC d OMRON.
-
Page 15: Mise En Garde
MISE EN GARDE MISE EN GARDE: Des changements ou modifications non approuv es express ment par Omron Healthcare, Inc. peuvent annuler la garantie accord e l usager de ce produit. REMARQUE: POTENTIEL DE BROUILLAGE RADIO LECTRIQUE ET EN T L VISION... -
Page 16: Entretien Et Nettoyage
ENTRETIEN ET NETTOYAGE Pour protéger votre tensiomètre contre tout dommage, veuillez ÉVITER les situations suivantes: ¥ Soumettre votre tensiom tre et votre brassard des temp ratures extr mes, de l humidit et un ensoleillement direct. ¥ Plier fortement le brassard et le tube. ¥... -
Page 17: Garantie Restreinte De Cinq Ans
Cette garantie sera en vigueur la condition expresse que la carte d enregistrement ci-jointe soit remplie et exp di e Omron dans les 10 jours suivant la date d achat. POUR LE SERVICE ¸ LA CLIENTØLE, APPELEZ SANS FRAIS LE 1-800-634-4350 ou utilisez le formulaire de commentaires www.omronhealthcare.com... -
Page 18: Sp Cifications
SPÉCIFICATIONS Modèle: HEM-711AC Écran: Affichage num rique cristaux liquides Plage de mesure: Tension : 0 280 mmHg Pouls : 40 180/minute Précision/étalonnage: Tension : – 3 mmHg ou 2 % de la mesure Pouls : – 5 % de la mesure... - Page 19 For Customer Service Call Toll Free 1-800-634-4350 Fabriqué par OMRON Distribué par: OMRON HEALTHCARE CANADA 5500 North Service Road Burlington, Ontario L7L 6W6 Copyright © 8/2001 OMRON HEALTHCARE, INC. 711ACCANINST REV...
- Page 20 INSTRUCTION MANUAL Automatic Blood Pressure Monitor IntelliSense™ with HEM-711AC Model...
- Page 21 TABLE OF CONTENTS Introduction....................24 Notes on Safety...................25 Know Your Unit..................26 Quick Reference Guide ................27 Battery Installation/Replacement..............28 How to Apply the Arm Cuff ..............29, 30 How to Take a Reading ................31, 32 How to Use the Memory Function .............33 How to Use the AC adapter................34 Troubleshooting ..................35 Caution......................36 Care and Maintenance ................37...
-
Page 22: Introduction
Arm discomfort and misreading due to improper cuff inflation are virtually eliminated. Your new OMRON monitor uses the oscillometric method of blood pressure measurement. This means the monitor detects your blood’s movement through your brachial artery and converts the movements into a digital reading. -
Page 23: Notes On Safety
NOTES ON SAFETY ¥ The warning signs and the sample icons shown here are listed for you to use the product safely and correctly as well as to prevent the risk and the damage to you and others from happening. ¥... -
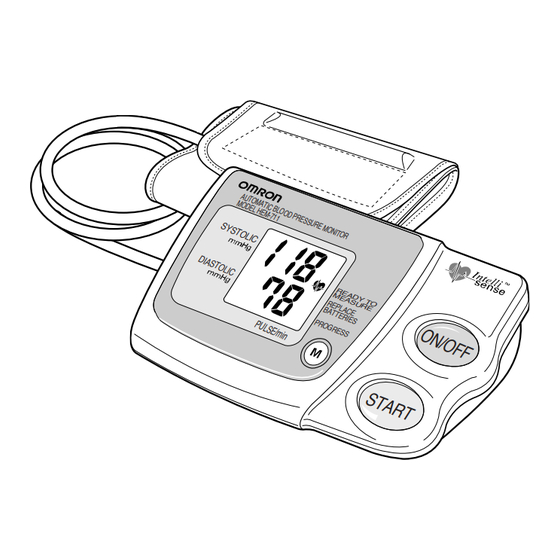
Page 24: Know Your Unit
KNOW YOUR UNIT Heart Symbol Systolic Blood Pressure Display ON/OFF Button START Button Memory Call Button Air Jack Diastolic Blood Pressure Display / Pulse Display Air Plug (Connects to the air jack) Arm Cuff Air Tube Green Marker AC Adapter Carrying Case... -
Page 25: Quick Reference Guide
QUICK REFERENCE GUIDE 1. Avoid eating, smoking, and exercising for at least 30 minutes before taking a measurement. 2. Remove tight-fitting clothing from your upper arm. 3. Sit in a chair with your feet flat on the floor and place your arm on a table so that the cuff is at the same level as your heart. -
Page 26: Battery Installation/Replacement
BATTERY INSTALLATION/REPLACEMENT Slide the battery cover off in the direction of the arrow. 2. Install or replace 4 "AA" size batteries so the + (positive) and — (negative) polarities match the polarities of the battery compartment as indicated. 3. Replace the battery cover. Notes: If the Low Battery Indicator ) appears on the display,... -
Page 27: How To Apply The Arm Cuff
HOW TO APPLY THE ARM CUFF If the cuff is assembled correctly, the hook material will be on the outside of the cuff loop and the metal D-ring will not touch your skin. 2. If the cuff is not assembled, pass the end of the cuff furthest from the tubing through the metal D-ring to form a loop. - Page 28 HOW TO APPLY THE ARM CUFF Pull the cuff so that the top and bottom edgesm are tightened evenly around your arm. 6. When the cuff is positioned correctly, press the sewn hook material FIRMLY against the pile side of the cuff. 7.
-
Page 29: How To Take A Reading
HOW TO TAKE A READING 1. Press the ON/OFF button. a) All display symbols appear for approximately one second. b) When the monitor becomes ready to measure, the Heart Symbol appears on the display. 2. Press the START button and remain still. Initial LCD Test As the cuff begins to inflate, the monitor automatically determines your ideal inflation level. - Page 30 HOW TOP TAKE A READING Instructions for special conditions: ¥ If your systolic pressure is known to be more than 220 mmHg, push and hold the START button until the monitor inflates 30 to 40 mmHg higher than your suspected systolic pressure. NOTE: Do not apply more pressure than necessary.
-
Page 31: How To Use The Memory Function
HOW TO USE THE MEMORY FUNCTION This monitor has a memory capable of storing fourteen sets of readings. Every time you complete the measurement, the monitor automatically stores blood pressure and pulse rate. ¥ Push the button to recall stored readings while the Heart Symbol ( ) is displayed. -
Page 32: How To Use The Ac Adapter
HOW TO USE THE AC ADAPTER To avoid potential damage to the monitor, use only the exclusive AC adapter (Model HEM-ADPT1). To connect the AC adapter 1. Insert the AC adapter plug into the jack on the side of the monitor. 2. -
Page 33: Troubleshooting
Problem caused by abnormal Refer to page 18, sending unit memory function. in for repair service. If you continue to have difficulty obtaining a reading, call OMRON HEALTHCARE CUSTOMER SERVICE TOLL FREE 1-800-634-4350. Please tell the representative you have an OMRON Model HEM-711AC. -
Page 34: Caution
CAUTION CAUTION: Changes or modifications not expressly approved by Omron Healthcare, Inc. could void the user s warranty. NOTE: POTENTIAL FOR RADIO/TELEVISION INTERFERENCE (for U.S.A. only) This product has been tested and found to comply with the limits for a Class B digital device, pursuant to part 15 of the FCC rules. -
Page 35: Care And Maintenance
CARE AND MAINTENANCE To protect your monitor from damage, please AVOID the following: ¥ Subjecting your monitor and cuff to extreme temperatures, humidity, moisture, and direct sunlight. ¥ Folding the cuff and tubing tightly. ¥ Inflating the monitor over 280 mmHg. ¥... -
Page 36: Five Year Limited Warranty
This warranty extends only to the original retail purchaser. Should repair be needed within the warranty period, ship the unit prepaid with the proof of purchase date and $5.00 for return shipping and insurance to: Omron Healthcare, Inc. Attn: Repair Department 300 Lakeview Parkway Vernon Hills, IL 60061 Be sure to include the model number and your phone number on any correspondence. -
Page 37: Specifications
SPECIFICATIONS Model: HEM-711AC Display: LCD Digital Display Measurement Range: Pressure: 0 to 280 mmHg Pulse: 40 to 180/minute Accuracy/Calibration: Pressure: –3 mmHg or 2% of reading Pulse: –5% of reading Inflation: Automatic by electric pump Deflation: Active electronic control valve... - Page 38 For Customer Service Call Toll Free 1-800-634-4350 Manufactured by OMRON Distributed by: OMRON HEALTHCARE CANADA 5500 North Service Road Burlington, Ontario L7L 6W6 Copyright © 8/2001 OMRON HEALTHCARE, INC. 711ACCANINST REV...
Need help?
Do you have a question about the HEM-711AC and is the answer not in the manual?
Questions and answers