Table of Contents
Advertisement
Quick Links
OWNER'S MANUAL
ELECTRIC SCOOTER
,
this manual contains important safety
performance and
.
maintenance information
read the manual before taking your
first ride or allowing your child to ride your new electric
.
scooter
keep the manual handy for future reference
DO NOT RETURN TO STORE!
QUESTIONS OR COMMENTS?
STOP
1-800-288-1560
FOR AGES EIGHT AND UP
MAXIMUM WEIGHT: 120 lbs. (54 kgs.)
NOTE: Illustrations in this Manual are for reference purposes only and may not reflect the exact
appearance of the actual product. Specifications are subject to change without notice.
NOTE: The electric scooter must be traveling at 3 mph before the motor will engage. Kick start to
3 mph while applying the throttle to engage motor.
1
Advertisement
Table of Contents

Subscribe to Our Youtube Channel
Related Manuals for Dynacraft Electric scooter


Summary of Contents for Dynacraft Electric scooter
- Page 1 NOTE: Illustrations in this Manual are for reference purposes only and may not reflect the exact appearance of the actual product. Specifications are subject to change without notice. NOTE: The electric scooter must be traveling at 3 mph before the motor will engage. Kick start to 3 mph while applying the throttle to engage motor.
-
Page 2: Table Of Contents
TABLE OF CONTENTS 1. Introduction, Safety, and Warnings 2. Before You Begin Assembly 3. E-Scooter Parts 4. Assembly 5. Before You Ride 6. Routine Checks and Hardware Maintenance 7. Detailed Maintenance and Repair 8. Troubleshooting Guide 9. Warranty... -
Page 3: Introduction, Safety, And Warnings
It is also important that your or your child’s first ride on your new electric scooter be in a controlled environment, away from cars, obstacles, and other riders. - Page 4 SAFE RIDING PRACTICES AND WARNINGS • Check and obey all local laws or regulations which may be in effect in the locations where the electric scooter may be used. • Always wear a helmet and other safety equipment and appropriate clothing and...
- Page 5 • Do not attempt or perform any stunts or tricks on the electric scooter. The scooter is not made to withstand abuse from jumping, curb grinding or any other type of misuse or stunting.
- Page 6 actions or reactions. • Do not to allow hands, feet, hair, body parts, clothing, or similar articles to come in contact with moving parts, wheels, or drivetrain, while the engine is running. • Before each cycle of operation, the operator shall perform the preoperation checks specified but the manufacturer, including: •...
-
Page 7: Before You Begin Assembly
Phillips screw driver (not included) WARNING: DO NOT USE NON-ORIGINAL OR NON-RECOMMENDED PRODUCTS WITH YOUR ELECTRIC SCOOTER. Altering of the original components or the use of non-recommended replacement parts may or may not be compatible with the design and will void the warranty and may cause an unsafe... -
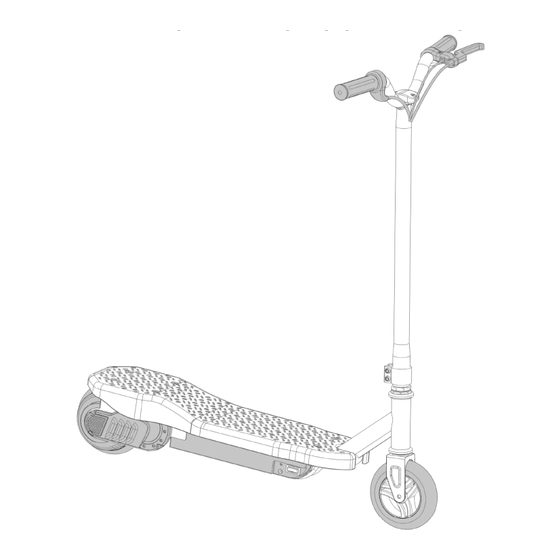
Page 8: E-Scooter Parts
E-SCOOTER PARTS Part Description Part Description frame brake motor throttle front fork brake lever headset controller clamp battery right side cover steer tube kickstand handlebar battery box handlebar clamp deck charger port rear wheel reset button left side cover on/off switch front wheel chain wheel chain... -
Page 9: Assembly
ASSEMBLY BRAKE LEVER TWIST GRIP THROTTLE HANDLEBAR STEER TUBE CHARGER (INCLUDED) RESET BUTTON CHARGING PORT ON/OFF SWITCH... - Page 10 Handlebar Steer Tube Assembly Tools required: 5 mm Allen key, 10 mm wrench 1. Slide the clamp onto the handlebar steerer tube as shown. Depress the push button located on the rear of the fork stem and attach the handlebar steerer tube onto the fork stem.
-
Page 11: Before You Ride
Charging the Battery Required components: Charger Your electric scooter may not have a fully charged battery. Therefore the battery must be charged prior to use. Initial battery charge time – Approximately 18 hours, and never charge the battery longer than 30 hours. - Page 12 1. Make sure that the power switch is in the OFF position before plugging in the charger. Insert the charger into the charging port on the right side of the battery box. 2. Plug the charger into a wall power outlet.
-
Page 13: Before You Ride
BEFORE YOU RIDE Before you ride always check the following: Safety Gear: Always wear proper protective gear (including helmet, elbow and knee pads, wrist guards) and appropriate clothing and shoes. Brakes: Check that the brakes are functioning properly. Check to make sure that when the brake lever is squeezed, the brake slows and stops the rear wheel without excessive effort. -
Page 14: Routine Checks And Hardware Maintenance
ROUTINE CHECKS AND HARDWARE MAINTENANCE Brake: Check the brakes for proper function. When you squeeze the lever, the brake should provide positive braking action. When you apply the brake with the speed control on, the brake cut off switch should stop the motor. Make sure that the brakes are not rubbing. -
Page 15: Detailed Maintenance And Repair
DETAILED MAINTENANCE AND REPAIR WARNING: Turn the power switch “OFF” before conducting any maintenance procedures. Adjusting the Brakes Tools required; 10mm wrench 1. To adjust the brake cable tension, turn the adjusting barrel on the brake lever clockwise (to loosen) or counter-clockwise (to tighten) . - Page 16 Chain, Rear Brake, and Rear Wheel Replacement Tools required: 4mm Allen key, 5mm Allen key, two 13mm wrenches (not included), 10mm wrench, Phillips screwdriver (not included) 1. Use a 4mm Allen key to remove the 4 bolts from the rear axle cover on both sides of the scooter.
- Page 17 4. Note the location of all rear wheel hardware and make sure that you properly reinstall all items. (Replace the rear brake as indicated in the diagram above if needed.) 5. If you are replacing the chain, remove the motor bolts with a 4mm Allen key. Slide motor out of the frame slightly so that there is enough room to remove/ replace the chain onto the motor gear.
- Page 18 Chain and Rear Wheel Replacement (Continued) Tools required: 4mm Allen key, 5mm Allen key, two 13mm wrenches (not included), 10mm wrench, Phillips screwdriver (not included) 7. Ensure that the axle washers are seated correctly against the frame. After tightening the axle nuts with 13mm wrenches, check wheel alignment and the tracking of the chain by rotating the wheel counter clockwise with your hand.
- Page 19 10. Reinstall side covers using a 4mm Allen key. Be careful not to over tighten the bolts. Chain Tensioner Replacement Note: Use a 4mm Allen key to remove the 4 bolts from the rear axle cover on both sides of the scooter.
- Page 20 Front Wheel Replacement (Continued) Tools required: Two 5mm Allen keys 2. Reinstall new replacement wheel, being sure to note the order and location of all components. 3. Reinstall hardware and tighten the front axle by turning clockwise with a 5mm Allen key. Battery Care and Disposal Do not store the battery in temperatures above 75°F (23.5 °C) or below 32°F (0°C).
-
Page 21: Replacement Parts
to a state or federal approved lead acid battery recycler or check with your local retailer of vehicle batteries. If you live in Florida or Minnesota, it is prohibited by law to throw away lead-acid batteries in the municipal waste stream. WARNING: • Do not mix old and new batteries. -
Page 22: Troubleshooting Guide
The average rechargeable battery life is 1 to 2 years depending on scooter conditions and use. Replace only with Dynacraft recommended replacement batteries. Brakes are not adjusted correctly Refer to the instructions on adjusting (brake too tight) - Page 23 Motor or electrical switch damage Contact your local Dynacraft service center for diagnosis and repair. Scooter makes loud noises or Chain is too dry Apply a lubricant such as 3 in 1™ or grinding sounds Tri-Flow™...
-
Page 24: Warranty
Parents that allow their children to ride taking such actions will assume their own risk and the risk of injury to their children, and Dynacraft will not be responsible. THE PURCHASE OF THIS ELECTRIC SCOOTER WILL CONFIRM THE BUYER’S AGREEMENT THAT DYNACRAFT’S LIABILITY UNDER THIS WARRANTY SHALL BE NO... - Page 25 SB 1918/Cal. Veh. Code, §§ 406, 407.5 (CALIFORNIA) DISCLOSURE YOUR INSURANCE POLICIES MAY NOT PROVIDE COVERAGE FOR ACCIDENTS INVOLVING THE USE OF THIS SCOOTER/ ELECTRIC VEHICLE. TO DETERMINE IF ANY COVERAGE IS PROVIDED, YOU SHOULD CONTACT YOUR INSURANCE COMPANY OR INSURANCE AGENT...
- Page 26 Cal. Veh. Code, § 407.5 (CALIFORNIA) DISCLOSURE (IF APPLICABLE) YOU MAY NOT MODIFY OR ALTER THE EXHAUST SYSTEM OF THIS SCOOTER TO CAUSE IT TO AMPLIFY OR CREATE EXCESSIVE NOISE PER VEHICLE CODE SECTION 21226, OR TO FAIL TO MEET APPLICABLE EMISSION REQUIREMENTS PER VEHICLE CODE 27156.
-
Page 27: Customer Service
Having this information is required and helps us handle your call more effectively. DO NOT return this item to the store. STOP Please call Dynacraft for assistance. Dynacraft BSC, Inc. 2012 Printed in China 89 S. Kelly Rd., American Canyon, CA 94503 Call Toll Free 1.800.288-1560...
Need help?
Do you have a question about the Electric scooter and is the answer not in the manual?
Questions and answers