Table of Contents
Advertisement
Advertisement
Table of Contents

Summary of Contents for NexxTech Wireless thermometer
-
Page 1: Atomic Clock
6312026 Wireless In/Out Thermometer with Atomic Clock USER’S MANUAL... -
Page 2: Table Of Contents
Table of Contents Table of Contents ............1 Introduction ..............2 Product Overview ............3-6 Before You Begin ............7 Battery Installation ............8 Low Battery Warning ............9 Getting Started ..............9 Placement of the Units ........... 9 Remote and Indoor Temperature ........ 10 Maximum and Minimum Readings ...... -
Page 3: Introduction
Introduction Thank you for selecting the Wireless In/Out Thermometer with Atomic Clock. This device combines precise time keeping with monitoring and displaying of current temperature conditions from up to 3 remote locations. In this package you will find: • One main unit (receiver) •... -
Page 4: Product Overview
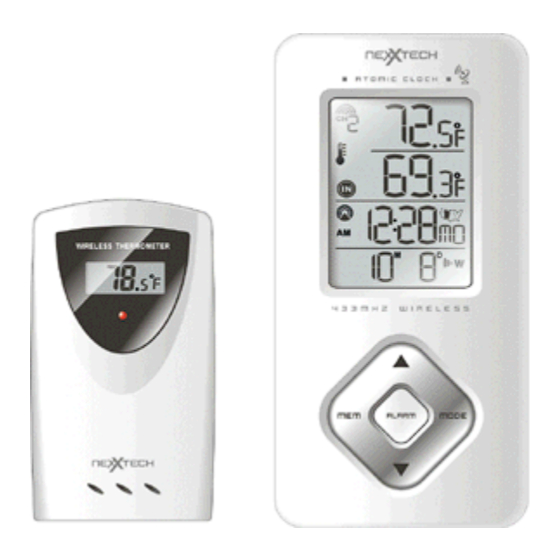
Product Overview MAIN UNIT Features • Time automatically sets to the US Atomic Clock • 12 or 24 hour Time Format • Dual crescendo Time Alarm with Snooze • Multi language day of the week displayed in English, French, Spanish, German, or Italian •... - Page 5 Product Overview FRONT/REAR VIEW...
- Page 6 Product Overview A. TEMPERATURE AND TIME IN LARGE EASY-TO-READ DIGITS B. SNOOZE/LIGHT button • Stops the clock’s alarm temporarily • Activates a blue backlight for 5 seconds C. CHANNEL button • Recalls a different remote sensor reading - 1, 2, or 3 •...
- Page 7 Product Overview REMOTE SENSOR Features • Remote temperature transmission to the main unit via 433 MHz frequency • Case can be wall mounted using built-in hanger • Selection of the temperature display in Celsius or Fahrenheit • Three channel selection •...
-
Page 8: Before You Begin
Before You Begin • We recommend using alkaline batteries for the remote sensor and main units when the temperatures are above 0 ˚C (32 ˚F). We recommend using lithium batteries for the remote sensor when the temperatures are below 0 ˚C (32 ˚F). •... -
Page 9: Battery Installation
Battery Installation NOTE: When the temperature falls below freezing, the batteries in the outdoor remote sensor may have reduced voltage supply and a shorter effective range. We recommend using lithium batteries at temperatures of 0˚C (32˚F) and below. REMOTE SENSOR NOTE: Install the batteries;... -
Page 10: Low Battery Warning
Low Battery Warning A low-battery indicator [ ] will appear next to the indoor or remote data reading line, of the main unit, warning that the corresponding batteries need replacement. Getting Started TEMPERATURE DISPLAY Once the batteries have been installed, the remote sensor will transmit temperature data at 45 second intervals. -
Page 11: Remote And Indoor Temperature
Remote and Indoor Temperature The remote temperature information line is located on the top line of the main unit’s display. The wave icon is located above the remote channel number to indicate the reception status from the corresponding remote sensor. Three different types of reception status may be displayed. -
Page 12: Lost Communication
Lost Communication If the main unit display line for the remote sensor reading goes blank, press and hold the DOWN ( ) button for 2 seconds to begin a new signal search. If the signal still cannot be received, please ensure the following: •... -
Page 13: Transmission Interference
Transmission Interference Signals from other household devices such as wireless doorbells, home security systems, and entry control, may interfere with this product or cause temporary reception interruption. This is normal and will not affect the general performance of the product. The transmission and reception of the temperature readings will resume once the interference subsides. -
Page 14: Atomic Clock
Atomic Clock Immediately after establishing communication between the main unit and remote sensor, the atomic time signal receiver will open and start to search for the atomic time signal. The search usually takes between 5-8 minutes. NOTE: Do not press any buttons on the main unit during auto search as it may interrupt the search and you will need to start the set up procedure again. -
Page 15: Manual Settings
Manual Settings It is necessary to set the desired TIME ZONE. TIME ZONE • Press the MODE button once so that the Day of the Week abbreviation is displayed to the right of the time; for example: pm 2:37tu. • Select the Time Zone by pressing and holding the UP ( ) button for 3 seconds. -
Page 16: Clock Alarms
Clock Alarms SETTING THE WEEKDAY (W) AND SINGLE DAY (S) ALARMS • Press the ALARM button once to enter the alarm setting mode. The default alarm is a Weekday alarm (W). The abbreviation “OFF” with a letter “W” next to it will be displayed, if the alarm has not been previously set. -
Page 17: Snooze
Snooze When the alarm sounds, press the SNOOZE/LIGHT button to temporarily stop it. The alarm will sound again in four minutes. If the alarm is not disabled after that, it will sound for two more minutes and then will stop automatically. -
Page 18: Troubleshooting
Troubleshooting Check here before contacting customer service. ISSUE SYMPTOM SOLUTION MAIN Atomic Time Place unit by the UNIT signal is not window and keep it received there overnight REMOTE Cannot locate Check batteries SENSOR remote sensor Check location Press and hold DOWN ( ) button on the main unit to search for the signal from the... -
Page 19: Specifications
Specifications MAIN UNIT Indoor Temperature Proposed Operating Range: -5˚C to +50˚C (23.0˚F to 122.0˚F) Temperature Resolution: 0.1˚C (0.2˚F) User Selectable (˚C or ˚F) Temperature Display Maximum Number of remote sensors: 3 (one included) Readings Update Interval: every 45 seconds EL Backlight Low Battery Indicators •... -
Page 20: Fcc/Rss-210 Statements
FCC Statement The FCC Wants You to Know This device complies with Part 15 of the FCC rules. Operation is subject to the following two conditions: (1) This device may not cause harmful interference and (2) This device must accept any inteference received, including interference that might cause undesired operation. -
Page 21: Warranty
Warranty Who is Providing This Warranty? Are There Other Warranties? • Orbyx Electronics, LLC (“Orbyx), as the distributor • There are no express warranties other than those of this Nexxtech product (your “Product”). expressed herein. Neither the sales personnel What Does This Warranty Cover? nor any other person is authorized to make any •...
Need help?
Do you have a question about the Wireless thermometer and is the answer not in the manual?
Questions and answers
How do you change from Fahrenheit to celcius
Use the ˚C/˚F SWITCH to select the temperature display in Celsius or Fahrenheit.
This answer is automatically generated