Table of Contents
Advertisement
Advertisement
Table of Contents

Related Manuals for TECHWOOD 32884 HD DIGITAL


Summary of Contents for TECHWOOD 32884 HD DIGITAL
-
Page 2: Table Of Contents
Contents IDTV Menu System ..........12 Accessories ............2 Channel List ............12 Features ..............2 Timers ............... 14 Introduction ............. 2 Conditional Access ........... 14 Preparation ............. 2 TV Setup ............15 Safety Precautions ..........2 Setup ..............15 Power Source ............. -
Page 3: Accessories
Accessories Introduction Thank you for choosing this product. This manual will guide you for the proper operation of your TV. Before operating the TV, please read this manual thoroughly. Please do keep this manual in a safe place for future references. Preparation Batteries: 2 X AAA For ventilation, leave a free space of at least 10 cm... -
Page 4: Moisture And Water
Moisture and Water • Packaging and packaging aids are recyclable and should principally be recycled. Packaging materials, Do not use this device in a humid and such as foil bag, must be kept away from children. damp place (avoid the bathroom, the •... -
Page 5: Connection To A Television Distribution System (Cable Tv Etc.) From Tuner
Connection to a Television Environmental Information Distribution System (Cable TV etc.) • This television is designed to consume less energy from Tuner to save environment. Device connected to the protective earthing of the You not only help to save the environment but also building installation through the mains connection or you can save money by reducing electricity bills through other apparatus with a connection to protective... -
Page 6: Overview Of The Remote Control
Overview of the Remote Control Standby Mono/Stereo - Dual I-II / Currrent Language (*) (in DTV mode) Expand (in TXT mode)/ Image size Green / Picture Menu / Subtitle on-off(*) (in DTV mode) Red /Sound Menu / Channel List(*) (in DTV mode) Numeric buttons Teletext / Mix / PAT (in TXT mode) -
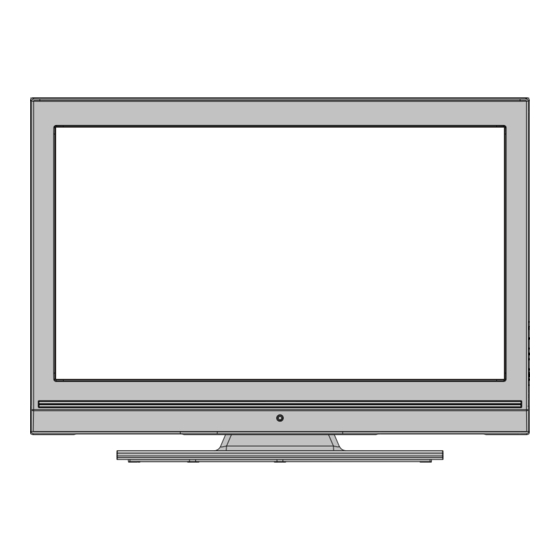
Page 7: Lcd Tv And Operating Buttons
LCD TV and Operating Buttons FRONT and REAR VIEW SIDE VIEW Control Buttons Standby button TV/AV button Programme Up/Down buttons Volume Up/Down buttons Note: Press “ ” /“ ” buttons at the same time to view main menu. Viewing the Connections - Back Connectors SCART socket inputs or outputs for external devices. -
Page 8: Viewing The Connections - Side Connectors
Viewing the Connections - Side Connectors CI Slot is used for inserting a CI card. A CI card allows you to view all the channels that you subscribe to. For more information, see “Conditional Access” section. Component Video Inputs (YPbPr) are used for connecting component video.You can connect the component video and audio sockets with a device that has component output. -
Page 9: Using Side Usb Input
Using Side USB Input • You can connect USB devices to your TV by using the USB input of the TV. This feature allows you to display/play music,photo or video files stored in a USB stick. • It is possible that certain types of USB devices (e.g. MP3 Players) may not be compatible with this TV. -
Page 10: Using Side Av Connectors
Inserting Batteries into the Remote Control Handset • Remove the battery cover located on the back of the handset by gently pulling backwards from the indicated part. • Insert two AAA/R3 or equivalent type batteries inside. Observe the correct polarity (+/-) when inserting batteries and replace the battery cover. -
Page 11: Input Selection
will be described in accordance with the menu system Input Selection of your TV. Once you have connected external systems to your TV, • Functions of the menu system are described in the you can switch to different input sources. following sections. -
Page 12: General Operation
Electronic Programme Guide (EPG) • Some, but not all, channels send information about the current and next events. Press EPG button to view the EPG menu. EPG appears on the screen. It is able to get Information of the channel - programs weekly by means of 7-DAY-EPG. -
Page 13: Digital Teletext (** For Uk Only)
Notice ! Highlight the “Subtitle” item in “Language settings” menu and use ” or “ button to set Subtitle to the If there is no audio available, the following warning desired language. message will be displayed on the screen: If “Subtitle” is on and a language option is set, pressing the “... -
Page 14: Adding Locks To Channels
Moving the channels in the channel list button as illustrated below. Press the “OK” button to activate the rename feature. • Press “ ” or “ ” buttons to select the channel that will be moved. • Press “ ” or “ ” buttons to select the “Move” item on Channel List menu. -
Page 15: Timers
To display timers window, activate the item from the main menu. To add a timer, press the YELLOW button on the remote control. Then “Add Timer” window appears. Channel: “ ” or “ ” keys will navigate the user through the TV or Radio list. Date: Starting date is entered via the Left/Right or the numeric buttons. -
Page 16: Tv Setup
Note: Insert or remove the CI module only when the TV is If the broadcaster enables any special signal switched off or in standby mode. concerning the audio, you can set this setting as On TV Setup to receive such signals. Favourite Mode You can use this item to display the TV functions. -
Page 17: Maturity Lock
Maturity Lock (*) Use “ ” or “ ” buttons to change the Time Zone between GMT-12 or GMT+12. Current Time on the (*) If you set Country option as UK in the first time top of the menu list will then change according to the installation, Maturity Lock option will not be visible. -
Page 18: Language Settings
“OK” and Language Settings submenu will be displayed on the screen: Use “ ” or “ ” buttons to highlight the menu item that will be adjusted and then press “ ” or “ ” button to set. Notes: • System Language determines the on-screen menu language. -
Page 19: Media Browser
Press the “OK” button to search for analogue By selecting Yes and pressing the “OK” button, the channels. The following menu appears on the screen existing channel table will be deleted. After factory for analogue channel search: settings are loaded, “First Time Installation” menu will be displayed. -
Page 20: Playing Mp3 Files
Slideshow Options Note: If you plug USB stick while in analogue mode, the TV will automatically switch to digital TV mode. Note: Some USB compliant devices may not be supported. Note: If the USB stick is not recognized after power off/on or First Time Installation, first, plug the USB device out and power off/on the TV set. -
Page 21: Analogue Tv Menu System
Also; Picture Mode, Contrast, Brightness, Sharpness, Analogue TV Menu System Colour and Colour Temp settings will be invisible and Picture Menu disabled while Game Mode is on. Note: Picture mode selection button on the remote control will have no function while Game Mode is on. Picture Zoom Select Picture Zoom by pressing “... -
Page 22: Feature Menu
Feature Menu Select the desired frequency by pressing “ ” or “ ” button and increase or decrease the frequency gain by pressing “ ” or “ ” button. Press the “MENU” button to return to the previous menu. Note: Equalizer menu settings can be changed only when the Equalizer Mode is in User. -
Page 23: Install Menu
Power Save Mode Install Menu Use “ ” or “ ” button to select Power Save Mode. Press “ ” or “ ” button to set Power Save Mode as On or Off. See the section, “Environmental Information” in this manual for further information on Power Save Mode. -
Page 24: Source Menu
Delete To delete a programme, press the YELLOW button. Pressing the YELLOW button again erases the selected programme from the programme list, and the following programmes shift one line up. APS (Auto Programming System) When you press the BLUE button for starting automatic tuning, Auto Programming System menu will appear on the screen: Colour System... -
Page 25: Pc Mode Menu System
picture on the screen. In such a case you can use this ” button. Source options are; TV, DTV/USB, EXT-1, item to get a clear picture by trial and error method. FAV, HDMI, YPbPr and PC-VGA. Select Phase item by using “ ” or “ ” buttons. Use Note: Once you have connected optional equipment systems “... -
Page 26: Zoom Modes
Zoom Modes You can change the aspect ratio (image size) of the TV for viewing the picture in different zoom modes. Cinema Press “SCREEN” button to directly change the zoom This zooms up the wide picture (16:9 aspect ratio) to mode. -
Page 27: Tips
“OK” Hold Tips Holds a text page when convenient. Press again to Image Persistence resume. Please note that ghosting may occur while displaying “ ” Subcode Pages a persistent image. LCD TVs’ image persistence may Selects subcode pages if available when the teletext disappear after a short time. -
Page 28: Appendix A: Pc Input Typical Display Modes
Appendix A: PC Input Typical Display Modes The display has a maximum resolution of 1600 X 1200. The following table is an illustration of some of the typical video display modes. Your TV may not support different resolutions. Supported resolution modes are listed below. If you switch your PC to an unsupported mode, a warning OSD will appear on the screen. -
Page 29: Appendix B: Av And Hdmi Signal Compatibility (Input Signal Types)
Appendix B: AV and HDMI Signal Compatibility (Input Signal Types) Source Supported Signals Available PAL 50/60 NTSC 60 EXT-1 (SCART) RGB 50 RGB 60 PAL 50/60 NTSC 60 480I 60Hz 480P 60Hz 576I 50Hz 576P 50Hz 720P 50Hz YPbPr 720P 60Hz 1080I 50Hz... -
Page 30: Appendix C: Supported File Formats For Usb Mode
Appendix C: Supported File Formats for USB Mode Format Remarks File Media Extension Video Audio (Maximum resolution/Bit rate etc.) MPEG Layer MPEG1 .mpg/ .dat/ 1/2/3 .vob MPEG2 MPEG2 Movie XviD/ 3ivx PCM/MP3 XviD Verson up to: 1.1.2 (optional) MPEG4 PCM/MP3 .avi MS ISO PCM/MP3... -
Page 31: Specifications
Specifications TV BROADCASTING PAL/SECAM B/G D/K K’ I/I’ L/L’ RECEIVING CHANNELS VHF (BAND I/III) UHF (BAND U) HYPERBAND MHEG-5 ENGINE compliant with ISO/IEC 13522-5 UK engine Profile 1 Object carousel support compliant with ISO/IEC 135818-6 and UK DTT profile for UK Frequency range: 474-850 MHz for UK models 170-862 MHz for EU models Digital... -
Page 32: Important Instruction
Important Instruction For your own safety read following instruction carefully before attempting to connect this unit to the mains supply. MAINS (AC) OPERATION The wires in the mains lead are coloured in accordance with the following code : GREEN FUSE &...
Need help?
Do you have a question about the 32884 HD DIGITAL and is the answer not in the manual?
Questions and answers