
Related Manuals for Charnwood W588


Summary of Contents for Charnwood W588
-
Page 1: Operating Instructions
8” x 5” PLANER THICKNESSER OPERATING INSTRUCTIONS MODEL: W588 Charnwood, Cedar Court, Walker Road, Bardon, Leicestershire, LE67 1TU Tel. 01530 516 926 Fax. 01530 516 929 Email; sales@charnwood.net website; www.charnwood.net... -
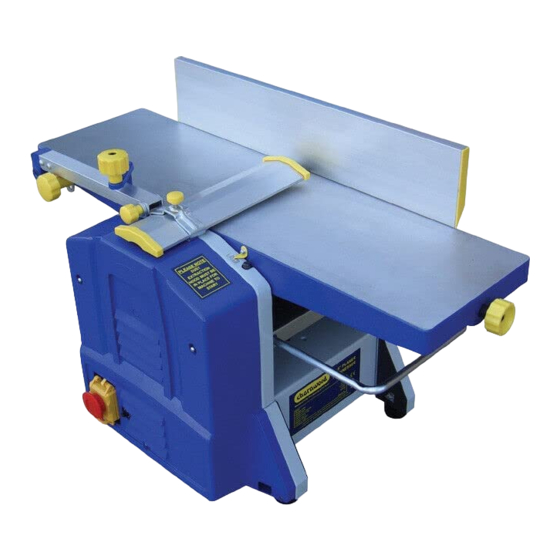
Page 2: Main Components
Introduction To get the most out of your new planer thicknesser, please read through this manual and safety instructions before use. Please also save the instructions in case you need to refer to them at a later date. Technical data Voltage/frequency 230 V ~ 50 Hz Power rating... -
Page 3: Special Safety Instructions
Special safety instructions For planing wood only. Never use the machine if the blade is not correctly locked in the blade housing. When not in use, cover the blade housing. Use a piece of scrap wood as a pusher when planing small items. Never allow fingers or tools to get near the blade when machine is in use. - Page 4 Mounting Place on a level, stable surface. Fit the side guide (2) using the two screws supplied. Fit blade guard arm (3) to rear table (1) opposite side guide. Stabilise machine if required by passing a piece of wood through stabilising holes (12) on base. This is advisable if large items are to be planed.
- Page 5 Connect extractor hose to thicknesser table under the front table. The three studs in the extractor nozzle slot into the corresponding holes on the table. Raise thicknesser table again by turning handle clockwise, until nozzle fits tightly to underside of table.
- Page 6 Planing IMPORTANT: The Dust Extaction Hood must be fitted underneath the cutterblock before operating the machine. Sensors will detect if the hood is not fitted correctly and disable the switch. Turn adjustment knob (9) to lower front table to desired height. Planing depth can be seen on indicator (c) Place workpiece on front table and set blade guard to required height using arm adjustment knob (15).
- Page 7 The workpiece should be able to pass unhindered under the guard. Set guide fence angle, if planer is to be used for beveling. Start machine at on/off switch (11). Slide item slowly and steadily towards blade. Thicknessing IMPORTANT: The Dust Extaction Hood must be fitted over the cutterblock before operating the machine.
-
Page 8: Cleaning And Maintenance
General Switch off machine after use and remove chips and dust from blades. Cleaning and maintenance Always disconnect machine from mains before performing maintenance! Servicing and replacing blades Remove side guide and blade guard. Slacken screws (d) with the screwdriver supplied. Turn blade housing until holder (e) and blade (f) can be removed. -
Page 9: Environmental Information
General cleaning Remove dust and chips regularly from machine with a brush or compressed air. Check that motor ventilation slots are not blocked. Lubricate all bearings and moving parts regularly with oil. Avoid getting oil on drive belt. Regularly remove sap and the like from the front and rear tables with household spirit or petroleum. - Page 10 Charnwood W588 Parts List Part No Description Part No Description 1 Chain tensioning rivet 46 Lock Bolt Components 2 Chain tensioner 47 Cap Nut M5 3 Open Collar 6 48 Big Flat Washer 5 4 Spring washer 5 49 Coupling Stud...
- Page 11 Part No Description Part No Description 91 Adjusting Bar 136 Square Bush 92 Lock Nut M8 137 Big Gear 93 Lever 138 Connection Plate Rivet 94 Insert Block 139 Connection Plate Tensioning Spring 95 Stopper 140 Axis Collar (12) Cross Recessed Raised Pan Head Screws 96 Tapping Screw ST4.2x6 M5x12 97 Locking Bush...
- Page 12 Charnwood W588 Exploded View Diagram...
Need help?
Do you have a question about the W588 and is the answer not in the manual?
Questions and answers