Bose LIFESTYLE 135 series II Setup Manual
Lifestyle 135 series ii
Hide thumbs
Also See for LIFESTYLE 135 series II:
- Setup manual (52 pages) ,
- Owner's manual (14 pages) ,
- Operating manual (34 pages)

Related Manuals for Bose LIFESTYLE 135 series II


Summary of Contents for Bose LIFESTYLE 135 series II
- Page 1 series LIFESTYLE ® home entertainment system Setup Guide | Guía de instalación | Guide d’installation...
-
Page 2: Safety Information
Please take the time to follow the instructions in this owner’s guide carefully. It will help you set up and operate your system properly and enjoy its advanced features. Please save this guide for future reference. All Bose ® products must be used in accordance with local, state, federal, and industry regulations. - Page 3 The speaker wire and interconnect cables included with the system are not approved for in-wall installation. Please dispose of used batteries properly, following any local regulations. Do not incinerate. Bose ® Names and Contents of Toxic or Hazardous Substances or Elements...
-
Page 4: Important Safety Instructions
Safety Information Important Safety Instructions 1. Read these instructions. 2. Keep these instructions. 3. Heed all warnings. 4. Follow all instructions. Do not use this apparatus near water. Clean only with a dry cloth. 7. Do not block any ventilation openings. Install in accordance with the manufacturer’s instructions. 8. -
Page 5: Table Of Contents
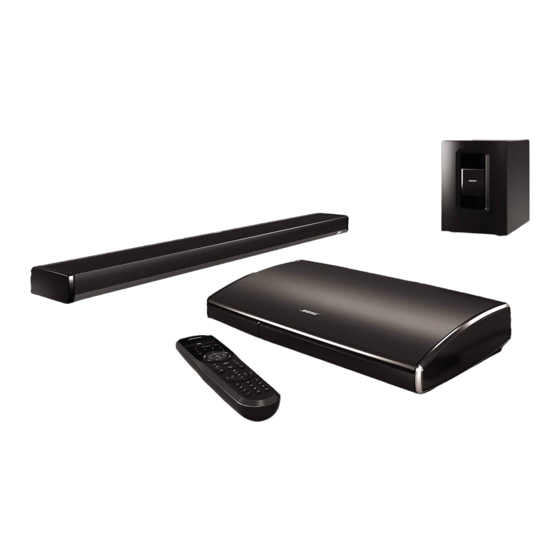
Contents Welcome Thank you ......................Unpacking ......................Carton contents ..................Accessories boxes ..................Wall mounting kit ....................System Setup Putting the system together ................Step 1: Set up the speaker array .............. Step 2: Set up the control console ............Step 3: Set up the Acoustimass ®... -
Page 6: Thank You
Unpacking As you carefully unpack the carton, if any part appears damaged, do not attempt to use it. Notify Bose or your authorized Bose dealer immediately. For Bose contact information, refer to the address sheet included in the carton. Be sure to save all of the packing materials. These provide the safest means for any necessary shipping or transporting. -
Page 7: Wall Mounting Kit
® cable Batteries Wall mounting kit The speaker array can be mounted on a wall. If you wish to do this, contact Bose ® to purchase the WB-135 Wall Mount Kit. CAUTIONS: Do not use any wall-mounting hardware other than the WB-135 Wall Mount Kit to mount the speaker array on a wall. -
Page 8: Putting The System Together
System Setup Putting the system together Notes: The LIFESTYLE 135 Series II home entertainment system uses the reflective ® surfaces of your room to deliver wide, spacious sound. For best sound quality, the speaker array should not be placed inside a cabinet, or diagonally in a corner. Keep other wireless equipment, such as wireless computer network routers, cordless phones, microwave ovens, or other WI-FI ®... -
Page 9: System Setup
System Setup C. Plug the small end of the power cord into the connector labeled Power. Note: Do not plug the power cord into an AC power outlet at this time. You will be instructed to do this later in the setup process. Power cord D. - Page 10 System Setup Turn the speaker array over and place it in front of your TV with the speaker grille facing into the room. CAUTIONS: The speaker array must be placed on a solid flat surface. For proper support, all of the feet on the bottom of the speaker array must be resting on the table top.
-
Page 11: Step 2: Set Up The Control Console
System Setup Step 2: Set up the control console What you need: Control console Power supply HDMI ® cable Power cord A. Place the control console on a flat, stable surface near your TV. Control console Note: Until your system is completely installed, it may be helpful to keep the control console positioned for easy access to its rear connection panel. - Page 12 System Setup B. Plug one end of the HDMI ® cable into an HDMI INPUT connector on your TV. Note: If an HDMI cable is already connected to an HDMI input on your TV, you can use this cable. Just disconnect the other end. C.
- Page 13 D. Plug the audio input cable coming from the speaker array into the connector labeled Audio OUT on the control console. Make sure the flat surface with the arrow on the plug faces up. Note: Make sure the audio input cable is not plugged into a Bose link connector. Audio input cable Audio OUT Plug the power supply output cord into the connector labeled Power.
- Page 14 System Setup Step 3: Set up the Acoustimass module ® What you need: Acoustimass module Rubber feet Power cord CAUTION: Choose a stable and level surface for the Acoustimass module. Vibration can cause the speaker to move, particularly on smooth surfaces like marble, glass, or highly polished wood.
-
Page 15: First Time Startup
System Setup C. Place the Acoustimass ® module according to the following guidelines: For best sound quality, stand the Acoustimass module on its feet along the same wall as your TV, or along any other wall in the front third of the room. The front opening of the module can face any direction. -
Page 16: Step 1: Set Up The Remote Control
System Setup Step 1: Set up the remote control A. Slide the battery compartment cover off the back of the remote control. AA (IEC LR6) batteries (4) Battery compartment cover B. Install four AA (IEC LR6) batteries, matching the polarity markings (+ and –) to the markings inside the battery compartment. -
Page 17: If You Have Setup Problems
Setup” in your system operating guide. For help in trying to resolve any problems, see the troubleshooting table in your system operating guide. Contacting customer service For additional help in solving problems, contact Bose Customer Service. See the ® address sheet included with your system.
Need help?
Do you have a question about the LIFESTYLE 135 series II and is the answer not in the manual?
Questions and answers