
Related Manuals for Gold Century GC-1010


Summary of Contents for Gold Century GC-1010
- Page 1 Gold Century GC-1010 Metal Detector Digital LCD Display Advanced Metal Detector OWNER’S MANUAL Warranty...
-
Page 2: Table Of Contents
CONTENTS Features……………………………………………………………………... Preparation………………………………………………………………….. Assembling the detector………………………………………………… Installing the batteries…………………………………………………… Using headphones……………………………………………………….. Listening safely…………………………………………………………… Functions and indications………………………………………………….. A quick look at the detector……………………………………………… Displays…………………………………………………………………… Tones……………………………………………………………………… Operation……………………………………………………………………. Turning on the detector………………………………………………… Setting the operation mode……………………………………………… Testing and using the detector………………………………………….. Indoor testing and use………………………………………………… Outdoor testing and use………………………………………………. -
Page 3: Features
With your metal detector, you can hunt for coins, relics, jewelry, gold, and silver just about anywhere. The detector is versatile and easy to use. The detector’s features include: LCD Display—shows the probable type of metal with an arrow, the depth of the target, DISC/NOTCH range, the level of SENS with segment, the operating mode, and low battery indication. -
Page 4: Preparation
PREPARATION ASSEMBLING THE DETECTOR Assembling your detector is easy and requires no special tools. Just follow these steps. 1. Turn the stem’s lock nut clockwise until it loosens. 2. Lengthen or shorten so when you stand upright with the detector in your hand, the search coil is level with and about 1/2 to 2 inches above the ground with your arm relaxed at your side. -
Page 5: Installing The Batteries
7. Loosen the knob at the search coil’s end, then adjust the search coil to the desired angle so that it is parallel with the ground. Then tighten the knob. Caution: Do not overtighten the search coil or use tools such as pliers to tighten it. 8. -
Page 6: Using Headphones
USING HEADPHONES 1. Insert the headphones’ 3.5mm plug into the HEADPHONE jack. At this time the internal speaker disconnects. 2. Set the VOLUME to the desired setting. headphone Listening Safely To protect your hearing, set the volume to the lowest setting before you begin listening, adjust the volume to a comfortable level. -
Page 7: Displays
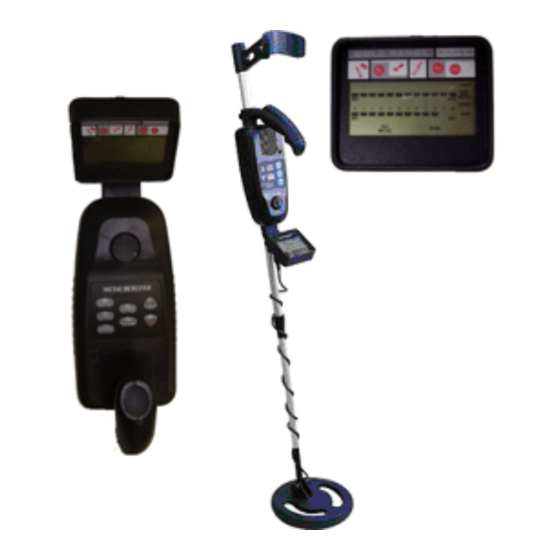
TARGET INDICATOR LCD SCREEN INDICATION PANEL VOLUME CONTROL FUNCTION PANEL OPERATION MODE BUTTONS UP & DOWN SENSITIVITY DISC/NOTCH POWER 2. DISPLAYS The indicator of target includes target icons and LCD displays and is located at the top of the detector. It can indicate coins of different type, gold, silver etc. -
Page 8: Tones
TARGET INDICATION METAL ICONS DISC/NOTCH RANGE SENSITIVITY LEVEL DEPTH LOW BATT OPERATION MODE SENSITIVITY DISC/NOTCH BUTTONS CONTROL INDICATION GOLD Range IRON FOIL—indicates that the target is probably iron or foil. Some oxidized iron might register somewhere within the SILVER range. 5¢(NICKEL)—indicates that the target is probably 5¢... -
Page 9: Operation
items. A high tone is for brass or silver items. Notes: When you set the detector to DISC or NOTCH mode, the detector sounds a medium or high tone when it detects highly oxidized iron. An arrow appears in medium or high tone area. Depending on the alloys used to make them, about 15 percent of gold rings cause the detector to sound a medium tone. -
Page 10: Testing And Using The Detector
not function except SENS. To adjust the sensitivity, first press SENS and UP to increase the sensitivity, then press Dn to decrease it. b. DISC—used for target discrimination. You can set the target range from MAX to MIN by pressing DISC/NOTCH and UP & Dn keys. The detector can detect the metal type indicated on the display. -
Page 11: Outdoor Testing And Use
metal of some kind in the floor, which might interfere with the objects you’re testing or mask the signal completely. 5. Slowly sweep a sample of the material you want the detector to find (such as a gold ring or a coin) 2-3 inches or more above the face of the searchcoil. -
Page 12: Searchcoil Sweeping Hints
motion. Searchcoil Sweeping Hints: Never sweep the searchcoil as if it were a pendulum. Raising the searchcoil while sweeping or at the end of a sweep will cause false readings. correct wrong Sweep slowly hurrying will cause you to miss targets. It’s better you sweep the search coil from side to side in an arc line of 3 inches motion and keep the search coil parallel with the ground. -
Page 13: Adjusting Sensitivity
The detector responds with a signal when it detects most valuable metal objects. If a signal does not repeat after you sweep the search coil over the target a few times, the target is probably junk metal. False signals can be caused by trashy ground, electrical interference, or large irregular piece of junk metal. -
Page 14: Factors That Affect The Detecting
2. Make a visual note of exact spot on the ground where the detector beeps. 3. Stop the search coil directly over this point on the ground. Then move the search coil straight forward away from you and straight back towards you a couple of times. - Page 15 Your 3010/GC1010 metal detector is an example of superior design and craftsmanship. The following suggestions will help you care for your metal detector so you can enjoy it for years. Handle the detector gently and carefully. Dropping it can damage circuit boards and cases and can cause the detector to work improperly.
- Page 16 Gold Century Warranty This product is warranted against defects in materials and workmanship for 1 year from date of purchase. The item must be shipped at buyer’s expense to our offices where we will, at our discretion, repair or replace it free of charge.
Need help?
Do you have a question about the GC-1010 and is the answer not in the manual?
Questions and answers