Advertisement
Table of Contents
- 1 Important Safety Instructions
- 2 Table of Contents
- 3 Mega Kitchen System
- 4 Mega Kitchen System
- 5 Ninja ® Mega Assembly and Use for the 72 Oz. Pitcher
- 6 Assembly and Use for the Single Serve Cup
- 7 Assembly and Use for the 64 Oz. Bowl
- 8 Assembly and Use for the 3 Cup Mini Prep Bowl
- 9 Speed Setting & Uses
- 10 Care & Maintenance
- 11 Troubleshooting Guide
- 12 Replacement Parts
- 13 Sample Recipes
- 14 Warranty & Registration
- Download this manual
Advertisement
Table of Contents

Subscribe to Our Youtube Channel
Related Manuals for Ninja BL772


Summary of Contents for Ninja BL772
- Page 1 ® Mega Kitchen System BL772 OWNER’S GUIDE ® HELP LINE www.ninjakitchen.com 1 877 646-5288 BL772_30_IB_ENG_120627_2.indd 1 12-06-27 12:30 PM...
-
Page 2: Important Safety Instructions
1. To protect against electrical shock, do FOLLOWING: not submerge the appliance or allow the READ ALL INSTRUCTIONS BEFORE power cord to come into contact with USING YOUR NINJA PROFESSIONAL ® water or any other liquid. BLENDER. 2. DO NOT allow young children to operate the appliance or use as a toy. - Page 3 9. Keep hands, hair, clothing, as well as 21. DO NOT overfill. utensils out of container while processing 22. Extreme caution must be used when to reduce the risk of severe injury to moving an appliance containing hot persons or damage to the appliance. A food, water or other liquids.
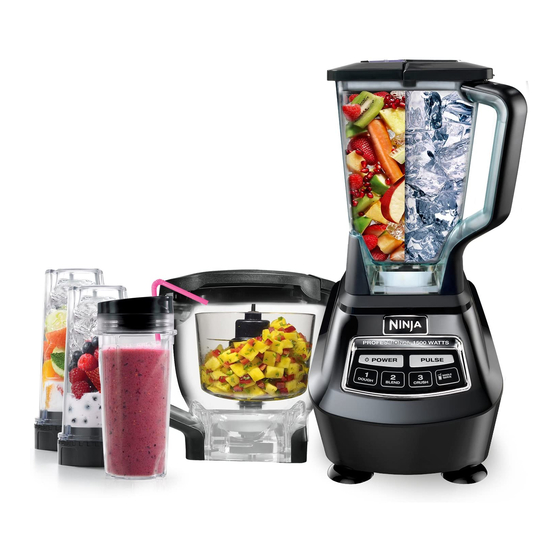
- Page 4 THIS BOOK COVERS MODEL NUMBERS: BL772 30 TECHNICAL SPECIFICATIONS Voltage: 120V., 60Hz. Power: 1500 Watts Pitcher Capacity: 72 ounces (9 cups) (2.15 L) Bowl Capacity: 64 ounces (8 cups) (1.89 L) Mini Prep Bowl Capacity: 24 ounces (3 cups) (.710 L) Single Serve Capacity: 16 ounces (2 cups) (.473 L)
-
Page 5: Table Of Contents
Contents Thank you for Getting to Know Your Ninja Mega Kitchen System ........5 ® purchasing the Using the Ninja Mega Kitchen System ............7 ® Ninja Mega ® Assembly and Use for the 72 oz. Pitcher ............8 Kitchen System. Assembly and Use for the Single Serve Cup ...........10 Assembly and Use for the 64 oz. -
Page 6: Mega Kitchen System
Getting To Know Your Ninja Mega Kitchen System ® a Bowl Lid with Locking Handle j 6-Blade Assembly (pitcher) b Pitcher Lid with Locking Handle k 64 oz. Bowl c 24 oz. Mini Prep Bowl Blade l 72 oz. Pitcher... - Page 7 Mega Kitchen System is a professional, high powered innovative tool with a sleek design and ® outstanding performance, a true asset to any kitchen. It is perfect for ice crushing, blending, food processing, and complete juicing. The Ninja Mega Kitchen System also features a unique capability to knead dough for ®...
-
Page 8: Mega Kitchen System
Using the Ninja Mega Kitchen System ® PLEASE KEEP THESE IMPORTANT SAFEGUARDS IN MIND WHEN USING THE APPLIANCE: IMPORTANT: Never add ingredients into the container before placing the attachment in first. IMPORTANT: Attachments are not interchangeable. CAUTION: Blades are sharp! Use extreme caution when handling the blade assemblies. -
Page 9: Ninja ® Mega Assembly And Use For The 72 Oz. Pitcher
Assembly and Use for the 72 oz. Pitcher Assembly Fig. 3a Fig. 1 Fig. 4 Fig. 5 Fig. 3b Fig. 2 6 Add the ingredients to the pitcher, making sure IMPORTANT: Make sure that the motor base that they do not exceed the highest measured is plugged in for use. marking line on the side of the pitcher. - Page 10 Assembly and Use for the 72 oz. Pitcher - cont. WARNING: Never leave the appliance unattended while in use. REMOVAL Fig. 6 Fig. 7 Fig. 8 9 Select the speed that best suits your needs. 12 Depending on the consistency of the contents (Fig. 6) in the container, open the pour spout cap NOTE: Pulse ingredients for even chopping by and use the spout to empty liquid contents.
-
Page 11: Assembly And Use For The Single Serve Cup
Assembly and Use for the Single Serve Cup WARNING: Never leave the appliance unattended while in use. ASSEMBLY REMOVAL Fig. 1 Fig. 2 Fig. 5 Fig. 4 Fig. 3 For best results, use short “PULSES”... Practice makes perfect!! 6 Once you have reached your desired IMPORTANT: Make sure that the motor consistency, turn the power button off. -
Page 12: Assembly And Use For The 64 Oz. Bowl
Assembly and Use for the 64 oz. Bowl WARNING: Never leave the appliance unattended while in use. ASSEMBLY Fig. 1 Fig. 3a Fig. 4 Fig. 2 Fig. 3b Fig. 5 6 Add the ingredients to the bowl, making sure IMPORTANT: Make sure that the motor base that they do not exceed the highest measured is plugged in for use. - Page 13 REMOVAL Activate Suction Fig. 2 Suction Fig. 4a Lever Release Suction Fig. 1 Fig. 4 Fig. 4b Fig. 3 USING THE DOUGH BLADE USING THE 4-BLADE ASSEMBLY IMPORTANT: Use only the “DOUGH” button when using Holding the 4-Blade assembly by the shaft, place it this attachment.
-
Page 14: Assembly And Use For The 3 Cup Mini Prep Bowl
Assembly and Use for the 24 oz. Mini Prep Bowl WARNING: Never leave the appliance unattended while in use. ASSEMBLY REMOVAL Fig. 1 Fig. 3 Fig. 6 Fig. 5 Fig. 7 Fig. 2 Fig. 4 USING THE 3 CUP MINI PREP BOWL Select the speed that best suits your needs. For best results, press the Pulse button in short intervals. -
Page 15: Speed Setting & Uses
Speed Setting & Uses SPEED FUNCTION CONTAINER ATTACHMENT TYPE OF FOOD BUTTON Smoothies Single Serve Single Serve Cup Single Serve Blade Single Serve Frappes Blending Milk Shakes Onion Single Serve Single Serve Cup Single Serve Blade Mincing Garlic Mini Prep Bowl MIni Prep Bowl Blade Pulse Herbs Bread dough... -
Page 16: Care & Maintenance
Care & Maintenance HOW TO CLEAN HOW TO STORE CAUTION: Make sure that the motor base is unplugged Store the Ninja Mega Kitchen System upright with the ® from the power source before inserting or removing any pitcher on the motor base, 6-Blade assembly inside the attachment and before cleaning. -
Page 17: Troubleshooting Guide
Troubleshooting Guide PROBLEMS POSSIBLE REASONS & SOLUTIONS Make sure the container is securely placed on motor base. Make sure the lid is securely on container in the correct position (align arrows). The appliance is turned “Off”. Press the power button ( ) to turn “On”. Check that the plug is securely inserted into the electrical outlet. -
Page 18: Sample Recipes
Recipes Easy Pizza Dough Ingredients: oz. Pkg. Dry Active Yeast 1 tsp. Salt 1 Tbsp. Sugar Water, warmed to 110-115°F Canola Oil (substitute olive oil) 2 Cups All-Purpose Flour Directions: Place the yeast, salt, sugar and water in the bowl. Pulse on 1 for 10 seconds. Add the oil and flour and blend on 1 until the dough is smooth and no lumps remain. - Page 19 Orange Double-Up Ingredients: 4 Cups Orange Juice, divided Frozen Orange Juice Concentrate 2 Medium Fresh Oranges, peeled, seeded and cut into pieces 16 oz. Carbonated Water Directions: Pour 2 cups of orange juice into the pitcher. Add the juice concentrate and the fresh oranges. Blend on 2 until uniformly smooth.
- Page 20 Recipes - cont’d English Toffee Cookies Ingredients: 1 Cup Butter, softened Dark Brown Sugar, packed Sugar 1 tsp. Vanilla Extract Egg Yolk 2 Cups Cake Flour Pinch Salt 10 oz. Milk Chocolate Candy Bar, melted Almonds, chopped Directions: Place the softened butter, sugars, extract and egg yolk in the bowl and blend on 1 until smooth and creamy.
- Page 21 Sweet Strawberry Smoothie Ingredients: Half-and-Half Cream Whole Milk 1 Cup Ripe, Sweet Strawberries, stemmed and washed Lowfat Vanilla-Flavored Yogurt 2 Cups Ice Cubes Directions: Pour the milk and cream into the pitcher and add the strawberries, yogurt and ice cubes. Blend on 3 until the mixture is very smooth and no fruit pieces remain.
- Page 22 Recipes - cont’d Banana Pineapple Smoothie Ingredients: 2 Cups Pineapple Juice 1 Cup Pineapple Chunks, fresh or canned 1 Small Ripe Banana, cut into chunks Unsweetened Coconut Milk 1 Tbsp. Honey 3 Cups Ice Cubes Directions: Pour the juice into the pitcher and add the pineapple, banana, coconut milk, honey and ice. Blend on 3 until very smooth.
-
Page 23: Warranty & Registration
Product Registration lease visit www.ninjakitchen.com or call 1-877-646-5288 to register your new Ninja product ® within ten (10) days of purchase. You will be asked to provide the store name, date of purchase and model number along with your name and address. - Page 24 Euro-Pro Operating LLC Newton, MA 02459 CAN: Ville St-Laurent, QC H4S 1A7 1-877-646-5288 www.ninjakitchen.com Copyright © 2012 Euro-Pro Operating LLC Printed in China Illustrations may differ from actual product. BL772.E.120627.2 BL772_30_IB_ENG_120627_2.indd 23 12-06-27 12:30 PM...
Need help?
Do you have a question about the BL772 and is the answer not in the manual?
Questions and answers
I have a Mega Kitchen System - Ninja BL772. I need a replacement seal for the bowl lid with locking handle. I believe it is a 9” diameter (approximately) silicone seal. How can I get a replacement?
You can get a replacement seal for the bowl lid with locking handle for the Ninja Mega Kitchen System BL772 by purchasing compatible replacement parts. One option is to buy a seal lid that is compatible with models including BL772, as listed in the product description. These parts are available from third-party sellers and are designed to fit models like BL770, BL771, BL772, and others in the Mega Kitchen System series.
This answer is automatically generated