Casio Exilim EX-S2 User Manual
Casio exilim digital camera user's guide
Hide thumbs
Also See for Exilim EX-S2:
- User manual (119 pages) ,
- Servise manual & parts list (26 pages) ,
- User manual (55 pages)
Table of Contents
Advertisement
Quick Links
Digital Camera
EX-S2/EX-M2
User's Guide
Thank you for purchasing this
CASIO Product. Before using
it, be sure to read the
precautions contained in this
User's Guide, and keep the
User's Guide in a safe place
for future reference.
All the illustrations in this manual show the
EX-M2. See the text that accompanies the
illustrations for information about how the
EX-S2 and EX-M2 differ from each other.
EX-M2
E
Advertisement
Table of Contents

Related Manuals for Casio Exilim EX-S2


Summary of Contents for Casio Exilim EX-S2
-
Page 1: Digital Camera
User’s Guide, and keep the User’s Guide in a safe place for future reference. All the illustrations in this manual show the EX-M2. See the text that accompanies the EX-M2 illustrations for information about how the EX-S2 and EX-M2 differ from each other. -
Page 2: Introduction
INTRODUCTION INTRODUCTION Unpacking Check to make sure that all of the items shown below are included with your camera. If something is missing, contact your dealer as soon as possible. Camera Rechargeable lithium ion USB Cradle Special AC Adaptor battery (NP-20) EX-M2 AC power cord * Strap... -
Page 3: Table Of Contents
INTRODUCTION GETTING READY Contents General Guide ............17 Camera INTRODUCTION USB Cradle Using the Controller ........... 19 Unpacking ..............2 Monitor Screen Contents ........... 20 Features ............... 8 Indicator Lamps ............22 Precautions ..............9 General Precautions Attaching the Strap ............ 22 Data Error Precautions Power Requirements .......... - Page 4 INTRODUCTION Using Zoom ..............36 PLAYBACK Using the Flash ............37 Basic Playback Operation .......... 54 Flash Precautions Playing an Audio Snapshot (EX-M2 Only) Using the Self-timer ........... 39 Zooming the Displayed Image ........56 Specifying Image Size and Quality ......40 Resizing an Image .............
- Page 5 INTRODUCTION DPOF ................66 USING A MEMORY CARD To insert the date during printing To configure print settings for a single image Using a Memory Card ..........77 To configure print settings for all images To insert a memory card into the camera PRINT Image Matching II ..........
- Page 6 INTRODUCTION Transferring Files to a Computer ....... 89 APPENDIX Transferring Files Over a USB Connection Using a Memory Card to Transfer Images Menu Reference ............106 to a Computer Indicator Lamp Reference ........107 Memory Data Camera Indicator Lamps Memory Directory Structure USB Cradle Indicator Lamps Image Files Supported by the Camera Built-in Memory and Memory Card Precautions...
- Page 7 EX-S2/EX-M2. • Photo Loader and Photohands are the property of • CASIO COMPUTER CO., LTD. shall not be held liable CASIO COMPUTER CO., LTD. Except as stipulated for any damages or losses suffered by you or any third...
-
Page 8: Features
INTRODUCTION • Best Shot Features Simply select the sample scene that matches the type of • 2.0 million Effective Pixels image you are trying to record and the camera performs A high-resolution megapixel CCD provides 2.0 million ef- troublesome setups automatically for beautiful pictures ev- fective pixels (2.11 million total pixels) for images that print ery time. -
Page 9: Precautions
All references in this manual to “this camera” and “the cam- Quick and easy recording of voice input. era” refer to the CASIO EX-S2/EX-M2 Digital Camera. • After Recording • Never try to take pictures or use the built-in display while Adds audio to images after they are recorded. - Page 10 Doing so can result in an cord from the power outlet, and contact your dealer or accident. nearest CASIO authorized service center. Using the cam- • Physical damage and malfunction of this camera can era under these conditions creates the danger of fire and cause the data stored in its memory to be deleted.
-
Page 11: Data Error Precautions
INTRODUCTION Data Error Precautions Operating conditions • Your digital camera is manufactured using precision digital • This camera is designed for use in temperatures ranging components. Any of the following creates the risk of cor- from 0°C to 40°C. ruption of data in camera memory. •... -
Page 12: Condensation
Condensation can cause malfunc- placed by a CASIO authorized service center. Note that tion of the camera, so you should avoid exposing it to con- you will be charged for LED backlight replacement. -
Page 13: Other
INTRODUCTION Other • The camera may become slightly warm during use. This does not indicate malfunction. -
Page 14: Quick Start Guide
QUICK START GUIDE QUICK START GUIDE Getting Ready Load the battery (page 23). Place the camera onto the USB cradle to charge the battery (page 24). • It takes about two hours to achieve a full charge. -
Page 15: Configuring Display Language And Clock Settings
QUICK START GUIDE Configuring Display Language and Clock Settings To record an image (See page 32 for details.) (See page 34 for details.) 2, 3, 4, 5 Press the power button to turn on the camera. Press the power button to turn on the camera. Rock the controller up or down to select the Align the mode selector with “REC”. -
Page 16: To View A Recorded Image
QUICK START GUIDE To view a recorded image To delete an image (See page 54 for details.) (See page 62 for details.) 3, 4, 5, 6 Press the power button to turn on the camera. Press the power button to turn on the camera. Align the mode selector with “PLAY”. -
Page 17: Contents
GETTING READY GETTING READY This section contains about things you need to know about and do before trying to use the camera. General Guide The following illustrations show the names of each component, button, and switch on the camera. Camera Front Back Operation/Flash charge... -
Page 18: Usb Cradle
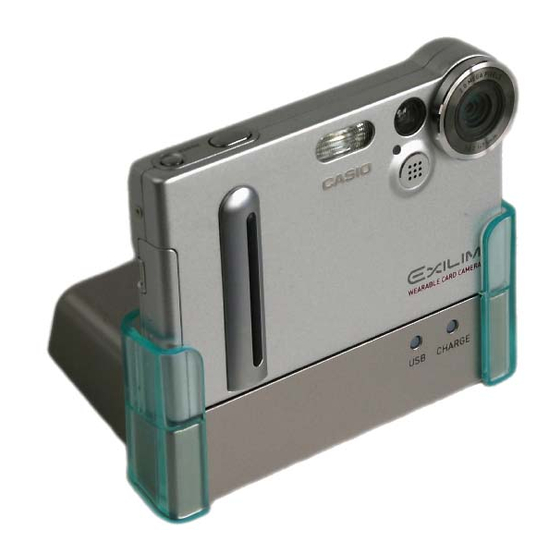
GETTING READY Bottom USB Cradle Simply placing your CASIO digital camera onto the USB cradle lets you perform the following tasks. • Battery charging (page 24) • Automatic transfer of images to a computer (page 89) Connector cover Memory card slot... -
Page 19: Using The Controller
GETTING READY NOTE Using the Controller • See “Using the Camera as an Audio Player” on page The controller is used to select on-screen items and to ex- 98 for information about the LCD remote controller ecute functions. The following are the terms used in this that comes with the EX-M2. -
Page 20: Monitor Screen Contents
GETTING READY Monitor Screen Contents The monitor screen uses various indicators and icons to keep you informed of the camera’s status. REC Mode Self-timer Recording Mode indicator Snapshot White balance indicator Best Shot None Auto Movie Sunlight Snapshot Audio (EX-M2 only) Shade Voice Recording (EX-M2 only) Light Bulb... -
Page 21: Play Mode
GETTING READY PLAY Mode IMPORTANT! • Some information may not display properly if you dis- play an image that was recorded using a different digi- tal camera model. Folder number/File number Image protection Image size indicator 1600 x1200 pixels 1280 x 960 pixels 640 x 480 pixels Quality FINE... -
Page 22: Indicator Lamps
GETTING READY Indicator Lamps Attaching the Strap You can find out the operational status of the camera and the Attach the strap to the strap bar as shown in the illustration. USB cradle at a glance by checking the color of the indicator lamps, and whether a lamp is lit or flashing. -
Page 23: Power Requirements
GETTING READY Swing the battery cover closed, and then slide Power Requirements it in the direction indicated by the arrow while Your camera is powered by a rechargeable lithium ion bat- pressing down on it. tery (NP-20). To load the battery Pressing the battery cover on the side of the camera, slide it in the direction indicated by mark and then swing it open. -
Page 24: To Charge The Battery
GETTING READY To charge the battery Turn off the camera and remove its connector cover. Connect the AC power cord to the AC adaptor. Plug the other end of the AC power cord into a household power outlet. Connector cover Connect the AC adaptor to the DC IN 5.3V con- nector of the USB cradle. - Page 25 GETTING READY IMPORTANT! • The CHARGE lamp flashing red indicates that an error occurred while charging. An error can be caused by • It takes about two hours to achieve a full charge. Ac- any of the following: a problem with the cradle, a prob- tual charging time depends on current battery capac- lem with the camera, or a problem with the battery or ity and charging conditions.
- Page 26 • If the same symptoms occur again when you place the • Image recorded about every 10 seconds camera on the cradle after taking the above steps, contact a CASIO authorized service center. *2 Continuous Playback Conditions • Normal temperature: 25°C (77°F) •...
- Page 27 GETTING READY • Recording one image per minute under the above condi- Tip to Make the Battery Last Longer tions reduces battery life to about one sixth of that noted If you do not need the flash while recording, use the menu to above.
-
Page 28: Power Supply Precautions
See the instructions that come with the rechargeable lithium damaged (exposed internal wiring), request a ion battery (NP-20) for important precautions you need to replacement from a CASIO authorized service observe during its use. center. A damaged AC adaptor cord creates the danger of fire or electric shock. -
Page 29: Turning The Camera On And Off
GETTING READY Turning the Camera On and Off Auto Power Off (APO) Press the power button to turn the Auto Power Off (APO) automatically turns off the camera camera on and off. when you do not perform any operation for certain amount of Pressing the power button to turn time. -
Page 30: Using The On-Screen Menus
GETTING READY Menu Screen Operations Using the On-screen Menus When you want to do this: Do this: Pressing MENU displays menus on the monitor screen that Move between tabs Rock the controller left or right you can use to perform various operations. The menu that appears depends on whether you are in the REC mode or Move from the tab to the Rock the controller down... - Page 31 GETTING READY Rock the controller left or right to select the tab Next, do either of the following. you want, and then rock it down to move the If you want to do this: Do this: selection cursor from the tab to the settings. Apply the setting and exit the •...
-
Page 32: Configuring Display Language And Clock Settings
GETTING READY IMPORTANT! Configuring Display Language and Clock Settings • The camera’s clock settings are cleared whenever power is totally cut off. This can happen if the battery Be sure to configure the following settings before using the goes dead while the camera is not being supplied camera to record images. - Page 33 GETTING READY Press the power button to turn on the camera. Set the date and the time. Rock the controller up or down to select the language you want. : Japanese To do this: Do this: English : English Change the setting at the Rock the controller up or Français : French current cursor location...
-
Page 34: Basic Image Recording
BASIC IMAGE RECORDING BASIC IMAGE RECORDING This section describes the basic procedure for recording an Compose the image 12 12 image. 1600 1600 1200 1200 on the monitor NORMAL NORMAL screen. • The focusing range of Recording an Image the camera is approxi- Your camera automatically adjusts shutter speed in accor- 02/12/24 02/12/24... -
Page 35: About The Rec Mode Monitor Screen
BASIC IMAGE RECORDING • Depending on the distance or angle between the sub- Recording Precautions ject and the camera, the image you see in the • Never open the battery cover or place the camera onto the viewfinder may not be exactly the image that is re- USB cradle while the operation/flash charge lamp is flash- corded. -
Page 36: Using Zoom
BASIC IMAGE RECORDING Rock the controller up or down in the REC Using Zoom mode to change the digital zoom factor. You can use the digital zoom feature of your camera to zoom Rock up to zoom in. in on the center of an image. Performing a zoom operation Rock down to zoom out. -
Page 37: Using The Flash
BASIC IMAGE RECORDING To do this: Select this setting: Using the Flash Have the flash fire automatically Auto Perform the following steps to select the flash mode you when required (Auto Flash) want to use. Turn off the flash (Flash Off) In the REC mode, press MENU. -
Page 38: Flash Precautions
BASIC IMAGE RECORDING NOTE Flash Precautions • You can use the key customization feature (page 52) • Take care that your fingers do not block the flash when you to configure the camera so the flash mode changes hold the camera. Covering the flash with your finger can whenever you rock the controller left or right while in greatly reduce its effectiveness. -
Page 39: Using The Self-Timer
BASIC IMAGE RECORDING • When the red-eye reduction mode ( ) is being used, Using the Self-timer flash intensity is adjusted automatically in accordance with The self-timer delays shutter release so it is performed about the exposure. The flash may not fire at all when the subject 10 seconds after you press the shutter release button. -
Page 40: Specifying Image Size And Quality
BASIC IMAGE RECORDING Self-timer lamp Record the image. Specifying Image Size and Quality • The self-timer lamp You can specify the image size and image quality to suit the flashes and the shutter type of image you are recording. releases about 10 seconds after you press the shutter release To specify the image size... -
Page 41: To Specify The Image Quality
BASIC IMAGE RECORDING To specify the image quality NOTE • Use the “Fine” setting when image quality is your top priority and file size is secondary. Conversely, use the In the REC mode, press MENU. “Economy” setting when file size is your top priority and image quality is secondary. -
Page 42: Other Recording Functions
OTHER RECORDING FUNCTIONS OTHER RECORDING FUNCTIONS This chapter describes the other powerful features and func- Rock the controller up or down to change the tions that are available for recording. exposure compensation value, and then click. • Clicking the controller registers the displayed value. Exposure Compensation (EV Shift) Up : Increases the EV value. -
Page 43: Adjusting The White Balance
OTHER RECORDING FUNCTIONS Record the image. Adjusting the White Balance The wavelengths of the light produced by various light IMPORTANT! sources (sunlight, light bulb, etc.) can affect the color of a • When shooting under very dark or very bright condi- subject when it is recorded. -
Page 44: Adjusting White Balance Manually
OTHER RECORDING FUNCTIONS Rock the controller up or down to select the Adjusting White Balance Manually setting you want, and then click. Under some light sources, automatic white balance under the “Auto” setting can take a long time to complete. Also, the When shooting under these auto white balance range (color temperature range) is lim- Select this setting:... -
Page 45: Using The Best Shot Mode
OTHER RECORDING FUNCTIONS Point the camera at a white piece of paper or Using the Best Shot Mode similar object under the lighting conditions for Selecting one of the six Best Shot scenes automatically sets which you want to set the white balance, and up the camera for recording a similar type of image. -
Page 46: Using The Movie Mode
OTHER RECORDING FUNCTIONS Click the controller. Using the Movie Mode • This displays a sample scene. You can record movies up to 30 seconds long. The EX-M2 even lets you record audio along with your movies. Rock the controller left or right to select the sample scene you want, and then click. - Page 47 OTHER RECORDING FUNCTIONS Remaining capacity Rock the controller IMPORTANT! up or down to select • The flash does not fire in the Movie Mode. (Movie), and then • The EX-M2 also records audio. Note the following points when recording a movie with the EX-M2. click.
-
Page 48: Recording Audio (Ex-M2 Only)
OTHER RECORDING FUNCTIONS In the REC mode, press MENU. Recording Audio (EX-M2 Only) Select the “REC” tab, select “REC Mode”, and Adding Audio to a Snapshot then rock the controller to the right. You can add audio to a snapshot after you record it. Rock the controller up or down to select •... -
Page 49: Recording Your Voice
OTHER RECORDING FUNCTIONS Press the shutter release button to start audio Recording Your Voice recording. The Voice Recording Mode provides quick and easy record- • The operation/flash charge lamp flashes green as re- ing of your voice. cording is performed. •... - Page 50 OTHER RECORDING FUNCTIONS Press the shutter release button to start voice Audio Recording Precautions recording. • Keep the microphone on the front of the camera pointed • The remaining recording time value counts down on at the subject. the monitor screen and the operation/flash charge •...
-
Page 51: Rec Mode Camera Settings
OTHER RECORDING FUNCTIONS IMPORTANT! REC Mode Camera Settings • The monitor screen turns back on automatically in the following cases, even if “LCD-OFF” is selected with Turning the Monitor Screen On and Off the above procedure. Turning off the monitor screen when recording helps to con- —... -
Page 52: Assigning Functions To The Controller
• Rock left or right to cycle through modes. Do not display images immediately • EX-S2: Snapshot, Best Shot, Movie REC Mode after they are recorded • EX-M2: Snapshot, Best Shot, Movie, Snapshot Audio, Voice... -
Page 53: Specifying Power On Default Settings
OTHER RECORDING FUNCTIONS Specifying Power On Default Settings In the REC mode, press MENU. The camera’s “mode memory” feature lets you specify the Select the “Memory” tab, select the item you power on default settings individually for the recording want to change, and then rock the controller to mode, flash mode, digital zoom mode, and white balance the right. -
Page 54: Playback
PLAYBACK PLAYBACK You can use the camera’s built in monitor screen to play Rock the controller right (forward) or left back files. (back) to scroll through files on the monitor screen. Basic Playback Operation Use the following procedure to scroll through files stored in the camera’s memory. -
Page 55: Playing An Audio Snapshot (Ex-M2 Only)
PLAYBACK Playing an Audio Snapshot (EX-M2 Only) IMPORTANT! • Audio volume can be adjusted only when playback is Perform the steps below to display an audio snapshot (indi- being performed or is paused. cated by a indicator) and play its audio. •... -
Page 56: Zooming The Displayed Image
PLAYBACK After clicking the Zooming the Displayed Image controller, you can Perform the following procedure to zoom the image currently then rock it up, down, on the monitor screen up to four times its normal size. left, or right to scroll to different parts of In the PLAY mode, rock the controller left or the zoomed image. -
Page 57: Resizing An Image
PLAYBACK Rock the controller up or down to select the Resizing an Image setting you want, and then click. You can use the following procedure to change a snapshot image to either VGA size (640 x 480 pixels) or QVGA size To do this: Select this: (320 x 240 pixels). -
Page 58: Playing A Movie
PLAYBACK • You can perform the following operations while a Playing a Movie movie is playing. Use the following procedure to play back a movie recorded To do this: Do this: in the movie mode. Fast forward or fast reverse Hold the controller left or the movie right. -
Page 59: Adding Audio To A Snapshot (Ex-M2 Only)
PLAYBACK In the PLAY mode, rock the controller left or Adding Audio to a Snapshot (EX-M2 Only) right to scroll through snapshots until the one The “after-recording” feature lets you add audio to snap- to which you want to add audio is displayed. shots after they are recorded. -
Page 60: To Re-Record Audio
PLAYBACK To re-record audio IMPORTANT! • Keep the microphone on the front of the camera pointed at In the PLAY mode, rock the controller left or the subject. right to scroll through snapshots until the one • Take care that you do not whose audio you want to re-record is dis- block the microphone with played. -
Page 61: Playing Back A Voice Recording File (Ex-M2 Only)
PLAYBACK IMPORTANT! Playing Back a Voice Recording File (EX-M2 Only) • Audio volume can be adjusted only when playback is being performed or is paused. Perform the following steps to play back a voice recording • When you have the LCD remote controller connected file. -
Page 62: Deleting Files
DELETING FILES DELETING FILES You can delete a single file, or you can delete all files cur- Deleting a Single File rently in memory. Perform the following steps when you want to delete a single file. IMPORTANT! In the PLAY mode, •... -
Page 63: Deleting All Files
DELETING FILES IMPORTANT! Deleting All Files • If a file cannot be deleted for some reason, the mes- The following procedure deletes all unprotected files cur- sage “The function is not supported for this file.” ap- rently in memory. pears when you try to delete it. In the PLAY mode, rock the controller down Rock the controller up or down to select “All File Delete”, and then click.
Need help?
Do you have a question about the Exilim EX-S2 and is the answer not in the manual?
Questions and answers