
Related Manuals for 3M Shoot ‘n Share CP40


Summary of Contents for 3M Shoot ‘n Share CP40
- Page 1 ’n share Camcorder Projector Operator’s Guide Guide de l’utilisateur Guía del usuario Model CP40 July 2010 78-6971-1565-3-A...
-
Page 2: Table Of Contents
Table of Contents Getting Started ..............7 Product overview .................. 7 Package Content .................. 8 Reading LED indicators ................ 9 Charging the battery ................9 Inserting a memory card (optional) ............10 Power Projector ON/OFF..............10 Set language..................10 Menu Navigation ................... 11 Understanding Status Icons.............. -
Page 3: Important Notice
You assume all risks and liability associated with such use. Any statements related to the product which are not contained in 3M’s current publications, or any contrary statements contained on your purchase order shall have no force or effect unless expressly set forth in a written agreement signed by an authorized officer of 3M. -
Page 4: Intended Use
Warning: Hazardous Voltage WARNING To reduce the risk associated with hazardous voltage: • Do not modify this product in any way. Use only 3M approved replacement components. • Do not attempt to service this projector. There are no user serviceable parts. - Page 5 • Do not immerse the projector in water or allow to get wet. • Use only the 3M specified wall charger or automobile charger. • Do not use the projector if it gives off an odor, or generates excessive heat.
- Page 6 LED LIGHT OUTPUT CLASS 1 IEC60825-1 :1993+A1 Maximum Radiant Power: 0.59 mW :1997+A2:2001 PRODUCT SAVE THESE INSTRUCTIONS Usage Notice: • Turn off the power switch and unplug the power adapter before cleaning the projector. • Use a soft dry cloth with mild detergent to clean the display housing. •...
-
Page 7: Getting Started
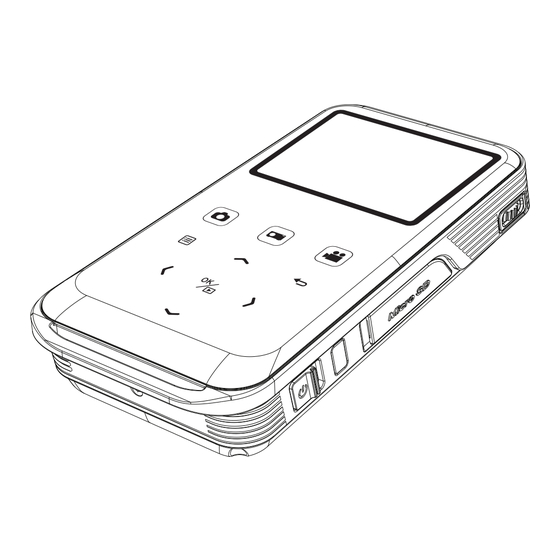
Getting Started Product overview Projection button Shutter button Record button Up arrow (Zoom in) Menu button Return button Right arrow (LED light) Left arrow (Folder) OK button Down arrow (Zoom out) Focus switch Micro SD card slot IR receiver Power Switch Tripod socket Speaker Camcorder... -
Page 8: Package Content
Package Content Projector Quick Guide AV cable (RCA AC power adapter female to mini jack) USB cable... -
Page 9: Reading Led Indicators
Reading LED indicators The Power LED turns orange when the projector is charging. The Power LED turns green when the AC power adapter is connected and the projector is in standby mode. Also indicates a fully charged battery. Charging the battery Connect one end of the supplied AC adapter to the USB port of the projector and the other end to a wall outlet. -
Page 10: Inserting A Memory Card (Optional)
Inserting a memory card (optional) Open the Micro SD card cover. Gently insert the card as indicated (contacts facing upward) until the card reaches the end of the slot. When the card is fully seated, the icon ( ) will appear on screen. -
Page 11: Menu Navigation
The following LCD icons display at the top of the screen to indicate current projector settings. 00:03:12 Video resolution (QVGA, VGA, Internal memory/SD card inserted DVD, HD 720p) Battery life (empty battery ----> full Picture resolution (3M, 5M, 8M) battery) LED light (On, Off) Zoom ratio indicator Recording time... -
Page 12: Basic Operations
Basic Operations Recording a video clip Press the Up/Down ( ) arrows to zoom in or zoom out. Press the Record ( ) button to start recording. Press the Record ( ) button again to stop recording. While in recording mode, press the OK/Quick Playback ( ) button to pause recording. -
Page 13: Projecting Files
Projecting fi les Press the OK/Quick Playback ( ) button or the Left ( ) arrow. Press the Up/Down arrows to select target folder. When selecting one fi le, press the OK button to play it. Press the Projection button ( ) to project. -
Page 14: During Playback
During Playback • Playing Video Press Left/Right arrow to move to previous/next fi le. Press and hold Left/Right arrow button to fast forward and fast rewind. Use Up/Down arrow to control volume. Press the OK button to pause the video (press OK again to resume). The following status information will display. -
Page 15: Menu Items In Playback Mode
• Menu items in Playback mode For playback video or photo files, press the Menu ( ) button to set up the following features. When you are done, press the Menu button to exit the menu screen. Item Description Delete Delete the files. - Page 16 Adjusting the Projected Image Projection Distance Screen size - Width Screen Size - Height Screen Diagonal (cm) (inch) (cm) (inch) (cm) (inch) (cm) (inch) 19.0 12.2 15.2 38.1 24.4 18.3 30.5 12.0 63.5 40.6 16.0 30.5 12.0 50.8 20.0 101.3 39.9 65.0 25.6...
-
Page 17: Connecting Projector To Media Devices
Connecting Projector to Media Devices Composite AV Cable This projector connects to most DVD players, SAT-Receivers, Portable Media Players and Game consoles with the projector AV cable (supplied) and the composite AV cable that came with the media device. Projector AV cable Composite AV-out (rouge) DVD Player/ cable... - Page 18 HDMI Cable This projector connects to most HD Digital TV’s with an optional (not included) HDMI cable. HDMI In HDMI Out HDMI cable (Optional) Turn on your HDTV. Connect the HDMI-in connector (the bigger end) of the HDMI cable to the HDTV. Turn on the projector.
-
Page 19: Advanced Operations
Advanced Operations Menu Setting items Item Option Description QVGA Set the video resolution to QVGA (320x240 pixels). Set the video resolution to VGA (640x480 pixels). Video Resolution Set the video resolution to DVD (720x480 pixels). HD(720P) Set the video resolution to HD 720P (1280x720 pixels). Set the picture resolution to 3 mega pixels. -
Page 20: Flicker Setting Table
Flicker Setting Table Region England Germany France Italy Spain Netherlands Russia Setting 50Hz 50Hz 50Hz 50Hz 50Hz 50Hz 50Hz Region Portugal America Taiwan China Japan Korea Thailand Setting 50Hz 60Hz 60Hz 50Hz 50/60Hz 60Hz 50Hz Battery Life Indicator Icon Description Full battery Half-Full battery Low battery... -
Page 21: Specifications
Video: MPEG-4( ASF), H.264(MP4), M-JPEG(AVI) Play Back Format compatible with bundle software Audio: MP3 Sensor Resolution Video Clip HD 720p, DVD, VGA, QVGA Image Resolution 8M, 5M, 3M Lens Focus Fixed Output HDMI, Audio Audio Speaker Mono Built-in Memory 32MB... - Page 22 Item Description Dimension (LxWxH) 125 x 62 x 24 mm AV cable (RCA female to mini jack), USB cable, Package Content AC power adapter, Quick Guide,CD Note: - Advanced Systems Format (*.ASF) - Video CD (*.DAT) - MPEG (*.MPG; *.MPEG; *.MPE) - RealMedia Video (*.RMVB) - Windows Media Video (*.WMV) - Microsoft PowerPoint (*.ppt, *.pps)
-
Page 23: Troubleshooting
Troubleshooting If your projector does not seem to be functioning properly, check the items below before you contact an authorized service center. Symptom Check Point The projector can not be • Ensure the battery is fully charged or the AC power adapter turned on. -
Page 24: Limited Warranty
• All other accessories included with the 3M product are warranted to be free from defects in material or manufacture for a period of 1 year from the date of purchase. • Optional product accessories that are not sold as part of the 3M product are subject to individual warranties. - Page 25 This warranty does not cover postage, insurance, or shipping costs incurred in presenting your 3M product for warranty service. Said costs are the customer’s responsibility. If a claimed defect cannot be identified or reproduced in service, the customer may be held responsible for cost incurred. Should your warranty upgrade include a “change out” service and the claimed defect cannot be identified or reproduced by the technician, the customer will be responsible for call out costs. FAILURE TO FOLLOW THE INSTRUCTIONS CONTAINED IN THE APPROPRIATE 3M PRODUCT MANUAL OR TO USE THE 3M PRODUCT IN ACCORDANCE WITH 3M’S INTENDED USE STATEMENT, WILL VOID ALL WARRANTIES AND LIMITED REMEDIES.
- Page 26 EXCEPT AS SPECIFICALLY STATED IN THE APPLICABLE 3M PRODUCT MANUAL, 3M SHALL NOT BE LIABLE FOR ANY INDIRECT, INCIDENTAL, SPECIAL OR CONSEQUENTIAL DAMAGES (INCLUDING, BUT NOT LIMITED TO, LOSS OF PROFITS, REVENUE OR BUSINESS) RESULTING FROM, OR IN ANY WAY RELATED TO PERFORMANCE, USE OR INABILITY TO USE ANY OF THE 3M PRODUCT. This limitation applies regardless of the legal theory upon which damages are sought. For warranty support, please call or write your local 3M office or a 3M Authorized Service Provider to obtain an RMA # (Return Material Authorization number) before returning the product. If you are inside the Continental United States of America, please contact 3M Customer Service at 1-866-631-1656 or email meetings@mmm.com. What 3M Will Do To Correct Problems: • If your 3M product requires service, 3M will ask you to bring or send the 3M product, securely packaged in its original container or equivalent, along with proof of the date of original purchase, to your 3M Service Dealer or 3M Service Center. • 3M will, at its option, repair or replace the defective unit without charge for parts or labor. Return of the 3M product will be at 3M’s expense. • When warranty service involves the exchange of the 3M product or of a part, the item replaced becomes 3M property. • The exchanged 3M product or part may be new or previously refurbished to the 3M standard of quality, and at 3M’s option, the replacement may be another model of like kind and quality. • 3M’s liability for replacement of the warranted 3M product or part will not exceed the original retail selling price of the 3M product. Exchange or replacement products or parts assume the remaining warranty period of the product covered by this limited warranty. 82-703-90020v1.0...
- Page 27 3M is a trademark of 3M Company. All other trademarks or registered trademarks are property of their respective companies. Projection Systems 3M Mexico, S.a. de C.V. 3M Canada 3M Austin Center Apartado Postal 14-139 P.O. Box 5757 6801 River Place Blvd.
Need help?
Do you have a question about the Shoot ‘n Share CP40 and is the answer not in the manual?
Questions and answers