Swann DVR4-2500 Operating Instructions Manual
4 channel h.264 digital video recorder
Hide thumbs
Also See for DVR4-2500:
- Operating instructions manual (22 pages) ,
- Easy setup manual (3 pages) ,
- Specifications (2 pages)
Table of Contents
Advertisement
Quick Links
Swann Technical Support
All Countries E-mail: tech@swannsecurity.com
Telephone Helpdesk
USA toll free
1-800-627-2799
(Su, 2pm-10pm US PT)
(M-Th, 6am-10pm US PT)
(F 6am-2pm US PT)
USA Exchange & Repairs
1-800-627-2799 (Option 1)
(M-F, 9am-5pm US PT)
See http://www.worldtimeserver.com for information on time zones and the
current time in Melbourne, Australia compared to your local time.
© Swann Communications 2009
AUSTRALIA toll free
1300 138 324
(M 9am-5pm AUS ET)
(Tu-F 1am-5pm AUS ET)
(Sa 1am-9am AUS ET)
NEW ZEALAND toll free
0800 479 266
UK
0203 027 0979
Advanced security made easy
DVR4-2500™
4 Channel H.264 Digital Video Recorder
Operating Instructions
SW342-2DV
www.swannsecurity.com
M2DV300310E
plug&playsecurity
Advertisement
Table of Contents

Subscribe to Our Youtube Channel
Related Manuals for Swann DVR4-2500


Summary of Contents for Swann DVR4-2500
-
Page 1: Operating Instructions
0800 479 266 1-800-627-2799 (Option 1) (M-F, 9am-5pm US PT) 0203 027 0979 See http://www.worldtimeserver.com for information on time zones and the current time in Melbourne, Australia compared to your local time. Operating Instructions SW342-2DV www.swannsecurity.com © Swann Communications 2009 M2DV300310E... -
Page 2: Before You Begin
These devices comply with part 15 of the FCC Rules. Operation is subject to the following two conditions: for parts or labour or replaced at the sole discretion of Swann. The end user is (1) These devices may not cause harmful interference, and responsible for all freight charges incurred to send the product to Swann’s repair... -
Page 3: Table Of Contents
Table of Contents Notes Before You Begin ____________________________________________________________________ Table of Contents ____________________________________________________________________ Package Contents ____________________________________________________________________ Read Before Installation ____________________________________________________________________ Overview Important Information ____________________________________________________________________ Layout of the Front Panel ____________________________________________________________________ Layout of the Rear Panel ____________________________________________________________________ Layout of the Remote Control ____________________________________________________________________ Connecting Cameras Navigating the Menus... -
Page 4: Package Contents
Display Resolution NTSC: 704 x 480, PAL: 704 x 576 Display Frame Rate NTSC: 120fps, PAL: 100fps Audio Audio Inputs 4 x RCA Audio Input DVR4-2500™ Unit Software CD Audio Output 2 x RCA Audio Output Remote Control Network cable Recording Compression Format H.264... -
Page 5: Read Before Installation
Never open the case whilst the DVR is plugged in , and never turn the maybe faulty. We suggest calling Swann Technical Support - the contact information DVR on whilst the case is open. is on the rear cover of this booklet. -
Page 6: Overview
Let’s just take a moment to talk drive pre-installed, and you don’t want about some of the great features that the DVR4-2500 offers and some of the to change it, disregard these steps. -
Page 7: Important Information
If you do manage to lock yourself out of the DVR, you’ll need to contact us indicates the area which will be sensitive to at the Swann Technical Support Telephone Helpdesk - the number is on the motion. back cover. -
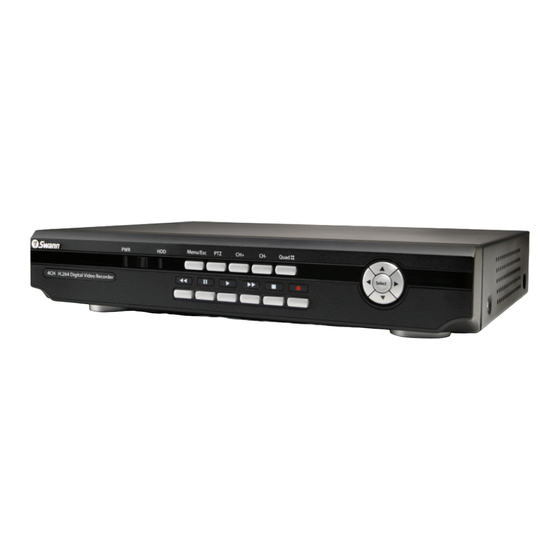
Page 8: Layout Of The Front Panel
Layout of the Front Panel NetViewer - Setup In the SETUP you can change the camera record settings. You can turn each channel on or off, select the recording resolution & quality, turn on or off the audio, select a record mode and set up the record schedule. Note that you must be logged in using the ADMINISTRATOR password to be able to change options. -
Page 9: Layout Of The Rear Panel
Layout of the Rear Panel NetViewer - The Replay Interface The REPLAY screen allows you to remotely access, playback and backup recordings from the DVR remotely. When backing up in this manner, the fi le will be saved directly to the computer you’re accessing the DVR from. 1) CH1 ~ CH4 (Video Inputs): These 5) USB Mouse Port: For connecting are the four camera inputs, labelled as... -
Page 10: Layout Of The Remote Control
Layout of Remote Control NetViewer - The Main Interface 6) Menu: One of the primary controls for navigating through the menus. When in live-viewing mode, it will enter the main menu. When pressed in the main menu, it will return the DVR to live-viewing mode. -
Page 11: Connecting Cameras
Connecting Cameras NetViewer - Starting the Software Before starting the NetViewer software, ensure that the DVR is properly connected to your network. The computer you use to open the software should also be connected the network or the Internet so that it can communicate with the DVR. To open NetViewer: •... -
Page 12: Navigating The Menus
Navigating the Menus NetViewer - Installation Guide Insert the mini CD-ROM which came with There are two main ways to navigate through the menus on the DVR. One way is Step 2 your DVR into your computer. Most CD/ to use the buttons on the front panel of the DVR and/or the remote control. The DVD/Blu-Ray trays have a small, inner other way is to use the included USB mouse. - Page 13 NetViewer - About the Software Using the On-Screen Keyboard The included software “NetViewer” is an invaluable tool for accessing, operating, controlling and backing up footage from your DVR. It interfaces with your DVR via As the DVR doesn’t have a keyboard, when you have to enter text the DVR will your local network or remotely via the Internet, so it’s also the primary method of present you an on-screen ‘keyboard’.
-
Page 14: Starting The Dvr
Accessing the DVR4-2500 from a Mobile device running Windows Mobile Once the DVR has been connected to You’ll need the mini-CD which came with the DVR4-2500, as that contains the software power, switch it on by using the power ®... -
Page 15: The Main Menu
Remote Access from a Mobile Device The Main Menu The DVR4-2500 supports access from mobile devices, such as mobile phones with Microsoft Windows Mobile ® as their operating system, as well as the increasingly popular iPhone. To correctly confi gure your DVR for remote access via a mobile... -
Page 16: The Camera (Display Setup) Menu
The Camera (Display Setup) Menu Adjusting the Security Settings in Internet Explorer Open Internet Explorer. You will now see the list below (or similar, depending on the version of IE you are running). Click Tools --> Internet Options. The DISPLAY SETUP MENU of the DVR. - Page 17 Remote Access via Internet Explorer Color Setup The easiest way to access your DVR remotely is via an Internet browser. These You can fi ne tune the look of each channel individually by adjusting the HUE, instructions will detail how to access the DVR via Microsoft Internet Explorer ®...
-
Page 18: The Record Setup Menu
The Record Setup Menu Static and Dynamic IP Addresses In much the same way as your home network can use static or dynamic IP addresses, many Internet providers don’t issue (or charge more for) a static IP address for users. The easiest way to fi... - Page 19 Setting Up Remote Access Public and Private IP Addresses Audio The IP address used by the DVR, whether entered manually (STATIC) or assigned The audio recording function can be turned enabled or disabled here. If you have by the dynamic host (DHCP) is the private IP address of the DVR. The private IP no audio recording equipment (such as a microphone) attached to your system or address is used to locate the DVR on your private network.
-
Page 20: The Recording Schedule
If you’d like to set the schedule for more than one channel at a time, you have two options. One option is to manually enter the same information for each channel The DVR4-2500 needs two “ports” to be available and properly confi gured to individually. - Page 21 Requirements for Remote Access The primary requirements for accessing the DVR4-2500 via the Internet are: Setting the Schedule A High-Speed Internet Connection The fi rst step in setting the schedule is choosing which channel you’d like to set the schedule for. From the CHANNEL drop-down menu, select the channel you’d Video uses a lot of data, so you’ll need a fast Internet connection in order to get...
-
Page 22: The Network Confi Guration Menu
The Network Configuration Menu This is the NETWORK SETUP screen. Cruise Mode This is the most technically complex aspect to setting up the DVR, and does require a working knowledge of network technologies. To setup CRUISE MODE, you’ll need to defi... - Page 23 PTZ Controls MEDIA PORT: This is the port that the DVR will use to send information through. The most important things are that: Nothing else share this port. The default port number is 9000, which is not used by many other devices/programs. However, particularly if you have another DVR or DVR-like device, something might be using this port already.
-
Page 24: The Video Search Menu
& YEAR then click the SEARCH button. If you want to be really vague, or look at a drive. Usually, you won’t need to use this setting unless directed to do so by Swann really long list, you can input the YEAR alone. -
Page 25: The File List & Usb Backup
The Language and Info Menus The File List & USB Backup Language Menu The FILE LIST screen. • Using the mouse or the arrow buttons, This is the main screen you’ll use select the drop-down menu of when locating specifi c incidents languages. -
Page 26: The Playback Interface
The Playback Interface The Video Setup Menu The VIDEO SETUP menu allows you to control the video signals being sent by the DVR. You can confi gure settings for both composite video (BNC) outputs, and the VGA connection. VGA RESOLUTION: This setting will determine how detailed the image sent to a VGA compatible monitor (connected via the VGA port on the rear of the DVR) will be. - Page 27 NOTE: The default password to the DVR is “123456”. If you lose or forget your password (thus locking yourself out of the DVR) you’ll need to contact Swann Technical Support. Our number is on the back of this booklet. However, we strongly advise that you choose a password you’ll remember! It’ll save grief later...
-
Page 28: Playing Backed Up Footage On A Pc
Playing Backed Up Footage on a PC The Time Setup Menu The video fi les which the DVR backs up are not playable by standard multimedia software. This means that your usual media player is not going to be able to open or display footage from the DVR. - Page 29 The System Setup Menu The Playback Interface Assuming that you’ve used the default installation paths, you can access the The SYSTEM SETUP menu. playback software by selecting the desktop icon named Playback Software, or fi nding The SYSTEM SETUP menu is where most the program group of the same name in of the advanced settings for the DVR your Start Menu.
-
Page 30: The Device Management Menu
The Device Management Menu How Motion Detection Works This is the DEVICE MANAGEMENT menu. Here you’ll fi nd options to The way that the DVR looks for motion is quite straight forward - it’s a process customise and confi gure settings for: where it compares one frame (that is, a single image taken approximately a •... -
Page 31: The Hdd (Hard Drive) Management Screen
Motion Detection Configuration The HDD (Hard Drive) Management Screen This is the HARD DRIVE (HDD) Say, for example, you are trying to monitor your front yard, whilst in the background MANAGEMENT screen. All aspects of the there is a busy street, and the cars driving past continually set off the motion hard drive can be managed from this screen. -
Page 32: The Ptz (Pan, Tilt, Zoom) Setup Menu
DVR as an ALARM EVENT. Thus, you can use the ALARM RECORDING system. The DVR4-2500 supports the Pelco-P and Pelco-D protocols. mode in the schedule to trigger the DVR to record when either an external sensor is triggered, or motion detection triggers the alarm signal. -
Page 33: The Alarm Menu
Video Loss: Will trigger an alarm/buzzer when a camera stops supplying images. router/gateway for port forwarding. • A compatible mobile device. Currently, the DVR4-2500 supports a mobile Alarm Management: Here you can confi gure how the DVR will alert you in the device (such as a cellphone) running Microsoft Windows Mobile ®... -
Page 34: Auto Email Setup
Auto Email Setup Step 4 Step 5 You can confi gure the DVR to automatically send you email alerts when it detects an alarm event. Once you’ve entered all the required Once all your information has been information, the information in the entered, choose APPLY to save your Please note that this function is not compatible with all email servers - as the fi...
Need help?
Do you have a question about the DVR4-2500 and is the answer not in the manual?
Questions and answers