Advertisement
Instruction Manual
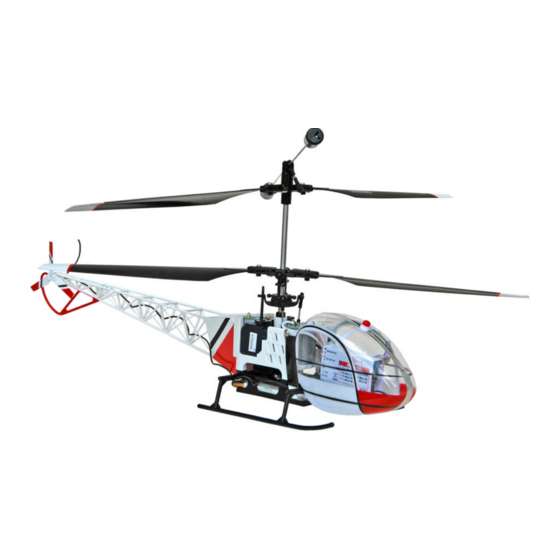
Specifications:
Main Rotor Diameter A: 340mm
Main Rotor Diameter B: 340mm
Overall Length: 425mm
Servos: weight 8.5g / speed 0.11sec/60° (4.8V) / torque 0.9kg/cm (4.8V) / dimension 22.5mm x 11.5mm x 24mm
Model Features:
1.
One cell Li-Po @ 3.7V 1000mAH gives 7 to 10 minute flight when fully charged.
2.
High quality servos are fat and precise for total control when flying.
3.
Coaxial driveshafts system provides easy and stable flying characteristics.
4.
4-channel transmitter with illuminated power indicator makes for problem-free flying.
5.
This model is ideal for the beginner as it is very stable and easy to control.
Australian agent:
Drive System: 2x 130PH
Transmitter: WK-0408
Receiver: RX-410 (4-in-1 receiver) Gyro: Built-in
All-up Weight: 188g (Battery included)
Battery: 3.7V 1000mAh Li-Po
Advertisement
Table of Contents

Related Manuals for Walkera MH 5G4


Summary of Contents for Walkera MH 5G4
-
Page 1: Instruction Manual
Instruction Manual Specifications: Main Rotor Diameter A: 340mm Drive System: 2x 130PH All-up Weight: 188g (Battery included) Main Rotor Diameter B: 340mm Transmitter: WK-0408 Battery: 3.7V 1000mAh Li-Po Overall Length: 425mm Receiver: RX-410 (4-in-1 receiver) Gyro: Built-in Servos: weight 8.5g / speed 0.11sec/60° (4.8V) / torque 0.9kg/cm (4.8V) / dimension 22.5mm x 11.5mm x 24mm Model Features: One cell Li-Po @ 3.7V 1000mAH gives 7 to 10 minute flight when fully charged. -
Page 2: Table Of Contents
Contents Introduction ------------------------------------------------------------------------------ 3 Warnings --------------------------------------------------------------------------------- 3 Cautions ---------------------------------------------------------------------------------- 4 Charging batteries ---------------------------------------------------------------------- 5 Transmitter Features ------------------------------------------------------------------ 6 Receiver Identification ------------------------------------------------------------------ 7 Battery Mounting and Adjustment ------------------------------------------------- 7 Swashplate Adjustment -------------------------------------------------------------- 8 Main Rotor Blade Adjustment ------------------------------------------------------ 8 Flying the HM 5G4 -------------------------------------------------------------- 8 – 11... -
Page 3: Introduction
Introduction Thank you for purchasing our product. We strongly recommend that you read the whole user manual before you fly your helicopter. This will make it easier and safer as you will be given a full explanation of how the helicopter works, and how to use the control transmitter. -
Page 4: Cautions
Cautions 1. This helicopter is operated by radio control, so it is important that you are always using fresh and / or fully charged batteries. Never allow the batteries to run low as that may cause you to lose control of the helicopter. -
Page 5: Charging Batteries
1. Charging On-board Li-Po Batteries: Use the supplied battery charger for the on- board Li-Po battery in the helicopter. This charger will automatically give the correct charge. Plug the charger to the battery before plugging the charger into power point if the power point is not switched off. -
Page 6: Transmitter Features
Transmitter Features 4-Channel Transmitter Features: Mode 1 The transmitter has power indicator, ergonometric design, and DIP switches available for servo reversing. 4-channel micro-computer encoder; PPM modulation; output power 200mW; current drain: 150mA; Power source: 8 x 1.2V Ni-Cd battery (9.6V 600mAh) or 8 x 1.5V AA dry cell battery. -
Page 7: Receiver Identification
DIP Switches Identification (Fig. 3): The Factory Default Settings: CHANNEL ON/OFF Elevator. Reverse the elevator servo direction. 2. Aileron. Reverse the aileron servo direction. 3. Throttle. Reverse the throttle stick direction. Note: Make sure that the throttle stick works correctly before flight, NOT USED 4. -
Page 8: Swashplate Adjustment
Swashplate Adjustment Fig.7 Swashplate inspection. Pull down the throttle stick and throttle trim to the lowest position, and put the elevator trim and aileron trim in the neutral position, - centred (Fig. 1). Then turn on the transmitter and then connect the helicopter power cable. -
Page 9: Flying The Hm 5G4
• While doing a low-level hover, check to see if any trim is required to stop the MH 5G4 drifting in any direction. If you find the helicopter drifts without any directional control input, make adjustments with the trim levers. If you are not comfortable with doing this in flight, make sure you know the drift direction, land the helicopter and make minute trim adjustments before you try again. - Page 10 Flying the MH 5G4 in Mode 1 For Mode 2 the elevator and the throttle are on opposite side of Mode 1. The trims are also changed over accordingly. See next page >...
- Page 11 Flying the MH 5G4 in Mode 2...
- Page 12 NOTICE: The specifications of this R/C helicopter may change without prior notice.
Need help?
Do you have a question about the MH 5G4 and is the answer not in the manual?
Questions and answers