Advertisement
Quick Links
Advertisement

Related Manuals for PowaCycle PUMA LPX


Summary of Contents for PowaCycle PUMA LPX
- Page 1 Owner’s Manual for Puma LPX & Lynx LPX Lithium Polymer Powered Electric Folding Bikes ...
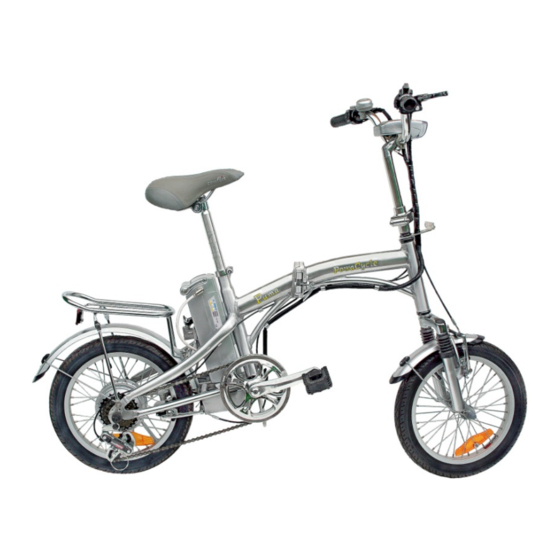
- Page 2 Model Shown ‐ PowaCycle Puma LPX ...
- Page 3 Main Technical Specification Summary Bicycle Motor Weight: 17.8 kg Puma Type: High‐efficiency DC 20kg Lynx Permanent‐magnet Brushless Motor Maximum riding noise: ≤ 62db Size: 1410 x 610 x 1040mm (Puma) Rated power: 180W 1600 x 560 x 1070mm (Lynx) Maximum motor speed: 20 km/h Rated speed of revolution: 235 rpm Distance per charge: 25‐33miles Rated Voltage: 24V Power Assisted Cycling Climbing Ability: ≤12 degrees Rated efficiency: 78% Power consumption per 100 kilometres: Over Current protection value: 15 ± IA ≤l.2 kWh Under voltage Protection value: 21.5 V Weight: ≤ 2.5 kg Battery Charger Type: Polymer Lithium Ion Battery ...
-
Page 4: Safety Requirements
Safety Requirements Before use, read through this manual, and ensure that any riders are familiar with the content herein. Always obey traffic rules. Do not carry a passenger. When adjusting the saddle, keep adjustment within the max safety line on the seat post. Please note that the tightening torque of saddle’s grip nut and post’s clamping bolt is 18Nm. When adjusting the handle bar, do not set handlebar above the safety line/marker on the handle bar stem. Please note that the tightening torque of screw rod for the stem handlebar clamp bolt is 18Nm. Regular checking of the brake pads is necessary to ensure top performance. The torque of both front and rear hub nuts, are set to 18Nm and 30Nm respectively. Operation Guide and Precautions Electric Cycling • Insert the battery box into the bicycle frame. • Insert the key in the box lock, turn the key in the battery case lock 180 degrees clockwise, and always remove the key after locking. • To power on, turn the ignition key clockwise, noting the red indicator light on the battery box and the status lights on the throttle. The additional green status light shows when the full capacity is available with the lights extinguishing as power decreases. • Assisted Power mode is engaged whenever the ignition is turned on. • Users can also use the cycle in throttle mode alone. To use the throttle turn the switch on the left handlebar to the on position. ... - Page 5 Cycling without power support • The ignition switch must be turned off in order to enable riders to use the electric bicycle in the same way as an ordinary bicycle. Charging • The battery for this electric bicycle must be charged by its own specific Puma or Lynx LPX charger. The charger’s supply voltage must match the local voltage. • Charging needs to be carried out in a dry cool environment. • Do not charge in areas where there is a risk of exposure to water, or in areas that can become exposed to direct sunlight. • The battery can be charged on or off the bicycle. • When the red indicator on the charger turns green, it means that the battery is fully charged. According to power consumption, the charging can be completed within 2‐10 hours. • During charging, the charger and the battery box should be located in a stable position on its side to prevent it toppling over. Do not cover the charger or battery box while in use. • During charging, if the battery pack overheats, it indicates that there is fault with the battery pack or charger. In this case, cut off the power supply immediately and return it to your vendor’s after‐sales‐service centre for repair. Directions for using the Battery Pack • On the first time of use, the battery will need a longer charge of 8‐10 hours. • In order to achieve the full range from the battery, new batteries must be conditioned. To do this fully charge and discharge the battery 8‐10 times. • Only use the dedicated Li‐Polymer battery charger for Puma LPX or Lynx LPX. • When the power is exhausted, the pack shouldn’t be stored for more than 48 hours, but charged as soon as convenient. • For long life, the pack should be removed from the bicycle, fully charged, and stored in a shady, cool and dry place. • Do not use or store the pack near heat sources such as an electric fire or heat source. • Do not attempt to directly connect the battery pack to a mains supply outlet. • Do not allow the battery pack to be immersed in water • Never put the battery in fire, even at end of life. • Do not short the battery by connecting the electrodes via metal or water. • Take care to avoid impact to the battery pack. • Do not use sharp tools that could pierce the battery pack. • Do not drop or shake the battery pack violently. ...
-
Page 6: Maintenance
Maintenance • Before using, please check that the battery box is locked in place, the red battery indicator light is on when you operate the key switch, and the throttle light does not indicate empty. • Ensure the cleanness of the bicycle body and the battery contacts. Immediately remove the dirt to avoid the decline in the efficiency or damage to the electrical parts. • Frequently check tyre pressures are correct against the figures marked on the side of the tyre wall. Under‐inflation of tyres will reduce the riding distance achieved, and in worst case, the tyre will be damaged by either over or under‐inflation. • As with ordinary bicycles essential mechanical and safety checks are required. • Do not use the bike in water depths where water can reach the lowest part of wheel hub or battery. Otherwise, electrical damage can occur due to water ingress. • Keep the bicycle away from moist, high temperatures and gas‐acrid environments, to avoid the chemical corrosion on the electroplated coating surfaces of the metal parts. • Avoid long exposure to direct sunlight or drenching with water, to prevent damage or malfunctioning of parts. • It is normal for the electric bicycle to feel heavier during reverse maneuvering, and the wheel hub can make a friction sound during forward movement. • Do not overload to avoid damage to the battery or motor. • Lubrication is an important item in the maintenance of the electrical bicycle. According to the usage, scrub and lubricate the rotational parts such as the front, back and middle axles, flywheel and front fork every 6 months. Special lubricating oil has been smeared on the riding components inside electrical wheel hub, so it is unnecessary to perform this lubrication yourself. Go to our authorised service/maintenance centres, if you identify any abnormal functioning or a service need. Adjusting method for braking system Examine the braking system frequently to ensure its reliability. Adjusting can be performed as follows: ‐ Check that the brake levers make contact when its movement reaches 1/2X (see illustration below). ‐ Loosen the screw on the braking cable seat then tighten or loosen the braking cable, enabling the average movement between each of the two brake blocks and the rims of approximately 1.5‐2mm. Electrical Circuit Diagram Note: Wiring colours can vary. ... - Page 7 Electric Bicycle Electrics & Troubleshooting Methods The information in this manual is for the purpose of explanation, not as a recommendation for users to carry out repair. Any remedy outlined below must be carried out by a competent person aware of the safety issues and sufficiently familiar with electrical maintenance. PowaCycle reserves the right to without further notice, make modifications to the product. For further advice contact your vendor or PowaCycle. Trouble Description Causes Troubleshooting Methods After the switch has been turned on, the • Poor contact between the electrodes of • Check if there is any dirt on the electrodes power indicator does not come on and the the battery or connecting plug. of the battery unit or plug, and clean the bicycle cannot start. contacts. After the switch has been turned on. The • Check for poor contact with battery. • Press the units tightly together to ensure power indicator is on, but the bicycle will • Check if the plug is properly inserted. that contact points are in place. not start. • Check whether the throttle is jammed. The motor starts and continues running • The throttle has not reset. If yes, free it. after the switch is on. (Note: immediately • Return the control to our company’s turn off the switch to prevent an accident.) ...
- Page 8 Puma LPX Lynx LPX Owner’s Manual for Puma LPX & Lynx LPX Lithium Polymer Powered Electric Folding Bikes PowaCycle Ultima Networks plc, Akhter House, Tel: 01279 821243 Perry Road, Fax: 01279 821300 Harlow, Email: Support@PowaCycle.co.uk Essex CM18 7PN www.PowaCycle.co.uk E&OE ©Ultima Networks plc ...
Need help?
Do you have a question about the PUMA LPX and is the answer not in the manual?
Questions and answers