Table of Contents
Advertisement
Advertisement
Table of Contents

Related Manuals for Impecca DVHP9116


Summary of Contents for Impecca DVHP9116
-
Page 2: Table Of Contents
TABLE OF CONTENTS Introduction ..........................2 What’s In the Box ........................3 Warnings and Safety Instructions ....................4 Getting to know your DVD Player ....................5 Remote Control features ......................6 Connecting to a Television ......................9 Basic Operation ........................11 USB and SD/MC Memory Cards .................... -
Page 3: Introduction
Congratulations on your purchase of the IMPECCA™ Compact Home DVD Player. The Compact Home DVD player from IMPECCA™ is a great way to enjoy your DVDs without the clutter of a full size player. Its compact design provides easy access to all your favorite media, and the fast search backwards/forwards will guarantee that you never miss a minute. - Page 4 This product should be operated only from the type of power source indicated on the marking label. The IMPECCA™ Compact Home DVD Player is designed to use 120V – 60Hz only.
-
Page 5: What's In The Box
WHAT’S IN THE BOX 1. DVHP9116 Compact Home DVD player 2. Remote Control 3. A/V Cables 4. User’s Guide - 4 -... -
Page 6: Getting To Know Your Dvd Player
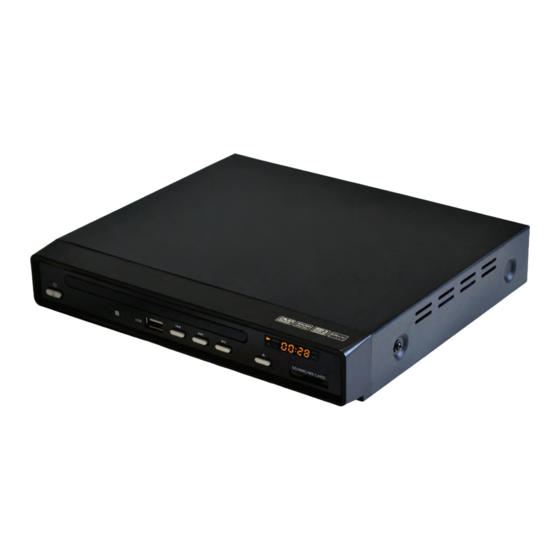
GETTING TO KNOW YOUR DVD PLAYER FRONT PANEL 1. Power On/Off 6. Next 2. Disc Tray 7. Play/Pause 3. Remote Sensor 8. Open/Close 4. USB Host Port 9. Display 5. Previous 10. SD/MMC Card BACK PANEL 1. Video Output Jack 3. -
Page 7: Remote Control Features
REMOTE CONTROL 18) REV 1) OPEN/CLOSE 19) FWD 2) PROG (PROGRAM) 20) PREV 3) MUTE 21) NEXT 4) AUDIO 22) N/P 5) SUBTITLE (NTSC/PAL) 23) PBC 6) ZOOM 24) STOP 7) A-B 25) DIRECTION 8) OSD BUTTON 26) SETUP 9) MENU 27) ANGLE 10) VOL + (VOLUME... - Page 8 1. OPEN/CLOSE - Press to open and close the disc drawer. 2. PROG - Press to program a DVD to play chapters or tracks in a specified order. 3. MUTE - Press to mute or unmute the volume. 4. AUDIO - Press to switch between available audio modes. 5.
- Page 9 Installation of Batteries 1. Press and lift the back cover up to open the battery compartment of the remote control. 2. Insert two AAA size batteries. Make sure that the polarities of the batteries ( + ) and ( - ) match those of the battery compartment.
-
Page 10: Connecting To A Television
CONNECTING TO A TELEVISION When connecting this unit and other components, be sure that all devices are turned off. Audio/Video cables are connected according to different color identification and should be fitted firmly into the appropriate jacks. Basic TV Connection: Connecting to a TV using the standard Audio/Video cable You can connect the DVD player to a standard television using the player's Audio and... - Page 11 Enhanced Video Connections: Connection to TV through HDMI output jacks (HDMI cable not included) 1. Connect the HDMI cable to the HDMI jack located on the rear of the DVD player. 2. Connect the HDMI cable to the HDMI hack on the HDMI Input on your television.
-
Page 12: Basic Operation
BASIC DVD PLAYER OPERATION Before You Begin Turn on your TV and select the appropriate video input settings to correspond to the input used when connecting to the DVD player. Refer to the “System Connections” section of this manual. If you have connected the player to an audio system (stereo or amplifier) turn on your audio system and select the appropriate audio input settings to correspond to the input used when connecting to the DVD player. - Page 13 Forward/Reverse Scan • Press REW or FF during playback. • To increase the Fast Forward or Rewind speed, press the REW or FF button again to choose the desired speed (Normal, x2, x4, x8, x16, x32) Skip Next/Previous You can skip to a specific chapter or track during playback. Skipping Ahead •...
-
Page 14: Usb And Sd/Mc Memory Cards
USING USB MEMORY STICKS/ MEMORY CARDS 1. Turn off the DVD player. 2. Insert the USB Memory Stick or SD/MMC memory card (with MP3, WMA or JPEG files) to the USB Port or SD/MMC card port on the front of the DVD Player. 3. -
Page 15: Configuring Settings
SETTINGS 1. Press the SETUP button. The setting menu will appear on the screen. 2. Use the Direction buttons to select and highlight the function you need to configure. Press the Direction button. Press the ENTER button to confirm the selection. 3. - Page 16 Audio Setup Page This page allows you to configure the Audio settings. Speaker Setup You can use this feature to set the front speakers to LT/RT Stereo. SPDIF Setup You can use this feature to configure the SPDIF outputs. Dolby Setup Page This page allows you to configure the Dolby settings.
- Page 17 Resolution Use this feature to adjust the resolution to your television screen. Quality Use this feature to adjust the quality of your video display. Select Quality and then use the Left/Right Direction buttons to adjust the Sharpness, Brightness, or Contrast. Press the Enter button to confirm and return to the previous menu.
- Page 18 Password Use this feature to setup and change a password to manage rate levels or to prevent others from changing the settings. From the Preference Page, choose Password and then select Change. You will need to enter the old, or current, password and then enter a combination of numbers in the New Password field.
-
Page 19: Troubleshooting
3. Replace the batteries with new batteries. If you experience any issues that are not listed above, or if you are unable to resolve your issue after trying the methods and solutions described above, please contact Impecca technical support team: Email: service@impeccausa.com Website: www.impeccausa.com... -
Page 20: Specifications
Macro vision Corporation. Reverse engineering and disassembly prohibited. IMPECCA USA® is a division of Luzerne Trading Co. Wilkes-Barre PA. All rights reserved. All trademarks are the property of their respective owners and are used by Luzerne Trading Company solely for descriptive purposes.
Need help?
Do you have a question about the DVHP9116 and is the answer not in the manual?
Questions and answers