Table of Contents
Advertisement
Quick Links
Advertisement
Table of Contents
Troubleshooting

Related Manuals for SpinetiX Hyper Media Player


Summary of Contents for SpinetiX Hyper Media Player
- Page 1 Hyper Media Player User Manual Revision: July 2013...
- Page 2 DAMAGES. "SpinetiX" and “HMP Hyper Media Player” are registered trademarks, and all logo and graphic designs are trademarks of SpinetiX S.A. Other product and company names appearing in SpinetiX S.A. products and materials are used for identification purposes only and may be trademarks or registered trademarks of their respective companies.
-
Page 3: Table Of Contents
Full Connectivity ....................................8 Installation ......................................9 Front panel connectors ..................................9 Back panel connectors ..................................9 Power up your Hyper Media Player ................................. 10 Troubleshooting ....................................11 Updating firmware ....................................12 Check for updates..................................... 12 Updating firmware .................................... 13 Automatic update ..................................... -
Page 4: Introduction
The rich set of functionalities offered by the HMPs simplifies the implementation, management and maintenance any digital signage installation, large or small. An HMP is not a simple media player, but a Hyper Media player, combining an embedded solution with the connectivity and functionality of a PC. -
Page 5: How Does It Work
How does it work? SpinetiX HMPs simplify the publishing and maintenance of your digital signage project. Connected to digital displays through HDMI and VGA, an HMP is capable of rendering combinations of media elements from a rich set of formats: audio, video, vector graphics, pictures and text. The HMP natively implements the open standards required to schedule, update, stream, and animate objects. -
Page 6: Easy Installation And Low Maintenance
Remote monitoring – peace of mind Complete Plug & Play setup As dedicated appliances, the SpinetiX HMPs are truly “plug and play”. Power on your HMP by plugging in the power line and connecting the video cable (HDMI and/or VGA) to a digital display. After power-on, the HMP boots in a few seconds and automatically selects the best resolution supported by the digital display. -
Page 7: Top Reliability
The HMP’s capabilities are always evolving via firmware upgrades, adding support for new codecs and standards, new peripherals, and new extensions. SpinetiX provides updates free of charge for installation on HMPs via a range of methods; directly via the internet, from a private server, or on a USB drive using the software packages distributed by SpinetiX. -
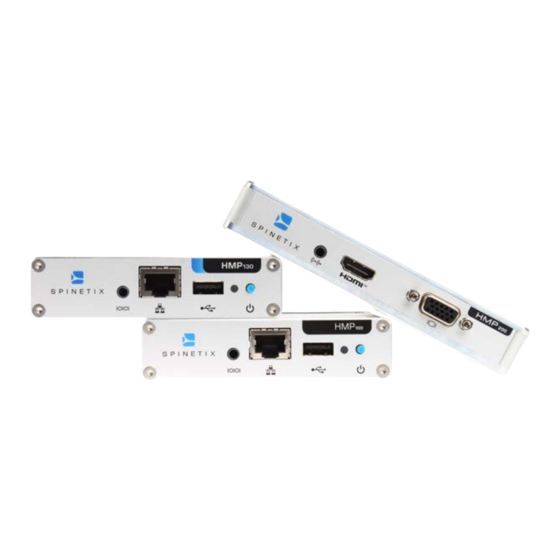
Page 8: Full Connectivity
New protocol descriptions can be uploaded to an HMP to support different display Support Wiki keyword: models. The required cable can be purchased from SpinetiX or built (pin outs are freely RS233 available). Input devices such as GPS can also be used together with the RS232 port. -
Page 9: Installation
) available on most recent displays. Also carries stereo digital audio. Can be used with passive converter to fit DVI screen. Analog Audio out: Stereo audio output Analog Video out: Standard Video Graphics Array (VGA) supported by most CRT and analog LCD screens. SpinetiX SA, Switzerland... -
Page 10: Power Up Your Hyper Media Player
5. Power up the HMP. Use the cables and the regional power adapter in the HMP package. Connect the plug adapter to one side of the 110-220V outlet the other end to the back panel DC jack on the HMP. Shortly after power up, the screen displays the SpinetiX splash screen: HMP splash screen (power up) The first time an HMP boots, the automatic configuration procedure takes about 1½... -
Page 11: Troubleshooting
At the end of the booting process, the screen will start displaying the animated SpinetiX logo. This is the default content. The LED (‘SYS’ Led on HMP200) blinks regularly on and off once per second to indicate normal operation. HMP splash screen (power up) -
Page 12: Updating Firmware
Updating firmware SpinetiX regularly publishes new firmware versions for the HMPs. These new versions are free to all Support Wiki keyword: customers and improve the performances and reliability of your product. Firmware Check for updates To check if a new version of the firmware is available for your unit, follow the simple steps below: 1. -
Page 13: Updating Firmware
Automatic update is not recommended if your HMP is deployed in a production environment. To enable automatic update: 1. Check the "Enable automatic updates" check box 2. Select the update time. 3. Press Apply to validate your changes SpinetiX SA, Switzerland... -
Page 14: Reset An Hmp To Factory Default Settings
Firmware tab with “check for updates” button Settings tab Reset an HMP to factory default settings Support Wiki keyword: This procedure depends on the HMP type and on the firmware improvements. The procedure is Reset Factory Defaults therefore described on our website. SpinetiX SA, Switzerland... -
Page 15: Get Connected
4. Configure the network on your PC to use DHCP. Note that your PC might indicate the only limited network connectivity is available. This will not prevent you from connecting to the HMP. 5. Make sure that the Bonjour client is installed on your PC (either install Elementi software from SpinetiX or download the Bonjour installer from the Apple website) 6. -
Page 16: Troubleshooting
Congratulations. You can now explore the configuration interface of your Hyper Media Player. Troubleshooting Support Wiki keyword: If you have not been able to connect to your HMP, check the Support Wiki for troubleshooting steps. Get Connected The Support Wiki also details the latest recommended 3rd party plug-ins that can assist with device Support Wiki keyword: discovery. -
Page 17: Checking The Hmp Configuration
If the LED of the player is not blinking, it might be malfunctioning. 2. The screen displays a fix SpinetiX logo with the text "Recovery System". Your HMP is in recovery mode. In this case, unplug the unit and wait for one minute before powering up again. If the HMP remains in recovery mode, contact your distributor. -
Page 18: Fixed Ip Configuration
Once the device has rebooted, you can check the new configuration by accessing HMP Control Center as before, but using the new IP address. If your HMP has mistakenly been configured with the wrong IP address and can no longer be Support Wiki keyword: contacted, the player must be reset to factory defaults. Reset Factory Defaults SpinetiX SA, Switzerland... -
Page 19: Hmp Control Center Overview
All changes need to be confirmed with the Apply button, and depending on the state of the player, may trigger a reboot of the unit. HMP Control Center: Display Settings on HMP100/HMP130 and HMP200, showing optimum Display settings SpinetiX SA, Switzerland... -
Page 20: Controlling The Display Power
HMP Control Center, but at the page /fusion. For example: http://spx-hmp-001d50000005.local/fusion/ http://192.168.3.1/fusion/ Support Wiki keyword: Fusion documentation is available entirely online. Fusion mode SpinetiX SA, Switzerland... -
Page 21: Use A Usb Drive With An Hmp
However FAT-formatted file systems cannot be written to by the HMP. To use USB storage permanently, Support Wiki keyword: and continue to write to the storage via the network, the drive must be formatted by the HMP. Storage SpinetiX SA, Switzerland... -
Page 22: Using A Network Server With Hmp
You can specify a Fallback source in case your network server cannot be reached by the HMP. If your server requires a username and a password, you can enter them using the Advanced dialog as described in Network credentials. Setting the media sources SpinetiX SA, Switzerland... -
Page 23: Pull Mode
Using iCalendar schedule files: This option gives you full control over the Pull mode of the HMP, but requires an external tool to create the iCalendar files (such as Sunbird or Elementi for instance). Support Wiki keyword: Pull Mode SpinetiX SA, Switzerland... -
Page 24: Configure Network Credentials For Remote Servers
4. If you need to add additional server credentials, press the Add server row button. 5. Press Apply to save your changes Note that networks credentials are used by the HMP player when accessing the remote resource via any method (Pull mode or Client/Server mode). Network credentials settings SpinetiX SA, Switzerland... -
Page 25: Control User Rights
3. Enter the password and confirm it in the second text area. 4. Press Apply to save your changes. Note: you need to press apply for each password you want to change; it is possible to change only one password at the time. SpinetiX SA, Switzerland... -
Page 26: Using The Hmp To Control External Appliances
By default the serial port control is disabled. It is enabled by selecting a protocol file in the Protocols drop-box. Choose either pre- loaded files designed by SpinetiX (identified by the prefix [sys] before the name of the protocol), or files that you have uploaded on this page. - Page 27 An uploaded protocol file for the Sharp Aquos monitors (sharp_aquos) Once a protocol file is selected, you may change the serial port configuration, and/or enable automatic power on and power off of the attached screen (see Display) SpinetiX SA, Switzerland...
Need help?
Do you have a question about the Hyper Media Player and is the answer not in the manual?
Questions and answers