Table of Contents
Advertisement
Quick Links
OWNER'S/OPERATOR'S
MANUAL
This dirt bike is recommended for riders 16 and over
Always wear a helmet it could save your life!
Provincial / Municipal governments have different regulations
pertaining to owning and operating an off-road vehicle, learn the
regulations in your area.
READ THIS MANUAL CAREFULLY!
Model: 250DX
71910
Advertisement
Table of Contents

Related Manuals for Metal Motorsports 250DX


Summary of Contents for Metal Motorsports 250DX
- Page 1 MANUAL This dirt bike is recommended for riders 16 and over Always wear a helmet it could save your life! Model: 250DX Provincial / Municipal governments have different regulations pertaining to owning and operating an off-road vehicle, learn the regulations in your area.
- Page 2 To the Owner Congratulations on your purchase of a Metal Motorsports Dirt Bike. This Owner’s/ Operator’s manual will provide you information regarding safe operation, operational instructions, maintenance and care. Fully understanding this manual and following all of the instructions herein will provide the knowledge needed to have safe and enjoyable Dirt Bike operation.
- Page 3 The third part will describe HOW TO AVOID THE HAZARD. Metal Motorsports is concerned about the environment and believes in conserving and protecting all natural resources. For this reason , owners should recycle, trade in, or dispose as appropriate, batteries, oil and tires.
- Page 4 WARNING The engine exhaust from this Dirt Bike contains chemicals known to the state of California to cause cancer, birth defects or other reproductive harm. California proposition 65...
-
Page 5: Table Of Contents
TABLE OF CONTENTS METAL MOTORSPORTS WARRANTY..2 SPARK ARRESTOR INSPECTION AND IMPORTANT SAFETY LABELS....4 CLEANING........25 LOCATION........4 IDLE SPEED ADJUSTMENT....26 WARNING LABELS......5 THROTTLE CABLE ADJUSTMENT..26 SAFETY ..........6 BRAKES........... 27 DESCRIPTION AND PART LOCATIONS... 7 BRAKE FLUID CHECK.... -
Page 6: Metal Motorsports Warranty
90 days from the date of purchase shown on the sales receipt. During this period of time Metal Motorsports will, at its option, either repair or replace any original Metal Motorsports part which is covered by this warranty and is proven to be defective in workmanship or material. - Page 7 5. Any product which has been altered or modified in a manner not consistent with the original design of the product or in a manner not approved by Metal Motorsports. 6. Tires 7. Damage or failures due to abuse, neglect, or misuse of the product.
-
Page 8: Important Safety Labels
IMPORTANT SAFETY LABELS LOCATION 1 2 3... -
Page 9: Warning Labels
Warning Labels WARNING • NEVER operate this vehicle without first reading and understanding the owner’s manual and all labels. • ALWA YS wear a DOT certified motorcycle helmet, protective riding gear and eye protection. • NEVER operate this vehicle while under the influence of drugs or alcohol. -
Page 10: Safety
SAFETY All operators under the age of 16 Never take drugs or alcohol before should be supervised continually or during operating this Dirt Bike. by an adult. Some children, even though they may be the correct Never traverse, climb or go down age to operate a Dirt Bike, may a hill that is too steep. -
Page 11: Description And Part Locations
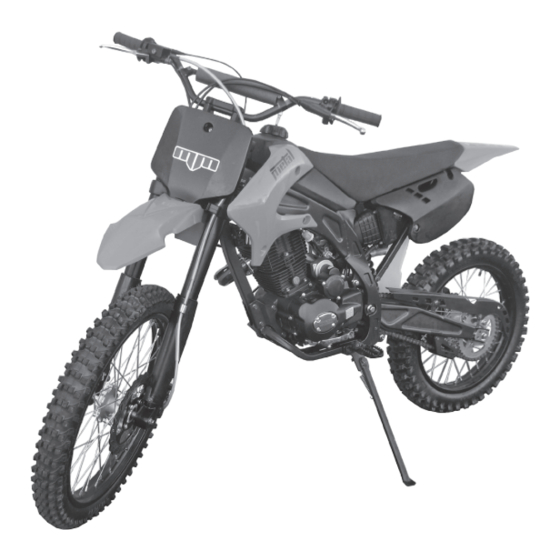
DESCRIPTIONS AND PART LOCATIONS 1. Front Wheel 2. Front Brake Caliper 3. Front brake disc 4. Front Fender 5. Front Forks/Shocks 6. Fuel tank/cap 7. Seat 8. Rear Fender 9. Rear Wheel 10. Rear sprocket 11. Drive Chain 12. Kick Stand 13. -
Page 12: Description And Part Functions
DESCRIPTION AND PART FUNCTIONS Ignition Key Ignition Key (1) Before the engine will start, the ignition key needs to be turned clockwise to “ON” position. Right side handlebar functions Right hand brake lever (2). Front brakes are applied when the right hand brake lever is pulled toward the hand grip. -
Page 13: Choke Lever
DESCRIPTION AND PART FUNCTIONS Choke Lever Choke Lever (1): If the engine is cold, lift the choke lever to the “ON” (up) position. Once engine has warmed up , place choke lever to the “OFF” (down) position. Gear Shift Lever Gear shift lever (2): This Dirt bike has a 4 speed transmission which is operated by the gear shift lever. -
Page 14: Fuel Valve
DESCRIPTION AND PART FUNCTIONS Fuel Valve operation Fuel Valve The fuel valve has 2 positions: “OFF”and “ON” “OFF”position (1): Fuel will not flow to the carburetor in this position. Always turn the fuel valve to the “OFF” position when unit is not in use or is being transported. ”ON”position (2) This is the normal operating position. -
Page 15: Fuel And Oil
FUEL AND OIL FUEL WARNING Never use leaded gasoline in this product. It could affect the engine’s emissions and Fuel and fuel vapor are highly damage the engine. flammable and toxic. You can be This dirt bike requires clean unleaded burned or poisoned while refueling. -
Page 16: Break In
BREAK - IN Break in period Observe your initial and most critical maintenance service The initial 5 hours of operation is most im- portant in the life of your Dirt Bike. Proper The initial service( break in maintenance ) operation during this break in period will is the most important service for your Dirt help assure maximum life of your Dirt Bike Bike. -
Page 17: Pre Ride Inspection
PRE-RIDE INSPECTION WHAT TO CHECK FOR Inspecting and checking the condition of CHECK the Dirt Bike before each ride is Steering • Smoothness important. Following the pre-ride check • No restriction of list will help insure the you do not have movement mechanical problems which could result in injury or becoming stranded. -
Page 18: Riding Dirt Bike
RIDING THE DIRT BIKE HELMET, EYE PROTECTION, PROTECTIVE CLOTHING Always wear a DOT certified motorcycle helmet (1). A helmet helps protect against serious head injuries in the event of an accident. A helmet is the most important safety gear item you can wear. Consult with a motorcycle dealer for the correct size and type of motorcycle helmet that is right for you. -
Page 19: Starting The Engine
RIDING THE DIRT BIKE STARTING ENGINE Before attempting to start the engine, make sure to follow the pre-ride inspection checklist in this manual. 1. Place the fuel valve (1) in the “ON” position. 2. Place dirt bike in neutral by pulling in the clutch lever and depressing the shift lever (2) as many times as needed to get into 1st gear. -
Page 20: Starting Off And Shifting
RIDING THE DIRT BIKE STARTING OFF AND SHIFTING 1. Once engine has warmed up in neutral, place Dirt Bike in first gear by pulling in the clutch lever and depressing the shift lever into first gear. 2. Release brakes and apply throttle while releasing clutch gradually. -
Page 21: Load Guidelines
Do not add any accessory or cargo to the modification or accessory, contact your handlebars that could impede vision or dealer or call Metal Motorsports. make the Dirt Bike harder to steer. Make sure accessories do not get in the way of any controls of the Dirt Bike. -
Page 22: Maintenance
MAINTENANCE For maintenance, your Dirt Bike may be maintained by an authorized metal motorsports service dealer or a repair shop of your choosing. Following the proper maintenance procedures and time table for CAUTION maintenance listed in this manual is important for the safety of the rider and Failing to perform recommended the life span of the Dirt Bike. -
Page 23: Maintenance Chart
MAINTENANCE CHART Whichever Initial Comes First Maint. Regular Maintenance Interval 1200 1800 2400 Items Note Month 1 Fuel Line Throttle Operation Note 1 Air Cleaner Spark Plug Engine Oil Engine Oil Strainer Screen Engine Idle Speed Note 1 I,L Every 300 mi ( 30hr) or 3 month Drive Chain Drive Chain Slider Brake Pad Wear... -
Page 24: Maintenance Record
MAINTENANCE RECORD Keeping accurate records will help ensure your dirt bike is properly maintained. Keep records below whenever any maintenance is performed. If any problems are encountered while performing maintenance, make sure they are repaired before dirt bike operation. Miles Date Performed By: Notes... -
Page 25: Air Filter
MAINTENANCE Air Filter CAUTION The air cleaner element needs to be Clean air filter frequently if Dirt cleaned or replaced periodically (see Bike is driven in wet, muddy or chart for cleaning/replacement dusty conditions. intervals). The air filter element will need to be cleaned more often if Dirt Bike is Driving in the above conditions ridden in muddy, wet, or dusty conditions. -
Page 26: Spark Plug
MAINTENANCE Spark Plug This Dirt Bike comes equipped with an spark plug. To inspect the spark plug 1. Remove plug cap (1) 2. Clean around spark plug base so dirt does not enter the engine when plug is removed. 3. Remove the spark plug (2) from the engine with the spark plug tool provided. -
Page 27: Engine Oil
MAINTENANCE WARNING Engine Oil The proper amount and grade of engine oil New and used oil can be hazardous will have a great impact on the life of the Children and pets can be harmed engine. Checking the oil daily and changing the oil as listed in the by swallowing new or used oil. -
Page 28: Cleaning Oil Filter
MAINTENANCE Cleaning Oil Filter Screen 1. Drain oil as listed in the “Changing the oil” section of this manual. 2. Locate and remove the Oil filter screen cover (1). 3. Remove filter screen (2) from the Filter screen assembly. 4. Remove any debris from filter screen then rinse screen with water. -
Page 29: Spark Arrestor Inspection And Cleaning
MAINTENANCE Spark arrestor inspection and cleaning. 1. Locate and remove screws (1) attaching spark arrestor cap (2) to spark arrestor. 2. Remove spark arrestor cap (2) 3. Locate and remove spark arrestor screen assembly (3) 4. Inspect spark arrestor screen for damage. -
Page 30: Idle Speed Adjustment
MAINTENANCE Idle speed adjustment The idle speed should be set at 1500 ± 100 RPMs To adjust the idle speed: 1. Locate the idle adjustment screw (1) located on the carburetor. 2. Allow the engine to warm up approximately 10 minutes 3. -
Page 31: Brakes
MAINTENANCE Brakes Brake Fluid Check Check the brake fluid level site gauges (1) located on the front brake and rear brake master cylinders. If fluid level is below the halfway point in the site gauges, inspect the brake hoses (2) for leaks or cracks. -
Page 32: Bleeding The Brakes
MAINTENANCE Bleeding the Brakes The brake system is hydraulic which uses brake fluid for actuation. Any air entering the system causes bubbles which affects braking efficiency. Air can enter the sys- tem when the Dirt bike sits for long periods of time. -
Page 33: Clutch Lever Freeplay
MAINTENANCE Clutch Lever Freeplay: To ensure durability of the clutch, proper lever freeplay is important. Freeplay is needed to ensure the clutch is not .0625 - .25 inch engaged when not needed. Premature (2-6mm) clutch wear can take place if the clutch lever has no freeplay. -
Page 34: Chain And Sprocket Insp
MAINTENANCE Chain Chain lubrication Chain and sprocket inspection Lubricating the chain before each ride will help to ensure maximum life of the chain and sprockets. Inspect the drive chain for wear, rust, bound links, proper lubrication and proper Instructions for cleaning and tension. -
Page 35: Tires
MAINTENANCE Tires Minimum tread Inspect tires before each ride, this should 4mm (.16 in.) include the following: 1. Inspect for cracks or leaks 2. Inspect tread depth. If tread depth is below 4mm (.16 in.) replace the tire. 3. Check tire pressure. Incorrect tire pressure can affect the handling, rider comfort, steering, tire life and traction. -
Page 36: Storage
STORAGE Storage If the Dirt Bike is left unused for an extended period of time proper storage maintenance is required. 1. Wash Dirt Bike thoroughly, then wax plastics and painted parts with a non abrasive auto wax. Coat vinyl seat and rubber parts with a vinyl/rubber protectant. -
Page 37: Washing The Dirt Bike
WASHING THE DIRT BIKE Washing the Dirt Bike 1. Wash mud and dirt off Dirt Bike with low pressure water from a hose. 2. Wash Dirt Bike using a mild detergent or car soap using a sponge, soft rag or brush. -
Page 38: Troubleshooting
TROUBLESHOOTING Trouble Possible cause Solution Engine will • Ignition key is not in the “ON” • Place ignition key in the not start position. “ON” position. • ON/OFF switch in the “OFF” • Place ON/OFF switch in position the “ON” position •... -
Page 39: Specifications
SPECIFICATIONS Engine Braking Displacement 230cc Front Brakes (Type) Hydraulic disc Starting Kick/Electric Rear Brakes (Type) Hydraulic disc Spark Plug Type NGK D8EA Cooling Air cooled Engine Oil Capacity 1qt.(1L) Tires Lubrication Pressure/Splash Ignition Type Front Tire Size 80/100 - 21 Number of Cylinder Single Rear Tire Size... -
Page 40: Frame And Engine Number Location
FRAME AND ENGINE NUMBER LOCATION The Vehicle identification number and the engine number are needed when calling for parts, service center help or when register- ing your Dirt Bike. Locate the numbers and VIN # list the numbers below for your reference. The 17 digit Vehicle Identification Number (VIN) is located on the steering neck assembly... -
Page 41: Warranty
APOLLO MOTOR CORPORATION - Emissions Control System Warranty Statement YOUR WARRANTY RIGHTS AND OBLIGATIONS The emission control system warranty period for this vehicle begins on the date the vehicle is delivered to the first purchaser other than an authorized dealer, or the date it is first used as a demonstrator, lease, or company vehicle, whichever comes first and continues for 30 months after that date, or 5,000km, whichever comes first, provided there has been no abuse, neglect or improper maintenance of your vehicle. - Page 42 labor and other costs) not covered by this emission control system warranty or the standard warranty is the responsibility of the owner. Coverage of repairs under this warranty applies only when repairs are completed at an authorized dealer or repair facility. The Distributor will not cover repairs performed out- side of an authorized dealer or repair facility, except in an emergency situation.
- Page 43 Use of the vehicle in any type of racing or related events immediately and completely voids this and all other warranties. LIMITED LIABILITY The liability of the Distributor under the Emission Control System Warranty is limited solely to the remedying of defects in material and workmanship by an authorized dealer at its place of business during customary business hours.
- Page 44 PO BOX 336 TEMPE AZ. 85280 PHONE: Toll Free 888-748-5884 FAX: 888-748-5884 www.metalmotor.com...
Need help?
Do you have a question about the 250DX and is the answer not in the manual?
Questions and answers