Table of Contents
Advertisement
Available languages
Available languages
Advertisement
Chapters
Table of Contents

Related Manuals for Verizon jetpack MHS291L


Summary of Contents for Verizon jetpack MHS291L
- Page 1 User Guide 4G LTE Mobile Hotspot - MHS291L...
-
Page 2: User Manual
User Manual Thank you for purchasing the Verizon Jetpack® 4G LTE Mobile Hotspot MHS291L. The MHS291L is a Global Ready wireless device that provides high-speed wireless communication and easily connects at high speeds to the internet, your corporate intranet, and your email while you’re away from the office or out of the country. -
Page 3: Table Of Contents
Table of Contents Getting Started System Requirements ..................5 Components ......................6 Display Icons ......................8 Using Your Jetpack About Broadband Networks ................9 Removing/Attaching the Back Cover ............11 Installing/Removing the 4G LTE SIM Card ..........12 Installing/Removing the Battery ..............13 Power Management ..................17 Connecting to Your Jetpack .................18 Tethering Your Jetpack ..................19... - Page 4 Jetpack User Interface Settings Wi-Fi Name/Password ..................23 Connected Devices ...................23 Messages ......................24 Network Settings ....................24 Wi-Fi Settings ......................24 Software Update ....................27 About Jetpack .....................28 Web User Interface Start the Jetpack’s Web User Interface 30 My Jetpack Home ....................31 Data Usage ......................32 Connected Devices ...................33 Jetpack Settings Jetpack ........................34...
- Page 5 About Jetpack Internet Status ....................50 Jetpack Info ......................51 Diagnostics ......................52 Statistic & Logs ....................53 Help and Support ....................54 Troubleshooting Windows XP(SP3) ....................55 Windows Vista(SP2) ..................56 Windows 7 / Vista(SP2) ..................56 Windows 7 ......................58 Glossary Safety and Warranty Regulatory Notices ...................63 Warnings and Cautions ...................63 Product Handling ....................65 Caring for Your Device ..................65...
-
Page 6: Getting Started
To use Wi-Fi mode, your computer or connected device needs Wi-Fi capability. Note • When multiple users are connected to the MHS291L, all of their data usage will be combined and applied to the data plan associated with this jetpack. -
Page 7: Components
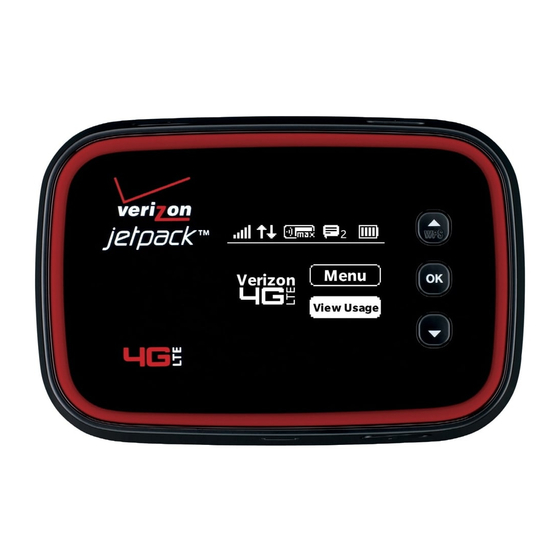
Components Number Description Red Lighting Effect - Illuminates when the display is on. Home Screen - Provides connection and battery status, network signal strength, roaming status, and the number of users connected with Wi-Fi. Scroll Up/Down( / ) - Scrolls up or down through the available menu options. - Page 8 Number Description Power Button( ) - Press and hold to turn the Jetpack on and off. External Antenna Adapter Port( ) - Connects to an external antenna (sold separately) for improved signal reception under certain conditions. Micro USB Port - Connects to the included USB cable for charging or tethering.
-
Page 9: Display Icons
Display Icon Description Network signal strength indicator. Indicates data is being transferred between the Verizon Wireless network and the Jetpack. Indicates the number of connected devices. When available connections are filled, MAX is displayed. Indicates the number of unread SMS messages. -
Page 10: Using Your Jetpack
Using Your Jetpack About Broadband Networks 4G LTE With Verizon 4G LTE, you can get the broadband-like speed you require to work efficiently outside the home or office. You can connect to the Internet, access your corporate intranet, check your email and download attachments at speeds that are up to 10 times faster than 3G*. - Page 11 • 802.11n uses the 5 GHz frequency with Wi-Fi speeds of up to 150 Mbps. Speeds shown are those published by Verizon Wireless, Inc. and are theoretical in nature. Actual throughput speed and coverage may vary. Speed claims not applicable when roaming.
-
Page 12: Removing/Attaching The Back Cover
Removing/Attaching the Back Cover To remove the back cover on your Jetpack: 1. Rotate it to view the bottom side. 2. Place your fingernail in the cutout on the side of the Jetpack and pop the cover off. To attach the back cover: 1. -
Page 13: Installing/Removing The 4G Lte Sim Card
1. Remove the back cover and battery. 2. Position the SIM card (“SIM” is inscribed near the slot opening) with the Verizon logo facing up and the notched edge facing towards the center of the battery compartment. Slide the SIM card into the slot, insert the battery and attach the back cover. -
Page 14: Installing/Removing The Battery
Installing/Removing the Battery 1. Insert your fingernail into the slot at the left of the Jetpack and gently lift the back cover to remove. 2. Slide the battery into the slot by aligning the gold-colored contacts and press down until it clicks into place. 3. -
Page 15: Charging The Battery
Charging the Battery The Jetpack uses a Lithium Ion (Li-Ion) battery. Make sure to use the authorized battery and charger only. 1. Connect the USB cable with the Wall/USB Charger Adapter. Note Make sure to align the connector as indicated in the image. Otherwise, the charging connector may become damaged and the battery will not be charged. -
Page 16: Battery Tips
Battery Tips Warning Always use only approved batteries and chargers with your MHS291L. The warranty does not cover damage caused by non-approved batteries and/or chargers. • It normally takes at least three hours to fully charge the battery with the wall charger. - Page 17 • When storing your battery, keep it uncharged in a cool, dark, dry place. • Never expose batteries to temperatures below -22°F (-30°C) or above 140°F (60°C). • Never leave the Jetpack in an unattended vehicle due to uncontrollable temperatures that may be outside the desired temperature for this Jetpack.
-
Page 18: Power Management
Note When the device display is off, and the Jetpack is on, pressing and holding the Power button will turn on the display. You can only power off the device when the display is on by pressing and holding the Power button. Power Management Your Jetpack can operate with either its battery or external power source. -
Page 19: Connecting To Your Jetpack
3. Connect to the Wi-Fi network name shown on Jetpack display under Menu > Wi-Fi Name/Password. The Wi-Fi network name (SSID) is in the format Verizon-291LVW-XXXX, where XXXX are four digits unique to your device. 4. Enter the 8-digit Wi-Fi password. -
Page 20: Tethering Your Jetpack
Windows 8 (32-bit/64-bit), Windows 7 (32-bit/64-bit), Windows Vista SP2 (32-bit/64-bit) and Windows XP SP3 (32-bit). For Windows 7/8/Vista SP2 a CD Drive will be populated on your computer when the MHS291L is tethered to your computer. Double-click and follow the Install Wizard. Note • USB Tethering is not compatible with Mac OS. - Page 21 Computer > Verizon Mobile > Windows, and then double- click the driver file. Note If you already installed the USB driver for MHS291L, Verizon Mobile will not display. 4. To continue with installation, click Next > Install. Setup may take a few minutes.
- Page 22 7. Connect to Wi-Fi network name (SSID) shown on Jetpack display under Menu > Wi-Fi Name/Password. The network name or SSID is in the format Verizon-291LVW-XXXX, where XXXX are four digits unique to your device. 8. Enter the 8-digit Wi-Fi password.
-
Page 23: Jetpack User Interface
Jetpack User Interface Settings... -
Page 24: Wi-Fi Name/Password
Settings You can configure the settings on your Jetpack using the scroll up/ down and OK button. Select the desired menu by pressing . When you have finished settings, select Close and press and press . And, you can go to the Home screen directly by pressing and holding Wi-Fi Name/Password 1. -
Page 25: Messages
Messages 1. From the Home screen, select Menu > Messages and press 2. Select a message and press 3. You can delete a message by selecting Delete and pressing Network Settings 1. From the Home screen, select Menu > Network Settings and press 2. - Page 26 3. You can change Wi-Fi band by selecting 2.4GHz or 5.0GHz and pressing Note You can use only one Wi-Fi band at a time on the MHS291L. Wi-Fi Network Mode Some older Wi-Fi devices may experience connectivity issues with wireless networks that broadcast multiple Wi-Fi network modes. If you cannot connect your Wi-Fi device with the Jetpack, you may want to change the Jetpack’s Wi-Fi Network Mode to one that is...
- Page 27 Broadcast SSID If you want Wi-Fi devices to automatically detect your Jetpack’s Wi- Fi network, turn the Jetpack’s Broadcast SSID setting to On. 1. From the Home screen, select Menu and press 2. Select Wi-Fi Settings > Broadcast SSID and press 3.
-
Page 28: Software Update
Max Connections 1. From the Home screen, select Menu and press 2. Select Wi-Fi Settings > Max Connections and press 3. You can set maximum number of devices (up to 10) that can be connected. Note When you are using 3G networks, up to 5 devices can be connected. -
Page 29: About Jetpack
Note You can turn off the Factory reset by using Jetpack settings in the web user interface. See Backup and Restore on page 37. About Jetpack Jetpack Info 1. From the Home screen, select Menu and press 2. Select About Jetpack > Jetpack Info and press 3. -
Page 30: Web User Interface
Web User Interface Start the Jetpack’s Web User Interface Jetpack Settings Messages About Jetpack... - Page 31 3. Connect to Wi-Fi network name (SSID) shown on Jetpack display under Menu > Wi-Fi Name/Password. From your device the Wi- Fi network name (SSID) is in the format Verizon-291LVW-XXXX, where XXXX are four digits unique to your device. 4. Enter the 8-digit Wi-Fi password. The password appears under Menu >...
-
Page 32: My Jetpack Home
6. Type your Wi-Fi/Admin password in the Sign In field in the upper right corner of the window and click Sign In. My Jetpack Home My Jetpack Home is your gateway to configuring and managing your Jetpack. 1. Click My Jetpack Home. 2. -
Page 33: Data Usage
Usage on the Menu panel to display the Data Usage page and access information specific to your particular plan. You can also access and manage your account by clicking on My Verizon. 1. Click Data Usage. 2. You can review your usage history. -
Page 34: Connected Devices
Connected Devices You can view, edit, or block Wi-Fi devices currently connected to your Jetpack, as well as any currently blocked devices. 1. Click Connected Devices. 2. Click Edit and adjust settings for connected devices. • Enter the nickname of a device in the Nickname field. • To add a device to Blocked Device Info, select Blocked Device Only from Device Filtering drop-down list, Then click Block next to Nickname field. -
Page 35: Jetpack Settings
Jetpack Settings The Jetpack settings page allows you to make Jetpack changes, select mobile network options, update software, and backup and restore files to your Jetpack. Jetpack Jetpack Admin Password The Jetpack Admin Password page allows you to change the Admin Password. - Page 36 Preferences 1. Click Jetpack Settings > Jetpack > Preferences. 2. Adjust settings. • Turn off Display After: Select the amount of time that expires before the display turns off. • Automatic Shutdown: Select the amount of time that expires before the device automatically shuts down. • USB Mode: Turns the USB tethered mode on or off.
- Page 37 Software Update 1. Click Jetpack Settings > Jetpack > Software Updates. 2. Click Check for update to check for new software updates and follow the instructions. 36 Jetpack Settings...
-
Page 38: Backup And Restore
Backup and Restore The backup and restore feature allows you to make a copy of the configuration settings from Jetpack to a file on your computer, and restore (upload) a previously-saved configuration file. 1. Click Jetpack Settings > Jetpack > Backup and Restore. 2. -
Page 39: Wi-Fi
Wi-Fi The Wi-Fi menu allows you to customize the Wi-Fi profiles and view details about the devices connected to your Jetpack. 1. Click Jetpack Settings > Wi-Fi. 2. Adjust settings for Wi-Fi. • Wi-Fi On/Off: Turn Wi-Fi on or off. • Wi-Fi Name (SSID): Enter the network name of the Jetpack. - Page 40 • Display the Wi-Fi Password on Jetpack screen: Displays the current Wi-Fi password. • Frequency (Channel): Select the frequency and channel. If channel setting is available, select Auto. If Auto is not available, you can experiment to see which channel provides the best results, or use the default settings.
-
Page 41: Advanced
Advanced The Advanced page allows you to change advanced settings. The Advanced page provides network, manual DNS, SIM, GPS, firewall and LAN settings; and options for configuring port filtering applications. Important Changing advanced settings can adversely affect stability, performance and security. Networks 1. -
Page 42: Network Selection
Network Selection Automatic Selection 1. Click Jetpack Settings > Advanced > Networks. 2. Select GSM/UMTS Mode from Network Type drop-down list. 3. Select the network subtype from Sub type drop-down list. You can select GSM/UMTS Dual, GSM only, or UMTS only. 4. -
Page 43: Manual Dns
Manual DNS The Jetpack automatically selects a Domain Name Server (DNS). The Manual DNS menu allows you to manually select up to two DNS IP addresses. 1. Click Jetpack Settings > Advanced > Manual DNS. 2. Enter the DNS address. 3. - Page 44 The SIM menu gives you settings and information about the SIM card. The SIM card can be locked with a PIN code for additional security. If locked, the PIN code must be entered before the Jetpack can connect to the Internet. The SIM menu takes you to the SIM page.
- Page 45 1. Click Jetpack Settings > Advanced > GPS. 2. To enable the GPS, click Start > Apply. 3. Click Yes to accept the notification. Firewall The Jetpack firewall determines which Internet traffic is allowed. 1. Click Jetpack Settings > Advanced > Firewall. 2.
- Page 46 • Enable DMZ: Turns the DMZ feature on or off. If this is On, DMZ feature allows all unknown traffic to be sent to a designated IP address. • Destination IP Address: Enter the IP address for the DMZ feature. 3.
- Page 47 2. Adjust settings. • IP Address: Enter the IP address for the Jetpack. • Subnet Mask: Enter the subnet mask address for the Jetpack. The default value 255.255.255.0 is standard for small networks. If you change the IP Address, ensure you use the current subnet mask for IP address range.
-
Page 48: Port Filtering
Port Filtering Port Filtering allows you to block outgoing Internet connections and permit only allowed applications to access the Internet. You can also customize a list of allowed applications which permits only certain programs to connect to the Internet. 1. Click Jetpack Settings > Advanced > Port Filtering. 2. -
Page 49: Port Forwarding
Port Forwarding Port Forwarding allows remote devices to connect to a specific computer within a private LAN. 1. Click Jetpack Settings > Advanced > Port Forwarding. 2. The Port Forwarding allows you to forward incoming traffics from the Internet to a particular connected computer or device that are connected to the wireless network of the Jetpack. -
Page 50: Messages
Messages Messages display SMS messages sent to you and includes counters for the total number of messages and new messages. 1. Click Messages. 2. You can see the received messages. to delete a message. You can also click Delete All to 3. -
Page 51: About Jetpack
About Jetpack About Jetpack allows you to view detailed device specific information about your MHS291L. Internet Status 1. Click About Jetpack > Internet Status. 2. You can see the detailed information about current internet status. 50 About Jetpack... -
Page 52: Jetpack Info
Jetpack Info The Jetpack Info page contains detailed information about the MHS291L. 1. Click About Jetpack > Jetpack Info. 2. You can see the detailed information about the Jetpack. About Jetpack 51... -
Page 53: Diagnostics
Diagnostics The Diagnostics page shows information about the Jetpack information. 1. Click About Jetpack > Diagnostics. 2. You can see the information about the Jetpack firmware and other system-level information. This screen is used mostly for troubleshooting and is not required for normal operation. 52 About Jetpack... -
Page 54: Statistic & Logs
Statistic & Logs The Logs page allows you to enable or disable logs and to delete system logs. 1. Click About Jetpack > Statistic & Logs > Statistic. 2. You can see the data usage statistics. Click Reset to reset the statistics. -
Page 55: Help And Support
4. You can see detailed usage logs. • Export: To export a log file, click and select start date and end date. Then click Export File. • Filter: To review the log for specified time period, click and select start date and end date. Then click Filter File. • Auto Clear: To change the period of time that system log is deleted, select a option from Auto Clear drop-down list and then click Apply. -
Page 56: Troubleshooting
Troubleshooting Windows XP(SP3) Symptom 1 A Remote Network Driver Interface Specification (RNDIS) device no longer works correctly. For example, the data application on the computer may report an error that the data transmission has failed. To resolve this problem, you have to restart the computer. Resolution Consider the following scenario: • The RNDIS device is installed on a Windows XP-based... -
Page 57: Windows Vista(Sp2)
Windows Vista(SP2) Symptom 1 A bus driver that manages a Network Driver Interface Specification (NDIS) miniport is not loaded as expected. Therefore, a yellow exclamation mark (!) appears in Device Manager next to the device that is driven by the miniport. The driver also displays error code 38 (CM_PROB_DRIVER_FAILED_PRIOR_UNLOAD). - Page 58 Resolution Consider the following scenario: • You have a computer that is running Windows 7, Windows Server 2008 R2, Windows Vista or Windows Server 2008. • You attach a USB Remote Network Driver Interface Specification (RNDIS) device to the computer through an external USB hub.
-
Page 59: Windows 7
Windows 7 Symptom 1 Windows does not load the Wireless Wide Area Network (WWAN) adapter driver. Additionally, you receive an error message that resembles the following: Windows cannot load the device driver for this hardware because a previous instance of the device driver is still in memory. Resolution Consider the following scenario: • You have a Windows 7-based or Windows Server 2008 R2-... -
Page 60: Glossary
Glossary • 1X — Internet at 1/10 the speed of EV-DO. • 3G — Third Generation. 3G refers to the third generation of mobile telephony technology. • 4G LTE — Fourth Generation. 4G LTE refers to the fourth generation of mobile telephony technology. • 802.11 (a, b, g, n) —... - Page 61 • GSM — A computer program embedded in an electronic device. Firmware usually contains operating code for the device. • Hotspot — A Wi-Fi (802.11) access point or the area covered by an access point. Used for connecting to the Internet. • HTTP —...
- Page 62 • Port Forwarding — A process that allows remote devices to connect to a specific computer within a private LAN. • Port Number — A 16-bit number used by the TCP and UDP protocols to direct traffic on a TCP/IP host. Certain port numbers are standard for common applications.
- Page 63 • USB Port Types — The USB ports on computers and hubs have a rectangular Type A socket, and peripheral devices have a cable with a Type A plug. Peripherals that do not have an attached cable have a square Type B socket on the device and a separate cable with a Type A and Type B plug.
-
Page 64: Safety And Warranty
Safety and Warranty Regulatory Notices MHS291L complies with Parts 15, 22, 24, and 27 of the FCC rules. This mobile hotspot must not be co-located or operated in conjunction with any other antenna or transmitter. If you use this mobile hotspot in any other configuration, the FCC RF Exposure compliance limit can be exceeded. - Page 65 - Connect the mobile hotspot into a different outlet than the receiver. - Consult the dealer or an experienced radio/TV technician for help. • This mobile hotspot does not exceed the Class B limits for radio noise emissions from digital apparatus as set out in the interference causing equipment standard entitled “Digital Apparatus”, ICES-003 of the Department of Communications.
-
Page 66: Product Handling
Product Handling • Keep the mobile hotspot in a dry and clean place. Keep your device away from liquids, dust and excessive heat. • Storage temperature: -22˚F to 140˚F (-30˚C to 60˚C) • Operating temperature: -22˚F to 140˚F (-30˚C to 60˚C) • This device may cause harmful interference, and must accept any interference received, including interference that may cause undesirable operations. -
Page 67: Safety Information For Mobile Hotspot
Safety Information for Mobile Hotspot READ THIS INFORMATION BEFORE USING YOUR MOBILE HOTSPOT Exposure to radio frequency signals Your mobile hotspot is a low power radio transmitter and receiver. When it is ON, it receives and also sends out radio frequency (RF) signals. - Page 68 Antenna safety Use only the approved replacement antenna. Unauthorized antennas, modifications, or attachments could result in violation of FCC regulations. Please contact your local dealer for replacement antenna. Do not use the mobile hotspot with a damaged antenna. If a damaged antenna comes into contact with the skin, a minor burn may result.
- Page 69 • If you have any reason to suspect that interference is taking place, turn your mobile hotspot OFF immediately. Other medical devices If you use any other personal medical device, consult the manufacturer of your device to determine if they are adequately shielded from external RF energy.
- Page 70 Other safety guidelines Aircraft FCC regulations prohibit using your device while in the air. Turn your device OFF before boarding an aircraft. Always request and obtain prior consent and approval of an authorized airline representative before using your device aboard an aircraft. Always follow the instructions of the airline representative whenever using your device aboard an aircraft to prevent any possible interference with airborne electronic equipment.
- Page 71 Precautions Your mobile hotspot is a high quality piece of equipment. Before operating, read all instructions and cautionary markings in the User Guide. • DO NOT use this equipment in an extreme environment where high temperature or high humidity exists. • DO NOT abuse the equipment.
-
Page 72: Safety Information For Fcc Rf Exposure
Safety Information for FCC RF Exposure WARNING! READ THIS INFORMATION BEFORE USING CAUTIONS In August 1996 the Federal Communications Commission (FCC) of the United States with its action in Report and Order FCC 96-326 adopted an updated safety standard for human exposure to radio frequency electromagnetic energy emitted by FCC regulated transmitters. -
Page 73: Sar Information
SAR Information THIS MODEL MEETS THE GOVERNMENT’S REQUIREMENTS AND EUROPEAN UNION (EU) STANDARDS FOR EXPOSURE TO RADIO WAVES. Your mobile hotspot is a radio transmitter and receiver. It is designed and manufactured not to exceed the emission limits for exposure to radio frequency (RF) energy set by the Federal Communications Commission of the U.S. - Page 74 at the ear and worn on the body) as required by the FCC for each model. The highest SAR value for this model device when tested for use when worn on the body, as described in this user guide, and for simultaneous transmission, uses the conditions of both 1.52 W/kg, and 1.54 W/kg respectively.
-
Page 75: Fcc Compliance Information
FCC Compliance Information This device complies with Part 15 of FCC Rules. Operation is subject to the following two conditions: (1) This device may not cause harmful interference, and (2) This device must accept any interference received. Including interference that may cause undesired operation. Information to the user NOTE: This equipment has been tested and found to comply with the limits for a Class B digital device, pursuant to part 15 of the FCC... -
Page 76: 12-Month Limited Warranty
CAUTION Changes or modifications that are not expressly approved by the responsible party of Compliance could void the user’s authority to operate the equipment. 12-Month Limited Warranty Personal Communications Devices, LLC. (the “Company”) warrants to the original retail purchaser of this mobile hotspot, that should this product or any part thereof during normal consumer usage and conditions, be proven defective in material or workmanship that results in product failure within the first twelve (12) month... - Page 77 (d) Damage resulting from connection to any accessory or other product that are not approved by the Company; (e) Defects in appearance, cosmetic, decorative or structural items such as framing and nonoperative parts; (f ) Product damaged from external causes such as fire, flooding, dirt, sand, weather conditions, battery leakage, blown fuse, theft or improper usage of any electrical source.
- Page 78 (e.g. dated bill of sale), the consumer’s return address, daytime phone number and/or fax number and complete description of the problem, transportation prepaid, to the Company at the address shown below or to the place of purchase for repair or replacement processing.
- Page 79 IN USA: Personal Communications Devices 1516 Motor Parkway Hauppauge, New York 11749 www.pcdphones.com IN CANADA: Personal Communications Devices, LLC 5535 Eglinton Avenue West, Suite 210 Toronto, Ontario M9C 5K5 www.pcdphones.com ©2013 Verizon Wireless. All Rights Reserved. 78 Safety and Warranty...
- Page 80 Internet, a su Intranet corporativa y a sus e-mails mientras usted esté ausente de la oficina o en viaje al exterior. El MHS291L es fácil de usar.
- Page 81 Contenido Iniciando Requisitos del sistema ..................5 Componentes ....................... 6 Iconos de exhibición ..................8 Utilización de su Jetpack Acceso a la red ...................... 9 Remoción/Acoplamiento de la tapa trasera ..........11 Instalación/Remoción de la tarjeta SIM 4G LTE ........12 Instalación/Remoción de la batería ............13 Administrador de energía ................18 Conexión a su Jetpack ..................18 Cambio informaciones con su Jetpack ............20...
- Page 82 Interfaz de Usuario Jetpack Configuraciones Nombre/Contraseña Wi-Fi ................25 Dispositivos conectados .................25 Mensajes .......................26 Configuraciones de red ...................26 Configuraciones Wi-Fi ..................26 Actualización del software ................30 Sobre el Jetpack ....................31 Interfaz de Usuario Web Abra la Interfaz de Usuario de Jetpack 33 Mi Jetpack Home ....................34 Uso de datos......................35 Dispositivos conectados .................36...
- Page 83 Sobre el Jetpack Estado en la Internet ..................54 Informaciones sobre el Jetpack..............55 Diagnósticos......................56 Estadísticas y Registros ..................57 Ayuda y Soporte ....................58 Guía de solución de problemas Windows XP(SP3) ....................59 Windows Vista(SP2) ..................60 Windows 7 / Vista(SP2) ..................61 Windows 7 ......................63 Glosario Seguridad y garantía Avisos de reglamentación ................68...
-
Page 84: Iniciando
Wi-Fi. Nota • Cuando múltiples usuarios estén conectados al hotspot móvil MHS291L, todos sus datos de uso serán agregados y aplicados al plan de datos asociado a este jetpack. • USB 3.0 no es soportado en el modo cambio de informaciones. -
Page 85: Componentes
Componentes Número Descripción Efecto de iluminación roja – Enciende cuando la pantalla está activada. Pantalla Inicio – Suministra el estado de la conexión y el estado de la batería, intensidad de la señal de red, estado de roaming y el número de usuarios conectados a la red Wi-Fi. - Page 86 Número Descripción Botón Enciende/apaga( ) - Presione y mantenga presionado para encender y apagar el dispositivo. Puerto del adaptador para una antena externa ) - Puede ser conectado a una antena externa (vendida en separado) para el recibimiento perfeccionado de la señal bajo determinadas condiciones.
-
Page 87: Iconos De Exhibición
Indicador de la intensidad de la señal de red. Este icono es exhibido cuando los datos son transferidos a y desde la red Verizon, su Jetpack y dispositivos conectados. Exhibe el número de dispositivos conectados. Cuando las conexiones disponibles sean concluidas, se exhibirá... -
Page 88: Utilización De Su Jetpack
Acceso a la red 4G LTE Con la tecnología 4G LTE de Verizon Wireless, se puede obtener la velocidad similar a la banda ancha que usted necesita trabajar con eficiencia cuando esté ausente de su residencia o de la oficina. - Page 89 Reivindicación de velocidad Mobile Broadband Rev. A basada en las pruebas de red Verizon Wireless con archivos de datos de 5 MB FTP sin compresión. Su Jetpack habilitado para su Mobile Broadband Rev. A indicará...
-
Page 90: Remoción/Acoplamiento De La Tapa Trasera
Remoción/Acoplamiento de la tapa trasera Para remover la tapa trasera de su dispositivo: 1. Gírelo para visualizar el lado inferior. 2. Posicione la uña en el lado de corte del Jetpack y remueva la tapa. Para acoplar la tapa trasera: 1. -
Page 91: Instalación/Remoción De La Tarjeta Sim 4G Lte
Para informaciones de que dispositivos son compatibles con la tarjeta SIM de Verizon Wireless, acceda verizonwireless.com/certifieddevice. 1. Remueva la tapa trasera y la batería. -
Page 92: Instalación/Remoción De La Batería
Nota • Contáctese con el soporte de Verizon Wireless si pierde o daña su tarjeta SIM. • Para insertar/remover la tarjeta SIM, usted debe remover la batería. Instalación/Remoción de la batería 1. Inserte a uña en la ranura a la izquierda del Jetpack y levante suavemente la tapa para remover. - Page 93 4. Presione en los bordes de la tapa hasta escuchar que se encajó en el lugar y que este plana en toda la superficie inferior. 5. Para remover la batería, apague su Jetpack y remueva la tapa trasera. 6. Inserte la uña en la ranura y levante la batería del compartimiento.
- Page 94 2. Inserte la extremidad micro USB del cable de carga en el puerto de carga. 3. Conecte la otra extremidad del cargador de pared en la toma de alimentación apropiada. La carga de la batería será iniciada. 4. Desconecte el cargador cuando la batería este completamente cargada.
- Page 95 Datos para la batería Advertencia Utilice siempre las baterías y cargadores aprobados con su MHS291L. La garantía no cubre daños causados por baterías y/o cargadores aprobados. • Normalmente la carga de la batería lleva tres horas para la conclusión con el cargador de pared.
- Page 96 • Es normal que las baterías sufran desgaste gradual y exijan mayor tiempo de carga. Si usted nota una alteración en la vida útil de la batería, probablemente es el momento de adquirir una nueva batería. Importante Siempre que usted remueva o inserte la batería o la tarjeta SIM, asegúrese que su Jetpack no esté...
-
Page 97: Administrador De Energía
Administrador de energía Su Jetpack puede operar con la batería o con una fuente de alimentación externa. • Indicador da carga de la batería - Cargue la batería conectando en el cargador de pared. Mientras la batería este siendo cargada, las barras del ícono de la batería parpadearan. Cuatro barras de la batería indican que la batería está... - Page 98 3. Conecte al nombre de red Wi-Fi indicado en la pantalla del Jetpack en la secuencia Menu > Wi-Fi Name/Password. El nombre de la red Wi-Fi (SSID) está en el formato Verizon- 291LVW-XXXX, donde XXXX son los cuatro dígitos exclusivos de su dispositivo.
-
Page 99: Cambio Informaciones Con Su Jetpack
Windows Vista SP2 (32-bit/64-bit) y Windows XP SP3 (32-bit). Para el Windows 7/8/Vista SP2 una unidad de CD será exhibida en su computadora cuando el MHS291L estuviere cambiando informaciones con su computadora. De un doble pulsar y siga el asistente de instalación. - Page 100 • Si su computadora no reconoce el Jetpack, seleccione My Computer > Verizon Mobile > Windows y, enseguida, pulse dos veces en el archivo del driver. Nota Si usted ya tiene instalado el driver USB para el MHS291L, Verizon Mobile no será exhibido. Utilización de su Jetpack...
- Page 101 Jetpack en la secuencia Menu > Wi-Fi Name/ Password. El nombre de la red o SSID está en el formato Verizon-291LVW-XXXX, en que XXXX son cuatro dígitos exclusivos para su dispositivo. Inserte la contraseña de 8 dígitos Wi-Fi.
- Page 102 9. Regrese al administrador de instalación. Ahora pulse en el Download Link en el prompt e instale el Windows Hotfix. 10. Siga las instrucciones en la pantalla. Cuando complete, pulse en OK en el prompt. En seguida pulse en Finish para completar la instalación.
-
Page 103: Interfaz De Usuario Jetpack
Interfaz de Usuario Jetpack Configuraciones... -
Page 104: Configuraciones
Configuraciones Usted puede configurar los ajustes en su Hotspot Móvil Jetpack utilizando el botón de desplazamiento hacia arriba/hacia abajo y OK. Seleccione el menú deseado presionando y presione . Cuando termine los ajustes, seleccione Close y presione Usted puede avanzar a la pantalla Inicio directamente presionando y manteniendo presionado Nombre/Contraseña Wi-Fi 1. -
Page 105: Mensajes
Mensajes 1. En la pantalla Inicio, seleccione Menu > Messages y presione 2. Seleccione un mensaje y presione 3. Usted puede excluir un mensaje seleccionando Delete y presionando Configuraciones de red 1. En la pantalla Inicio, seleccione Menu > Network Settings y presione 2. - Page 106 1. En la pantalla Inicio, seleccione Menu y presione 2. Seleccione Wi-Fi Settings > Wi-Fi Band Select y presione 3. Usted puede cambiar la banda Wi-Fi seleccionando 2.4GHz o 5.0GHz y presionando Nota Usted puede utilizar una banda Wi-Fi en un momento en el MHS291L. Configuraciones 27...
- Page 107 Modo de Red Wi-Fi Algunos dispositivos Wi-Fi más antiguos pueden experimentar problemas de conectividad con redes inalámbrica que transmiten múltiples modos de red Wi-Fi. Si usted no puede conectar su dispositivo Wi-Fi con el Jetpack, se puede desear cambiar el Modo de red Wi-Fi del Jetpack para un modo soportado por el dispositivo Wi-Fi que usted esté...
- Page 108 Aislamiento AP Aislamiento AP (Punto de Acceso) es una técnica para la prevención que dispositivos móviles conectados a una AP se comuniquen directamente uno con el otro. Si el punto de acceso es utilizado en un lugar público en que usted no desea que clientes inalámbricos puedan compartir archivos, active la función de Aislamiento AP.
-
Page 109: Actualización Del Software
Actualización del software Verificación del software El menú Verificación de Actualizaciones permite que usted actualice el software. 1. En la pantalla Inicio, seleccione Menu y presione 2. Seleccione Software Update > Software Check y presione 3. Seleccione Check Now y presione 4. -
Page 110: Sobre El Jetpack
Sobre el Jetpack Informaciones sobre o Jetpack 1. En la pantalla Inicio, seleccione Menu y presione 2. Seleccione About Jetpack > Jetpack Info y presione 3. Usted puede visualizar informaciones detalladas sobre el Jetpack. Nota Usted puede cambiar la contraseña admin. Refiérase a la sección Contraseña Admin del Jetpack en la página 38. -
Page 111: Interfaz De Usuario Web
Interfaz de Usuario Abra la Interfaz de Usuario de Jetpack Configuraciones del Jetpack Mensajes Sobre el Jetpack... -
Page 112: Abra La Interfaz De Usuario De Jetpack
Jetpack en Menu > Wi-Fi Name/Password. En su dispositivo el nombre de la red Wi-Fi (SSID) es el formato Verizon-291LVW-XXXX donde XXXX son los cuatro dígitos exclusivos de su dispositivo. 4. Inserte la contraseña Wi-Fi de 8 dígitos. La contraseña se exhibirá... -
Page 113: Mi Jetpack Home
5. Abra el navegador de Internet en su computadora. Para abrir la Interfaz de Usuario Web Jetpack, inserte http://my.jetpack en la línea de dirección del navegador y enseguida presione la tecla Enter. 6. Digite su contraseña Wi-Fi/Admin en el campo Firma en la esquina derecha superior de la ventana y pulse en Sign In. -
Page 114: Uso De Datos
Uso de Datos e informaciones de acceso específicas a su plan en particular. Usted también puede acceder y administrar su cuenta pulsando en Mi Verizon. 1. Pulse en Data Usage. 2. Usted puede revisar su historial de uso. -
Page 115: Dispositivos Conectados
Dispositivos conectados Usted puede visualizar editar o bloquear dispositivos Wi-Fi actualmente conectados a su Jetpack, como también cualesquier dispositivos actualmente bloqueados. 1. Pulse en Connected Devices. 2. Pulse en Edit y ajuste las configuraciones para los dispositivos conectados. • Inserte el apodo de un dispositivo en el campo Nickname. • Para agregar un dispositivo a Blocked Device Info, seleccione Blocked Device Only en la lista resultante Device Filtering. - Page 116 • Para agregar un dispositivo a Allowed Device Info, seleccione Allowed Device Only en la lista resultante Device Filtering. Enseguida pulse en Allow próximo al campo Nickname. Usted también puede permitir un dispositivo pulsando en Add e inserte la dirección MAC. • Para excluir un dispositivo de las Allowed Device Info, seleccione Allowed Device Only a partir de la lista resultante Device Filtering.
-
Page 117: Configuraciones Del Jetpack
Configuraciones del Jetpack La página de configuraciones Jetpack permite que usted realice alteraciones en su Jetpack, seleccione las opciones de la red móvil, actualice el software, genere respaldos y recupere archivos para su Jetpack. Jetpack Contraseña Admin del Jetpack La página de contraseña del Jetpack permite que usted cambie la contraseña del administrador. - Page 118 Preferencias 1. Pulse en Jetpack Settings > Jetpack > Preferences. 2. Ajuste las configuraciones. • Turn off Display After: Seleccione el período de tiempo antes que la pantalla sea apagada. • Automatic Shutdown: Seleccione el período de tiempo antes que el dispositivo sea automáticamente apagado. • USB Mode: Activa o desactiva el modo USB.
- Page 119 Actualización del software 1. Pulse en Jetpack Settings > Jetpack > Software Updates. 2. Pulse en Check for update para verificar nuevas actualizaciones del software y siga las instrucciones. 40 Configuraciones del Jetpack...
- Page 120 Respaldo y recuperación La función de respaldo (download) permite que usted genere una copia de los ajustes de configuración de su Jetpack para grabado en un archivo en su computadora y recupere (cargue) un archivo de configuración previamente grabado. 1. Pulse en Jetpack Settings > Jetpack > Backup and Restore. 2.
-
Page 121: Wi-Fi
4. Se usted desear habilitar la función de reiniciación a los ajustes de fábrica, pulse en la caja de verificación próxima a Allow to restore Factory Defaults in Jetpack. 5. Pulse en Save Changes. Wi-Fi El menú Wi-Fi permite que usted personalice los perfiles Wi-Fi y visualice detalles sobre los dispositivos conectados a su Jetpack. - Page 122 • Broadcast Network Name (SSID): Transmite el nombre de la red (SSID). • Security: Seleccione el tipo de seguridad utilizada para codificar la red inalámbrica. • Wi-Fi Password (Key): Inserte la nueva contraseña de la conexión Wi-Fi. • Display the Wi-Fi Password on Jetpack screen: Exhibe la contraseña Wi-Fi actual.
-
Page 123: Avanzadas
Avanzadas La página Avanzadas permite que usted modifique los ajustes avanzados. La página Avanzada proporciona acceso a los ajustes de Red, DNS manual, tarjeta SIM, GPS, firewall y LAN y opciones para configurar las aplicaciones de filtrado para las puertas. Importante La modificación de ajustes avanzados puede afectar adversamente la estabilidad, desempeño y la seguridad de las... - Page 124 Selección de la Red Selección automática 1. Pulse en Jetpack Settings > Advanced > Networks. 2. Seleccione GSM/UMTS Mode en la lista resultante Network Type. 3. Seleccione el tipo secundario de la red en la lista resultante Sub type. Usted puede seleccionar GSM/UMTS Dual, GSM only o UMTS only.
- Page 125 DNS Manual El Jetpack selecciona automáticamente un Servidor de Nombre de Dominio (DNS). El menú DNS Manual permite que usted seleccione manualmente hasta dos direcciones DNS IP. 1. Pulse en Jetpack Settings > Advanced > Manual DNS. 2. Inserte la dirección DNS. 3.
- Page 126 El menú SIM ofrece ajustes e informaciones sobre la tarjeta SIM. Esta tarjeta puede ser bloqueada con un código PIN para seguridad adicional. Si fuere bloqueado, el código PIN debe ser insertado antes que el Jetpack pueda ser conectado a Internet. El menú SIM abre la página SIM.
- Page 127 1. Pulse en Jetpack Settings > Advanced > GPS. 2. Para habilitar el GPS, pulse en Start > Apply. 3. Pulse en Yes para aceptar la notificación. Firewall El firewall del Jetpack determina que tráfico de Internet es permitido. 1. Pulse en Jetpack Settings > Advanced > Firewall. 2.
- Page 128 • Enable DMZ: : Activa o desactiva la función DMZ. Si estuviere On, la función DMZ permite que todo el tráfico no conocido sea enviado a una dirección IP designado. • Destination IP Address: Inserte la dirección IP para la función DMZ.
- Page 129 2. Ajuste de las configuraciones. • IP Address: Inserte la dirección IP para el hotspot móvil. • Subnet Mask: Inserte la dirección de la máscara de subred para el Jetpack. El valor estándar 255.255.255.0 es estándar para redes de pequeño porte. Si usted cambia la IP Address, asegúrese de utilizar la máscara de subred actual para el rango de dirección IP.
- Page 130 Filtro de puerto La función Filtro de puerto permite que usted bloquee conexiones a Internet transmitidas y permite que solamente aplicaciones concedidas accedan a Internet. Usted también puede personalizar una lista de aplicaciones permitidas que permiten solamente que determinados programas sean conectados a Internet. 1.
- Page 131 5. Inserte el nombre Application name, Start port y End port. Enseguida seleccione el protocolo utilizado por el rango del puerto. 6. Pulse en Save Changes. Encaminado por el puerto La función Encaminado por el puerto permite que dispositivos remotos sean conectados a una computadora específica dentro de una LAN privada.
-
Page 132: Mensajes
Mensajes La función Mensajes exhibe los mensajes SMS enviados e incluye contadores para el número total de mensajes y nuevos mensajes. 1. Pulse en Messages. 2. Usted puede visualizar los mensajes recibidos. 3. Pulse en para borrar un mensaje. Usted también puede pulsar en Delete All para excluir todos los mensajes. -
Page 133: Sobre El Jetpack
Sobre el Jetpack Esta función permite que usted visualice informaciones específicas detalladas del dispositivo sobre su MHS291L. Estado en la Internet 1. Pulse en About Jetpack > Internet Status. 2. Usted puede visualizar informaciones detalladas sobre el estado actual de la Internet. -
Page 134: Informaciones Sobre El Jetpack
Informaciones sobre el Jetpack La página Jetpack Info contiene informaciones detalladas sobre el MHS291L. 1. Pulse en About Jetpack > Jetpack Info. 2. Usted puede visualizar informaciones detalladas sobre el Jetpack. Sobre el Jetpack 55... -
Page 135: Diagnósticos
Diagnósticos La página Diagnósticos muestra informaciones sobre el Jetpack. 1. Pulse en About Jetpack > Diagnostics. 2. Usted puede visualizar las informaciones sobre el firmware Jetpack y otras informaciones en nivel de sistema. Esta pantalla es utilizada principalmente para solución de problemas y no es exigida para la operación normal. -
Page 136: Estadísticas Y Registros
Estadísticas y Registros La página Logs permite que usted habilite o deshabilite registros y borre registros del sistema. 1. Pulse en About Jetpack > Statistic & Logs > Statistic. 2. Usted puede visualizar las estadísticas de uso de los datos. Pulse en Reset para reiniciar las estadísticas. -
Page 137: Ayuda Y Soporte
4. Usted puede visualizar registros detallados de uso. • Export: Para exportar un archivo de registro, pulse en y seleccione la fecha de inicio y la fecha de término. Enseguida pulse en Export File. • Filter: Para revisar el registro por un determinado período de tiempo, pulse en y seleccione la fecha de inicio y la fecha de término. -
Page 138: Guía De Solución De Problemas
Guía de solución de problemas Windows XP(SP3) Síntoma 1 Un dispositivo RNDIS (Especificaciones de la Interfaz de Driver de Red Remota) no operará más adecuadamente. Por ejemplo, la aplicación de datos en la computadora puede reportar un error informando que la transmisión de los datos falló. Para solucionar este problema, es necesario reiniciar la computadora. -
Page 139: Windows Vista(Sp2)
Windows Vista(SP2) Síntoma 1 Un driver de bus que administra una mini porta Especificaciones de la interfaz del driver de red (NDIS) no es cargado como esperado. Por lo tanto, un símbolo de exclamación amarillo (!) será exhibido en el Administrador de Dispositivos próximo al dispositivo accionado por el minipuerto. -
Page 140: Windows 7 / Vista(Sp2)
Windows 7 / Vista(SP2) Síntoma 1 La comunicación entre el modem y la computadora es interrumpida. Adicionalmente, un punto de exclamación amarillo (!) es exhibido próximo al nombre del dispositivo en el Administrador de Dispositivos. Resolución Considere el siguiente escenario: • Usted tiene una computadora operando con Windows 7, Windows Server 2008 R2, Windows Vista o Windows Server 2008. - Page 141 Resolución Considere el siguiente escenario: • Usted utiliza un sistema tolerante a falla que esté operando en Windows Server 2008 R2 o Windows 7. • Usted removió repentinamente un dispositivo NDIS del sistema. Continúe con la instalación del Microsoft Hotfix localizado en el sitio de Internet a continuación: http://support.microsoft.com/kb/2471472 62 Guía de solución de problemas...
-
Page 142: Windows 7
Windows 7 Síntoma 1 El Windows no cargo el driver adaptador WWAN (Red de Área Amplia Inalámbrica). Adicionalmente, usted recibe un mensaje de error que informa lo siguiente: El Windows no puede cargar el driver del dispositivo para este hardware porque una ejecución previa del driver del dispositivo continúa en la memoria. -
Page 143: Glosario
Glosario • 1X — Internet con 1/10 de la velocidad de EV-DO. • 3G — Tercera generación. 3G se refiere a la tercera generación de la tecnología de telefonía móvil. • 4G LTE — Cuarta generación. 4G LTE se refiere a la cuarta generación de la tecnología de telefonía móvil. - Page 144 • GSM — un programa de computadora incorporado a un dispositivo electrónico. El firmware normalmente contiene el código operativo para el dispositivo. • Hotspot — Un punto de acceso Wi-Fi (802.11) o el área cubierta por un punto de acceso. Utilizado para conexión a la Internet.
- Page 145 • Puerto — Conexión de datos virtual utilizado por los programas para cambiar datos. Ella es el punto final de una conexión lógica. El puerto es especificado por el número del puerto. • Encaminado por el puerto — Proceso que permite que dispositivos remotos sean conectados a una computadora específica dentro de una LAN privada.
- Page 146 • Tipos de puerto USB — Los puertos USB en las computadoras y hubs tienen un terminal tipo A rectangular y dispositivos periféricos tienen un cable con un conector tipo A. Los periféricos que no tienen un cable acoplado tienen un terminal tipo B cuadrado en el dispositivo y un cable en separado con un conector tipo A y un tipo B.
-
Page 147: Seguridad Y Garantía
Seguridad y garantía Avisos de reglamentación El modelo MHS291LW está en conformidad con las partes 15, 22, 24 y 27 de las reglas FCC. Este hotspot móvil no debe ser localizado en proximidad u operado en conjunto con cualesquier otra antena o transmisor. - Page 148 - Aumento de la distancia entre el hotspot móvil y el receptor. - Conexión del hotspot móvil en una toma diferente de la del receptor. - Consulta al revendedor o a un técnico de radio/TV experto para ayuda. • Este Hotspot Móvil no excede los límites de la clase B para emisiones de ruido de radio de aparatos digitales como un ajuste en la interferencia de acuerdo con el estándar del equipo intitulado “Aparato digital”, ICES-003 del Departamento...
-
Page 149: Manipulación Del Producto
ADVERTENCIA • Este producto contiene un producto químico conocido en el Estado de California como causador de cáncer. • Este producto contiene un producto químico conocido en el Estado de California como causador de defectos congénitos u otros daños reproductivos. Manipulación del producto • Mantenga el hotspot móvil en un lugar seco y limpio. -
Page 150: Informaciones De Seguridad Sobre El Hotspot Móvil
• No aplique etiquetas adhesivas al Jetpack; ellas pueden hacer con que el Jetpack potencialmente sobrecaliente y altere el desempeño de la antena. • Guarde el hotspot móvil en un lugar seguro cuando no esté en uso. Informaciones de seguridad sobre el hotspot móvil LEA ESTAS INFORMACIONES ANTES DE UTILIZAR SU HOTSPOT MOVIL Exposición a las señales de radiofrecuencia... - Page 151 El diseño de su hotspot móvil está en conformidad con las directrices de FCC (y esas normas). American National Standards Institute (Instituto Americano de Normas Nacionales). National Council on Radiation Protection and Measurements (Consejo Nacional de Medidas y Protección contra la Radiación). *** International Commission on Nonionizing Radiation Protection (Comisión internacional de Protección contra Radiación No-ionizante).
- Page 152 Marcapasos La Asociación de la Industria de la Salud Manufacturera recomienda que se deba mantener una separación mínima entre un hotspot móvil y un marcapaso de por lo menos 15 centímetros para evitar una potencial interferencia con el marcapaso. Estas recomendaciones son consistentes con el estudio independiente y por las recomendaciones de la Investigación de Tecnología Inalámbrica.
- Page 153 Disposiciones en instalaciones APAGUE (OFF) su hotspot móvil en lugares donde por medio de anuncios así lo dispone. Otros lineamientos de seguridad Aeronaves Las regulaciones de la FCC prohíben utilizar su dispositivo cuando se está en el aire. APAGUE (OFF) su dispositivo antes de abordar una aeronave.
- Page 154 por lo regular, pero no siempre se indica esto claramente. Estas incluyen áreas de carga de combustible, tales como gasolinera, bajo cubierta en los barcos, en instalaciones de transferencia o almacenamiento, vehículos que utilizan gas petróleo líquido (como el butano o propano) áreas donde el aire contiene químicos o partículas, tales como grano, polvo o talco de metal y cualquier otra área donde a usted normalmente se le indique que se apague el motor de su vehículo.
-
Page 155: Informaciones De Seguridad Para Exposición A Rf Conforme Fcc
• La transmisión y recepción de datos no puede ser garantizada debido a la naturaleza de las comunicaciones inalámbricas. Los datos pueden ser retrasados, dañados o perdidos durante la transmisión. A pesar de que es muy raro que el retraso o pérdida significativa de datos se produce si el dispositivo USB se utiliza de una manera normal, este dispositivo USB no se debe utilizar en los casos en que la transmisión de... -
Page 156: Informaciones Sobre Sar
Operación de la unidad cerca del cuerpo Este dispositivo fue probado en varias configuraciones de computadoras con diferentes configuraciones de puertos USB cuanto a operaciones típicas acerca del cuerpo con la parte trasera del hotspot móvil manteniendo una distancia de 10 mm del cuerpo. - Page 157 energía de RF para la población en general. Estas directrices están basadas en normas que fueron desarrollados por organizaciones científicas independientes a través de la evaluación periódica y a fondo de los estudios científicos. Las normas incluyen un margen de seguridad substancial diseñado para asegurar la seguridad de todas las personas, sin importar la edad y su salud.
-
Page 158: Informaciones Sobre Conformidad Con Fcc
normas gubernamentales referentes a la exposición segura. La FCC ha otorgado una Autorización de Equipo para este modelo de dispositivo con todos los niveles de SAR reportados como en cumplimiento con las normas de exposición de RF de la FCC. La información de SAR en este modelo de teléfono se encuentra archivada en la página de Búsqueda de ID de la FCC http://www. - Page 159 Información al usuario NOTA: Este equipo ha sido probado y cumple con los límites establecidos para un dispositivo digital de Clase B según la Parte 15, de normas de la FCC. Estos límites están diseñados para proveer una protección razonable contra interferencias dañinas en una instalación residencial.
-
Page 160: Garantía Limitada De 12 Meses
Garantía limitada de 12 meses Personal Communications Devices, LLC. (la “Compañía”) garantiza al comprador original de este hotspot móvil, que si este producto o cualesquiera de sus partes durante el uso y condiciones normales del consumidor probara ser defectuoso en material, mano de obra que resultara en mala operación del producto durante los primeros doce (12) meses del periodo de fecha de compra, tal(es) defecto(s) serán reparados o remplazados según la opción de la Compañía... - Page 161 (f ) Producto dañado por causas externas como un incendio, inundación, suciedad, arena, condiciones del clima, fuga de baterías, quema de fusible, robo o uso inapropiado de cualquier fuente de electricidad. La Compañía no declara su responsabilidad para la remoción o reinstalación del Producto para cobertura geográfica, por recepción de señal inadecuada de la antena o por rango de comunicaciones u operaciones del sistema celular como un todo.
- Page 162 cobertura de la Garantía con (ej., el recibo fechado de venta), la dirección del consumidor remitente, número de teléfono y/o fax en horas y días hábiles y una descripción completa del problema, el envío prepagado, para la Compañía a la dirección exhibida abajo o al lugar donde se adquirió...
- Page 163 EN ESTADOS UNIDOS: Personal Communications Devices 1516 Motor Parkway Hauppauge, New York 11749 www.pcdphones.com EN CANADA: Personal Communications Devices, LLC 5535 Eglinton Avenue West, Suite 210 Toronto, Ontario M9C 5K5 www.pcdphones.com ©2013 Verizon Wireless. Todos los Derechos Reservados. 84 Seguridad y garantía...
Need help?
Do you have a question about the jetpack MHS291L and is the answer not in the manual?
Questions and answers