Table of Contents
Advertisement
Quick Links
Owner's Manual
Read this manual before using your K5100
K5100 Handheld Label Printer
Toll Free 800.776.5769
Visit www.kroy.com
K5100
File
Font
Size
Style
Rep
A
B
C
D
E
G
H
I
J
K
~
^
M
N
O
P
Q
¢
ƒ
S
T
U
V
W
<
>
¡
@
Y
Z
CAPS
1
2
+
;
:
%
$
4
5
/
&
*
Enter
7
8
¿
(
[
Shift
Space
,
0
ALT
Del
F
"
L
±
R
¥
X
#
£
3
6
-
9
)
.
]
FEED
PRINT
Order Number 2561100
Rev B 9/04
Advertisement
Table of Contents

Related Manuals for Kroy K5100

Summary of Contents for Kroy K5100
- Page 1 Owner’s Manual Read this manual before using your K5100 K5100 File Font Size Style " ± ¢ ƒ ¥ < > ¡ £ CAPS & Enter ¿ Shift Space FEED PRINT K5100 Handheld Label Printer Toll Free 800.776.5769 Order Number 2561100 Visit www.kroy.com...
-
Page 3: Fcc Notice
(6) months from the date of purchase. At no charge to the customer except for inbound freight to Kroy’s service center, Kroy will, at Kroy’s option, repair or replace any product determined to be defective. Kroy will pay return UPS ground charges. A purchase receipt or other evidence of purchase will be required before warranty service is rendered. -
Page 4: Table Of Contents
Table of Contents Chapter 1: Getting Started Contents of Box....................3 Printer Description.................... 4 Important Safety Precautions................5 Connecting AC Adapter..................6 Installing Batteries (Optional)................7 Charging Batteries.................... 8 Installing the Supply Cartridge................9 Chapter 2: Printing Your First Label Printing a Label.................... - Page 5 Chapter 4: PC Operations Introduction...................... 43 KLDS Software and Driver Installation............44 KLDS Operation..................45-46 Downloading Fonts..................47-48 Using Your Printer with Other PC Applications.......... 49-50 Appendices Maintaining Your Printer................. A-1 System Messages..................B-1 Troubleshooting..................... C-1 Updating Printer Firmware..............D-1 D-2 Using Accent Characters................E-1 Using the Character Map ................
-
Page 6: Chapter 1 Getting Started
Chapter 1 Getting Started... -
Page 7: Contents Of Box
Contents of Box (1) Owner’s Manual and (1) CD-ROM (1) K5100 Handheld Label Printer with KLDS Software and Drivers (1) AC Adapter with Power Cord (1) Serial Cable... -
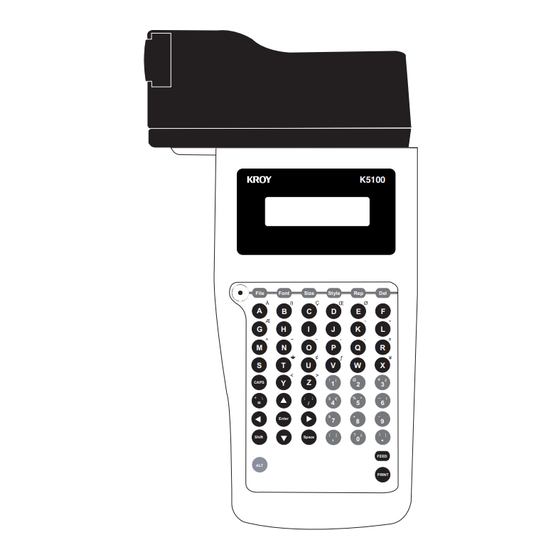
Page 8: Printer Description
Printer Description Figure 1: Top View of Printer Tape Compartment Cutter K5100 LCD Display Function Keys Delete/Esc Key LCD Contrast File Style Font Size Adjustment " ± ¢ ƒ ¥ < > ¡ £ CAPS Cursor Keys Enter Key &... -
Page 9: Important Safety Precautions
Do not pull on the tape, you could damage the tape cartridge. Do not attempt internal repairs to the printer. If service or repair is needed, contact a qualified Kroy service representative. Do not touch the printhead ceramic or rollers with your fingers. -
Page 10: Connecting Ac Adapter
Connecting AC Adapter The supplied AC adapter can be used to power the K5100. Warning: Only use the AC adapter provided with this machine. Use of any other AC adapter may damage your K5100 and void the warranty. Connecting the AC Adapter Insert the AC adapter plug into the AC adapter jack on the left side of the machine. -
Page 11: Installing Batteries (Optional)
Installing Batteries (Optional) Installing Batteries (Optional) Your K5100 printer can optionally operate with six 2.5 Ampere-hour “C” size nickel cadmium batteries for primary power. Do not replace with other type batteries. These batteries can be purchased from Kroy or your Kroy dealer as accessory Part# 2449300 (6 pack Ni-Cd battery). -
Page 12: Charging Batteries
The internal Ni-Cd battery charger operates when the AC adapter is connected to the K5100 printer. The normal complete charge cycle for fully discharged bat- teries is approximately 8 hours. The three LED’s at the front of the printer indi-... -
Page 13: Installing The Supply Cartridge
Installing the Supply Cartridge Figure 4: Installing the Supply Cartridge Supply Cartridge Exit Slot Lock/Release Knob Printhead & Rollers Wind the ribbon spool on the bottom of the supply cartridge counter-clock wise two full turns in the direction of the arrow with your finger. Insert cartridge into the cartridge cavity with the lock/release knob turned counter-clockwise and the excess material threaded in the exit slot. -
Page 14: Chapter 2: Printing Your First Label
Chapter 2 Printing Your First Label... -
Page 15: Printing A Label
ON. The default font is “Block”. No other font is installed on your K5100, however, other fonts of your choice can be downloaded into your K5100. The default justi- fication is left. -
Page 16: Editing Text
To make a two line label, press Enter at the end of line 1 and you will see the cursor go to line 2. Type in the text “Floor 2C” on line 2. 1: Cable 2E45 1: Cable 2E45_ 2: Floor 2C_ Now that you have two lines typed, press the Print key and the auto sizing feature automatically sizes the two lines for you. -
Page 17: Printing On Shrink Tube
Printing on Shrink Tube Kroy offers flattened shrink tube cartridges for wire marking. Insert a shrink tube cartridge for this example. You will start with a New file. To create a New file, press the File key and select New with the Enter key. Or use Shift and File as a shortcut. -
Page 18: Printing A Self-Laminating Wire Wrap
Printing a Self-Laminating Wire Wrap Kroy offers self-laminating wire wrap cartridges ideal for marking terminated wires and cables. Insert a self-laminating wire wrap cartridge for this example. For our example, we kept Auto Size ON. You will start with a New file. To create a New file, press the File key and select New with the Enter key. -
Page 19: Frequently Used Keys
Frequently Used Keys The keyboard is used to enter label text and access menus. You will hear an audible click whenever a key is depressed. The frequently used keys on the keyboard are described below. Function keys (File, Font, Size, Style, Repeat), will automatically prompt a list of selections to choose from. -
Page 20: Chapter 3: Operating Your Printer
Chapter 3 Operating Your Printer... -
Page 21: Font Function
This is the only font included with the K5100 . Font Menu _ Block K5100 has the option of downloading fonts from your PC. When you download a font, it will be added to your Font menu. Font Menu... -
Page 22: Size Function
Auto Size OFF _ 24 _Auto Size When printing, the K5100 will show what point size is being printed in the auto size mode. See below. Printing..Auto Size xx pt If you select Auto Size, the K5100 will automatically adjust the print size based on the number of lines of your label and the width of the label media. -
Page 23: Character Styles
The following style settings are available on the K5100: Rotate, Bold, Italic, Underline, Justify, Mirror, Frame and Vertical. To Select Multiple Styles, with less keystrokes, use the Space key and the cursor keys to turn styles on and off. -
Page 24: Character Styles
The most common character styles used are Bold, Italic and Underline. To emphasize the text of your label using Bold, move the cursor to the position where you want to apply the Bold attribute and press the Style key. Use the left and right cursor keys to move the cursor to the left of Bold and press Enter. -
Page 25: Other Styles
Other Styles Other character styles include Mirror, Frame, Justify, Vertical and Rotate. To reverse the text of your label using Mirror press the Style key. Use the left and right cursor keys to move the cursor to the left of Mirror and press Enter. When turned on, an asterisk will appear. - Page 26 To frame just a line of text, move the cursor to the line of your text and select Line by pressing the Enter key. When turned on, an asterisk will appear 1: ATTENTION Frame Menu 2: EMPLOYEES _ Page _Line Line Frame Example: ATTENTION EMPLOYEES...
- Page 27 Rotate Example: Auto Rotation When a self-laminating wire wrap cartridge is installed, the K5100 will automati- cally rotate and auto size the text using the instructions below. You will start with a New file. To create a New file, press the File key and select New with the Enter key.
-
Page 28: Label Setup
Label Setup To select the Label Setup press the Shift and the Style key together. The prompt below will appear. The menu options are length, cutmark, left margin and vertical margin. Label Setup _ Length _Cutmark In the default setting, the Length of a printed label automatically adjusts to fit the length of text. - Page 29 The Vertical margin function allows you to move text from the top to the bottom by pixel on your label. Use the left and right cursor keys to move the cursor to the left of Vertmargin and press Enter. A prompt will appear below. Use the right and left cursor key to select an increment up to 30 pixels.
-
Page 30: Shortcuts And Hot Keys
Shortcuts and Hot Keys A Shortcut will provide a direct route to some submenus and options. See the listing below. To use a shortcut, first press and hold the Shift or Alt key and then press the second key. Shift + File Creates a New File / Erases All Text Shift + Font Bar Code Menu... -
Page 31: Multiple Copies & Sequencing
Multiple Copies and Sequencing This section explains how to use the Repeat key to print multiple copies of a file or sequence text either numerically or alphabetically. Press the Repeat key to make copies or sequence labels. The prompt below will appear. - Page 32 Select Sequence from the Repeat menu. The Sequence menu will appear. Sequence Menu _ Insert _Alpha _Num Use the left and right cursor keys to move to the left of the option you want and press Enter to select it. Example 1 If you choose Alphabetic, the printer prompts you to enter the first letter to start the sequence.
- Page 33 For multiple labels, Press the Repeat key and the Repeat menu will appear. Toggle your cursor to the left of Copies and press Enter to select. Repeat Menu _Sequence _ Copies The number of copies can either be typed in or you can use your up and down cursor keys.
- Page 34 A black box will be seen where the sequence will start. 1: A Press the Print key. Example 3 Here is another example of a numeric sequence using an increment of 2 and triple digits. Enter the first number to start the sequence. We chose “006” for this example. Press Enter.
- Page 35 Example 4 Here is an example of using multiple pages and numeric sequencing. For our example, we have typed “Line In” on the label (Page 1). 1: Line In_ Press the Repeat key and select Sequence by pressing Enter. Toggle the cursor to the left of Numeric and press Enter again.
- Page 36 To start a new page, use the Shift and the Down Cursor key to move to the next page. A prompt will appear with the page number. Page 2 We have typed “Line Out” on the label (Page 2). 1: Line Out_ Follow the same steps for the sequence setup on Page 1 and Insert the sequence.
-
Page 37: Printer Setup
Printer Setup To select the Printer Setup press the Shift and the Print key together. The prompt below will appear. The menu options are reset, unit of measure, density, auto off, advance cut, language, printspeed and lcd contrast. Printer Setup _ Reset _Unit _Density Select Reset to restore all factory settings and defaults. - Page 38 Select Auto Off to activate auto shut off. The factory default is to shut off the printer after 5 minutes of non-use. When the printer is turned off, all current label text and text attributes settings are saved. All files in memory are still saved.
-
Page 39: Bar Codes
Code Menu to specify the type of bar code you want to print. BARCODE Menu _ None _codaBar _Code39 _Ean8 _eAn13 _I2of5 BARCODE Menu _Upca _uPce _coDe128 _Msiplessey _pdF417 K5100 has ten bar codes built-in. The following table summarizes information on these bar codes.The Checksum Fixed Valid... -
Page 40: Bar Codes
Select Code to change the type of bar code you want to print. The printer dis- plays the types of bar codes available. Use the left and right cursor keys to move to the left of the option you want and press Enter. If an asterisk displays to the left of the option, selecting it turns code off. -
Page 41: File Management
File Management To select the File Menu press the File key. Use the File Menu to create new files, open files, save files and delete files. File Menu _New_Open_Save_Delete Select New to create a new document. The printer clears any text displayed on the screen, returns all attributes to factory defaults and displays a blank edit screen so you can enter new text. - Page 42 If you enter a file name for an already existing file, you will see the following message: Overwrite? OK? (Y,N) Press Y to overwrite or N to enter a different file name. If you decide not to save the file, simply press Delete. Select Delete to delete files that you no longer need.
-
Page 43: Multiple Page Documents
Multiple Page Documents You can enter multiple labels in a file by using Page Up an Page Down to access additional pages (labels). In this case, you can think of a file as a sin- gle document containing one or more pages (labels). Each label can be up to six lines. -
Page 44: Time/Date Stamp
Time/Date Stamp To select the Time/Date Menu press the Shift and Repeat keys together. Use the Time/Date Menu to print labels with Time/Date Menu _ Time _datE _stamP _setclOck _24Hourmode To use the Time/Date functions you must first set the real time clock with the local time and date. - Page 45 Select Time to add the current time to your label. Use the cursor keys to scroll to the left of Time and press Enter. The time will be added to the label where the cursor is positioned. The time can be formatted or deleted just as you had physically typed it in.
- Page 46 Chapter 4 PC Operations...
-
Page 47: Introduction
The K5100 will operate either standalone or as a PC printer. This new printer will operate with Microsoft Windows 98, ME, 2000 or XP. Any standard windows application such as Word, Excel or other programs can print to the K5100 via a standard Windows printer driver. -
Page 48: Klds Software And Driver Installation
KLDS Software and Driver Installation Installing the KLDS Software Close all programs prior to installation. Insert the Kroy Label Designer into the CD-ROM drive. On most systems the installation program will automatically start. See the steps below to help you along with your setup. -
Page 49: Klds Operation
Double click the KLDS Icon or go to your Start Menu\Programs\Kroy Label Designer and select it. The main screen will appear. Go to the Label Menu and select Label Setup. Click on the K5100 printer. Click OK to verify. Select the appropriate Supply Type, Size and Label Orientation that you... - Page 50 After creating your label, click on the Print Icon from the top tool bar, or go to the Label Menu and select Print. Select the number of copies and click OK to print your label. The K5100 will then print your label. For further assistance, go to the Help Menu of your KLDS Software.
-
Page 51: Downloading Fonts
Downloading Fonts Downloading a Font The K5100 has the option of downloading fonts from the PC into your Font Menu. Follow the steps below. 1. Connect the serial cable to the com port of choice and to your printer. 2. Go to the Start Menu of your PC and go to Settings and select Printers. - Page 52 6. Go to the Font folder on the C drive of your PC and click OK. 7. Select the Font or Font Family of your choice and click OK. 8. The LCD Display of the printer will show the progress of the download using the pound sign(#) across the bottom.
-
Page 53: Using Your Printer With Other Pc Applications
This is an example using Microsoft Word to create a label. 1. Click on the File menu and select Print. 2. Select the Kroy K5100 Label Printer in the drop down box and Click Close. 3. Click on the File Menu and select Page Setup. - Page 54 7. A blank label template with a blinking cursor will appear on your PC monitor. 8. Enter the label text. 9. Select Print from the File menu. Make sure that the K5100 is selected and Click OK to print the label. Note: When printing and the cartridge runs out of tape, remove and install a new cartridge, and press Feed to continue printing.
-
Page 55: Maintaining Your Printer
Appendix A: Maintaining Your Printer The printer requires no lubrication and only minimal maintenance. Occasional cleaning of the exterior surfaces and regular cleaning of the printhead and rollers are all that is required. This appendix explains how to clean these parts of your printer. -
Page 56: System Messages
Appendix B: System Messages The following are system messages that the K5100 will display and an explana- tion of each message. Cannot Save (1) There is not enough memory to save your file. No Memory Either delete unneeded files or simplify labels by reducing the amount of text or the number of formatting options they contain. -
Page 57: Troubleshooting
This appendix explains how to solve some common problems that may arise when you are using the printer. If you are unable to correct the problem contact your Dealer or Kroy Customer Service. In the United States, call (800)347-5769; in Europe call +44-(0)118-986-5200. -
Page 58: Updating Printer Firmware
Appendix D: Updating Firmware Updating Firmware Updates for firmware can be found at www.kroy.com. Go to support and click on downloads. 1. Connect the serial cable to your Com port of choice and to your printer. 2. Download the updated file from our site. - Page 59 9. Select the firmware file and click Open. 10. The printer will then update the file. The LCD Display will show the progress of the download using the pound sign(#) across the bottom. The printer will show a receiving and an updating display.
-
Page 60: Using Accent Characters
Appendix E: Using Accent Characters K5100 has a variety of international characters and symbols found in Blue on the keypad. Use the Alt key + the accent character and/or symbol to print out these special accent characters. In our example, we will use the ´ accent character and add it to the letter “i”... -
Page 61: Using The Character Map
Appendix F: Using the Character Map The K5100 has the capability to accept code to print characters not found on the keyboard. To use the character map, the Extended Mode must be on.To turn the Extended Mode on press the Alt and Space key together. To turn this mode off, press the Alt and Space key together again.
Need help?
Do you have a question about the K5100 and is the answer not in the manual?
Questions and answers