Table of Contents
Advertisement
Quick Links
Download this manual
See also:
User Manual
Advertisement
Table of Contents

Related Manuals for MEGAPOWER ML130


Summary of Contents for MEGAPOWER ML130
- Page 1 MEGAPOWER User’s Manual MODEL ML130 DLP PICO PROJECTOR DLP PICO PROJECTOR...
-
Page 2: Table Of Contents
4.1 Cleaning the Pico Projector Housing -------- 11 4.2 Cleaning the Projection Lens --------------- 12 4.3 Transporting the Pico Projector ------------ 12 Chapter 5 – Troubleshooting Guide ------------------------------ 12 Appendix 1 – Product Specifications for ML130 DLP Pico Projector ----------------------------------------------------------------- 13... - Page 3 Note: 1. The appliance inlet of the power supply is the disconnector from mains and must be anytime easily accessible. The maximum noise level of the product is L ≤70dB (A) DIN 45635-19-01-KL2. 1. Der Gerätestecker Netzteiles bildet Trennvorrichtung Versorgungsstromkreis muß...
-
Page 4: Chapter 1 - Introduction
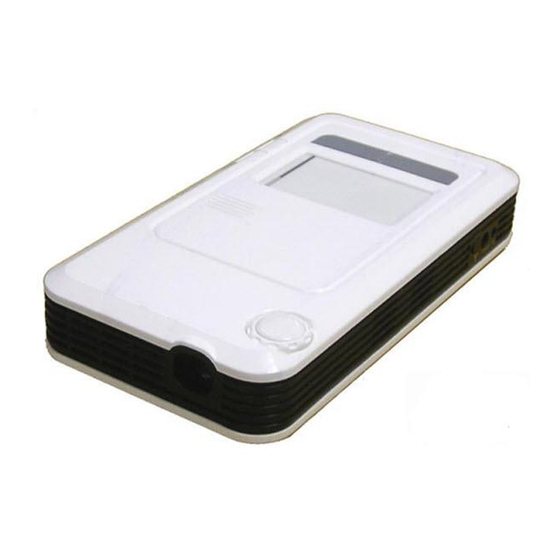
Chapter 1 Introduction About Your DLP Pico Projector The DLP Pico Projector is a convenient, versatile, state-of-the-art presentation system. It is an effective and valuable tool for projecting computer-generated video information or full motion video signals onto a front or rear projection screen. The built-in Windows CE Operating System allows playback of PDF, photos, Powerpoint and various video files directly from the Pico Projector without the need for external signal source. -
Page 5: Power Adaptor
Power Source Check the power specification plate on the back of the Pico Projector. Ensure that your line voltage matches with the power adapter rating of the Pico Projector. The Power Adaptor accepts AC power 100-240V, 50-60 Hz. Power Adaptor Use only the power adaptor supplied with the Pico Projector. -
Page 6: System Contents
System Contents Handle your DLP Pico Projector carefully as you remove it from the packing box. The following items should be included in your package:- 1. DLP Pico Projector 2. AC Power Adaptor 3. Adaptor Plugs for AC Adapter 4. AV Cable 5. -
Page 7: Chapter 2 Installation
Rechargeable Chapter 2 Installation Left & Right Click Buttons Mouse Pad LED Indicator Focus Adjust Knob Projector Lens... -
Page 8: Setting Up
Volume Button Source Button On/Off Power Button Micro SD Card connector Setting Up 1. Slide the battery door open & plug the battery connector to the Pico projector, as indicated by the following sequence of photos. The battery compartment was designed to accommodate different batteries, and as sizes can vary, double sided adhesive tape on the batteries can be used to hold it in place. -
Page 9: Connector Panel
10 seconds to initialize. Thereafter the Windows CE Screen will be projected. 5. Place the Projector at a suitable distance so the image size is around 20” to 40” diagonal 6. Turn the Focus Knob to bring the image into focus. 7. -
Page 10: Connecting To Power Adaptor
Connecting to Power Adaptor When adapter is plugged into the unit the battery starts to charge. The battery can also be charged via the device USB port (only when the unit is in the off state) Presentation with Window CE 1. -
Page 11: Connecting To External Sources
Connecting to External Sources 1. Power up the Pico Projector. 2. Bring up the MODE SELECT window. 3. (a) Computer : Plug the 15pin VGA connector to the computer and the connector on the other end of the cable to the Pico AV/VGA input. -
Page 12: Connecting To Micro Sd Card
2.6 Connecting to Micro SD Card 1. Insert MICRO SD card into the card slot. 2. Open MY DEVICE, the storage card icon should be displayed and use as an external drive for storing files. 2.7 Connecting to USB Host Port 1. -
Page 13: Connecting To Usb Device Port
2.8 Connecting to USB Device Port Connect the USB port on PC to USB Device Port via standard USB cable with mini B connector (not included). The Pico Projector will show as external memory device on the PC. You can retrieve or download files from your PC as you would do for external memory devices. -
Page 14: Led Indicators
On/Off Switch Slide the On/Off switch and hold for 1 second then release to turn on the Pico Projector. Slide the On/Off switch in the same way to turn off the Projector. Source On Desktop open MODE SEL to bring up the setup menu. Select the desired source input. -
Page 15: Chapter 4 - Care And Maintenance
Infra-red receiver for remote control (Option used with DVB-T adapter) Antenna connection (Option for DVB-T version) Chapter 4 Care and Maintenance The information in this chapter describes how to care for and prevent accidental damage to your Pico Projector. You should treat your Pico Projector with the same care you would give to any other valuable equipment. -
Page 16: Chapter 5 - Troubleshooting Guide
bag or use the original packing carton to minimize shock and impact. Store and transport the Pico Projector at temperature between 0 and 140 degrees Fahrenheit (-17 to 60 degrees Centigrade). Avoid storage in automobiles during seasonal temperature extremes. Automobile interior temperatures can exceed 160 degree Fahrenheit (70 degrees Centigrade) in summer. -
Page 17: Pico Projector
Appendix 1 Product Specifications for ML130 DLP Pico Projector Product Specification Display Technology DLP Technology Light Source Resolution WVGA (854 x 480 pixels) Brightness (Typical) 50 Lumens Contrast Ratio 1000 : 1 Built in Window CE capable of playing pdf, powerpoint,...
Need help?
Do you have a question about the ML130 and is the answer not in the manual?
Questions and answers