Table of Contents
Advertisement
Quick Links
Advertisement
Table of Contents

Related Manuals for MEGAPOWER ML131


Summary of Contents for MEGAPOWER ML131
- Page 1 User’s Manual DLP ANDROID PICO PROJECTOR DLP PICO PROJECTOR...
-
Page 2: Table Of Contents
TABLE OF CONTENTS Introduction -------------------------------------------------------------------1 Box Contents ------------------------------------------------------------------ 1 Projector Controls and Indicators --------------------------------------- 2 Setting Up the Pico Projector --------------------------------------------- 4 Using the Mouse Pad ------------------------------------------------------- 5 Using an External USB Mouse -------------------------------------------- 6 Applications Drawer -------------------------------------------------------- 6 Projector Settings ------------------------------------------------------------- 7 Connecting to Wireless Network ---------------------------------------- 9 Installing New Applications ---------------------------------------------- 12 Connecting to External Sources ------------------------------------------ 13... - Page 3 Notes: The appliance inlet of the power supply is the disconnector from mains and must be anytime easily accessible. ≤70dB (A) DIN 45635-19-01-KL2. The maximum noise level of the product is L Der Gerätestecker des Netzteilesbildet die TrennvorrichtungzumVersorgungsstromkreis und mußjederzeitleichtzugänglichsein. ≤70dB (A) DIN 45635-19-01-KL2.
- Page 4 Safety Information Please read these instructions before using your Pico Projector. Failure to comply with these instructions could result in electric shock, fire, personal injury or damage to your Pico Projector. Power Source Check the power specification plate on the back of the Pico Projector. Ensure that your line voltage matches with the power adapter rating of the Pico Projector.The Power Adaptor accepts AC power 90-264V, 50-60 Hz.
-
Page 5: Introduction
Introduction The DLP Pico Projector is a convenient, versatile, state-of-the-art presentation system. It is an effective and valuable tool for projecting computer-generated video information or full motion video signals onto a front or rear projection screen. The built-in Google Android Operating System allows playback of PDF, photos, Excel files, Powerpoint presentations and various video files directly from the Pico Projector without the need for external signal sources. -
Page 6: Projector Controls And Indicators
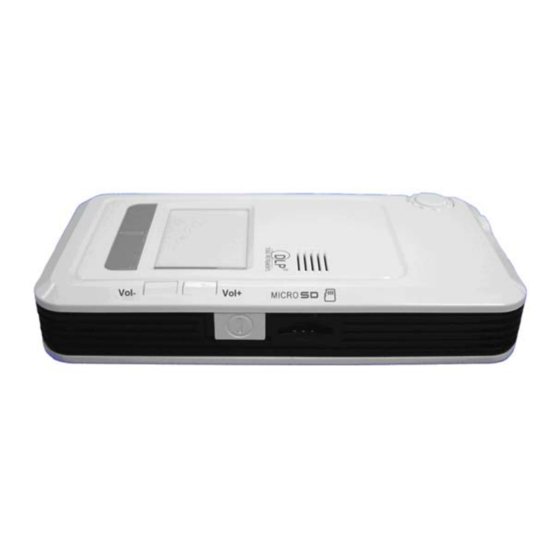
Check to make sure all parts are included in the shipping box. If any are missing, contact your dealer immediately. AC Power Adaptor DLPPicoProjector AV and OTG Cable (plug supplied according to national standard) Projector Controls and Indicators Back and Select Buttons Mouse Pad LED Indicator Projector Lens... - Page 7 Volume Up Volume Down On/Off Power Button Micro SD Card connector On/Off Switch Slide the On/Off switch and hold for 1 second then release to turn on the Pico Projector. Slide the On/Off switch in the same way to turn off the Projector. Vol.
-
Page 8: Setting Up The Pico Projector
Setting Up the PICO Projector 1. Plug the Power Adaptor to the DC in connector at the rear of the DLP Pico Projector. Note : For first time use with internal battery, charge unit for about 4~5hours 2. Slide the ON/OFF power switch towards the rear of the unit and hold until the display turns on, “Booting Up----“. -
Page 9: Using The Mouse Pad
Notification bar Back to previous Home Applications cache screen Home Screen (appearance may differ) Using the Mouse Pad :All features of the Pico Projector can be controlled by the mouse pad. Moving the cursor : Place finger over and in contact with the mouse pad, gently move the finger across the mouse pad surface. -
Page 10: Using An External Usb Mouse
Using an External USB mouse Controlling the cursor : Move the computer mouse over a flat surface and the cursor will follow. Select applications : move cursor over the application icon then click the left mouse button Return to previous screen : the right mouse button doubles up as the back button, click to return to previous screen Relocating applications icon : move cursor over the icon then click and hold the left mouse button then move the mouse and release the left mouse button to drop into... -
Page 11: Projector Settings
For convenience, links to frequently used Apps can be placed on the Home Screen. To create an APP link to the Home Screen : 1. Display the ALL APPS SCREEN 2. Move the cursor over the required App icon (Launcher) 3. - Page 12 Storage : shows internal and external storage connected to the projector Battery : shows state of charge of battery Apps : lists show Downloaded, Running (cached) and All applications installed in the projector. Applications installed by the user can be removed at any time. Select Downloaded from the Apps option Move cursor over the applications to be uninstalled Tap on the mouse pad then select Uninstall option...
- Page 13 Language & Input Change System Language : 1. In Settings select Language 2. Scroll to the preferred language then select with the Select button or a tap on the mouse pad Choose Keyboard and Input method : 1. In Settings select the preferred input method for KEYBOARD & INPUT METHODS, e.g.
-
Page 14: Connecting To Wireless Network
Factory Reset - SETTINGS/Backup & RESET/ select Factory data reset - Slide and hold the ON/OFF switch until factory reset action is complete - In the pop up select CANCEL - Select RESET TABLET - Select ERASE EVERYTING. The projector will power off - After the BOOT UP SCREEN appears, release the ON/OFF switch Connecting to Wireless Network 1. - Page 15 2. If WiFi is not already ON, move the cursor to the positions shown above then tap on the mouse pad to turn WiFi ON. A list of available networks should then be displayed on the right side of the screen. 3.
- Page 16 4. Input the network Password then select Connect. If all is correct, the connection status changes to Connected.
-
Page 17: Installing New Applications
Installing New Applications : From Google Playstore : for a new Playstore account you must have a gmail email account 1. Activate the Playstore app then follow instructions Installing Apps from other Sources : (not recommended, may compromise security) 1. In Settings Security enable (check) Unknown sources 2. -
Page 18: Connecting To External Sources
Connecting to External Sources Wireless Display : requires mobile device with compatible wireless display function (android OS 4.2 and above) 1. On mobile device turn on Wireless Display function. For non-modified OS 4.2, it is located in Settings Display Wireless display 2. - Page 19 4. After having connected to compatible device the projector displays an identical image of the connected device. Wireless DLNA (Pico projector and mobile device connected to same network) : 1) If you have not already done so, install a network media player, such as BubbleUpnp or IMediashare or equivalent application to the connecting media device (e.g.
- Page 20 2) In the Pico projector, click on the DLNA app. The display should show media devices connected to the same network. Following is a sample screen. 3) On the media device, select the video/photo/music to play to the Pico Projector, then select the device to use. On the Pico projector click on YES. Following is a sample screen.
- Page 21 USB A This illustration shows the connector panel at the rear of your DLP Pico Projector. Refer to this figure when making wired connections to the DLP Pico Projector. HDMI IN 1. Connect Pico projector to HDMI source with a HDMI cable. 2.
- Page 22 AUDIO OUT 1. Connect a self-powered Audio Speaker to the AUDIO OUT port to enjoy louder sound output. The sound volume can be adjusted on the video/music player or via the VOLUME CONTROL BUTTON. Micro SD Card Slot 1. Insert MICRO SDcard into the card slot and use the file manager view files and folders on the SDcard.
-
Page 23: Led Indicators
2. Connect a USB device to the OTG port with the supplied OTG cable to double up as a USB host port. LED Indicators Charge : when on (red) the unit is charging. After battery is fully charged the red LED turns off. : When turned on (blue) unit is powered up Charge Mobile devices The Pico projector can be used as a backup charger for mobile devices with USB... -
Page 24: Useful Apps
power connections. Only use this in cases of emergency as the Pico projector battery can be drained quite quickly. Useful Apps from Google Playstore Rotation Lock Adaptive, from MICGOOWARE Adobe Reader, from Adobe Systems for pdf files Easy Direct, from WCROW for WiFi direct file transfer Care and Maintenance The information in this chapter describes how to care for and prevent accidental damage to your Pico Projector. -
Page 25: Troubleshooting Guide
minimize shock and impact. Store and transport the Pico Projector at temperature between 0 and 140 degrees Fahrenheit (-17 to 60 degrees Centigrade). Avoid storage in automobiles during seasonal temperature extremes. Automobile interior temperatures can exceed 160 degree Fahrenheit (70 degrees Centigrade) in summer. If the Pico Projector has been exposed to extremely hot, cold or humid conditions, allow it to stand at room temperature for 30 minutes before use. -
Page 26: Appendix 1 (Product Specifications)
Appendix 1 Product Specifications Product Specification Display Technology DLP Technology Light Source RGB LED Resolution WVGA (854 x 480 pixels) Brightness (Typical) 100 Lumens Contrast Ratio 2000 : 1 Built in OS Android OS 4.2 capable of playing pdf, Powerpoint, Excel, Word files directly without connecting PC Rechargable Battery Battery capable of running for approx 60 mins... - Page 27 FCC Statement This equipment has been tested and found to comply with the limits for a Class B digital device, pursuant to part 15 of the FCC rules. These limits are designed to provide reasonable protection against harmful interference in a residential installation. This equipment generates, uses and can radiate radio frequency energy and, if not installed and used in accordance with the instructions, may cause harmful interference to radio communications.
- Page 28 Caution! The manufacturer is not responsible for any radio or TV interference caused by unauthorized modifications to this equipment. Such modifications could void the user authority to operate the equipment.
Need help?
Do you have a question about the ML131 and is the answer not in the manual?
Questions and answers