Table of Contents
Advertisement
Advertisement
Table of Contents

Related Manuals for Baotian BT49QT-12 Tanco


Summary of Contents for Baotian BT49QT-12 Tanco
- Page 1 BT49QT-12 Tanco – User Manual, Service Schedule & History...
- Page 2 MOTORCYCLE INDUSTRIAL CO. LTD. We hope you enjoy your new Baotian BT49QT-12 (Tanco). This owner’s handbook contains information necessary: • to enable you to get to know your Baotian BT49QT-12 (Tanco), to use it to the best advantage and to benefit from all the latest developments which it incorporates.
-
Page 3: Table Of Contents
CONTENTS Guidance................................1 Position of parts ..............................3 Controlling parts..............................4 Fuel tank ................................6 Fuel and engine oil ............................6 Starting pedal..............................6 Pre-riding inspection ............................7 Engine starting ..............................8 Running-in................................9 Regular maintenance............................10 Technical Parameters .............................15 Electrical Circuit Chart .............................17... -
Page 4: Guidance
Guidance Please keep safety in mind and observe the regulations of transportation while enjoying your ride. Pay attention to the following rules: 1. Pre-riding inspection IMPORTANT Please read the details in the relevant chapter for your safety. It is dangerous to drive on wet roads. Do not make any abrupt turning while 2. - Page 5 5. Positions of the numbers When your motorcycle needs to be inspected, repaired or undertake any service, these numbers will assist your Baotian Dealer when servicing your motorcycle. Please note down your numbers here: The frame number: ..........The engine number: ..........
-
Page 6: Position Of Parts
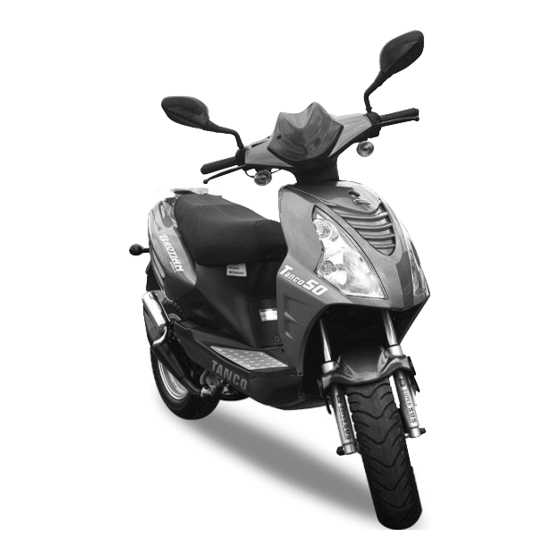
1 Front signal light 9 Starting pedal 18 Light switches 2 Left front turning light 10 Muffler 19 Front brake lever 3 Head light 11 Right rear turning light 20 Ignition switch 4 Rear brake lever 12 Rear light 21 Right front turning light 5 Rear-view mirrors 14 Main stand 22 Brake assembly... -
Page 7: Controlling Parts
1. Rear brake lever A. Horn button Hold it tight and the rear brake works B. Turning signal switch Left turning light right turning light ¶ C. Switch for high/low beam lights 3. Meters and indicating lights 2. Switches on the left handle A. - Page 8 4. Front brake lever 6. Ignition switch Press it tightly and the front brake works. ---ON ---OFF ---LOCK 5. Switches on the right Engine can be started and all the lights can be operated. The key cannot be taken out. The whole circuit is cut.
-
Page 9: Fuel Tank
Fuel tank Fuel and engine oil Usage of the fuel tank lock: A. Petrol 1. Turn the little cap on the fuel cap clockwise. Ensure unleaded petrol is used at all times.7 Insert the key and turn the key clockwise and take out the fuel cap. -
Page 10: Pre-Riding Inspection
Pre-riding inspection Please check the following parts before you drive. Items Inspection content Steering handle bar 1.Flexibility. 2. No gap or loose appearance Brake system 1.Travel of the front brake and the rear brake. 2. No damage to the cable 2. -
Page 11: Engine Starting
Engine starting 1. Please check the volume of engine oil and fuel 3. Engine Starting before starting. The main stand should be stood Grip the brake lever and press the starter button up while starting the engine. and then the engine will start. 2. -
Page 12: Running-In
Warning: Warning: ◆ 5 seconds is the maximum limit for each ◆ After the engine has started, the kick start starting and 10 seconds is the minimum pedal should be taken back to its original interval. position. Otherwise, it will affect the driver’s safety. - Page 13 1. Battery 3. Air cleaner • 12V/4Ah battery • When the voltage is less than 11.5V, please use kicking start in stead of electric starting. • Place the ignition switch to OFF position before battery replacement. • Electrode identification: “+”-red line, “-“-black line. •...
- Page 14 4. Spark plug 6. Engine oil • Clean the carbon deposit on the spark plug with a Replace the engine oil with engine warmed up. piece of hard wire or steel needle. • Adjust the gap to 0.6-0.7mm with a feeler gauge. •...
-
Page 15: Brake System
Disk brake ◆ ◆ Grip the brake lever and check the wear and tear indicator. If the indicator nearly touched the brake disc, please ask your Baotian Dealer to change the brake pads. 2. The rear brake (drum brake) Turn the adjusting nut to get a proper travel. -
Page 16: Regular Maintenance
8. Tyres Brake fluid level • It has been filled with the special brake fluid Insufficient tyre pressure increases wear to them before the motorcycle leaves the factory. Fluid and affects the riding stability. Please check the tyre should only ever be replace or filled with DOT4 pressure and tread depth when carrying out regular brake fluid. - Page 17 9. Starter motor How to change gear oil Check the fastening bolts and the contact • Stand up the main stand. brushes, and replace them if necessary. • Take off the oil plug for refill. 10. Fuse • Take out the oil drain plug for draining, let out all An inline fuse is located in the live wire from the the dirty gear oil.
-
Page 18: Technical Parameters
Technical Parameters Size Length 1850mm Width 680mm Height 1150mm Wheel base 1300mm Weight Unloaded weight 88kg Mass weight 242kg Capacity Max. Speed 45km/h Slope ≥6º Circuit system Spark plug A7RC Battery 12V / 5.7AH Fuse Headlight 12V 35/35W Turning lights 12V 10W Brake light 12V 21W / 5W... - Page 19 Technical Parameters Engine Model 139QMA Type 4 stroke Cylinder Bore and stroke 39 x 41.4mm Cylinder volume 49ml Compression ratio 10.5:1 Max. power 2.61 kW / 8000 (r/min) Max. torque 3.56 NM / 5500 (r/min) Carburetor PZ18J Air cleaner Sponge core Ignition type Starting mode Electric / kick start...
- Page 21 This cover is extended to the registered owner. In the event of change of ownership, 2. No liability will be accepted for damage caused by: please send written advice within 14 days of change to Baotian UK, Casino Industrial Estate, Canterbury Road, Wingham, Kent CT3 1NL. Please enclose copies of service a.
- Page 22 INITIAL INSPECTION SERVICE 2 Mileage: Mileage: Date: Date: Dealer stamp: Dealer stamp: SERVICE 1 SERVICE 3 Mileage: Mileage: Date: Date: Dealer stamp: Dealer stamp:...
- Page 23 SERVICE 4 SERVICE 6 Mileage: Mileage: Date: Date: Dealer stamp: Dealer stamp: SERVICE 5 SERVICE 7 Mileage: Mileage: Date: Date: Dealer stamp: Dealer stamp:...
- Page 24 SERVICE 8 SERVICE 10 Mileage: Mileage: Date: Date: Dealer stamp: Dealer stamp: SERVICE 9 SERVICE 11 Mileage: Mileage: Date: Date: Dealer stamp: Dealer stamp:...
- Page 25 SERVICE 12 SERVICE 14 Mileage: Mileage: Date: Date: Dealer stamp: Dealer stamp: SERVICE 13 SERVICE 15 Mileage: Mileage: Date: Date: Dealer stamp: Dealer stamp:...
-
Page 26: Maintenance Schedule
Maintenance Schedule Every 2 300 KM 1,000 KM 3,000 KM 6,000 KM 9,000 KM 12,000 KM Years Engine Oil Replace Replace Replace Replace Replace Replace Gear Oil Replace Replace Replace Oil Strainer Clean Clean Clean Replace Clean Replace Air Filter Clean Clean Replace...
Need help?
Do you have a question about the BT49QT-12 Tanco and is the answer not in the manual?
Questions and answers