Table of Contents
Advertisement
Quick Links
Download this manual
See also:
User Manual
Advertisement
Table of Contents

Related Manuals for T-Mobile KII0160


Summary of Contents for T-Mobile KII0160
- Page 1 User Manual...
- Page 2 Congratulations on the purchase of your new T-Mobile Shadow. Please Read Before Proceeding. THIS PHONE IS NOT FULLY CHARGED WHEN YOU TAKE IT OUT OF THE BOX. DO NOT REMOVE THE BATTERY PACK WHEN THE PHONE IS CHARGING. YOUR WARRANTY IS INVALIDATED IF YOU OPEN OR TAMPER WITH THE PHONE'S OUTER CASING.
- Page 3 Copyright © 2007, JATAAYU SOFTWARE (P) LTD. All Rights Reserved. Copyright © 2007, Dilithium Networks, Inc. All Rights Reserved. ArcSoft MMS Composer™ Copyright © 2003-2007, ArcSoft, Inc. and its licensors. All Rights Reserved. ArcSoft and the ArcSoft logo are registered trademarks of ArcSoft, Inc. in the United States and/or other countries.
-
Page 4: Important Health Information And Safety Precautions
Important Health Information and Safety Precautions When using this product, the safety precautions below must be taken to avoid possible legal liabilities and damages. Retain and follow all product safety and operating instructions. Observe all warnings in the operating instructions on the product. To reduce the risk of bodily injury, electric shock, fire, and damage to the equipment, observe the following precautions. - Page 5 WARNING: DANGER OF EXPLOSION IF BATTERY IS INCORRECTLY REPLACED. TO REDUCE RISK OF FIRE OR BURNS, DO NOT DISASSEMBLE, CRUSH, PUNCTURE, SHORT EXTERNAL CONTACTS, EXPOSE TO TEMPERATURE ABOVE 140˚F, OR DISPOSE OF IN FIRE OR WATER. REPLACE ONLY WITH SPECIFIED BATTERIES. RECYCLE OR DISPOSE OF USED BATTERIES ACCORDING TO THE LOCAL REGULATIONS OR REFERENCE GUIDE SUPPLIED WITH YOUR PRODUCT.
- Page 6 PREVENTION OF HEARING LOSS CAUTION: Permanent hearing loss may occur if earphones or headphones are used at high volume for prolonged periods of time. SAFETY IN AIRCRAFT Due to the possible interference caused by this product to an aircraft’s navigation system and its communications network, using this device’s phone function on board an airplane is against the law in most countries.
-
Page 7: Nonionizing Radiation
SAFETY PRECAUTIONS FOR RF EXPOSURE • Avoid using your device near metal structures (for example, the steel frame of a building). • Avoid using your device near strong electromagnetic sources, such as microwave ovens, sound speakers, TV and radio. • Use only original manufacturer-approved accessories, or accessories that do not contain any metal. -
Page 8: General Precautions
General Precautions • Heed service markings Except as explained elsewhere in the Operating or Service documentation, do not service any product yourself. Service needed on components inside these compartments should be done by an authorized service technician or provider. • Damage requiring service Unplug the product from the electrical outlet and refer servicing to an authorized service technician or provider under the following conditions:... -
Page 9: Adjust The Volume
NOTE: When taking the device from low-temperature conditions into a warmer environment or from high-temperature conditions into a cooler environment, allow the device to acclimate to room temperature before turning on the power. • Avoid pushing objects into product Never push objects of any kind into cabinet slots or other openings in the product. -
Page 10: Table Of Contents
Contents Welcome to T-Mobile Introduction ... 18 T-Mobile Services and Applications ... 19 Voice/Phone ... 19 Voicemail ... 20 E-mail ... 20 Messaging services ... 20 T-Mobile® myFaves T-Mobile HotSpot ... 21 T-Mobile Address Book ... 22 International Service ... 22 Activating Service ... - Page 11 Numeric mode ... 47 1.11 Battery Information ... 47 1.12 Shortcut Key ... 48 1.13 Status Indicators ... 49 Chapter 2 Using Phone Features 2.1 Using the Phone ... 52 The Phone screen ... 52 Set ring tones ... 52 2.2 Making a Call ...
- Page 12 Change which information is synchronized ... 64 Troubleshoot sync connection problems ... 64 3.5 Synchronizing via Bluetooth ... 65 3.6 Synchronizing Music and Video ... 66 Chapter 4 Managing your Phone 4.1 Personalizing Your Phone ... 68 Set up the Home screen ... 68 Set date, time, language, and other regional options ...
- Page 13 Add myFaves contacts ... 87 Call a myFaves contact ... 88 Edit a myFaves contact ... 89 5.4 Calendar ... 90 Create a personal appointment ... 90 View your appointments ... 90 Send appointments ... 91 5.5 Tasks ... 92 5.6 T-Mobile Address Book ...
- Page 14 Chapter 7 Working with Company E-mails and Meeting Appointments 7.1 Synchronizing Your Phone with the Exchange Server ...116 Set up an Exchange Server connection from your phone 116 Set up an Exchange Server connection from your PC ...118 Start synchronization ...121 7.2 Working with Company E-mails ...122 Automatic synchronization through Direct Push ...122 Scheduled synchronization ...123...
- Page 15 8.8 Bluetooth ...147 Bluetooth modes ...147 Bluetooth partnerships ...148 Connect a Bluetooth hands-free or stereo headset ...149 Beam information using Bluetooth ...151 Print files via Bluetooth ...152 8.9 Windows Live TM ....................153 Set up Windows Live The Windows Live 8.10 Windows Live Messenger ...155...
- Page 16 9.3 Windows Media® Player Mobile ...172 About the controls ...172 About the screens and menus ...173 About licenses and protected files ...174 Synchronize video and audio files ...174 Play media ...177 Playlists ...178 Troubleshooting ...179 9.4 Java Applications ...179 Install and run MIDlets/MIDlet suite ...179 Manage MIDlets/MIDlet suite ...181 Chapter 10 Using Other Applications 10.1 Microsoft®...
-
Page 17: Welcome To T-Mobile
Welcome to T-Mobile Introduction T-Mobile Services and Applications Activating Service... -
Page 18: Introduction
Introduction This User Manual provides you with detailed instructions on using your T-Mobile Shadow You will also find information from the following sources: Windows Mobile® Web site (http://www.microsoft.com/windowsmobile) T-Mobile Customer Care The T-Mobile Customer Care team offers responsive and knowledgeable customer support 24 hours a day, seven days a week. -
Page 19: T-Mobile Services And Applications
T-Mobile Services and Applications With your new T-Mobile Shadow and T-Mobile’s service package, you get the freedom of excellent voice and broadband connectivity in many locations nationwide. Important By using T-Mobile services, you acknowledge that you have read, understood and agreed to be bound by each of the terms and conditions of the Service Agreement. -
Page 20: Voicemail
20 Welcome to T-Mobile Voicemail Your T-Mobile Shadow has been programmed to forward calls when your line is busy or when you are not available. T-Mobile’s voicemail system offers your caller the option to record a voice message that you can play back at your convenience or to send a numeric page to your device. -
Page 21: T-Mobile® Myfaves Sm
Instant Messaging (IM) Your device comes with instant messaging (IM) applications pre-installed for your convenience. Your normal screen name and password work just as they would on any computer connected to the Internet. You may be charged for using instant messaging depending on your rate plan. www.t-mobile.com Visit instant messaging rates. -
Page 22: T-Mobile Address Book
For more information about T-Mobile HotSpot, see “Connect to T-Mobile HotSpot” in Chapter 8. T-Mobile Address Book This is a free service that allows you to view, back up, and manage your contact, tasks, and calendar items on t-mobile.com. See Chapter 5 for details. -
Page 23: Activating Service
Activating Service If your service has not been activated, then follow the steps in this section to activate. The T-Mobile Activations representative will set up your service and assign your mobile number. It takes about 20 minutes to activate voice service and may take up to 24 hours to activate data service. - Page 24 24 Welcome to T-Mobile...
-
Page 25: Chapter 1 Getting Started
Chapter 1 Getting Started 1.1 Getting to Know your Phone and Its Accessories 1.2 Inserting the SIM Card 1.3 Installing a microSD Card 1.4 Charging the Battery 1.5 Turning On the Phone 1.6 The Home Screen 1.7 Programs On Your Phone 1.8 Using the Start Menu 1.9 Using the Quick List 1.10 Entering Information... -
Page 26: Getting To Know Your Phone And Its Accessories
1.1 Getting to Know your Phone and Its Accessories... - Page 27 Item Function 1. Speaker Listen to a phone call. 2. Display Screen 3. Left SOFT KEY Press to perform the command shown in the label above the button. 4. HOME Press to go to the Home Screen. 5. NAVIGATION Use to scroll left, right, up, or down. You can either turn the WHEEL/CENTER wheel or press the wheel to scroll through items or screens.
- Page 28 28 Getting Started...
- Page 29 Item Function 15. Camera Lens 16. VOLUME Adjust the volume of your phone. Press the Up-arrow button CONTROL to increase the volume; press the Down-arrow button to decrease the volume. 17. Sync Connector/ Use for synchronizing data or recharging the battery. Remove Earphone Jack the cover to connect the earphone to listen to audio media or use the phone’s hands-free kit.
-
Page 30: Led Indicator Lights
LED indicator lights Various colors that might display in the two LED Indicators are summarized here. Left LED Status Solid green Battery is fully charged. Blank Battery case is empty, no SIM card inserted or phone is off. Solid amber Battery is charging or the phone is using ActiveSync to synchronize with a PC. - Page 31 Accessories The following accessories are provided with the T-Mobile Shadow: Accessory 1. AC adapter 2. USB cable 3. Audio / Charging cable 4. Stereo headset 5. Pouch Function Recharges the phone battery. Connects your phone to a PC to synchronize data and/or to charge the phone.
-
Page 32: Inserting The Sim Card
1.2 Inserting the SIM Card Your SIM (Subscriber Identity Module) card is given to you by T-Mobile and contains your basic subscriber information, such as your phone number and your address book. Before you begin, ensure that the phone is turned off. Open the cover and remove the battery Hold the phone in one hand facing down in the palm of your hand, and then with your thumb, press the top of the phone. - Page 33 Remove the SIM card Pull down the steel latch (the SIM card will slide down along with steel latch). Push up the steel latch and then slide out the SIM card. Steel latch SIM card Replace the battery Align the exposed metal contacts on the edge of the battery with the prongs in the body of the phone then gently push the top...
-
Page 34: Installing A Microsd Card
1.3 Installing a microSD Card You can install a microSD™ (Secure Digital) card on your phone to have an alternative storage place for your images, video, music, and other phone data. Note microSD card is not shipped with the phone. To install the microSD card Remove the cover on the right side of the phone. -
Page 35: Turning On The Phone
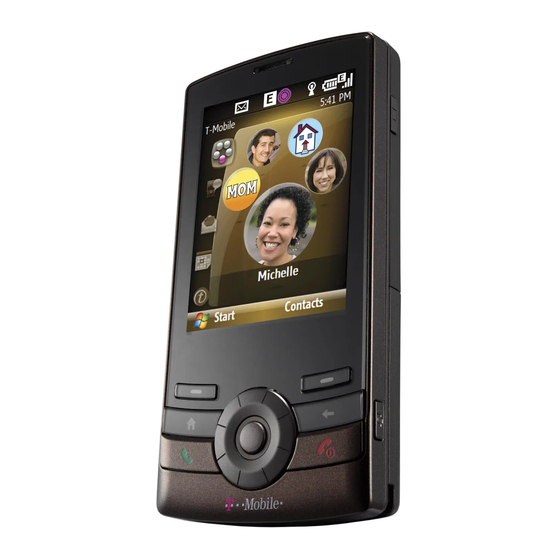
1.5 Turning On the Phone Turn on the phone by pressing the 1.6 The Home Screen The Home screen displays important information, such as upcoming appointments, status indicators, current date and time, battery level, and profile. The Home screen also gives you quick access to various applications and settings that you frequently use on your phone. -
Page 36: Shortcuts Bar
Select to display all program icons. Shortcuts Bar. See "Shortcuts Bar" in this chapter for details. Displays T-Mobile and the time. Displays notifications, such as missed calls or new messages. Displays the network or connectivity status. Displays the T-Mobile HotSpot status. See Chapter 8 for details. Displays the power status. - Page 37 Notifications Gives you quick access to view missed calls and new messages. This icon gleams when there is a new notification. Scroll the NAVIGATION WHEEL clockwise or counterclockwise to go through the items and then press CENTER SELECT to open the notification. Message Center Gives you quick access to your text message and Picture Message inbox.
- Page 38 Internet Quickly open your browser to surf the Internet or access t-zone to purchase ring tones and wallpapers. You can also access your T-Mobile account here. You can quickly go to the t-zone page to purchase wallpapers or ringtones by selecting Browse Wallpaper or Browse Hi-Fi Ringers.
-
Page 39: Programs On Your Phone
Settings Lets you quickly access the Comm Manager and Task Manager, change your profile, wallpaper, or ring tone, and check the phone’s battery power. Select All Settings to show the Settings screen. 1.7 Programs On Your Phone The following table lists icons of the programs that are already installed on your phone or are available on the discs that came with your phone. - Page 40 Icon Program Applications Calendar Call History Comm Manager Contacts File Explorer Games Handango InHand Internet Explorer Instant Messaging Live Search Description Adobe Reader LE View PDF files. Camera Capture photos in various modes. Java Applications Download and install Java-based applications, such as games and tools, on your phone.
- Page 41 Icon Program Office Mobile Messaging Messenger myFaves Pictures & Videos Settings Set Up E-Mail Speed Dial Description Use the complete suite of Microsoft® Office applications for your phone. OneNote Mobile Create OneNote files on your phone and then synchronize them with your PC.
- Page 42 Icon Program T-Mobile Address Book T-Mobile HotSpot t-zones Task Manager Tasks Voice Command Call contacts, open applications, play back music, and Voice Notes Description Synchronize and back up contacts, tasks and calendar items on your phone with the T-Mobile Web site. HotSpot Enter your HotSpot username Settings...
-
Page 43: Using The Start Menu
Icon Program Windows Live Windows Media Player 1.8 Using the Start Menu The Start menu is located at the bottom- left corner of the Home screen and displays various program icons that are spread across one or more screens. To see the available programs in the Start menu On the Home screen, select Start. -
Page 44: Using The Quick List
1.9 Using the Quick List The Quick List offers convenient access to a list of functions, such as locking your phone, opening Comm Manager, and choosing a different profile. For more information about profiles, see Chapter 4. To access the Quick List Press and hold the HOME button. -
Page 45: The 20-Key Qwerty Keyboard
The 20-key QWERTY keyboard To reveal the 20-key QWERTY keyboard, slide up the front panel of the phone. You can do the following with the 20-key QWERTY keyboard: • To use all uppercase letters, press lowercase letters, press • To use a single uppercase letter, press corresponding key. -
Page 46: Multipress Mode
Multipress mode In Multipress mode, you enter a character by pressing the key on which the character appears. To enter text in Multipress mode • To enter the first character on the numeric key, press once. To enter the second character on the numeric key, press twice, and so on. •... -
Page 47: Numeric Mode
Numeric mode If a text box permits a numeric entry only, such as a phone number, the input mode automatically defaults to Numeric mode. However, if you need to enter numbers within a line of text, change to Numeric mode (123 on the menu), and then change back to Multipress or XT9 mode to finish entering the text. -
Page 48: Shortcut Key
To check and optimize battery power On the Home screen, scroll down to on the Shortcuts Bar, then select Manage Battery. On the Power Management screen, adjust the backlight, display, and light sensor settings. To manage low battery When the low-battery warning appears, do the following: Immediately save your current data. -
Page 49: Status Indicators
Getting Started 49 1.13 Status Indicators The following table lists common status indicators and their meanings. Icon Description T-Mobile HotSpot in use T-Mobile HotSpot detected, user is not logged in Wi-Fi is on, but phone not connected to a wireless network Wi-Fi connected Connecting to wireless network Synchronizing via Wi-Fi... -
Page 50: Getting Started
50 Getting Started Icon Description New e-mail or text message (SMS, Short Message Service) New instant message from Live Messenger Signal strength Radio connected or no signal Radio off Vibrate call alert Ringer off Speakerphone on Voice call in progress Data call in progress Calls forwarded Call on hold... -
Page 51: Chapter 2 Using Phone Features
Chapter 2 Using Phone Features 2.1 Using the Phone 2.2 Making a Call 2.3 Receiving a Voice Call 2.4 In-Call Options 2.5 Additional Dialing Information... -
Page 52: Using The Phone
2.1 Using the Phone You can use your phone to make, receive, and keep track of voice calls, and send text messages (SMS, Short Message Service) and Multimedia Messages (Multimedia Messaging Service). You can also dial a phone number directly from Contacts, and easily copy SIM contacts to Contacts on the phone. -
Page 53: Making A Call
2.2 Making a Call With your phone, you can make calls from the Home screen, the Phone screen, from Contacts, Speed Dial, Call History, or SIM Contacts (contacts stored on your SIM card). You can choose to dial by name or number. Make a call from the Home screen •... -
Page 54: Make A Call From Call History
To specify the number to dial On the Home screen, select Start > Contacts. Select the contact. Press NAVIGATION left or right. The letter representing the number changes to m (mobile), w (work), or h (home). You can also select a contact in the contact list, and press CENTER SELECT to view details and different numbers associated with the contact. -
Page 55: Make A Call From Speed Dial
• To save a name or number in Contacts, select Menu > Save to Contacts. • To categorize the call or number into various call types, select Menu > Filter. Note You can also save a number in Contacts by selecting Save on the Call History screen. -
Page 56: In-Call Options
2.4 In-Call Options Your phone provides various options for managing multiple calls at the same time. You are notified when you have another incoming call, and you have the choice of ignoring or accepting the call. If you are already on a call and accept the new call, you can choose to switch between the two callers, or set up a conference call between all three parties. - Page 57 Notes • If the conference connection is successful, the word “Conference” appears at the top of the screen. • To add additional persons to your conference call, select Menu > Hold, enter the phone number, and then select Resume to return to the call. To turn on and off the Speakerphone The built-in Speakerphone allows you to talk hands-free or lets other people listen to the conversation.
-
Page 58: Additional Dialing Information
2.5 Additional Dialing Information Make an emergency call Dial the emergency number (911), and press Additional emergency numbers may be included in your SIM card. Contact your service provider for details. Make an international call Press and hold the Enter the full phone number, and press For example: +(1)(909)(22222222) (country code) + (area code) + (phone number). -
Page 59: Chapter 3 Synchronizing Information With Your Computer
Chapter 3 Synchronizing Information with Your Computer 3.1 About Synchronization 3.2 Setting Up Windows Mobile® Device Center on Windows Vista 3.3 Setting Up ActiveSync® on Windows XP 3.4 Synchronizing With Your Computer 3.5 Synchronizing via Bluetooth 3.6 Synchronizing Music and Video... -
Page 60: About Synchronization
3.1 About Synchronization You can take information from your computer wherever you go by synchronizing them to your phone. The following types of information can be synchronized: • Microsoft® Outlook® information, which include Outlook e-mail, contacts, calendar, tasks, and notes •... -
Page 61: Setting Up Windows Mobile® Device Center On Windows Vista
3.2 Setting Up Windows Mobile® Device Center on Windows Vista Microsoft Windows Mobile® Device Center is the replacement for Microsoft® ActiveSync® on Windows Vista®. Note Some versions of Windows Vista come with Windows Mobile Device Center already installed. If Windows Mobile® Device Center is not available on your Windows Vista, you can install it from the Getting Started Disc that came with your phone. -
Page 62: Setting Up Activesync® On Windows Xp
When you finish the wizard, Windows Mobile Device Center synchronizes your phone automatically. Notice that Outlook e-mails and other information will appear on your phone after synchronization. 3.3 Setting Up ActiveSync® on Windows XP The Getting Started Disc that comes with your phone contains Microsoft® ActiveSync®... -
Page 63: Synchronizing With Your Computer
Select or clear the Allow wireless data connections check box according to your preference. Click Finish. When you finish the wizard, ActiveSync synchronizes your phone automatically. Notice that Outlook e-mails and other information will appear on your phone after synchronization. 3.4 Synchronizing With Your Computer Connect your phone to your PC to synchronize the information between your phone and PC. -
Page 64: Change Which Information Is Synchronized
Change which information is synchronized You can add or reduce the types of information to synchronize between your phone and PC. Before changing synchronization settings on your phone, disconnect your phone from your PC. On your phone, select Start > ActiveSync. Select Menu >... -
Page 65: Synchronizing Via Bluetooth
3.5 Synchronizing via Bluetooth You can connect and synchronize your phone with the PC using Bluetooth. To synchronize with a computer via Bluetooth Set up the synchronization software (Windows Mobile Device Center or ActiveSync) on your computer to use a Bluetooth connection. For more information, see the software Help on your computer. -
Page 66: Synchronizing Music And Video
3.6 Synchronizing Music and Video If you want to carry your music or other digital media along with you while you travel, set up Microsoft® Windows Media® Player on your computer to synchronize music and video with your phone. Other than selecting the Media information type in ActiveSync to be synchronized, all media synchronization settings must be set in Windows Media®... -
Page 67: Chapter 4 Managing Your Phone
Chapter 4 Managing your Phone 4.1 Personalizing Your Phone 4.2 Adding and Removing Programs 4.3 Using Task Manager and Managing Memory 4.4 Managing and Backing Up Files 4.5 Protecting Your Phone 4.6 Restarting Your Phone 4.7 Resetting Your Phone 4.8 Windows Update... -
Page 68: Personalizing Your Phone
4.1 Personalizing Your Phone Set up the Home screen The Home screen is your starting place for most tasks. You can gain access to all features and programs from the Home screen. To customize the Home screen On the Home screen, select Start > Settings > Home Screen. In Home screen layout, Color scheme, Background image, and Time out, choose the options you want, and select Done. -
Page 69: Choose How To Be Notified About Events Or Actions
In Locale, select the locale for the language you selected. The Locale option automatically changes the format of the remaining options (such as date, time, and currency) according to the locale you specify. Select Done. To set the date and time On the Home screen, select Start >... - Page 70 To specify the sound for an event On the Home screen, scroll down to select Chnage Ringtone. For the desired event, select a sound. Select None if you do not want to hear a sound. Select Done. Note For ring tones, you can use sound files in either the .wav, .mid, .wma, or .mp3 file format.
-
Page 71: Set Personal Information
Set personal information Entering and displaying owner information are best practices; they allow someone to return the phone to you in case it is lost. To enter owner information On the Home screen, select Start > Settings > More > Owner Information. -
Page 72: Adding And Removing Programs
• In Display time out on battery / AC, select the time limit for the phone to be idle before the screen turns off when using the battery or AC power. • In When device is turned on, do not charge the battery when connected to PC, select On if you do not want to charge the battery when the device is connected to the computer. -
Page 73: Using Task Manager And Managing Memory
To remove a program On the Home screen, select Start > Settings > More > Remove Programs. Scroll to the program to remove and then select Menu > Remove. 4.3 Using Task Manager and Managing Memory To check how much memory is available On the Home screen, select Start >... -
Page 74: Managing And Backing Up Files
4.4 Managing and Backing Up Files You can back up files to your PC using Windows Mobile Device Center or ActiveSync or copy files to a storage card that is installed on your phone. You can also efficiently manage your files and folders using File Explorer installed on your phone. - Page 75 File Explorer - List View In File Explorer, select Menu to open a list that lets you send or beam the file, view the file’s properties, sort the files, and more. To send a file as an e-mail attachment In File Explorer, select a file and select Menu > Send. On the Messaging screen, select an e-mail account.
-
Page 76: Protecting Your Phone
4.5 Protecting Your Phone You can protect your phone from unauthorized use by requiring a PIN (personal identification number) in order to make calls. Your default PIN is 1234. Additionally, you can also lock the entire phone. To enable the SIM PIN On the Home screen, select Start >... - Page 77 Note You can still receive calls and make emergency calls when the phone is locked. To automatically enable phone lock On the Home screen, select Start > Settings > Security > Device lock. Select Prompt if device unused for then select the amount of time for the phone to be inactive before automatically locking.
-
Page 78: Restarting Your Phone
4.6 Restarting Your Phone Restart your phone when a program is not performing properly or the phone is not responding to any keypresses. To restart the phone Remove the battery. Wait 3 seconds, then reinsert the battery and turn on your phone. WARNING! If the phone is restarted while a program is running, unsaved work will be lost. -
Page 79: Windows Update
4.8 Windows Update Link to Microsoft’s Web site and update Windows Mobile® on your phone with the latest security patches or fixes. To set up Windows Update The first time you run Windows Update, you need to set up how you want Windows Update to check for patches on the Microsoft Web site. - Page 80 80 Managing your Phone...
-
Page 81: Chapter 5 Organizing Phone Information
Chapter 5 Organizing Phone Information 5.1 Contacts 5.2 SIM Manager 5.3 T-Mobile® myFaves 5.4 Calendar 5.5 Tasks 5.6 T-Mobile Address Book 5.7 Voice Recorder 5.8 Voice Notes... -
Page 82: Contacts
5.1 Contacts Contacts is your address book and information storage for the people and businesses you communicate with. If you use Outlook on your PC, you can synchronize contacts between your phone and PC. Create a contact on your phone To create a new contact on your phone On the Home screen, Start >... -
Page 83: Find A Contact
To call a contact from the contact list On the Home screen, select Start > Contacts. Select the contact to call and press number is dialed. To call a phone number other than the default, select the contact, scroll to the number you want to dial, and press Find a contact To find a contact... -
Page 84: Share Contact Information
Share contact information To beam contact information to another device via Bluetooth On the Home screen, select Start > Contacts and then select the contact whose information you want to beam. Select Menu > Send Contact > Beam. Select the device where you want to beam the contact details to and select Beam. -
Page 85: Sim Manager
5.2 SIM Manager SIM Manager allows you to view the contents of your SIM card and transfer contacts from your SIM card to your phone and vice versa. To create a contact on your SIM card Select Start > Accessories > SIM Manager. Select New and enter the contact name and phone number. -
Page 86: T-Mobile Myfaves Sm On The Home Screen
After modifying, select OK. Select Menu > Contacts to SIM. Select the check boxes of the contact’s phone numbers that you want to copy to your SIM card, then select Save. To display your phone number in SIM Manager On the SIM Manager screen, select Menu > Tools > List of Own Numbers. -
Page 87: Add Myfaves Contacts
T-Mobile myFaves Once your subscription to T-Mobile® myFaves service has been activated, myFaves will show on your phone’s Home screen. You can add and call contacts by simply selecting the circles you see on the Home screen when you have the myFaves icon ( ) selected. -
Page 88: Call A Myfaves Contact
Under Icon, select Change icon to associate the contact with an image. You can choose to take a picture, download from the T-Mobile site or use an existing image or icon on your phone. When using a photo taken by the phone’s camera as a photo for a myFaves contact, you can rotate the photo by selecting Options >... -
Page 89: Edit A Myfaves Contact
You can change the menu style by selecting Options > myFaves Settings > Menu Style. To view the activity log of the contact Select Activity Log on the Profile screen to view the activity log of the selected contact. From the Log screen, you can read a new text message, view/reply a missed call, play a voice note, and more. -
Page 90: Calendar
5.4 Calendar Use Calendar to schedule appointments, including meetings and other events. If you use Microsoft® Office Outlook® on your PC, you can synchronize appointments between your phone and PC. Create a personal appointment To set Calendar options On the Home screen, select Start > Calendar. Select Menu >... -
Page 91: Send Appointments
Highlighted areas represent time segments that have scheduled appointments. Select to change the view. Agenda View An appointment with the has a conflict with one or more existing appointments. Send appointments To send a meeting request You can send meeting requests via e-mail to persons that use Microsoft® Office Outlook®... -
Page 92: Tasks
Note When attendees accept your meeting request, the meeting is automatically added to their schedules. When their response is sent back to you, your calendar is updated as well. To send a calendar appointment You can send a calendar appointment to another phone over Picture Message. -
Page 93: T-Mobile Address Book
To locate a task On the Home screen, select Start > Tasks. In the task list, do one of the following: • To sort the list, select Menu > Sort by, and select a sort option. • To filter the list by category, select Menu > Filter, and choose the category you want displayed. -
Page 94: Voice Recorder
To synchronize with the T-Mobile Web site On the T-Mobile Address Book screen, select Sync. To view synchronization history On the T-Mobile Address Book screen, select Menu > History. 5.7 Voice Recorder Use Voice Recorder to create short voice recordings. Voice recordings are included in the All Notes list and are named consecutively (Recording1, Recording2, and so on). -
Page 95: Voice Notes
5.8 Voice Notes Voice Notes lets you record a voice clip and quickly send it via Multimedia Messages. To record a voice clip On the Home screen, scroll down to select Voice Notes > Compose. Hold the phone’s microphone near your mouth. Select Record to start recording your voice clip. - Page 96 96 Managing your Phone...
-
Page 97: Chapter 6 Exchanging Messages
Chapter 6 Exchanging Messages 6.1 Messaging 6.2 Text Messages 6.3 Picture Messages 6.4 Using Instant Messaging 6.5 Set Up E-Mail 6.6 Using E-mail 6.7 Using Keyboard Shortcuts... -
Page 98: Messaging
6.1 Messaging Messaging is where all of your e-mail, text message, and Picture Message accounts are located. When you receive a new message, you can open that particular message from the Home screen. Simply scroll down to the Notifications icon on the Shortcuts Bar then select the message. To access your message accounts, select Start >... -
Page 99: Text Messages
6.2 Text Messages Send short text messages to your contacts. Compose and send text messages To compose and send a text message On the Home screen, scroll down to select Text Messages > Compose. Enter the mobile phone number of one or more recipients, separating them with a semicolon (;). -
Page 100: Picture Messages
6.3 Picture Messages Sending Picture Messages (MMS) to your friends and family is fun and easy. You can include pictures, video, and an audio clip in a picture message. To access Picture Messages On the Home screen, scroll down to Picture Messages. -
Page 101: View, Reply To And Block Picture Messages
• To insert contact details of a contact or appointment details, select Menu > Insert Contact or Insert Calendar. You can then choose the details that you want to insert. Select Insert Audio to insert an audio clip. Select an audio clip on the Select Audio screen. -
Page 102: Using Instant Messaging
To block a phone number from sending you Picture Messages You can choose to block a phone number from sending you Picture messages if you do not want to receive future Picture messages from that number. View the Picture Message then select Menu > Show Message Details. -
Page 103: Icq
To add a buddy At Buddy List®, select Menu > Add Buddy. Type your buddy’s screen name and select Add. To delete buddy At Buddy List®, scroll to the buddy you want to delete. Select Menu > Delete Buddy. Select Yes. To send message to buddy At Buddy List®, scroll to and select the buddy you want to send a message. - Page 104 Type your ICQ® number and password. Note that your password is case-sensitive. Scroll to Save password and Auto-Sign On and press CENTER SELECT to place checks in the check boxes, if desired. Select Connect. To sign off At contact list, select Menu > Disconnect. Select Yes.
-
Page 105: Yahoo
To set away status At contact List, select Menu > My Status. Scroll to and select Away. Yahoo!® You will need a Yahoo!® account to use instant messaging. To set up an account, go to http://messenger.yahoo.com. To sign in On the Home screen, select Start > Instant Messaging. Scroll to and select Y! Messenger. -
Page 106: Set Up E-Mail
To send message to unlisted contact At contact list, select Menu > Send a Message to. Type the contact’s Yahoo! ID and select OK. Type your message and select Menu > Send Message. To set away status At contact List, select Menu > My Status. Scroll to and select Away. - Page 107 To set up AOL/AIM Mail, Yahoo! or Gmail Select AOL/AIM Mail, Yahoo!, or Gmail, then simply enter your e-mail address and password. To set up Windows Live Mail Select Windows Live, then sign in using your Windows Live ID. See Chapter 8 for details. To set up Outlook E-mail On the Select Account screen, select Outlook E-mail.
-
Page 108: Using E-Mail
6.6 Using E-mail After setting up e-mail accounts on your phone, you can start sending and receiving e-mail messages. Create and reply to e-mails To compose and send an e-mail Select Start > Messaging then select an e-mail account. Select Menu > New. Enter the e-mail address of one or more recipients, separating them with a semicolon. -
Page 109: View And Reply To E-Mails
Note This feature works for all Messaging accounts. View and reply to e-mails To read incoming messages By default, only the first few kilobytes of a message are shown when you open and read an incoming message. To read the whole message, do one of the following: •... -
Page 110: Send And Download E-Mails
Tips • To see more header information, scroll up. • To always include the original message, from the list view, select Menu > Tools > Options > Sending, and select the Include copy of original message when replying to e-mail check box. •... -
Page 111: Customize E-Mail Settings
To send and receive e-mail for an Outlook account Select Start > ActiveSync. Connect your phone to your PC. Otherwise, connect wirelessly if you are synchronizing Outlook e-mail with your company e-mail server. See Chapter 7 for details. Synchronization automatically begins, and your phone sends and receives Outlook e-mail. - Page 112 To change the download size, e-mail format and other settings for POP3/IMAP4 e-mail Select Start > Messaging. Use the up/down NAVIGATION to select your POP3 or IMAP4 e-mail account, then select Menu > Settings. You can make changes to your e-mail address, user name, password, etc., and customize the following settings: Options Automatic Send/Receive...
-
Page 113: Using Keyboard Shortcuts
To exclude your e-mail address when replying to all When you reply to all the recipients of an Outlook e-mail, your own e-mail address will also be added to the recipient list. Customize ActiveSync so that your e-mail address will be excluded from the recipient list. In ActiveSync on your phone, select Menu >... - Page 114 Press and hold the “0” key until the shortcuts list is displayed. Scroll up or down to view the whole list. To use a keyboard shortcut Press and hold the respective key. For instance, to reply to a message, press and hold 2.
-
Page 115: Chapter 7 Working With Company E-Mails And Meeting Appointments
Chapter 7 Working with Company E-mails and Meeting Appointments 7.1 Synchronizing Your Phone with the Exchange Server 7.2 Working with Company E-mails 7.3 Managing Meeting Requests 7.4 Finding Contacts in the Company Directory 7.5 E-mail Security... -
Page 116: Synchronizing Your Phone With The Exchange Server
7.1 Synchronizing Your Phone with the Exchange Server To keep up-to-date with your company e-mails and meeting schedules while you’re out of the office, you can connect your phone to the Internet wirelessly and synchronize these information with your company’s Exchange Server. - Page 117 In Server address, enter the Exchange Server name, and select Next. Enter your user name, password, and domain, and select Next. Select the check boxes of the types of information items that you want to synchronize with the Exchange Server. To change the rules for resolving synchronization conflicts, select Menu >...
-
Page 118: Set Up An Exchange Server Connection From Your Pc
Note If you synchronized e-mails with your PC before, open ActiveSync on your phone and select Menu > Add Server Source to set up an Exchange Server connection. When you're prompted to select information types for synchronization, you need to clear the E-mail check box under the Windows PC item first before you can select the E-mail check box under Exchange Server. - Page 119 Enter your company’s Exchange Server address, your username, password, and domain. Click Set Up. On Windows Mobile Device Center’s Home screen, click Change content sync settings. Select the check box of items you want to synchronize with the Exchange Server. Click Sync Settings to choose synchronization settings for the selected items.
- Page 120 On a Windows XP PC Install Microsoft ActiveSync on your PC if you have not yet done so. See “Install ActiveSync” in Chapter 3 for details. Connect your phone to the PC. If you have not set up synchronization with your PC before, follow the steps in “Set up synchronization in ActiveSync”...
-
Page 121: Start Synchronization
Choose the items to be synchronized and other settings in the Options, Schedule and Security tabs, then click OK. Options tab Start synchronization Before you start synchronizing with the Exchange Server, make sure your phone has been set up with a data connection to the Internet so that you can synchronize wirelessly. -
Page 122: Working With Company E-Mails
7.2 Working with Company E-mails Your phone gives you instant access to your company e-mails and lets you manage your messages easier. Messaging features such as Direct Push, Fetch Mail, and Filtering messages are just some of the tools you can use to manage your e-mails. -
Page 123: Scheduled Synchronization
To enable Direct Push via ActiveSync In ActiveSync on your phone, select Menu > Schedule. Select As items arrive in the Peak times and Off-peak times boxes. Note When both the GPRS/EDGE and Wi-Fi connections are turned on at the same time, the Direct Push feature will always opt for GPRS/EDGE, for which you could be charged per your T-Mobile’s service plan. -
Page 124: Instant Download Through Fetch Mail
Instant download through Fetch Mail Fetch Mail downloads an entire e-mail immediately without the need for you to perform a full Send/Receive action. Requirement Fetch Mail works for your phone only if your company is using Microsoft Exchange Server 2007 or higher. Select Start >... -
Page 125: Flag Your Messages
Flag your messages Flags serve as a reminder to yourself to follow-up on important issues or requests that are indicated in the messages. Requirement Flags are enabled only if e-mails are synchronized with Microsoft Exchange Server 2007 or higher. Flags are disabled or hidden if e-mails are synchronized with earlier versions of Microsoft Exchange Server. -
Page 126: View A Document Linked To An E-Mail Message
To send out-of-office auto-reply messages Select Start > Messaging > Outlook E-mail. Select Menu > Tools > Out of Office. From the I am currently list, select Out of the Office. Enter your auto-reply message then select Done. View a document linked to an e-mail message When you receive an e-mail that contains a link to a document such as a PDF or Microsoft®... - Page 127 To reply to a meeting request When there’s an incoming e-mail with a meeting request, a notification message will be displayed on your phone’s Home screen. Scroll to Outlook e-mail and select it. In the Outlook message list, select the e-mail to open it. Select Accept to reply and accept the meeting request, or select Menu >...
-
Page 128: Finding Contacts In The Company Directory
Notes • For information about creating a meeting request, see “To send a meeting request” in Chapter 5. • If you select a meeting that you have organized, the list shows who has accepted or declined the meeting. • To view an attendee’s contact information, select the attendee’s name. If the attendee is included in your contacts list, you will see the contact information immediately. -
Page 129: E-Mail Security
Enter the part or full contact name and select Search. In the search results list, select a contact to select it. Notes • You can save the contact from the Company Directory to your phone by selecting the contact then selecting Menu > Save to Contacts. •... -
Page 130: Encrypt And Sign Messages
Encrypt and sign messages To individually sign and encrypt a new message Select Start > Messaging > Outlook E-mail. Select Menu > New to create a new message. Select Menu > Message Options. From the Security list, select whether to encrypt only, sign the message only, or do both. -
Page 131: Set Permissions On An E-Mail Message
To digitally sign and encrypt all messages You can set up ActiveSync to digitally sign and encrypt all outgoing messages. You must obtain a valid certificate to sign and encrypt e-mail messages successfully. Select Start > ActiveSync. Select Menu > Options. Select the E-mail information type, and select Settings. - Page 132 In Permissions, do one of the following: • To allow anyone to read the message, select Unrestricted Access. • To prevent the message from being forwarded, printed, or copied, select Do Not Forward. Select Done. An IRM-protected message received on your phone can only be replied to or forwarded if the message permits it.
-
Page 133: Chapter 8 Getting Connected
Chapter 8 Getting Connected 8.1 Comm Manager 8.2 Ways of Connecting to the Internet 8.3 Wi-Fi 8.4 GPRS/EDGE 8.5 Dial-up and Others 8.6 Internet Explorer® Mobile 8.7 Using Your Phone as a Modem (Internet Sharing) 8.8 Bluetooth 8.9 Windows Live 8.10 Windows Live Messenger 8.11 Windows Live Search... -
Page 134: Comm Manager
8.1 Comm Manager Comm Manager acts like a central switch that lets you enable or disable phone features as well as manage your data connections easily. To open Comm Manager: On the Home screen, scroll down to Manage Connections. Select to enable or disable the phone. Select Settings > Phone to access phone settings. -
Page 135: Ways Of Connecting To The Internet
8.2 Ways of Connecting to the Internet Your phone’s networking capabilities allow you to access the Internet or your corporate network at work through wireless and conventional connections. You can connect to the Internet by using one of the following: •... - Page 136 To log in to T-Mobile HotSpot Select Start > T-Mobile HotSpot > HotSpot Settings. Type in your T-Mobile HotSpot Username and Password and select Simply turn on Wi-Fi from Comm Manager when you are in a T-Mobile HotSpot, and you will be connected. When logging into a T-Mobile HotSpot with Wi-Fi turned on, you will (this means it is trying to connect) on top of the Home screen.
- Page 137 • Skip ‘login/cancel/sign up’ request: If not selected, the HotSpot Found screen will be displayed first for you to log in (if Username and Password are not correctly filled in). If you want to get a T-Mobile HotSpot account, select Sign up for T-Mobile HotSpot service.
- Page 138 To find a T-Mobile HotSpot location Connect to the Internet using Wi-Fi, GRPS/EDGE, or dial-up. On the Home screen, sroll down to select Browse Web. Select Menu > Favorites > HotSpot locator and select Go. Note You may need to press one of the SOFT KEYs to show Menu. Enter or type in the search criteria and select Submit on the page.
-
Page 139: Connect To Other Wireless Networks
Connect to other wireless networks To create a connection to an existing Wi-Fi network On the Home screen, scroll down to select Manage Connections. On the Comm Manager screen, select the Wi-Fi icon. The Wi-Fi icon is then highlighted to indicate that Wi-Fi is turned on. After a few seconds, a message asks you if you want to see the list of available networks, select Yes. - Page 140 Note If you want only to connect directly to another device or computer, and not to a network through an access point, select This is a device to device (ad-hoc) connection. Select the Authentication type and Data encryption, then select Next.
-
Page 141: Gprs/Edge
8.4 GPRS/EDGE You can use GPRS/EDGE to connect to the Internet or to send and receive Picture Messages on your phone. You need a data plan to access the T-Mobile GPRS/EDGE network. Note T-Mobile GPRS/EDGE settings are already preconfigured and modifying them may cause services to stop working. - Page 142 In Connects to, select The Internet. Enter the appropriate information in the remaining fields. Select Done. To set up a dial-up connection to your corporate network On the Home screen, select Start > Settings > Connections > Dial-up > Add. In Description, enter a name for the connection.
-
Page 143: Internet Explorer® Mobile
Choose the appropriate information in the remaining fields. Select Done. 8.6 Internet Explorer® Mobile Internet Explorer® Mobile is a full-featured Internet browser, optimized for use on your phone. To open Internet Explorer Mobile On the Home screen, scroll down to Browse Web. - Page 144 Select Menu > Add to Favorites to save the current Web page in your Favorites folder. Select Favorites to access your Favorites folder. For more information about Internet Explorer® Mobile, please go to: http://www.microsoft.com/windowsmobile/help/smartphone/ browseinternet.mspx Select Menu > View and then select the text size and type of view you want to use while browsing a...
-
Page 145: Using Your Phone As A Modem (Internet Sharing)
8.7 Using Your Phone as a Modem (Internet Sharing) With Internet Sharing, you can use your phone as an external modem for another device such as a PDA or notebook computer. Notes • Make sure your phone has a SIM card installed, and your phone has a GPRS/ EDGE or phone dial-up modem connection. - Page 146 To set up the phone as a Bluetooth modem On your phone, turn on Bluetooth and set it to Visible mode by following the steps in “To turn on or off Bluetooth on your phone”. Initiate a Bluetooth partnership from your phone by following the steps in “To create a Bluetooth partnership.“...
-
Page 147: Bluetooth
8.8 Bluetooth Bluetooth is a short-range wireless communications technology. Phones with Bluetooth capabilities can exchange information within a distance of about 30 feet without requiring a physical connection. Bluetooth modes Bluetooth on your phone operates in three different modes: On. Bluetooth is turned on. Your phone can detect other Bluetooth- enabled devices, but not vice versa. -
Page 148: Bluetooth Partnerships
Bluetooth partnerships A Bluetooth partnership is a relationship that you create between your phone and another Bluetooth-enabled device in order to exchange information in a secure manner. To create a Bluetooth partnership On the Home screen, select Start > Settings > Connections > Bluetooth. -
Page 149: Connect A Bluetooth Hands-Free Or Stereo Headset
Select the check boxes of services that you want to use from the paired device. Select Done. You can now exchange information with the other device. To change the display name of a Bluetooth device On the Home screen, select Start > Settings > Connections > Bluetooth. - Page 150 3. Select Bluetooth > Add new device. Your phone searches for other Bluetooth-enabled devices and displays them in the list. Select the name of the headset, and select Next. In Passcode, enter the alphanumeric passcode for the Bluetooth headset, then select Next. The passcode is usually “0000”...
-
Page 151: Beam Information Using Bluetooth
Beam information using Bluetooth You can beam information, such as contacts, calendar items, and tasks, as well as files from your phone to your computer or to another Bluetooth- enabled device. Notes • If your computer does not have built-in Bluetooth capabilities, you need to connect and use a Bluetooth adapter or dongle on your computer. -
Page 152: Print Files Via Bluetooth
Now you are ready to beam. On your phone, select an item to beam. The item can be an appointment in your calendar, a task, a contact card, or a file. Select Menu > Beam [type of item]. Select the device name to which you want to beam to. Select Beam. -
Page 153: Windows Live
To print a calendar appointment Select Start > Calendar and then select the appointment whose details you want to print. Follow steps 2 to 5 in the “To print contact information” procedure. To print a message Select Start > Messaging and then select the messaging account where the message you want to print is located. - Page 154 To set up Windows Live for the first time On the Home screen, scroll down to select Set Up E-mail. On the Select Account screen, select Windows Live. On the Windows Live screen, select Sign in to Windows Live. On the next screen, select the links to read the Windows Live of Use and the Microsoft Privacy Statement.
-
Page 155: The Windows Live Tm Interface
The Windows Live On the main interface of Windows Live navigation bar, and an area where you can customize to show your picture. 8.10 Windows Live Messenger Live Messenger lets you send and receive instant messages online. With this mobile version of Windows Live Messenger, you enjoy many of the same cool features that you get from the desktop version, which include the following: •... -
Page 156: Add Windows Live Tm Contacts
Notes • Before you can use Live Messenger, your phone must be connected to the Internet. For information about setting up an Internet connection, see “Ways of Connecting to the Internet” in this chapter. • You also need to have a T-Mobile data plan to use Live Messenger. Launch the messenger and sign in To open Live Messenger Do one of the following:... -
Page 157: Send Instant Messages
Select Done. Follow the remaining instructions to add the new contact to your Windows Live contact list. To delete a contact In the messenger, select the contact and select Menu > Contact options > Remove contact. Choose whether to block the contact. Choose whether to also delete the contact from your phone’s contact list. - Page 158 To start a conversation with another contact, press left or right NAVIGATION to go back to the contact list, then select another contact and select Send IM again. Another message screen opens. To switch from one message screen to another, press left or right NAVIGATION to the display picture of the contact whom you want to talk to.
-
Page 159: Windows Live Tm Search
Personalize the messenger While on the contacts list, you can do the following: • Select Menu > Change status to set your current status (such as Busy, Out to lunch, etc.) so that your contacts will know whether or not you’re available. - Page 160 To open Windows Live Search Select Start > Live Search. To find a location Specify first where the location is near to. You can select from the list of cities. You can also select Choose a new location to enter a city, select on a map, or get a contact’s address.
-
Page 161: Chapter 9 Experiencing Multimedia
Chapter 9 Experiencing Multimedia 9.1 Camera 9.2 Pictures & Videos 9.3 Windows Media® Player Mobile 9.4 Java Applications... -
Page 162: Camera
9.1 Camera Taking photos and shooting video clips are easy with your phone’s built-in camera. To open Camera Do any of the following: • Press the CAMERA button on the right side of the phone. • On the Home screen, select Start > Applications > Camera. Opening the Camera program automatically switches the screen orientation to landscape mode. -
Page 163: Camera Mode Icons And Indicators
Captures still images and places them within frames. Picture Theme ( Captures a sequence of still images (3 or 5 frames) Sports ( automatically for a short duration at a defined frequency. Using the above capture modes, the camera captures files in the following formats: Capture type Format... - Page 164 Select to open the Camera Settings screen. Depending on the capture mode, this shows the remaining, available shots of pictures that you can take or remaining duration that can be recorded. While recording video, this shows the recorded duration. Select to open Pictures & Videos. The Camera [Video] screen The Camera [Picture Theme] screen The Recording Status indicator...
-
Page 165: Quick Settings Menu
Quick Settings Menu The Quick Settings Menu provides a quick way of adjusting some camera settings. Select on the screen to open the menu. Note The available settings on the menu depend on the Capture mode selected. Use the NAVIGATION WHEEL to select the setting you want to change. Press NAVIGATION up or down to go through the options per setting, then press CENTER SELECT to choose the option. -
Page 166: Quick Send
The camera zoom range for a picture or video depends on the capture mode and capture size. Also, please note the capture sizes available for certain capture formats also vary from one capture mode to another. To know if zooming is possible for the selected resolution and/or format, check if the zoom images (i.e. -
Page 167: The Review Screen
You can also change the default destination on the Quick Send screen by selecting Options > Change Default Destination > Change. On the Change screen, select the new destination and select Select. On the confirmation screen, select OK to change the default destination. -
Page 168: Camera Capture And Advanced Settings
Camera Capture and Advanced Settings Select > on the Camera screen to open the Camera settings screen where you can add a picture effect, change the quality, customize capture settings, adjust camera display properties, and more. Press CENTER SELECT to open the options associated with the item. -
Page 169: Pictures & Videos
9.2 Pictures & Videos The Pictures & Videos program allows you to view and manage photos, animated GIFs, and video files on your phone. Copy pictures, animated GIFs and video clips You can copy pictures and animated GIFs from your PC or a storage card to the My Pictures folder, and copy video clips to the My Videos folder on your phone. -
Page 170: Pictures & Videos Menu
Pictures & Videos menu Select a media file onscreen and select Menu to open a list of options that you can do with the selected media file. You can choose to send the selected media file via one of your messaging accounts, beam it to another device, play the pictures as a slide show, send the picture to your Windows Live MySpace... -
Page 171: Internet Explorer
After sending a picture to your Live Space, you can use Internet Explorer® to sign into your Live Space and check whether the picture has been successfully uploaded. To go to your Live Space on your phone On the Home screen, select Start > Internet Explorer. -
Page 172: Windows Media® Player Mobile
To go to your Live Space on your computer Open Internet Explorer® on your PC. On the address bar, enter “http://spaces.live.com/“ then press ENTER. In the Windows Live Spaces Web site, click Your space. Move the mouse pointer over to your Windows Live ID, then click Sign In. -
Page 173: About The Screens And Menus
Play or pause Skip to a previous file Skip to the next file Increase the volume Decrease the volume Turn the sound on or off quickly (mute) Switch to full screen during video playback Change rating Fast-forward a file Rewind a file About the screens and menus Windows Media®... -
Page 174: About Licenses And Protected Files
Select Menu to open a list of options that you can do in a particular screen The commands on this menu vary, depending upon which screen you are viewing. About licenses and protected files Some media files have associated licenses that protect them from being unlawfully distributed or shared. - Page 175 Note You can also sync your storage card if you have one installed on your phone. To set up media synchronization, right-click Storage Card then click Set Up Sync. On the Device Setup dialog box, select Sync this device automatically. If you created your own playlists, select your desired playlist(s) from the list box at the left, then click Add to add them to the list of playlists to sync on the right.
- Page 176 Click Finish. The files begin synchronizing to your phone. The next time you connect your phone to your PC while Windows Media® Player is running, synchronization will start automatically. See “Play media” for instructions on how to play media files. To synchronize content manually to your phone If you have not set up synchronization between your phone and PC, follow steps 1 to 3 in “To synchronize content to your phone...
-
Page 177: Play Media
Click Start Sync to start copying files to your phone. Playlists and Library list Playlist or library content list Notes • Use Windows Media® Player 11 or later on your PC to synchronize (copy) media files to your phone. • Audio files copy faster if Windows Media®... -
Page 178: Playlists
If you do not see the Library screen when you open Windows Media® Player Mobile, select Menu > Library to go to the Library. Select Done. To play video and audio files on your phone Select a category (for example, My Music or My Playlists). Select the item that you want to play (such as a song, album, or artist name), and then select Play. -
Page 179: Troubleshooting
Enter the playlist name then select Done. To play back the playlist you created, select My Playlists in the Library, select your playlist, then select Play. Troubleshooting For more information, see the Troubleshooting Windows Media® Player Mobile page at the Microsoft Web site (http://www.microsoft.com/ windows/windowsmedia/player/windowsmobile/troubleshooting.aspx). - Page 180 To install MIDlets from a PC You can install the MIDlets/MIDlet suites on your phone from a PC using the USB sync cable, or Bluetooth. MIDlets copied to your phone using Bluetooth or e-mail attachments are automatically saved in the My Documents folder. To install MIDlets from a local folder On the Home screen, select Start >...
-
Page 181: Manage Midlets/Midlet Suite
Manage MIDlets/MIDlet suite You can organize the MIDlets/MIDlet suites into folders. You can also uninstall, move or rename MIDlets/MIDlet suites. To uninstall a MIDlet Before you uninstall a MIDlet/MIDlet suite, make sure that it is not running. On the Java screen, select the MIDlet/MIDlet suite by using the NAVIGATION WHEEL. - Page 182 To move a MIDlet or folder to another location On the Java screen, select the MIDlet/MIDlet suite or folder by using the NAVIGATION WHEEL. Select Menu > Actions > Move. 3. Select the location where you want to move the MIDlet or folder to then select OK.
-
Page 183: Chapter 10 Using Other Applications
Chapter 10 Using Other Applications 10.1 Microsoft® Office Mobile 10.2 Microsoft® Office Word Mobile 10.3 Microsoft® Office Excel® Mobile 10.4 Microsoft® Office PowerPoint® Mobile 10.5 Microsoft® Office OneNote® Mobile 10.6 Adobe® Reader® LE 10.7 Speed Dial 10.8 Voice Command... -
Page 184: Microsoft® Office Mobile
10.1 Microsoft® Office Mobile Microsoft® Office Mobile consists of three applications that let you view and edit Microsoft documents. These 3 applications are: • Microsoft® Office Word Mobile lets you view and edit Microsoft Word documents and text files. • Microsoft®... -
Page 185: Edit And Send Documents
To change the zoom ratio Select View and then on the menu, select the zoom ratio to use. Select View > Wrap to Window to adjust the text flow so that the text wraps based on the screen size. This way, you do not need to scroll right to read long paragraphs or sentences. -
Page 186: Microsoft® Office Excel® Mobile
To save the document Select Menu > File > Save As. Type in the Name you want to use for the edited document and select the Location where you want to save the document. Select Save. To send the document through e-mail Select Menu >... -
Page 187: Edit And Send Worksheets
To view the contents of a cell There are times that the text in a cell cannot be fully displayed onscreen. To view the text in the cell in its entirety, select the cell and then select View > Cell Text. To immediately view an area in the worksheet In the worksheet, select View >... - Page 188 To delete the cell content Select the cell whose content you want to delete and select Menu > Edit > Clear Cell. You can select multiple cells by selecting Menu > Select and then choosing what to select in the worksheet. To edit the cell range of a defined name If your worksheet contains defined names created in Microsoft Excel on the PC, you can edit the cell range of the defined name.
- Page 189 To go to a cell Select Menu > Tools > Go To and then enter the Cell reference or name. Select OK. You can also sort and find text in the worksheet by selecting Menu > Tools > Sort or Find. To undo and redo an action Select Menu >...
-
Page 190: Microsoft® Office Powerpoint® Mobile
10.4 Microsoft® Office PowerPoint® Mobile Microsoft® Office PowerPoint® Mobile gives viewing capabilities for your PowerPoint presentations. To open PowerPoint Mobile Select Start > Office Mobile > PowerPoint Mobile. To open a file In PowerPoint Mobile, select Menu and choose the location where the .ppt file is saved. - Page 191 To set PowerPoint Mobile preferences Press the right SOFT KEY to show Menu. Select Menu > Options. Set the Orientation and Playback options and select Done. To show links in a slide You can show and activate hyperlinks in slides that you created on Microsoft PowerPoint on your phone.
-
Page 192: Microsoft® Office Onenote® Mobile
10.5 Microsoft® Office OneNote® Mobile Microsoft Office OneNote Mobile lets you easily create notes with audio and images. Create the notes in your phone, then synchronize them with your PC to keep your OneNote files up-to-date. Note You need an ActiveSync partnership between your computer and phone and Microsoft Office OneNote on your computer to synchronize OneNote files. -
Page 193: Adobe® Reader® Le
10.6 Adobe® Reader® LE Adobe® Reader® LE lets you view Portable Document Format (PDF) files. When you open a password-protected PDF file, you will be prompted to enter the password before the file can be opened. To open a PDF file on your phone Select Start >... - Page 194 Enter appropriate details in Name, Value, and Keypad assignment . Select Done. To quit at any time during this process, select Menu > Cancel. To create a speed dial entry for an item On the Home screen, select Start then choose (just highlight) the item you want.
-
Page 195: Voice Command
10.8 Voice Command Voice Command lets you call your contacts, open applications, play back music, and get calendar information just by using your voice. Voice Command only responds to a set of predefined commands, you cannot create your custom commands in Voice Command. To learn more about the commands that you can use, select Start >... - Page 196 In a clear voice, say “Show [Contact Name]” or “Lookup [Contact Name]. ” To request information from your calendar Hold the phone a few inches away from your mouth. Press and hold the SHORTCUT KEY to activate Voice Command. In a clear voice, say the information you want to retrieve. For example, “What’s my next appointment?”...
-
Page 197: Appendix
Appendix A.1 Specifications A.2 Regulatory Notices... -
Page 198: Specifications
A.1 Specifications System information Processor/Chipset Memory Operating system Display Type Resolution GSM/GPRS/EDGE Quad-band module GSM 850 GSM 900 GSM 1800 GSM 1900 Camera module Type Resolution • TI's OMAP™ 850 200 MHz • ROM: 256 MB (Standard) • RAM: 128 MB DDR •... - Page 199 Dimension Weight Controls and lights Navigation Buttons HTC ExtUSB™ : an 11-pin mini-USB and audio jack in one (ExtUSB is a proprietary connection interface that is trademarked by HTC) V 2.0 without EDR, Class 2 transmit power IEEE 802.11b/g compliant, Internal WLAN antenna AAC/AMR/WMA/WAV/MP3 codec •...
- Page 200 Lights Expansion slot microSD slot Power supply Battery Talk time Standby AC adapter • Event notification • Charge status • GSM/GPRS/EDGE signals • Bluetooth connection microSD memory card Li-Polymer 920 mAh removable, rechargeable battery Up to 7 hours Up to 175 hours •...
-
Page 201: Regulatory Notices
To ensure continued reliable and safe operation of your phone, use only the accessories listed below with your PHOE100. The Battery Pack has been assigned a model number of KII0160. This product is intended for use with a certified Class 2 Limited Power Source, rated 5 Volts DC, maximum 1 Amp power supply unit. -
Page 202: Safety Precautions For Rf Exposure
• The FCC requires the user to be notified that any changes or modifications made to the device that are not expressly approved by High Tech Computer Corporation may void the user’s authority to operate the equipment. Safety precautions for RF exposure Use only original manufacturer-approved accessories, or accessories that do not contain any metal Use of non-original manufacturer-approved accessories may violate your... - Page 203 research by and recommendations of Wireless Technology Research. Persons with pacemakers: • Should ALWAYS keep the phone more than six inches from their pacemaker when the phone is turned ON. • Should not carry the phone in a breast pocket. •...
-
Page 204: Rohs Compliance
Other tips and cautions • Avoid using your phone near metal structures (for example, the steel frame of a building). • Avoid using your phone near strong electromagnetic sources, such as microwave ovens, sound speakers, TV and radio. • Avoid using your phone after a dramatic change in temperature. WEEE Notice The Directive on Waste Electrical and Electronic Equipment (WEEE), which entered into force as European law on 13th February 2003, resulted in a... -
Page 205: Index
Index... - Page 206 Accessibility settings - confirmation time out 71 - in-call alert volume 71 - multipress time out 71 - system font size 71 ActiveSync 62 - overview 39 - synchronize 63, 121 Add and remove programs 72 Add attachment to message 108 Adobe Reader 40, 193 Alarm 70 Alarm settings 69...
- Page 207 - Send contact information via a text message 84 - Send contact information via MMS - View and edit a contact 82 Contacts picture (capture mode) 162 Copy - contacts to SIM card 85 - files between phone and PC 74 - media files from PC to device 174 - pictures, GIF animation, videos 169 - SIM contacts to phone 85...
- Page 208 Insert SIM Card 32 Install - Microsoft ActiveSync 62 Install Micro SD Card 34 Install MIDlets - from Internet 179 - from PC 180 - locally 180 Instant Messaging 40 International call 58 Internet 135 Internet Explorer Mobile 40, 143 Internet Sharing 39, 145 Java Applications 40, 179 Keyboard...
- Page 209 Outlook E-mail 107 Owner information 71 Parts and accessories 26 Pause in dialing sequence 58 PDF 193 Personal information 71 Phone program 51 Phone specification 72 Photo (capture mode) 162 Pictures & Videos 41, 169 Picture Message 100 - Create and send 100 Picture theme (capture mode) 163 PIN 76 Playlists 178...
- Page 210 Quick List 44 Quick Send 166 Quick Settings Menu 165 QWERTY keyboard 44 Receive - call 55 - Picture Message 101 Regional settings 68 Reply - Picture Message 101 Reply message 109, 113 Reset phone 78 Restart phone 78 Review screen 167 Ring tone 52, 94 Run MIDlets 180 Search for e-mails on the Exchange...
- Page 211 T-Mobile Address Book 42, 93 T-Mobile HotSpot 42 - HotSpot Settings 42 - HotSpot Status 42 t-zones 42 Tasks 42, 92 Task Manager 42, 73 Time setting 68 Troubleshooting - sync connection problems 64 Using Instant Messaging 102 - AIM 102 - ICQ 103 - Yahoo! 105 Verify digital signature 130...
Need help?
Do you have a question about the KII0160 and is the answer not in the manual?
Questions and answers