Advertisement
MODEL 403 Panel-Mount Intercom
MODEL 403d Panel-Mount Intercom
with Digital Clearance Recorder (DCR
)
™
INSTALLATION/OPERATION MANUAL
CONGRATULATIONS! You have just purchased the best value in "STATE OF THE ART" cockpit communication.
This unit is equipped with many new convenient features that will add to your flying enjoyment.
PLEASE READ THIS MANUAL BEFORE USING THE INTERCOM AND CONSULT WITH YOUR
A & P MECHANIC OR REPAIR STATION PRIOR TO INSTALLATION.
Advertisement
Table of Contents

Related Manuals for Flightcom 403


Summary of Contents for Flightcom 403
- Page 1 MODEL 403 Panel-Mount Intercom MODEL 403d Panel-Mount Intercom with Digital Clearance Recorder (DCR ™ INSTALLATION/OPERATION MANUAL CONGRATULATIONS! You have just purchased the best value in “STATE OF THE ART” cockpit communication. This unit is equipped with many new convenient features that will add to your flying enjoyment.
-
Page 2: System Overview
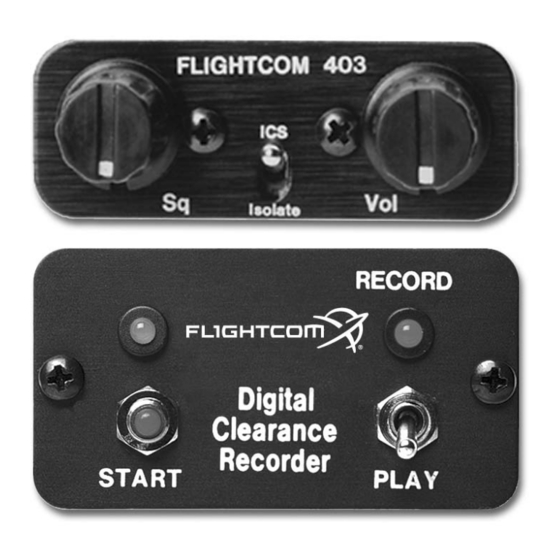
SYSTEM OVERVIEW Flightcom Intercom Models 403 and 403d are full dual-channel stereo capable units also compatible with monaural headsets. Installation of up to six places is possible with the jacks included with both models. Three of these six places have transmit capability over aircraft radios. Model 403d also includes the Digital Clearance Recorder (DCR™), which enables instant recall of voice information. -
Page 3: Setup And Installation
SET-UP and INSTALLATION Mounting the Intercom to the Aircraft The 403 and 403d intercoms can be mounted to the aircraft in either of the following ways: • Standard 2 inch Instrument Hole Mounting • Through-panel or Under-panel Mounting Standard 2... - Page 4 Headphone and Microphone Jack Installation The 403 and 403d intercoms can be installed as either a stereo/monaural, monaural only, or stereo only system. With either type of installation you may leave the existing aircraft headphone and microphone jacks in place to use as a convenient tie in point at which to connect wires 8, 17, and 21 to the radio, or you may connect the intercom to an audio panel instead of the aircraft jacks.
- Page 5 Stereo/Monaural Jack Installation The stereo/monaural installation is preferable because it allows stereo and monaural headsets to be used at the same time. To attach headphone and microphone jacks to the aircraft panel when you are installing the intercom as a stereo/monaural system: 1.
- Page 6 Figure 6 - Connection Schematic - Stereo Mode...
- Page 7 Monaural Only Jack Installation If you are using a monaural only or stereo only system, you will not install stereo/mono switches and switch plates. To attach headphone and microphone jacks to the aircraft panel when you are installing the intercom as a mon- aural only system: 1.
- Page 8 Figure 8 - Connection Schematic - Mono Mode...
- Page 9 Wiring Suggestions To wire the 403 and 403d intercoms: 1. Using a 25 watt soldering iron and 20 or 22 gauge Teflon-coated wire, make solder connections that are insulated with heat shrink tubing (page 6, Figure 8) and (page 4, Figure 6) for connector pin numbers and connection information.
- Page 10 If your aircraft does not have a built-in push-to-talk (PTT) switch, you will need to insert a portable PTT switch into another microphone jack that is parallel with the pilot’s microphone jack. Flightcom Portable PTT Switch (part number 103-0604-10) is designed specifically for the 403 and 403d intercoms.
-
Page 11: Dip Switches
Case Top Removal To open the Model 403 or 403d intercom case: 1. Remove the two hex screws at the rear of the intercom on either side of the 25-pin D-sub connector (DO NOT remove the screw on the side of the case). (Figure 10 below) 2. - Page 12 Figure 11 - DCR™ Control Panel-Exploded View START Pushbutton Switch Amber LED Assemble the DCR Control Panel Indicator Light before mounting either vertically or horizontally. Position toggle switch body so that the RED WIRES are at the bottom Control closest to the word PLAY on the front Panel RECORD side of the panel (Applies to both...
-
Page 13: Operating Procedures
OPERATING PROCEDURES Adjusting the Intercom and Headsets Models 403 and 403d are stereo intercoms, so use of stereo headsets will produce the finest sound reproduction. To adjust the intercom and headsets: 1. Plug the headset into the pilot, co-pilot, or passenger jacks in the aircraft. - Page 14 The power-off default is a monaural only feature. When using stereo headsets, such as the Flightcom 4DX or F20, set the headset switch to Mono. Using headsets with a stereo headphone plug but without a Mono setting will cause only one earphone to be active in the no-power default mode.
- Page 15 Making a New Recording to Replace a Previous One To make a new recording to replace a previous one: 1. Set the toggle switch to PLAY and then back to RECORD. 2. Press the START button. Stopping a Recording To stop recording before the 32 second time limit is reached, set the toggle switch to PLAY. Playing Back a Recording To play back a recording: 1.
-
Page 16: Troubleshooting
Solution: shine up the headset plugs with steel wool or crocus paper. Reason: the aircraft master switch may be turned off. Solution: turn on the aircraft master switch. Reason: the squelch may not be set correctly (the 403 and 403d intercoms are silent when muted). Solution: reset the squelch control. - Page 17 Problem: there is a high pitch whine that varies with engine RPM. Reason: the microphone jacks may not have been insulated from the aircraft frame when the intercom was installed. Solution: insulate all microphone jacks from the aircraft frame. Reason: a separate ground wire may not have been installed from each microphone jack to pin 13 on the intercom.
- Page 18 Solution: switch to a premium headset with a small electret element, such as the Flightcom 5DX. As an alternative, turn down the volume control on your headset until the noise is at an acceptable level, and speak louder with the microphone touching your lips to increase the signal-to-noise ratio by increasing the strength of your voice and decreasing the apparent strength of the noise.
-
Page 19: Warranty
The foregoing is your sole remedy for failure in service or defect. Flightcom Corporation shall not be liable under this or any implied warranty for incidental or consequential damages, nor for any installation or removal costs or other service fees. - Page 20 Flightcom Corporation 7340 SW Durham Road, Portland, OR 97224 USA www.flightcom.net • Phone: 503-684-8229 • Fax: 503-620-2943 Flightcom is a registered trademark of Flightcom Corporation. Specifications subject to change without notice. ©2007 Flightcom Corporation. 600-0036-00 Rev G.
Need help?
Do you have a question about the 403 and is the answer not in the manual?
Questions and answers