Table of Contents
Advertisement
Fig. 1 Typical Connection Configuration
Aircraft Radio
Optional Audio Panel
MUSIC
Optional
OPERATING PROCEDURES
Plug headsets into the proper intercom jacks. When using
stereo headsets, put the stereo/mono switch in the mono
mode. Turn on the aircraft master switch and avionics master,
if so equipped.
Initially set the intercom volume control to the 11 o'clock
position and the squelch control to the 3 o'clock position. Turn
up each headset volume all the way and position your boom
mic 1/8" from your lips and at the corner of your mouth for
best results. Noise canceling mics will not operate correctly if
they are more than 1/8" from your mouth. While speaking
loudly, adjust the intercom volume control to a comfortable
listening level.
Squelch Control: The squelch control should be set as far clockwise as possible while still blocking the background noise. When adjusting
the squelch, be sure no one is talking. Re-adjust this setting in flight to compensate for different noise levels.
Note: If the squelch is set too high (counter-clockwise) your voice will be cut out unless you talk very loudly. If the squelch is set too low
(clockwise) the background noise will be heard occasionally.
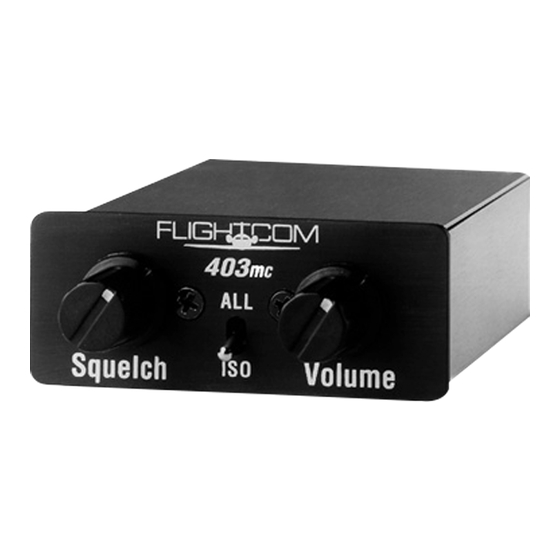
Model 403mc Voice Activated INTERCOM
INSTALLATION/OPERATION MANUAL
PLEASE READ THIS MANUAL THOROUGHLY
BEFORE USING THE INTERCOM
and consult with your A & P Mechanic or Certified
Repair Station prior to installation.
SYSTEM OVERVIEW
The Flightcom Model 403mc intercom is a monaural unit compatible with most
aviation headsets. Installation of up to four stations is possible using optional
jacks. The unit provides two station radio transmit capability.
Standby Jacks
ALL
Squelch
Volume
ISO
Front Panel
Headphone
Jack
Fig. 2 Correct Placement of Boom and Mic
ZERO to 1/8"
PTT Switches for
1-2 places
Optional
HEADSET JACKS
for 2-4 Places
Microphone
Jack
from mouth
1
Advertisement
Table of Contents

Subscribe to Our Youtube Channel
Related Manuals for Flightcom 403mc


Summary of Contents for Flightcom 403mc
- Page 1 Repair Station prior to installation. SYSTEM OVERVIEW The Flightcom Model 403mc intercom is a monaural unit compatible with most aviation headsets. Installation of up to four stations is possible using optional jacks. The unit provides two station radio transmit capability.
- Page 2 Complete Radio Priority: Connecting pins #23, #24 and #25 on the DB25 connector will give the radio complete priority and the radio will override all other audio in the model 403mc. Note: The DB25 connector shipped with the model 403mc intercom is pre-wired for complete...
- Page 3 For In-panel or Under-panel Mount: The intercom box measures 2.375"W x 1"H x 2.625"D. Depending on the type of housing used on your selected DB25 connector, allow at least an additional 3/4" in depth for mounting. If you’re using the Flightcom supplied DB25 connector, allow an additional 2"...
- Page 4 The copilot can transmit over the radio if pin 6 is connected to an existing copilot PTT switch and pins 16 & 17 are connected together. Note: The DB25 connector shipped with the model 403mc intercom is pre-wired this way.
- Page 5 PROCEDURE FOR WARRANTY CLAIM Please send in your warranty card promptly. When returning a unit for repair, enclose a copy of your original, dated bill of sale or the installation certificate as proof of purchase. Defective units must be shipped to us with the freight prepaid. Fig.
- Page 6 1 ........................25-pin D-sub connector housing 1 ..............................Faceplate 2 ................................Knobs 4 ............................4-40 Screws (black) 1 ........................25-pin D-sub connector (male) 1 ............................403mc Intercom 1 ................................. Manual 4 ............................Headphone Jacks* 4 ..............................Mic Jacks* 8 ................................Nuts* 8 ..............................
- Page 7 CONNECTIONS TO EXISTING JACKS HDPH TRANSMIT KEYLINE RECEIVE AUDIO TRANSMIT AUDIO OPTIONAL AVION CS GROUND POWER 12-28V CIRCUIT 1 AMP BREAKER AIRCRAFT RADIO PILOT COPILOT MUSIC SYSTEM HDPH HDPH Muting (Figure 6a) Sections Squelch Volume Intercom HDPH HDPH NOTE: Aux. Input is Pin No. 18...
- Page 8 Flightcom Corporation warrants to the original purchaser of this product that it will be free from defects in materials and workmanship under normal and proper use for the period of one year from date of purchase. Flightcom Corporation will repair or replace, at its option, any parts showing factory defects during this warranty period, subject to the following provisions.
Need help?
Do you have a question about the 403mc and is the answer not in the manual?
Questions and answers