Velleman DVM 68 Operation Manual
Lcd auto range digital multimeter
Hide thumbs
Also See for DVM 68:
- User manual (55 pages) ,
- User manual (36 pages) ,
- User manual (55 pages)

Related Manuals for Velleman DVM 68


Summary of Contents for Velleman DVM 68
- Page 1 DVM 68 LCD Auto Range Digital Multimeter OPERATION MANUAL GEBRUIKERSHANDLEIDING MANUEL D’UTILISATEUR...
-
Page 2: A Word About Safety
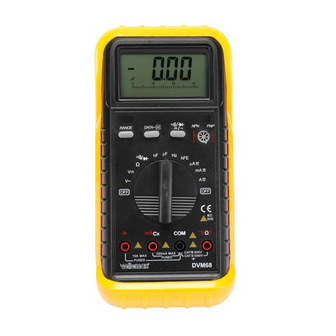
LCD Auto Range Digital Multimeter 1. Description Your DVM 68 is a autoranging professional digital multimeter with a 3 ¾ digit LCD display. It is ideally suited for field, lab, shop, and home applications. By using the latest in IC and display technology to significantly reduce the number of discrete internal components, the multimeter gives you superb measuring capability as well as the highest possible reliability. -
Page 3: Maintenance
1.3 Maintenance Your DVM 68 is an example of superior design and craftsmanship. The following suggestions will help you care for the multimeter so you can enjoy it for years : • Keep the multimeter dry. If it gets wet, wipe it dry immediately. -
Page 4: Data Hold Button
2.3 AC/DC Current or Selecting button Push this button to select AC or DC current measuring function when the function switch is set at µA, mA, A positions. Push this button to select measuring when the function switch is set at position. VELLEMAN... -
Page 5: Input Jacks
1) Connect the black test lead (-) to the COM jack and the red test lead (+) to the V/Ω/F jack. 2) Set the function switch at Ω range to be used and connect test leads across the resistance under measurement. VELLEMAN... -
Page 6: Measuring Capacitance
3) In continuity testing, if continuity exists (i.e. resistance less than about 50Ω), built- in buzzer will sound. 4) If diode test mode is selected, connect the red and black to the anode and cathode of the diode under test. The forward voltage drop of this diode in V will be displayed. VELLEMAN... -
Page 7: Transistor Test
± 0.5% of rdg ± 2 digits 326mV 0.1mV 3.26V ± 0.3% of rdg ± 2 digits 32.6V 10mV 326V 0.1V ± 0.5% of rdg ± 2 digits 1000V Input impedance : 10MΩ, more than 100MΩ at 326mV range VELLEMAN... - Page 8 ± 0.8% of rdg ± 3 digits 326Ω 0.1Ω 3.26kΩ 1Ω ± 0.8% of rdg ± 3 digits 32.6kΩ 10Ω 326kΩ 100Ω 3.26MΩ 1kΩ ± 1.2% of rdg ± 2 digits 32.6MΩ 10kΩ Maximum Open Circuit Voltage : 1.3V 4.7 Capacitance VELLEMAN...
-
Page 9: How To Use The Holster
Take the little stand off from the back side of the large stand and insert it into holes located upper on the holster. 4) Hold test leads. (fig. d) fig. a fig. b fig. c fig. d 6. Battery and fuse replacement VELLEMAN... - Page 10 Open the case as mentioned above and take the PCB assembly out from the case. Replace the blown fuse with ratings specified. F1 : F 300mA/250V F2 : F 10A/250V Remark : Before attempting to open the case, be sure that test leads have been disconnected from measurement circuit to avoid electric shock. VELLEMAN...
Need help?
Do you have a question about the DVM 68 and is the answer not in the manual?
Questions and answers