Table of Contents
Advertisement
Quick Links
Download this manual
See also:
User Manual
Be the band.
Hexpander MIDI Interface
Acousti-Phonic Pre-amp
User Guide
O
G
VERVIEW OF THE
HOST
Will it work with my guitar?
Introducing modular components
Output options
Mono and Stereo Modes
QuickSwitch functions
Hexpander only and mag-to-pin-7
Sample Control Layouts
P
Y
G
® I
LANNING
OUR
HOST
Locating Ghost® Components
Pots and QuickSwitches
Extension Harness *optional*
Hexpander and 13-pin Jack
Acousti-phonic & 9v battery
Acoustic volume: convert, stack, or drill?
Convert Mag Tone Pot to Acoustic Volume
Replace a Pot with a Stacked Pot
Drill a Hole and Add a Pot
Strats and Teles
Les Pauls and Hollow Bodies
R
, D
,
OUTING
RILLING
AND
Tools required
Optional Tools
Reversible installation
®
SYSTEM
NSTALLATION
N
OTCHING
Saddles
Notching the pick guard or pickup ring
Slotting the base plate *optional*
Drilling between control cavities
Hexpander
13-pin jack
Enlarging the control cavity
Curving the Jack Plate
Acousti-Phonic
Stereo switched Jack (no routing required)
9v battery
I
G
NSTALLING
HOST
Saddles
Pickup wires
Color code
Signal/ground color code
Summing board
Extension harness *optional*
Seating and setup
Hexpander
13-pin jack
Connecting the 13-pin jack
Traktion switch
Connecting Pickups to the Hexpander
Program Up/Down (orientation) *optional*
QuickSwitch for MIDI/both/guitar *opt.*
MIDI volume *optional*
Mag-to-pin-7 Harness *optional*
Acousti-Phonic
Acoustic volume and magnetic input
Acoustic volume with Mid/Dark switch *opt.*
Stereo switched output jack
QuickSwitch for mag/both/acoustic *opt.*
Connecting Pickups to the Acousti-phonic
Gain Adjustment
Battery Power Connecting the Battery
Piggyback – Hexpander + Acousti-Phonic
Other Possible Installations
Dual output jacks
Tone control on piezo
Passive volume kit
T
C
ECHNICAL
ONSIDERATIONS
Bridge radius - Do not file saddles!
Missing Pins (keyed connections)
String ground to prevent hum
Shielded cavity caveat
Ground Loops
Pot & switch mounting hole diameters
2
® M
C
ODULAR
OMPONENTS
3
4
Advertisement
Table of Contents

Subscribe to Our Youtube Channel
Related Manuals for Graphtech GHOST

Summary of Contents for Graphtech GHOST
- Page 1 Stereo switched output jack ® I QuickSwitch for mag/both/acoustic *opt.* LANNING HOST NSTALLATION Connecting Pickups to the Acousti-phonic Locating Ghost® Components Pots and QuickSwitches Gain Adjustment Extension Harness *optional* Battery Power Connecting the Battery Hexpander and 13-pin Jack Piggyback – Hexpander + Acousti-Phonic Acousti-phonic &...
-
Page 2: Output Options
SYSTEM ® Modular means that the ghost® system’s components can be The ghost® system is a set of modular components that plugged into each other in diff erent combinations to create adds acoustic or MIDI capability to your guitar without diff... -
Page 3: Mono And Stereo Modes
Mono and Stereo Modes QuickSwitch functions Two three-position switches provide fast, intuitive switching The Acousti-Phonic detects whether you’ve inserted a between all possible sound combinations: any one sound, stereo or mono plug into the 1/4” jack and automatically any combination of two, or all three at the same time. With- switches to Stereo (separate) or Mono (blended) mode. - Page 4 LANNING HOST NSTALLATION ® Adding a ghost® system to your instrument begins with Here are examples of possible control layouts on Strat- careful planning. Decide which optional controls suit the style and Les Paul-style guitars. The ghost® system music you make, and choose locations that are con- is not just for Strats and Les Pauls, and other layouts venient for you.
- Page 5 Locating Ghost® Components Hexpander and 13-pin Jack The ghost® boards are small -- about the size of a match The 13-pin jack that comes with the Hexpander can be box -- so they will fi t inside the control cavity of most mounted on the edge, on the front, or on the back of the guitars without any routing.
-
Page 6: Convert Mag Tone Pot To Acoustic Volume
Choose one of these three methods a 250K or 500K audio-taper potentiometer*, or you can get to add an acoustic volume to your guitar for the ghost® system: the ghost® Acoustic Volume with Mid/Dark Switch from Graph Convert Mag Tone Pot to Acoustic Volume Tech either as a push-on/push-off... -
Page 7: Tools Required
If you have a vintage instrument and its value may be af- Electric drill and 5/16” bit (12” long recommended) for fected by modifi cations, or if you want to try the ghost® drilling hole between cavities and starting 13-pin jack hole;... - Page 8 In some installations, you may have to drill a hole to Notching the pick guard or pickup ring The wires on the ghost® saddles must go into the control route the wires between cavities in the instrument to cavity to plug into the Hexpander or into the Acousti-Phonic pass the pickup wires through.
- Page 9 Using a 1/16” bit, drill the four holes for the mounting screws in the outer most marks to a depth of 1/4”. Make these holes Wire Color Abbreviations perpendicular to the surface. Using a 1/8” bit, drill the in- The wire colors in this manual are indicated with ner four marks to a depth of 1-1/8”, defi...
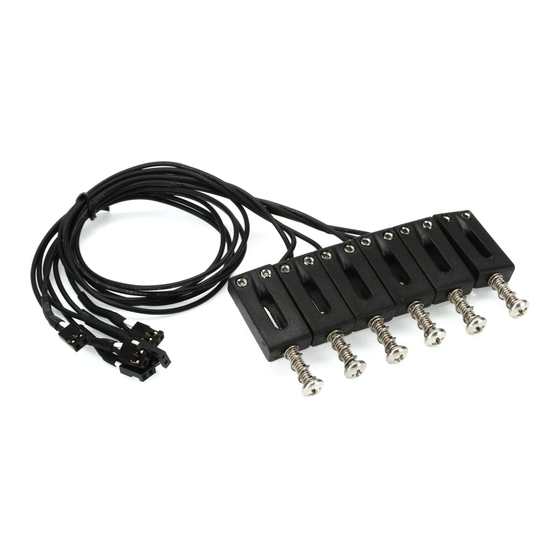
- Page 10 In most cases, no enlargement of the cavity is required to in- Saddles stall the main Hexpander board. Guitars with small cavities like Ghost® saddles are made of our patented String Telecasters, or guitars with a lot of electronics already installed Saver composite material which is rugged and du- may require some routing to make room for the Hexpander.
-
Page 11: Summing Board
Seating and setup The ghost saddle pickups are all identical and can be in- Ghost® saddles are designed to be set up just like the regu- stalled in any string position. The ends of the leads are col- lar saddles they replaced. For optimum performance, make... -
Page 12: Pin Jack
13-pin jack Traktion Switch After the mounting hole has been routed and the 13-pin The Traktion Switch optimizes the output of the Hexpander jack plate has been curved to conform to the edge of the for use with either Roland or Axon MIDI converters. Reach guitar (see instructions in the Routing, Drilling, and Notch- into the slot on the 13-pin jack plate with a toothpick to ing section of this manual) bolt the 13-pin jack plate to... -
Page 13: Connection Diagram
EXPANDER ONNECTION IAGRAM ������� ����� ��� ���� ��������� ������� ��� ��� ���� ��� �������������� ��� ������ ����������� ��� ������ ��� ���� ���� ����� ����� ��������� ����������� ������������� ������ �� �������� � � � ������� � � ���� � � � �... -
Page 14: Acoustic Volume And Magnetic Input
MIDI volume pot *optional* Acousti-Phonic Use an existing hole, or drill a new 9/32” hole in the pick guard Locate the Acousti-Phonic where it can accept plug-in or guitar top and mount the pot using the nuts and washers connections from the 1/4” jack, the saddle pickups, the supplied. -
Page 15: Gain Adjustment
QuickSwitch for mag/both/acoustic *optional* *optional* This switch selects either the EQ’ d ghost® acoustic sound, Drill a 1/4” hole in the pick guard or guitar top and mount or a second EQ curve with a boost in the mid range. It the QuickSwitch using the nuts and washers supplied. -
Page 16: Battery Power
Plugging holder. Locate the battery along the side or back wall of this in incorrectly may damage the ghost® boards. the control cavity, or on the cavity cover plate. Make sure The battery harness connector spans the two pin the wiring harness will reach the Acousti-Phonic, then rows labeled PWR (power) and BAT (battery). -
Page 17: Technical Considerations
The ResoMax® the EQ’ d acoustic sound the way it is. Try your ghost® system fi rst bridge assembly is ���... -
Page 18: Ground Loops
fi rst. String ground to prevent hum Because ghost® saddles are non-conductive, on some Sometimes a loop can be formed accidentally, through cavity guitars this can isolate the strings from the grounded shielding or another conductive component. -
Page 19: Installation Notes
(usually grey or black). This conductive shield- ing can sometimes cause problems for the ghost® system. The ghost® boards are not coated or insulated, so they must not touch the cavity shielding. Mounting the boards on the shielding is okay, as long as the foam tape on the back of the Acousti-phonic board keeps the board sepa- rated from the shielding.
Need help?
Do you have a question about the GHOST and is the answer not in the manual?
Questions and answers