Table of Contents
Advertisement
Quick Links
Download this manual
See also:
Online Manual
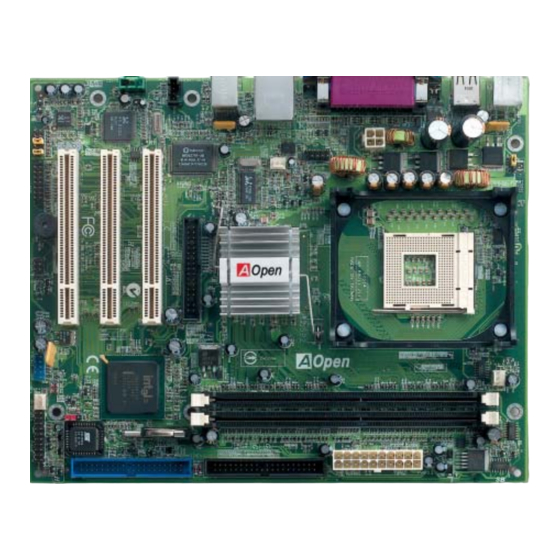
CD-IN Connector
AUX-IN Connector
AC'97 CODEC
Realtek RTL8101L LAN Chip
Front Audio Connector
Game Port Connector
32-bit PCI Expansion Slot x3
IrDA Connector
JP14 CMOS Clear Jumper
USB 2.0 Connector
SYSFAN3 Connector
Front Panel Connector
4Mb Flash ROM BIOS
Case Open Connector
ATA 66/100 IDE Connector x2
PS. Here we use MX4LR-GN motherboard as illustration.
PS/2 Mouse
SPP/EPP/ECP Parallel Port
Connector
USB2.0
Ports
PS/2 Keyboard
COM 1 Port
Connector
RJ45 10/100
LAN Jack
Line-In
Speaker
Out
MIC-In
VGA Port
USB 2.0 Port
SYSFAN2 Connector
COM2 Connector
4-pin 12V. ATX Power Connector
JP28 Keyboard/Mouse Wakeup Jumper
Resetable Fuse
Low ESR Capacitors
FDC Connector
478-pin CPU socket (Willamette/Northwood) with
Voltage
and
Frequency
Auto-detection
®
®
supports Intel
Pentium
4 1.4~2.4GHz+ CPU
Intel 845GL Chipset
CPUFAN1 Connector
184-pin DIMMx2 supports PC2100/2700 DDR
SDRAM maximum up to 2GB
ATX Power Connector
that
Advertisement
Table of Contents

Related Manuals for AOpen MX4LR-GN


Summary of Contents for AOpen MX4LR-GN
- Page 1 CPUFAN1 Connector SYSFAN3 Connector 184-pin DIMMx2 supports PC2100/2700 DDR SDRAM maximum up to 2GB Front Panel Connector 4Mb Flash ROM BIOS Case Open Connector ATX Power Connector ATA 66/100 IDE Connector x2 PS. Here we use MX4LR-GN motherboard as illustration.
-
Page 2: Connecting Atx Power Connector
1. JP14 Clear CMOS You can clear CMOS to restore system default setting. To clear the CMOS, follow the procedure below. 1. Turn off the system and unplug the AC power. 2. Remove ATX power cable from connector PWR2. Everything you need to boot this 3. -
Page 3: Installing Processor
Press down the CPU socket lever and chipset supports finish CPU installation. maximum 400MHz (100MHz x 4) system MX4LR-GN(100MHz x 4) bus and 66MHz AGP Note: If you do not match the CPU ® clock; Intel 845GV socket Pin 1 and CPU cut edge well,... -
Page 4: Front Audio Connector
6. Support Six USB 2.0 Connectors 8. Connecting Front Panel Cable Attach the power LED, speaker, and reset switch connectors to the corresponding pins. If This motherboard provides six 2.0 connectors to link USB devices, such as you enable “Suspend Mode” item in BIOS Setup, the ACPI & Power LED will keep mouse, keyboard, modem, printer, etc. -
Page 5: Case Open Connector
12. Case Open Connector 10. JP28 Keyboard/Mouse Wakeup Jumper The “CASE OPEN” header provides chassis intrusion-monitoring function. To make this This motherboard provides keyboard / mouse wake-up function. You can use JP28 to function works, you have to enable it in the system BIOS, connect this header to a sensor enable or disable this function, which could resume your system from suspend mode with somewhere on the chassis. -
Page 6: Bios Upgrade Under Windows Environment
(CPU, DRAM, HDD, etc.) are good enough for turbo setting. 15. AOpen Bonus Pack CD 17. BIOS Upgrade under Windows Environment You may accomplish BIOS upgrade procedure with EzWinFlash by the following steps, You can use the Autorun menu of Bonus CD. Choose the utility and driver and select and it’s STRONGLY RECOMMENDED to close all the applications before you start the... -
Page 7: Part Number And Serial Number
IDE cable. The problem should be caused by the Check if the system can IDE cables or HDD itself. reboot successfully. Re-install Windows 95, Windows 98 or Windows NT. MX4LR-GN is model name of motherboard; R1.00 is BIOS version... - Page 8 Online Manual: To download manual, please log on and then select your preferred language. Under “Type” directory, choose “Manuals” to go to our manual database. You can also find the manual and EIG in AOpen Bonus Pack. Dear Customer, http://club.aopen.com.tw/downloads Thanks for choosing AOpen products.
Need help?
Do you have a question about the MX4LR-GN and is the answer not in the manual?
Questions and answers