Advertisement
Available languages
Available languages
Quick Links
Download this manual
See also:
Reference Manual
Advertisement

Related Manuals for Alesis MasterControl


Summary of Contents for Alesis MasterControl
- Page 1 QUICKSTART GUIDE ENGLISH ( 1 – 9 ) MANUAL DE INICIO RÁPIDO ESPAÑOL ( 11 – 19 ) GUIDE D’UTILISATION RAPIDE FRANÇAIS ( 21 – 29 ) MANUALE RAPIDO DI UTILIZZAZIONE ITALIANO ( 31 – 39 ) KURZANLEITUNG DEUTSCH ( 41 – 49 )
-
Page 3: Key Features
INTRODUCTION Thank you for purchasing the Alesis MasterControl Studio Interface! The MasterControl Studio Interface is the next step in a long and proud tradition of Alesis recording technology. Once you work with the MasterControl, we’re confident you’ll appreciate the outstanding sound quality, superior construction, and attention to detail. -
Page 4: Driver Installation
Follow these steps to connect the MasterControl to your DAW software: Press the PRESET / HOME button next to the DISPLAY on the MasterControl. Turn the VALUE / ENTER knob to select your DAW; press the knob to accept the selection. -
Page 5: Troubleshooting
TROUBLESHOOTING Ensure that your computer “sees” the MasterControl. On Windows, open the Alesis Firewire Control Panel that was installed on your desktop. If its entries are blank, then there is no connection between the MasterControl and your computer. On Mac, open Audio MIDI Setup and ensure that you can select “Alesis Firewire” for your inputs and outputs. - Page 6 Use the other port to connect additional FireWire devices (such as hard drivers) to your computer. POWER IN – Use the included power adapter to connect the MasterControl to a power outlet. POWER ON/OFF – Turns the MasterControl on/off.
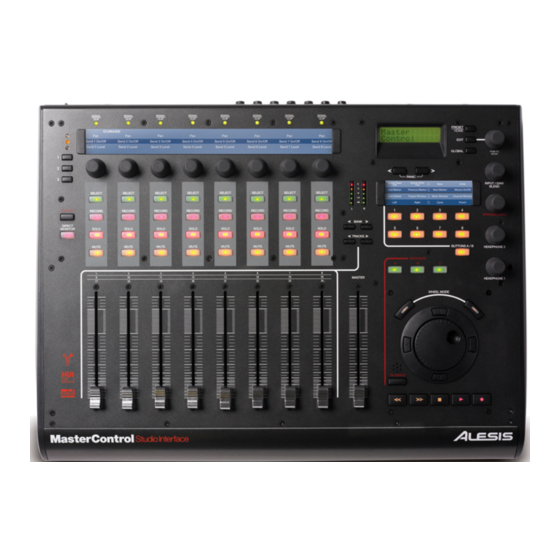
- Page 7 TOP PANEL OVERVIEW: CONTROL SURFACE This section breaks down the control surface into its functional areas. The area being discussed will be shaded in the accompanying diagrams. (A) Analog Input Signal Indicators (B) DAW Controls: Channels (C) DAW Controls: Multi-Function Knobs (D) DAW Controls: Transport (E) DAW Controls: Assignable Button Banks (F) Monitoring / Control Room Features...
- Page 8 (A) ANALOG INPUT SIGNAL INDICATORS SIGNAL / CLIP – Each LED lights green when the corresponding input channel receives an audio signal. It turns red when the audio level is nearing 0dBFS (zero decibels full-scale – turn down your input gain at this point). (B) DAW CONTROL: CHANNELS CHANNEL FADER –...
- Page 9 (C) DAW CONTROL: MULTI-FUNCTION KNOBS TEMPLATE OVERLAY – Place the overlay (included) for the software you are using here. ROW SELECT – Selects a row of parameters for the ASSIGNABLE KNOBS to control. An LED lights next to the selected row. 360°...
- Page 10 “listen to” outputs 1/2. (Set the assignments for the line outputs in the GLOBAL menus.) HEADPHONE 1 / 2 – Controls the volume for the MasterControl’s HEADPHONE 1 and 2 outputs, respectively. These volumes are not affected by the OUTPUT 1/2 LEVEL knob.
- Page 11 Chose a Preset before you open your software program. EDIT – Enters/exits the Edit Mode for making alternate assignments to the MasterControl’s ASSIGNABLE BUTTONS. GLOBAL – Enters/exits the Global Mode where you can adjust the MasterControl’s global configuration.
-
Page 13: Contenido De La Caja
¡Gracias por adquirir la interfaz de estudio Alesis MasterControl! La interfaz de estudio MasterControl es el paso siguiente en la larga y orgullosa tradición de grabación de Alesis. Estamos seguros de que una vez que trabaje con MasterControl, apreciará la sobresaliente calidad sonora, la construcción superior y la atención por el detalle. - Page 14 CÓMO INSTALAR LAS APLICACIONES OPCIONALES El DVD de DVD contiene un poderoso software para música. Si aún no cuenta con un programa de estación de trabajo de audio digital (DAW), instale Cubase LE y/o Ableton Live Lite Alesis Edition desde el DVD.
- Page 15 Asegúrese de que su computadora “vea” el MasterControl. En Windows, abra el panel de control Alesis Firewire que se instaló en su escritorio. Si sus entradas están en blanco, significa que no hay conexión entre el MasterControl y su computadora.
- Page 16 INTERRUPTOR DE PEDAL – Conecte a esta entrada un interruptor de pedal remoto con un cable de 1/4” para acoplar la función de intercomunicación (talkback) de MasterControl o para operar sobre la superficie de control. (Consulte en el Manual de referencia la información sobre cómo configurar su interruptor de pedal para uso con MasterControl).
- Page 17 VISTA DEL PANEL SUPERIOR: SUPERFICIE DE CONTROL En esta sección se subdivide la superficie de control en sus áreas funcionales. El área que se explica es la que está sombreada en los diagramas correspondientes. (A) Indicadores de señal de entrada analógica (B) Controles DAW: Canales (C) Controles DAW: Perillas multifunción (D) Controles DAW: Transporte...
- Page 18 (A) INDICADORES DE SEÑAL DE ENTRADA ANALÓGICA SEÑAL / RECORTE – Cada LED se enciende cuando el canal de entrada correspondiente recibe una señal de audio. Se ilumina con luz roja cuando el nivel de audio se acerca a 0 dbFS (cero decibeles a fondo de escala –...
- Page 19 (C) CONTROL DAW: PERILLAS MULTIFUNCIÓN PLANTILLA – Coloque aquí la plantilla (incluida) correspondiente al software que está usando. SELECCIÓN DE FILA – Permite selecciona una fila de parámetros a controlar con las PERILLAS ASIGNABLES. Se enciende un LED junto a la fila seleccionada. PERILLA DE 360°...
- Page 20 GLOBAL). AURICULARES 1 / 2 – Controla el volumen de las salidas HEADPHONE 1 y 2 del MasterControl, respectivamente. Estos volúmenes no son afectados por la perilla NIVEL DE SALIDA 1/2.
- Page 21 BOTONES ASIGNABLES de MasterControl. GLOBAL – Con este control se entra y sale del modo global, donde se puede ajustar la configuración global de MasterControl. Para más información, consulte la sección MENÚS DEL MODO GLOBAL en el Manual de referencia.
- Page 23 INTRODUCTION Merci d’avoir choisi l’interface studio MasterControl de Alesis. L’interface studio MasterControl est la toute dernière étape d’une longue et fière tradition de technologie d'enregistrement de Alesis. Une fois que vous aurez utilisé le MasterControl, nous sommes certains que vous apprécierez l’exceptionnelle qualité sonore, construction supérieure ainsi que l’attention que nous avons portée aux détails.
-
Page 24: Installation Des Pilotes
INSTALLATION DES PILOTES IMPORTANT!!! Suivez les étapes suivantes AVANT de brancher la console MasterControl pour la première fois. WINDOWS Si vous installez les pilotes à partir du DVD, suivez les instructions de la page de garde afin de lancer le programme d’installation du pilote du MasterControl. - Page 25 GUIDE DE DÉPANNAGE Assurez-vous que votre ordinateur reconnaisse le MasterControl. Sous Windows, ouvrez le fichier de configuration Alesis Firewire installé sur votre bureau. Si les champs sont libres, la connexion entre le MasterControl et votre ordinateur n’a pas été établie.
- Page 26 S/PDIF et une connexion optique qui peut être utilisée comme port ADAT ou S/PDIF. FIREWIRE – Branchez le MasterControl à votre ordinateur à l’aide d’une de ces connexions FireWire. Utilisez l’autre port pour brancher des appareils FireWire supplémentaires, tels qu'un disque dur, à...
- Page 27 CARACTÉRISTIQUES DU PANNEAU SUPÉRIEUR MODULE DE COMMANDE Cette section décompose le module de commande par fonction. La fonction, dont il est question dans chacune des sections suivantes, sera ombragée dans les schémas. (A) Témoins du signal d’entrée analogique (B) Commandes du poste audio numérique logiciel : Canaux (C) Commandes du poste audio numérique logiciel : Boutons multifonctions (D) Commandes du poste audio numérique logiciel : Défilement (E) Commandes du poste audio numérique logiciel : Touches assignables...
- Page 28 (A) TÉMOINS DU SIGNAL D’ENTRÉE ANALOGIQUE SIGNAL / CLIP – Chaque DEL s’allume en vert lorsque le canal d’entrée correspondant reçoit un signal audio. Elle devient rouge lorsque le niveau audio atteint 0 dBFS (zero décibel pleine échelle), il est préférable de baisser le gain d’entrée à ce point. (B) COMMANDES DU POSTE AUDIO NUMÉRIQUE LOGICIEL : CANAUX POTENTIOMÈTRES CANAUX –...
- Page 29 (C) COMMANDES DU POSTE AUDIO NUMÉRIQUE LOGICIEL : BOUTONS MULTIFONCTIONS CACHE – Placez le cache (inclus) en fonction du logiciel que vous utilisez. RANGÉE – Ces touches permettent de sélectionner la rangée de paramètres des boutons assignables. Une DEL s’allume à côté de la rangée sélectionnée. BOUTONS 360°...
- Page 30 Hardware Direct Monitoring du MasterControl permet d'acheminer les entrées directement aux sorties, sans passer pas votre ordinateur, n'ajoutant donc, pratiquement aucune latence. Remarque : Lorsque vous utilisez la fonction de pré-écoute du MasterControl, désactivez la fonction « input monitoring » du logiciel. Autrement, il y aura de l’écho.
- Page 31 PRESET / HOME – Cette touche permet de passer en mode Preset d’où vous pouvez sélectionner les préréglages du MasterControl afin qu’ils interagissent avec le logiciel. Choissisez un réglage avant de lancer le logiciel. EDIT – Cette touche permet de passer en mode Edit afin de modifier l’assignation des touches assignables du MasterControl.
- Page 33 Grazie per aver acquistato l’Interfaccia da Studio MasterControl di Alesis! L’Interfaccia da Studio MasterControl è il passo successivo in una lunga e orgogliosa tradizione di tecnologie di registrazione di Alesis. Non appena lavorerete con il MasterControl, siamo sicuri che ne apprezzerete la fantastica qualità...
- Page 34 Seguire queste fasi per collegare il MasterControl al software DAW: Premere il tasto PRESET / HOME di fianco al DISPLAY sul MasterControl. Girare la manopola VALUE / ENTER (valore / invio) per selezionare il DAW; premere la manopola per accettare la scelta.
- Page 35 In Windows, aprire il pannello di controllo Alesis Firewire installato sul desktop. Se le voci sono in bianco, non è presente alcun collegamento tra il MasterControl e il computer. In Mac, aprire Audio MIDI Setup e assicurarsi di poter selezionare “Alesis Firewire” per gli ingressi e le uscite.
- Page 36 INTERRUTTORE A PEDALE – Collegare un interruttore a pedale remoto a questo ingresso servendosi di un cavo da 1/4” per attivare la funzione talkback del MasterControl o per operare sulla superficie del comando. (Si veda il Manuale di riferimento per maggiori informazioni sulla configurazione dell’interruttore a pedale per l’uso con il MasterControl.)
- Page 37 PANORAMICA PANNELLO SUPERIORE: SUPERFICIE DI CONTROLLO Questo paragrafo suddivide la superficie di controllo in aree funzionali. L’area di cui si sta parlando verrà ombreggiata nei diagrammi allegati. (A) Indicatori segnale di ingresso analogico (B) Comandi DAW: canali (C) Comandi DAW: manopole multifunzione (D) Comandi DAW: trasporto (E) Comandi DAW: banchi tasti assegnabili (F) Funzioni di monitoraggio / Sala di controllo...
- Page 38 (A) INDICATORI SEGNALE DI INGRESSO ANALOGICO SIGNAL / CLIP – Ciascun LED si illumina di verde quando il canale di ingresso corrispondente riceve un segnale audio. Diventa rosso quando il livello audio si avvicina a 0dBFS (zero decibel full-scale – abbassare il guadagno di ingresso a questo punto). (B) COMANDI DAW: CANALI FADER CANALE –...
- Page 39 (C) COMANDI DAW: MANOPOLE MULTIFUNZIONE TEMPLATE OVERLAY – Posizionare a questo livello l’overlay (in dotazione) per il software utilizzato. ROW SELECT (SELEZIONE FILA) – Seleziona una fila di parametri che le MANOPOLE ASSEGNABILI controlleranno. Un LED si accende vicino alla fila selezionata. MANOPOLA A 360°...
- Page 40 (Configurare gli incarichi per le uscite di linea nei menu GLOBAL.) CUFFIE 1 / 2 – Controlla il volume per le uscite CUFFIE 1 e 2 del MasterControl, rispettivamente. Questi volumi non sono influenzati dalla manopola LIVELLO DI USCITA 1/2.
- Page 41 PRESET / HOME – Entra/esce dalla modalità Preset in cui è possibile selezionare i predefiniti del MasterControl in modo che possa interagire correttamente con il software. Scegliere uno dei predefiniti prima di aprire il programma software. EDIT – Entra/esce dalla modalità Edit per creare assegnazioni alternative ai TASTI ASSEGNABILI del MasterControl.
- Page 43 Gerätes sowie die Aufmerksamkeit, die wir jedem Detail zukommen ließen, schätzen werden. Wir sind sehr stolz auf die Produktionen, die mit Hilfe unserer Produkte entstanden sind und entstehen. Wir hoffen, Sie finden in Ihrer MasterControl viel Inspiration, um die besten Performances aufnehmen zu können.
- Page 44 Folgen Sie diesen Anweisungen, um die MasterControl mit Ihrer DAW Software zu verbinden: Drücken Sie die PRESET / HOME Taste neben dem DISPLAY der MasterControl. Drehen Sie den VALUE / ENTER Regler, um Ihre DAW auszuwählen und bestätigen Sie Ihre Auswahl, indem Sie auf den Regler drücken.
- Page 45 Falls alle Felder leer sind, kam keine Verbindung zwischen der MasterControl und Ihrem Computer zu Stande. Öffnen Sie am Mac das Audio MIDI Setup und überprüfen Sie, dass “Alesis Firewire” für Ihre Ein- und Ausgänge ausgewählt ist. Falls Ihr Computer die MasterControl nicht erkennen kann, überprüfen Sie, dass die Treiber richtig installiert wurden.
- Page 46 Computer. Über den anderen Anschluss können Sie zusätzliche Firewire Geräte (wie Festplatten) an Ihren Computer anschließen. POWER IN – Verwenden Sie das mitgelieferte Netzteil, um die MasterControl mit Spannung zu versorgen. POWER ON/OFF – Schaltet die MasterControl an und aus.
- Page 47 OBERSEITE: BEDIENOBERFLÄCHE In diesem Abschnitt haben wir die Oberfläche des Gerätes in verschiedene Funktionsbereiche unterteilt. Den Bereich, den wir gerade beschreiben, wird in den jeweiligen Abbildungen grau dargestellt. (A) Anzeigen für die analogen Eingangssignale (B) DAW Bedienelemente: Kanäle (C) DAW Bedienelemente: Multifunktionale Regler (D) DAW Bedienelemente: Transport (E) DAW Bedienelemente: Zuweisbare Tastenbänke (F) Monitoring / Abhörraumfunktionen...
- Page 48 (A) AZEIGEN FÜR DIE ANALOGEN EIGANGSSIGNALE SIGNAL / CLIP – Jede LED leuchtet grün, wenn der dazugehörige Eingangskanal ein Audiosignal empfängt. Falls der Audiopegel nahe 0dBFS (Null Dezibels Vollausschlag) ist, wird die jeweilige LED rot – verringern Sie dann den Eingangspegel des betreffenden Kanals. (B) DAW BEDIENELEMENTE: KANÄLE KANALFADER –...
- Page 49 (C) DAW BEDIENELEMENTE: MULTIFUNKTIONALE REGLER TEMPLATE OVERLAY – Legen Sie hier die mitgelieferten Template Masken für die von Ihnen verwendete Software ein. ROW SELECT – Wählen Sie die Parameterzeile, die Sie mit den ASSIGNABLE KNOBS steuern möchten. Ein LED markiert die ausgewählte Zeile. 360°...
- Page 50 Signalführung Ihrer Eingänge zu den Ausgängen, unter Ausschluss der Computerverbindung, was zu einer Latenz von nahe Null führt. Hinweis: Bei der Verwendung der Direct Monitoring Funktionen der MasterControl deaktivieren Sie bitte die Input Monitoring Funktion Ihrer Software. Anderenfalls werden Sie einen Echoeffekt hören.
- Page 51 Regler drehen. Wird der Regler gedrückt, wird die Auswahl geladen. PRESET / HOME – Ruft den Preset Modus, in dem Sie eines der Presets der MasterControl auswählen können, damit das Gerät mit der Software zu verwenden ist, auf oder verlässt diese Betriebsart.
-
Page 52: Specifications
At unity gain, +4 to +10dBu out: THD+N: < 0.004% SNR: 104.1dB Dimensions MasterControl only (without power adapter, packaging): 19.125” long x 14.5” deep x 3.75” high 486mm long x 368mm deep x 95mm high Weight MasterControl only (without power adapter, packaging): 7 pounds, 12 ounces 3.5 kilograms... - Page 56 7-51-0271-A...
Need help?
Do you have a question about the MasterControl and is the answer not in the manual?
Questions and answers