Table of Contents
Advertisement
Quick Links
Advertisement
Table of Contents

Subscribe to Our Youtube Channel
Related Manuals for BCM BC845DL


Summary of Contents for BCM BC845DL
- Page 1 P4 Socket 478 Motherboard BC845DL User’s Manual http://www.bcmcom.com...
-
Page 2: Declaration
(where applicable). References: This manual is created and written by BCM Technical Dept., but not limited, to the information from the BC845DL External Production Specifications, and BC845DL Specifications. If any comments, suggestions, or errors for this manual, please write and e-... -
Page 3: Compliance & Certificate
Compliance & Certificate & & ISO 9001 Certificate: This device was produced in our plant with advanced quality system certified by DNV QA Ltd. in according to ISO 9001. This Certificate is valid for: DESIGN & MANUFACTURE OF MOTHERBOARD AND PERSONAL COMPUTERS. CE Declaration: CE marking is a visible declaration by the manufacturer or his authorized representatives that the electrical equipment to which it relates satisfies all the provisions of the 1994... -
Page 4: Easy Installation
Easy Installation Easy Installation Steps The following “Easy Installation” steps are for users accustomed to the assembly of a computer system. For those individuals requiring more specific information, please refer to the more detailed descriptions located within the latter chapters of this manual. -
Page 5: Table Of Contents
Table of Contents Declaration....................... 1 Compliance & Certificate ..................2 Easy Installation...................... 3 1. Introduction ......................5 1.1 How To Use This Manual ................5 1.2 Check Your Device Items ................5 2. Features ....................... 6 2.1 Features Of The Motherboard ................. 6 3. -
Page 6: Introduction
1 IDE ribbon cable (80-pin for UATA) CHECK ITEMS 1 floppy ribbon cable Motherboard and 1 CD with drivers for BC845DL user manual on PDF format. WARNING: Intel i845chipset only support 1.5 volts AGP graphic boards (regardless of 2x or 4x). Therefore the 3.3 volts VGA graphic boards cannot be install in a Pentium 4 system. -
Page 7: Features
Features 2.1 Features Of The Motherboard This product is based on the ATX form factor. It features the Intel latest P4 socket 478 micro PGA socket and provides support for high performance Industrial and workstation. This motherboard incorporates Intel 845 chipset. Providing extra features such 4 Serial Port, 2 ISA, 2 DDR Memory Slot support up to 2GB of PC2100, Ultra DMA 33/66/100 IDE interface, ACPI Power Management, 10/100Mbps LAN, USB connectivity, and soft sound support. - Page 8 Features Supports ACPI (Advanced Configuration and Power Interface), and APM (Advanced Power Management) Supports to boot from CD-ROM, SCSI, IDE, FDD, ZIP, and LS-120 Green Features Power Management APM version 1.2 WOL (Wake On LAN), WOR (Wake On Ring), wake-up are supported. Sound System AC97 Revision v.
-
Page 9: Installation
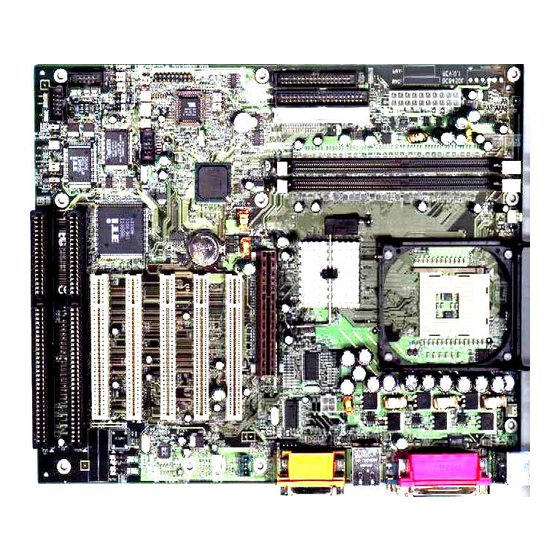
Installation 3.1 Motherboard Layout & Main Parts 12V Power AGP Slot CPU Socket PCI Slot ISA Slot DIMM 1 DIMM 2 COM3 ATX Power Heade Primary Front Panel Secondary Floppy COM4 Connector Heade... -
Page 10: Significant Parts List
Installation Significant Parts List Expansion Slots CPU Socket Refer to Sec. 3.3 System Memory Refer to Sec. 3.4 Expansion Slots Refer to Sec. 3.5 Front Panel Connectors/Back Panel Ports IrDA Connector (Part of Front Panel Header) Refer to Sec. 3.6.5 Sleep Connector (Part of Front Panel Header) Refer to Sec. -
Page 11: Precaution Before Start
Installation Precaution Before Start Static Electricity Damage: Static electricity can easily damage your motherboard. Observing a few basic precautions can help safeguard against damage that could result in expensive repairs. Follow the simple measures below to protect your equipment from static electricity damage. WARNING: Intel i845chipset only support 1.5 volts AGP graphic boards (regardless of 2x or 4x). -
Page 12: Connectors And Jumpers
Installation 3.2 Connectors and Jumpers This motherboard requires jumper setting for some features. The following graphic shows you how to set a proper jumper setting. PIN 1 PIN 1 Note: In the following pages, the triangle mark stands for pin 1 of the connector or header. Connectors/Jumpers List J1: Keyboard, and Mouse Ports J2: NC... - Page 13 Installation JP1: COM2 Pin 9 Selection JP2: COM1 Pin9 Selection JP3: COM3 Mode Selection JP4: COM3 Mode Selection JP5: COM3 Mode Selection JP6: COM3 Pin9 Selection JP7: COM4 Pin9 Selection JP8: Clear CMOS JP9: COM4 Pin 9 Selection JP10: FWH Boot Table Protection JP11: Operation Mode JP12: Clear Password JP13: COM4 Mode Selection...
-
Page 14: Cpu (Central Processing Unit)
Installation 3.3 CPU (Central Processing Unit) This motherboard supports a mPGA2 478 Pin Intel Pentium 4 processor. To complete CPU installation, please install CPU to socket firmly, presented in Sec. 3.3.1. 3.3.1 install a CPU Please follow the below steps to install your CPU. Step 1: Pull the handling bar of the socket upward to the other end to loosen the socket’s openings. -
Page 15: System Memory (Ddr Sdram)
Installation 3.4 System Memory (DDR SDRAM) 3.4.1 DDR DIMM (Double Data Rate Dual Inline Memory Module) The motherboard features three 184-pin DIMM sockets, share memory module. If you have only one DDR DIMM RAM, note that you must insert it into DIMM 0. You can configure the system memory size from 64MB to 1GB in a variety of ways by using different combinations of the three 168-pin DIMMs. -
Page 16: Expansion Slots
Installation 3.5 Expansion Slots This motherboard contains 8 expansion slots. One AGP, five 32-bit PCI and two ISA expansion slots. AGP Expansion Slot The Accelerated Graphics Port (AGP) is a high performance interconnect targeted at 3D graphical display applications and is based on a set of performance extensions or enhancements to the PCI bus. -
Page 17: Connectors, Headers, And Ports
Installation 3.6 Connectors, Headers, and Ports This motherboard contains IDE, floppy, power connector, front panel, and additional connectors. 3.6.1 Primary IDE Connector (J31, 39-pin block, Black) This connector supports two primary channel IDE devices as well as the LS120 floppy, Zip, CD-ROM, and DVD-ROM drives via a ribbon cable. - Page 18 Installation switch be used for rebooting the system in order to extend the life of the system’s power supply. HDD LED Connector (Pins 1, and 3) The motherboard supports one 2-pin connector for connecting to front Panel Hard Disk activity LED indicator. Sleep Switch Connector (Pins 10, and 12) When the APM (Advanced Power Management) feature is enabled in the system BIOS and the operating system’s APM driver is loaded, the system can enter the sleep (standby) mode...
-
Page 19: Back Panel Connectors
Installation 3.6.6 Back Panel Connectors PS/2 Keyboard and Mouse Ports (J1) The motherboard offers 1 PS/2 Keyboard Port and 1 PS/2 Mouse Port. USB (Universal Serial Bus) Ports and LAN (Local Area Network) Port (J5) The motherboard has two USB ports and a LAN port (optional). USB devices provide a more convenient operating environment and improve data transferring capacity. - Page 20 Installation JP3: COM3 Mode Selection JP9: COM4 Mode Selection RS232 (Default) RS232 (Default) RS422 RS422 RS845 RS845 JP4: COM3 Mode Selection JP13: COM4 Mode Selection 1-3, 2-4 RS232 (Default) 1-3, 2-4 RS232 (Default) 3-5, 4-6 RS422/ RS845 3-5, 4-6 RS422/ RS845 JP14: COM4 Mode Selection JP5: COM3 Mode Selection 1-3, 2-4...
-
Page 21: Additional Connectors And Headers
Installation The motherboard also provides external sound system through an user accessible stereo jack connector soldered to the PWA. This jack allow the connection of self-amplified speakers, Line-In voice input and Mic-In voice input. AGP Port (J21) This product has one 4X AGP slot. Game/MIDI Port (J9) The motherboard integrates a Game/MIDI port. - Page 22 Installation a PCI add-in network interface card (NIC) with remote wakeup capabilities. The remote wakeup connector on the NIC must be connected to the onboard WOL connector. For Wake on LAN, the 5-V standby line for the power supply must be capable of delivering 5V at 720mA.
- Page 23 Installation AC Power Fail Header (JP15, 3-pin) When set jumper to 2-3, system will be force to always on. JP15: AC Power Fail BIOS (Default) Force on Safe Speed Header (JP11, 3-pin) Forces the CPU to run at slowest speed in case of bad configuration preventing a boot-up. SCSI LED Connector (J33, 2-pin) This header is used for a front panel LED to give SCSI HDD Busy Signal (this will work only if SCSI adapter card and at least one SCSI drive is installed.)
- Page 24 Installation Are You Ready To Turn On The System? Check Again Is the CPU installed exactly and firmly into the socket (Sec. 3.3)? Are all the DRAM modules installed properly (Sec. 3.4)? Are all the add-in peripheral seated and configured properly (Sec. 3.5)? Are you sure that all the connectors (described in Sec.
-
Page 25: Bios Setup
BIOS Setup The motherboard uses Whizpro BIOS, stored in a flash EEPROM. All of the configuration information stored in the CMOS. 4.1 BIOS Setup The Whizpro BIOS is immediately activated when you first turn on the computer. The BIOS reads system configuration information in CMOS RAM and begins the process of checking the system and configuring it through the Power-On-Self-Test (POST). -
Page 26: Main Setup Menu
BIOS Setup 4.2 Main Setup Menu When you enter the Whizpro BIOS CMOS Setup Utility, a Main Menu appears on the screen. The Main Menu allows you to select from several Setup functions and two exit choices. Use the arrow keys to select among the items and press <ENTER> key to enter the sub-menu. A brief description of each highlighted selection appears at the right of the screen. -
Page 27: General Configuration Menu
BIOS Setup 4.3 General Configuration Menu In the Standard CMOS Menu, you can set the system clock and calendar, record disk drive parameters and the video subsystem type, and select the type of errors that stop the BIOS POST. 4.3.1 Date The BIOS determines the day of the week from the other date information. - Page 28 BIOS Setup 4.3.4 First Boot Device This option sets the type of device for the first boot drives that the BIOS attempts to boot from after BIOS Post completes. 4.3.5 Second Boot Device This option sets the type of device for the second boot drives that the BIOS attempts to boot from after BIOS Post completes.
-
Page 29: Advanced Configuration Menu
BIOS Setup 4.4 Advanced Configuration Menu These screens contain industry-standard options additional to the core PC AT BIOS. This section describes all fields offered by Whizpro Software in this screen. Some fields may vary from those in your Setup program. Your system builder may omit or modify some fields. 4.4.1 IDE Drive Delay Configure IDE drive delay. - Page 30 BIOS Setup 4.4.11 D800-DFFF Shadow These options specify how the ROM at D800h copy to RAM, enable will allow the ROM area from D000-DFFF copy to RAM. 4.4.12 Typematic Rate Setting When disabled, the following two items (Typematic Rate and Typematic Delay) are irrelevant.
-
Page 31: System Specific Setup
BIOS Setup 4.5 System Specific Setup 4.5.1 CPU Frequency Ratio Select CPU frequency multiplier. CPU core frequency = system bus x ratio. Must RESET system if a new ratio is selected. 4.5.2 Unused PCI Slot Clock Turn on or off the clock for unused PCI slots. 4.5.3 Unused DIMM Socket clock Turn on or off the clock for unused DIMM sockets. -
Page 32: Primary Ide Drives
BIOS Setup 4.6 Primary IDE Drives 4.6.1 Primary Master Select Auto BIOS will detects if a drive is installed and its CHS parameters. If Manual is select, CHS parameters needs to be insert manually. Select None for no IDE drive installed. Drive Type: None No IDE drive is installed... -
Page 33: Secondary Ide Drives
BIOS Setup 4.7 Secondary IDE Drives 4.7.1 Secondary Master Select Auto BIOS will detects if a drive is installed and its CHS parameters. If Manual is select, CHS parameters needs to be manually insert. Select None for no IDE drive installed Drive Type: None No IDE drive is installed... -
Page 34: Peripherals Setup Menu
BIOS Setup 4.8 Peripherals Setup Menu 4.8.1 Floppy Controller Set this option to enable to invoke the floppy drive controller on the motherboard. 4.8.2 Primary IDE Set this option to enable to invoke the Primary IDE channel on the motherboard. 4.8.3 Secondary IDE Set this option to enable to invoke the Secondary IDE channel on the motherboard. -
Page 35: Serial And Parallel Ports
BIOS Setup 4.9 Serial and Parallel ports 4.9.1 Parallel Port: This option specifies the base I/O port address of the parallel port. Available are 378-IRQ7, 278-IRQ7, 3BC-IRQ7, 378-IRQ5, 278-IRQ5, and 3BC-IRQ5. 4.9.2 Parallel Port Mode: The parallel port can be used with devices that adhere to Standard (SPP) or Enhanced Parallel port (EPP) specification. - Page 36 BIOS Setup Auto Automatic configuration. Set to I/O address 3F8. Set to I/O address 2F8. Set to I/O address 3E8. Set to I/O address 2E8. Set to I/O address 208. Set to I/O address 218. 4.9.5 Serial Port 2: This option specifies the base I/O port address of serial port 2. See table above. 4.9.6 Serial Port Mode: This option specifies the serial port mode, UART or IRDA.
-
Page 37: Power Management Setup Menu
BIOS Setup 4.10 Power Management Setup Menu The Power Management Setup allows you to configure your system to most effectively save energy while operating in a manner consistent with your own style of computer use. 4.10.1 Power Management Disable No power management. Allows operating system to use APM (Advanced Power Management) mode for power management. - Page 38 BIOS Setup 4.10.5 Suspend Timer Set system inactivity time period before BIOS enters the system into suspend state in APM mode. 4.10.6 Hard Disk Power Down Set system inactivity time period before BIOS shutdown IDE drive in APM mode. 4.10.7 Video Off Set system inactivity time period before BIOS turn off video in APM mode.
-
Page 39: Pci /Pnp Configurations Menu
BIOS Setup 4.11 PCI /PnP Configurations Menu 4.11.1 PnP OS Installed Set this option to “Yes” to inform BIOS the operating system can handle plug and play (PnP) devices. 4.11.2 Reset Configure Data Select Enabled to reset Extended System Configuration Date (ESCD) when you exit Setup if you have installed a new add-on and the system reconfiguration has caused such a serious conflict that the operating system cannot boot. -
Page 40: Hardware Monitor
BIOS Setup 4.12 Hardware Monitor 4.12.1 CPU Voltage Display current CPU Vcore voltage. 4.12.2 FSB Voltage Display current FSB voltage. 4.12.3 3.3 Volt Display current 3.3 volt. 4.12.4 5.0 Volt Display current 5 volt. 4.12.5 12 Volt Display current 12 volt. 4.12.6 -12 Volt Display current -12 volt. -
Page 41: Restore Default Settings
BIOS Setup 4.13 Restore Default Settings 4.13.1 Restore Manufacture Settings Restore manufacture settings to recover the optimum settings for the original manufacture configuration. 4.13.2 Restore Fail-Safe Settings Load Fail-Safe settings when you can not boot the system to operating system after change/ add/ remove hardware parts or peripherals. -
Page 42: Troubleshooting
Troubleshooting 5.1 General Troubleshooting Tips Is your system properly assembled and configured? Make sure the BIOS setup is set to default/optimal settings. Pressing <F2> key to enter the setup, select Default or Optimal settings, then save and exit the setup. For Windows 2000 that requires ACPI support make sure your ACPI + APM is selected at Power Management in your BIOS. - Page 43 PAST BCM’s warranty period. If your reseller is out of business or no longer in service, then the BCM’s warranty policy applies. Please also note that if the reseller is still in the business, BCM will IGNORE ALL RMA requests associated with this reseller.
Need help?
Do you have a question about the BC845DL and is the answer not in the manual?
Questions and answers