Table of Contents
Advertisement
Quick Links
CAUTIONS:
•
Before use, make sure the rated voltage of the adapter matches your local voltage.
•
The included AC adapter is for use with this unit only. Do not use it with other equipment.
•
If you are not going to use the unit for a long time, disconnect the AC adapter from the wall
outlet.
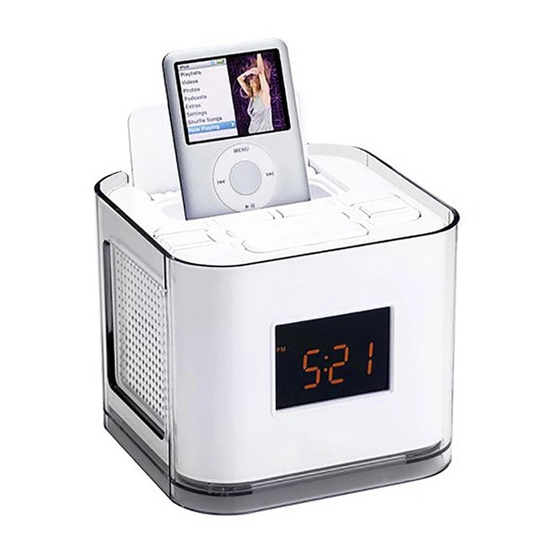
Dual Alarm Clock Radio for iPod
•
Whenever the AC adapter is plugged in to a wall outlet, electricity is running through the unit,
even when the power button on the unit is turned off.
Model No.: CR8030i
POWER BACK-UP DURING POWER INTERRUPTION
Open the battery door at the bottom of the unit and insert two
"1.5V UM3/AA size" batteries into the battery compartment.
Be sure to install two optional "1.5V UM3/AA size" batteries for
the power back-up function. If the AC power supply is
interrupted, the batteries supply power to keep the clock
operating and the alarm times set.
•
During power interruption, the clock function is still maintained. The alarm sound will not come
on.
•
These batteries are for clock operation and alarm memory during power interruption. You can
not listen to the radio/iPod/AUX with the batteries.
WHEN TO REPLACE THE BATTERIES
To check the batteries' condition, unplug the AC adapter from the wall outlet and plug it in again
after a few minutes. If the displayed time is incorrect, replace the batteries with new ones.
WARNINGS:
•
Danger of explosion if batteries are incorrectly replaced. Replace only with the same or
equivalent type.
•
Be sure to install the batteries before unplugging the AC adapter.
•
When the unit is going to be left unplugged for a long time, remove the batteries to avoid undue
User's Guide
battery discharge and unit damage from battery leakage.
•
Do not dispose of battery in a fire; battery may explode or leak.
CAUTION: When discarding batteries, environmental problems must be considered and local rules
or laws governing the disposal of these batteries must be strictly followed.
SAFETY PRECAUTIONS
FCC Information
TO ADJUST THE VOLUME
This device complies with Part 15 of the FCC rules. Operation is subject to the following two
Adjust the VOLUME control to obtain the desired volume.
conditions:
FOR PERSONAL LISTENING
(1) This device may not cause harmful interference, and (2) This device must accept any
Connect headphones (Ø3.5mm stereo mini plug) to the earphone jack. Adjust the VOLUME
interference received, including interference that may cause undesired operation.
control to obtain the desired volume.
When headphones are connected, the speakers are automatically disconnected.
NOTE: This equipment has been tested and found to comply with the limits for a Class B digital
Warning: Excessive sound pressure from earphone and headphones can cause hearing loss,
device, pursuant to part 15 of the FCC Rules. These limits are designed to provide reasonable
so start playback before putting on the earphones.
protection against harmful interference in a residential installation. This equipment generates,
uses, and can radiate radio frequency energy and, if not installed and used in accordance with
the instructions, may cause harmful interference to radio communications. However, there is no
guarantee that interference will not occur in a particular installation. If this equipment does cause
Setting the clock can only be done in STANDBY mode.
harmful interference to radio or television reception, which can be determined by turning the
equipment off and on, the user is encouraged to try to correct the interference by one or more
of the following measures:
•
Reorient or relocate the receiving antenna.
•
Increase the separation between the equipment and receiver.
•
Connect the equipment into an outlet on a circuit different from that to which the receiver is
connected.
•
Consult the dealer or an experienced radio/TV technician for help.
1. Press the FUNCTION/
WARNING: Changes or modifications to this unit not expressly approved by the party responsible
for compliance could void the user authority to operate the equipment.
2. Press and hold MEMORY/
24hrs or 12hrs time display.
This class B digital apparatus complies with Canadian ICES-003.
CAUTION: The marking information is located at the bottom of the apparatus.
3. Press the HOUR/
Warnings:
•
The AC adaptor is used as disconnect device and it should remain readily operable during
intended used. In order to disconnect the apparatus from the mains completely, the AC
4. Press the MIN/
adaptor should be disconnected from the mains socket outlet completely.
the FUNCTION/
•
Minimum 10 cm (4 inches) distances around the apparatus for sufficient ventilation.
•
Batteries shall not be exposed to excessive heat such as sunshine, fire or the like.
•
The ventilation should not be impeded by covering the ventilation openings with items such
•
In 12hrs time display, 12:00 PM=Noon. In 12hr mode, 'PM' is
as newspaper, table-cloths, curtains, etc.
displayed between 12 noon and midnight.
•
No naked flame sources such as lighted candles should be placed on the apparatus.
• The apparatus shall not be exposed to dripping or splashing and that no objects filled with
Note:
• In RADIO/iPod/AUX IN mode, the current time is always shown on the display.
liquids, such as vases, shall be placed on apparatus.
On Operation
Do not turn up the volume while listening to your iPod with no audio signals or very low level inputs.
If you do so, the speakers may be damaged when the peak level of the sound is played.
1. Press the STANDBY/ON
On Use
2. Press the FUNCTION/
Use the unit in moderate climates. Never use the unit where it would be subject to:
-
Heat sources such as radiators or air ducts.
3. Press the
-
Direct sunlight.
•
Adjust the volume control to obtain the desired volume.
-
Excessive dust.
Searching for a Station Automatically
-
Moisture or rain.
•
Press and hold the
-
Mechanical vibration or shock.
release. After finding a clear station, the search stops automatically.
-
Uneven surface.
Note: The search may not stop at a station with a very weak signal.
•
Do not place any heavy objects on top of the unit.
•
When the unit is used with an AC power adapter, do not wrap the unit in a cloth, blanket,
Presetting Stations
The unit can store a total of 20 stations in memory (10 X FM, 10 X AM). Presetting allows you
etc.. If you do so, the temperature inside and outside the unit may rise considerably,
to tune in to a station directly.
resulting in malfunctioning of the unit.
1. Tune in to a desired station(see previous section).
•
If the unit is brought directly from a cold to a warm location, or is placed in a very damp room,
the moisture may condense on the lens inside the unit. Should this occur, the unit will not
2. Press and hold the MEMORY/
blink on the display.
operate. In this case, remove the disc and leave the unit in a warm place for several hours
3. Press
until the moisture evaporates.
4. Press the MEMORY/
•
For the unit to operate at its best, it should not be subject to temperatures below 41°F (5°C)
5. Repeat steps 1-4 to store other stations.
or above 95°F (35°C).
Tuning in to a Preset Station
Press the PRESET/SNOOZE button, and the preset number will show, then press the
ACCESSORIES
or
button to select a preset number.
For Better Reception
Please check and identify the included accessories.
FM: Place the unit in the position that sounds best.
AC Adapter x 1
Note: When the reception is good, the "STEREO" indicator will appear on the display.
iPod Dock Adaptor x 4
AM: Reposition the unit to get better AM reception.
Blue sleeve x 1, pink sleeve x 1, green sleeve x 1 & silver sleeve x 1
Note:
To prevent interference to the AM signal, please keep a certain distance (the
length)
away from the main unit.
LOCATION OF CONTROLS
Front view
Rear view
iPod Compatibility
1
8
9
The unit works with iPod mini (4GB, 6GB), iPod nano (1st generation) - 1GB, 2GB, 4GB, iPod
10
5th generation (video) - 30GB, 60GB, 80GB, iPod nano (2nd generation) - 2GB, 4GB, 8GB, iPod
2
11
17
12
classic (80GB, 160GB), iPod nano 3rd generation (video) - 4GB, 8GB and iPod touch (8GB,
3
16
18
16GB, 32GB). Other iPod models are supported through the AUX IN jack on the unit's front panel
4
5
(see "AUX IN CONNECTION" section).
6
13
14
iPod Dock Adaptor
7
15
Before connecting your iPod, you need to install the appropriate iPod Dock Adaptor in the dock
of the unit. Four iPod Dock Adapters are included as shown below (if the adapter is not included
, please use the adaptor that came with your Pod.):
iPod
Adaptor No.
10. PRESET/SNOOZE button
1. ALARM1
button
11. SKIP/TUNING MIN
button
2. iPod Door
9
3. iPod dock
12. SLEEP
button
4. Function/
Clock button
13. - VOLUME + button
14. Right speaker
5. STANDBY/ON
/ button
15. LCD Display
10
6. MEMORY/
PAUSE button
16. Earphone jack
7. Left Speaker
17. AUX IN jack
8. ALARM2
button
13
18. DC IN jack
9. HOUR SKIP/TUNING
button
14
POWER SUPPLY
Installing the iPod Dock Adapter
1. Choose the iPod Dock Adapter that fits your iPod (if the adapter is not included , please use
Using an AC adapter other than the one supplied with the unit may damage the unit. This AC
adapter operates on AC 100-240V~50/60Hz.
the adaptor that came with your iPod).
2. Lift up the iPod Dock flap door to
approximately 90
To AC outlet
AC adapter
To "DC IN 12V" jack
GB-1
Removing the iPod Dock Adapter
Remove the Dock Adaptor by gripping
the inside with your thumb, then lifting
o u t t h e a d a p t o r u s i n g t h e f r i c t i o n
between your thumb and the adaptor.
Start Playback
1. Press the STANDBY/ON
2. Press the FUNCTION /
3. Press the MEMORY/
Notes:
•
The iPod will charge automatically while docked in the cradle(except when you are listening
to the radio.).
•
To prevent interference to the AM signal, please turn off the iPod while the radio is playing.
Pausing Playback
•
Press the MEMORY/
•
To resume playback, press the MEMORY/
Skipping to a Another Track
•
Press the
button to skip to the beginning of the current track or skip to previous track. Press
VOLUME ADJUSTMENT
the
button to skip to the next track.
Locating a Particular Point on a Track
•
Keep either the
or
and release at the desired point.
Note: Please refer to the owner's manual that was supplied with your iPod for more details.
DUAL ALARM SETTING
•
The unit should be in STANDBY mode to set alarm.
•
The alarm can be set to activate twice a day by setting two different alarm times in ALARM1
CLOCK SETTING
and ALARM2.
•
The unit can be set to "Buzzer", "Radio" or "iPod" alarm.
TIME DISPLAY INDICATOR
TO SET ALARM 1
HOUR digits
MINUTE digits
1. Press the
button, the "
2. Press the
button once again, then the "
and minute digits blink on the display.
3. Press the HOUR/
button to adjust the hours.
button, the hour and minute digits blink.
4. Press the MIN/
button to adjust the minutes.
5. Press the FUNCTION/
button to select "Buzzer", "TUNER", "iPod".
button for 1~3 seconds to choose
Note: The shown "TUNER" icon presents Radio(FM/AM) mode.
6. Adjust the volume control to obtain the desired volume for the Alarm1.
7. Press the
button again to confirm.
button to adjust the hour digits.
8. The alarm 1 indicator will light up.
Note: For the "Radio" Alarm, you should tune into your desired radio station before setting
alarms- the alarm will turn on to the last station you tuned.
button to adjust the desired minutes then press
The clock radio will wake up to "Buzzer", "Radio", "iPod", when alarm timer reaches the preset
button once to confirm.
time and then turns off automatically after 60 minutes.
TO SET ALARM 2
Setting the alarm for alarm2 is the same as setting alarm1 (Use the Alarm2 button instead of the
Alarm1 button).
Note: If the Alarm1 & Alarm2 are set to the same time, the unit will activate once only.
TO TURN OFF ALARM
1. Snooze (If you want to snooze a few more minutes)
Pressing the SNOOZE button will deactivate the sound for 9 minutes. You can repeat this
function as many times as you like within 60 minutes from the preset alarm time.
LISTENING TO THE RADIO
2. To stop alarm sound
Press the STANDBY/ON
/ button to turn the unit on.
will activate again in 24 hours.
button to FM or AM band.
TO CHANGE THE ALARM TIME
or
button to tune in to a station.
Set the alarm time again.
TO CANCEL ALARM MODE
After setting alarms, press and hold the
indicator disappears.
or
button until the tuner starts searching for a station, then
The sleep timer turns the unit off automatically at a pre-selected time.
1. While the unit is on, press the SLEEP button-the display will indicate "90".
2. Press the SLEEP button repeatedly to select the desired sleep time (in minutes) as listed
button. The preset number and the "MEM" indicator will
below:
or
button to select the preset number.
button again to store it in memory.
OFF
Note: OFF" means the sleep mode is disabled.
3.After setting a desired sleep time, the "
4. The unit will automatically turn off once it reaches the sleep time.
To clear the preset sleep time press the SLEEP button repeatedly until "
Connecting to AUX IN for Other Sound Sources
AC adapter cable'
You can connect audio devices such as your iPod, CD players or MP3 players to the unit through
the AUX IN jack. Use a standard 3.5mm-to-3.5mm audio cable (not supplied), connect the AUX
IN jack on the back panel of this unit to the Line Out or Earphone jack of the other audio device.
LISTENING TO YOUR iPod
Listening to the Connected Device
1. Press the FUNCTION /
2. Turn on the audio device you've attached to the AUX IN jack.
REPLACING COLOR SLEEVE
If you want to change your TOP CABINET color, use a new color sleeve to help you.
Choose your desired color sleeve, then follow the below steps to replace it.
iPod Description
Capacity
iPod 5th generation (video)
30GB
iPod classic
80GB
iPod 5th generation (video)
60GB, 80GB
iPod classic
160GB
iPod nano 3rd generation (video)
4GB, 8GB
STEP-1
STEP-2
Peel off the sheet from
Align the centre window in the color
8GB, 16GB, 32GB
iPod touch
sleeve with the unit's display window,then
the color sleeve.
allow the sleeve to stick to the unit.
3. Insert your iPod Dock Adapter into
o
.
the dock until it sits firmly in place.
iPod Dock
Adapter
NOTES:
•
Before adding a new sleeve, please peel off the old sheet from the unit.
• The sleeves will not leave residue on the unit, so if you make a mistake, just carefully lift a
corner, peel off and try again.
• Blue, pink, green, and silver sleeves are included in accessories.
GB-2
Inserting Your iPod
MAINTENANCE
1. Ensure the appropriate iPod Docking Adapter
is installed.
Cleaning the Unit
2. Insert your iPod into the connector in the dock.
• Be sure to turn off the unit, disconnect the power adapter and remove all external connections
before cleaning the unit.
• Wipe the unit with a dry soft cloth. If the surfaces are extremely dirty, wipe clean with a cloth
that has been dipped in a weak soap-and-water solution and wrung out thoroughly, then wipe
with a dry cloth.
• Never use alcohol, benzene, thinner, cleaning fluid or other chemicals. Do NOT use compressed
air to remove dust.
TROUBLESHOOTING GUIDE
Problems
Solutions
Clock
• There has been an electrical power interruption.
Clock does not show the correct
/ button to turn on the unit.
time.
button repeatedly until the indicator "iPod" appears on the display.
• Is the current time correctly set on the time display?
Alarm does not come on at the
• Is the alarm time correctly set?
button to start playing.
preset time.
RADIO
• Electrical devices in your home can cause poor
Poor FM reception
reception. Move the unit away from them (especially
those with motors and transformers).
button.
Poor AM reception
• Rotate the unit horizontally.
button again.
iPod
• Remove your iPod from the dock and check for
iPod does not dock properly or
does not install properly.
obstruction on the connectors in the dock and on your
iPod.Make sure you are using the appropriate adaptor
for your model of iPod.
button pressed during playback, according to the desired direction,
iPod does not respond to the
• Make sure that your iPod is working properly before
speaker system.
docking into the unit. Please refer to your iPod manual
for details.
SPECIFICATIONS
DC: 12V
1.25A EXTERNAL DC SUPPLY
BACKUP BATTERIES FOR CLOCK: 2x1.5V UM-3 OR AA SIZE
RADIO FREQUENCY: AM 520 ~ 1710KHz
FM 87.5 ~ 108.0MHz
HOUR digits
MINUTE digits
LIMITED WARRANTY
" icon blinks on the display.
" icon, hour
VENTURER ELECTRONICS ("VENTURER") makes the following limited warranty. This limited
warranty extend to the original consumer purchaser and is limited to non-commercial use of the
product.
ALARM1 indicator
ALARM2 indicator
Ninety (90) Day Parts & Labor Warranty
VENTURER products purchased in the United States are warranted to be free from defects in
materials or workmanship for a period of ninety (90) days from the date of their original retail
purchase. If the unit fails to conform to this warranty, we will service the product using new or
refurbished parts and products, at VENTURER's sole discretion.
During a period of ninety (90) days from the effective warranty date, VENTURER will provide,
when needed, service labor to repair a manufacturing defect at its designated Service Center.
To obtain warranty service in the Untied States, you must first call our Customer Support
Center at 1- 866 - 444 - 6478, 1- 800 - 252 - 6123, during the hours listed in the box below.
The determination of service will be made by VENTURER Customer Support. PLEASE DO NOT
RETURN YOUR UNIT TO VENTURER WITHOUT PRIOR AUTHORIZATION. New or
remanufactured replacements for defective parts or products will be used for repairs by
VENTURER at its designated Service Center for ninety (90) days from the effective warranty
date. Such replacement parts or products are warranted for an additional ninety (90) days from
the date of repair or replacement. The Customer will be required to ship the unit to the Service
Center indicated at the time Customer Support is contacted to make the necessary repairs. The
customer is responsible for all transportation charges to the service facility.
Packaging and Shipping Instruction
When you send the product to the VENTURER service facility you must use the original carton box
and packing material or an equivalent as designated by VENTURER.
/ button to stop alarm sound, Alarm Mode will stay active-alarm
Your Responsibility
(1) You must retain the original sale receipt to provide proof of purchase.
(2) These warranties are effective only if the product is purchased and operated in the U.S.A. or
Canada.
(3) Warranties extend only to defects in material or workmanship, and do not extend to any
or
buttons for 2 seconds until the alarm1 or alarm2
product or parts which have been lost or discarded, or damage to product or parts caused
by misuse, accident, improper operation or maintenance, or use in violation of instructions
provided with the product, or to product which has been altered or modified without
authorization of VENTURER, or to products or parts thereof which have had the serial
SLEEP TIMER SETTING
number removed or changed.
Out of Warranty
In the event your product requires repair after the limited warranty period has expired,
please contact our Customer Support Center at 1- 866 - 444 - 6478, 1- 800 - 252 - 6123
or www.venturer.com
Hours: Monday-Thursday: 9-7, Friday: 9-5, Saturday: 9-12 EST
Important:
You are responsible for any transportation, shipping or insurance relative to the return of
the product to our Product Returns Center.
" icon will be shown in the display.
" disappears.
All warranties implied by state law, including the implied warranties of merchantability and fitness for
a particular purpose, are expressly limited to the duration of the limited warranties set forth above.
AUX IN CONNECTION
With the exception of any warranties implied by state law as hereby limited, the foregoing warranty
is exclusive and in lieu of all other warranties, guarantees, agreements and similar obligations of
manufacturer or seller with respect to the repair or replacement of any parts. In no event shall
VENTURER be liable for consequential or incidental damages.
No person, agent, distributor, dealer or company is authorized to change, modify or extend the terms
of these warranties in any manner whatsoever. The time within action must be commenced to
enforce any obligation of VENTURER arising under the warranty or under any statute, or law of the
United States or any state thereof, is hereby limited to ninety (90) days from the date of purchase.
button to AUX IN mode and "AUX" is shown on the display.
This limitation does not apply to implied warranties arising under state law.
This warranty gives you specific legal rights and you may also have other rights, which may vary from
state to state. Some states do not allow limitations on how long an implied warranty lasts, when an
action may be brought, or the exclusion or limitation of incidental or consequential damages, so the
above provisions may not apply to you.
For more information on other products and services, please visit our web site at: www.venturer.com
Important: Also keep your "Bill of Sale" as proof of purchase.
Model no. .....................................................Product name ...............................................
color sleeve location
Type of set.....................................................
Serial no........................................................Invoice no. ...................................................
Date purchased ............................................Dealer name ................................................
color sleeve
STEP-3
Align each edge of sheet,
Design and specifications are subject to change without notice.
make sure it fits well with
the unit's casing.
GB-3
Radio-réveil à deux réglages pour iPod
N° du modèle: CR8030i
Reset the clock.
Manuel d´utilisation
PRÉCAUTIOUS DE SÉCURITÉ
Renseignements FCC
Cet appareil est en conformité avec la section 15 des règles de la FCC. Son fonctionnement est
soumis aux deux conditions suivantes:
(1) Cet appareil ne doit pas causer d'interférences gênantes, et (2)Cet appareil doit tolérer toute
interférence reçue, y compris celles qui pourraient causer son mauvais fonctionnement.
N.B. : Cet appareil a été soumis à des tests et s'est révélé en conformité avec les limites pour un
appareil numérique de classe B, conformément à la section 15 des règles de la FCC. Ces limites
ont pour but d'assurer une protection raisonnable contre les interférences gênantes dans une
installation résidentielle. Cet appareil génère, utilise et peut émettre des fréquences
radioélectriques, et s'il n'est pas installé et utilisé selon les instructions, il peut causer des
interférences nuisibles aux radiocommunications. Cependant, il n'y a pas de garantie que des
interférences ne se produiront pas dans une installation donnée. Si cet appareil cause des
interférences nuisibles à la réception de la radio ou de la télévision, ce qui peut être déterminé
en mettant l'appareil en et hors circuit, nous conseillons à l'utilisateur l'une ou plusieurs des
mesures correctives suivantes:
•
Réorientez ou changez l'emplacement de l'antenne de réception.
•
Augmentez la séparation entre l'appareil et le récepteur.
•
Branchez l'appareil dans une prise sur un circuit différent de celui sur lequel le récepteur est
branché.
•
Adressez-vous au dépositaire ou à un technicien qualifié de radio/téléviseur pour obtenir de
l'aide.
AVERTISSEMENT: Des changements ou modifications apportés à cet appareil, non approuvés
expressément par les responsables de la conformité, peuvent ôter à l'utilisateur le droit d'utiliser
cet appareil.
Cet appareil numérique de la classe B est conforme à la norme NMB-003 du Canada.
MISE EN GARDE : Plaque signalétique située sur le dessous de l'appareil.
Avertissements:
•
L'adaptateur CA est utilisé comme mécanisme de déconnexion et il doit rester facilement
accessible durant son utilisation. Pour déconnecter complètement l'appareil de la source
électrique, l'adaptateur CA de l'appareil doit être débranché de la prise électrique.
•
Distances minimum de 10 cm (4 po.) autour de l'appareil pour une ventilation suffisante.
•
N'exposez pas les piles à une chaleur excessive telle que celle du soleil, d'un feu, ou de
sources similaires.
•
La ventilation ne doit pas être entravée en couvrant les orifices de ventilation avec des articles
que les journaux, nappes de table, rideaux, etc.
•
Aucune source de flamme nue telle que des bougies allumées doivent être placées sur
l'appareil.
•
Maintenezl´appareil à l'abri des éclaboussures etveillez à ne pas poser d'objets remplis d'eau
ou detout autre autre liquide surl'appareil.
Pendant le fonctionnement
Ne pas augmenter le volume en écoutant une partie du disque sans signaux audio ou avec des
entrées de niveau très bas, sans quoi les enceintes risquent d'être endommagées lorsque le
niveau de crête du son est lu. Les lentilles situées sur le plateau du disque doivent être
maintenues propres.
Concernant l'installation
Utilisez cet appareil dans des climats tempérés.
Ne jamais installer le lecteur dans des endroits
où il est soumis:
-
à des sources de chaleur, telles que des radiateurs ou des conduits d'aération.
-
à la lumière directe du soleil.
-
à une poussière excessive.
-
à l'humidité ou la pluie.
-
à des vibrations ou des chocs mécaniques.
-
à une surface non plane.
•
Ne pas placer un objet lourd au-dessus du lecteur.
•
Lorsque le lecteur est utilisé avec un adaptateur de courant C.A., ne pas envelopper le
lecteur dans un chiffon ou une couverture, etc..., sans quoi la température à l'intérieur et
à l'extérieur du lecteur risquerait d'augmenter considérablement, ce qui donnerait lieu à un
dysfonctionnement du lecteur, voire à de graves accidents.
•
Si le lecteur est déplacé directement d'un endroit froid à un endroit chaud ou dans une
pièce très humide, de l'humidité risque de se condenser sur les lentilles à l'intérieur du
lecteur. Si cela se produit, le lecteur ne fonctionnera pas. Dans ce cas, enlever le disque
et laisser le lecteur dans un endroit chaud pendant plusieurs heures jusqu'à ce que
l'humidité s'évapore.
•
Pour un fonctionnement optimum, le lecteur ne doit pas être soumis à des températures
inférieures à 5°C (41°F) ou supérieures à 35°C (95°F).
ACCESSOIRES
Veuillez vérifier et identifier les accessoires fournis.
Adaptateur ca x 1
L'adaptateur iPod Dock x 4
Étui bleu x 1, étui rose x 1, étui vert x 1 et étui argenté x 1
EMPLACEMENT DES COMMANDES
Vue de Face
1
8
9
10
2
11
12
3
16
4
5
6
13
14
15
7
1. Touche ALARM1
2. Couvercle de la station pour iPod
3. Station pour iPod
4. Touche Function/
Clock
5. Touche STANDBY/ON
/
6. Touche MEMORY/
PAUSE
7. Enceinte gauche
8. Touche ALARM2
9. Touche HOUR SKIP/TUNING
ESOURE D'ALIMENTATION
Utilisation de l'adaptateur secteur (ca)
L'utilisation d'un adaptateur secteur (ca) autre que celui fourni avec l'appareil peut l'endommager.
Cet adaptateur secteur (ca) fonctionne avec du courant électrique (ca) 100-240V~ 50/60 Hz.
Printed in China
Adaptateur ca
Vers la prise d'entrée "DC IN 12V"
FR-1
GB-4
MISES EN GARDE:
•
Avant toute utilisation, assurez-vous que la tension nominale de l'adaptateur correspond bien
à votre tension locale.
• L'adaptateur secteur (ca) fourni ne doit être utilisé qu'avec cet appareil. Ne l'utilisez pas avec
d'autre équipement.
•
Si vous n'utilisez pas l'appareil sur une période prolongée, débranchez l'adaptateur secteur
(ca) de la prise murale.
•
Chaque fois que l'adaptateur secteur (ca) est branché à une prise murale, l'électricité alimente
l'appareil, même si l'interrupteur d'alimentation est hors tension.
ALIMENTATION AUXILIAIRE DURANT UNE PANNE DE
COURANT
Ouvrez le compartiment des piles sur le dessous de l'appareil et
insérez deux piles 1,5 V UM3/AA dans le compartiment.
Veillez à poser deux piles facultatives 1,5 V UM3/AA pour l'alimentation
auxiliaire.
S'il y a une interruption du courant CA, la piles auxiliaire maintient le
fonctionnement de l'horloge et le réglage du réveil sonore.
•
En cas de panne de courant, la fonction de l'horloge est maintenue.Le réveil sonore ne se
déclenche pas.
•
Cette piles sert uniquement au fonctionnement de l'horloge et à garder en mémoire le réglage
du réveil sonore pendant une panne de courant. Elle ne sert pas à faire fonctionner la
radio,iPod, AUX.
REMPLACEMENT DE LA PILES
Pour vérifier l'état de la pile, débranchez l'adapteur CA de la prise murale et branchez-le de
nouveau au bout de quelques minutes.
Si l'heure affichée est incorrecte, remplacez les piles par
des piles neuves.
Avertissements:
• Danger d'explosion si la pile est remplacée par un modèle incorrect. Remplacez la pile
uniquement par un modèle identique ou de type équivalent.
•
Veillez à poser la pile avant de débrancher l'adapteur CA.
• Si l'appareil va rester débranché pendant une longue période de temps, retirez les piles pour
éviter de les épuiser et pour ne pas endommager l'appareil en cas de fuite des piles.
•
Ne vous débarrassez pas de la pile en la jetant dans un feu, car elle pourrait exploser ou fuir.
MISE EN GARDE : Lorsque vous vous débarrassez de piles, veuillez respecter l'environnement
et suivre à la lettre les règlements locaux concernant la façon de se débarrasser des piles.
RÉGLAGE DU VOLUME
Régler le volume
Réglez les niveaux de VOLUME pour obtenir le niveau sonore souhaité.
Pour l'écoute personnelle
Branchez les écouteurs (prise mini stéréo de Ø 3,5 mm) à la prise PHONES.
Réglez les niveaux de VOLUME pour obtenir le niveau sonore souhaité. Les enceintes sont
automatiquement déconnectées quand les écouteurs sont connectés.
Avertissement: Une pression sonore excessive provenant d'écouteurs ou d'un casque d'écoute
peuvent entraîner une perte de l'ouïe, il faut donc commencer la lecture avant d'utiliser écouteurs/
casque d'écoute.
RÉGLAGE DE L'HORLOGE
Le réglage de l'horloge ne peut être fait que dans le mode STANDBY.
NDICATEURS D'AFFICHAGE
chiffres HEURES
chiffres MINUTES
1. Abaissez la touche FUNCTION/
, les heures et minutes
clignotent.
2. Abaissez et maintenez la touche MEMORY/
pendant 1~3
secondes pour choisir le format d'affichage de 24 heures ou 12
heures.
3. Abaissez la touche HOUR/
pour régler l'heure désirée.
4. Abaissez la touche MIN/
pour régler les minutes désirées et
abaissez la touche FUNCTION/
une fois pour confirmer.
•
En format d'affichage de 12 heures, 12:00 PM=Midi. En mode 12 heures, PM est affiché
entre midi et minuit.
Remarque:
•
En mode RADIO/iPod/AUX IN, l'heure en cours est toujours affichée.
ECOUTER LA RADIO
1. Pressez sur la touche STANDBY/ON
/ pour allumer l'appareil.
2. Abaissez la touche FUNCTION /
pour choisir la bande AM ou FM
3. Pressez sur la touche
ou
pour capter une station.
•
Réglez le volume.
Recherche automatique d'une station
•
Pressez et maintenez la touche
ou
jusqu'à ce que le syntoniseur commence à
chercher une station, puis relâchez. Une fois la station captée, la recherche s'arrête.
•
La recherche peut ne pas s'arrêter sur une station au signal très faible.
Préréglage des stations
L'appareil peut enregistrer jusqu'à 20 stations en mémoire (10 FM, 10 AM). Les préréglages
vous permettent de capter une station directement.
1. Syntoniser une station souhaitée manuellement.
2. Abaissez et maintenez la touche MEMORY/
. Le numéro de préréglage et l'indicateur
MEM clignotent sur l'affichage
3. Pressez sur la touche
ou
pour sélectionner le numéro préréglé.
4. Pressez sur la touche MEMORY/
à nouveau pour le mémoriser.
5. Répétez les étapes 1 à 4 pour enregistrer d'autres stations.
Syntoniser une station préréglée
Abaissez la touche PRESET/SNOOZE et le numéro de préréglage est affiché, abaissez la tou-
che
ou
pour choisir un numéro de préréglage.
Pour une meilleure réception
FM: Placez l'appareil de façon à obtenir un son optimal.
Remarque:
Quand la réception est bonne, le voyant "STEREO" apparaîtra à l'écran.
AM: Repositionnez l'appareil pour obtenir une meilleure réception AM.
Vue de dos
Remarque: Pour éviter des parasites sur la bande AM, étirez complètement le câble de
l'adaptateur CA.
ÉCOUTER VOTRE iPod
17
18
Compatibilité iPod
La Micro Chaîne CD fonctionne avec l'iPod mini (4 Go, 6 Go), l'iPod nano (1e génération) - 1Go,
2 Go, 4 Go, l'iPod 5e génération(vidéo) - 30 Go, 60 Go, 80 Go, l'iPod nano (2e génération) - 2 Go,
4 Go, 8 Go, l'iPod classic (80 Go, 160 Go), l'iPod nano 3e génération (vidéo) - 4 Go, 8 Go et l'iPod
touch (8 Go, 16 Go, 32Go). D'autres modèles iPod (et appareils audio) peuvent être raccordés à
la prise AUX IN sur le panneau avant de l'appareil (voyez la section CONNEXION AUX IN).
L'adaptateur iPod Dock
Avant de brancher votre iPod, vous avez besoin d'installer l'Adaptateur iPod Dock approprié
dans la station d'accueil de l'appareil. Quatre Adaptateurs d'iPod Dock sont compris comme
illustré ci-dessous(si l'adaptateur n'est pas compris dans les accessoires, veuillez utiliser celui
10. Touche PRESET/SNOOZE
qui est fourni avec votre iPod.):
11. Touche SKIP/TUNING MIN
Description d'iPod
No. d'adaptateur d'iPod
12. Touche SLEEP
L'iPod 5e génération (vidéo)
13. Touches - VOLUME +
9
L'iPod classic
14. Enceinte droite
L'iPod 5e génération (vidéo)
15. Affichage LCD
10
L'iPod classic
16. Prise d'écouteur
13
L'iPod nano 3e génération (vidéo)
17.
Prise d'entrée AUX IN
18. Prise d'entrée CC IN 12V
14
l'iPod touch
8GB, 16GB, 32GB
Installation de l'adaptateur iPod Dock
1. Choisissez l'adaptateur secteur iPod Dock qui s'adapte à votre iPod(si l'adaptateur n'est pas
compris dans les accessoires, veuillez utiliser celui qui est fourni avec votre iPod).
2.
Soulevez le couvercle de la station
3. Insérez votre adaptateur iPod Dock dans la station
en prenant garde qu'il soit bien en place.
pour iPod à environ 90°.
Adaptateur
iPod Dock
Vers la prise
secteur(ca)
FR-2
Capacité
30GB
80GB
60GB, 80GB
160GB
4GB, 8GB
Advertisement
Table of Contents

Related Manuals for Venturer CR8030i


Summary of Contents for Venturer CR8030i
- Page 1 Pressing the SNOOZE button will deactivate the sound for 9 minutes. You can repeat this On Operation When you send the product to the VENTURER service facility you must use the original carton box niveau de crête du son est lu. Les lentilles situées sur le plateau du disque doivent être function as many times as you like within 60 minutes from the preset alarm time.
- Page 2 Durante un período de noventa (90) días a partir de la fecha efectiva de la garantía, VENTURER utilisant des pièces et produits neufs ou réusinés, à la seule discrétion d’VENTURER. Remarque: Pour le mode « Radio » de l’alarme, vous devriez syntoniser la station de radio La radio reloj se despertará...
Need help?
Do you have a question about the CR8030i and is the answer not in the manual?
Questions and answers